background image

Содержание SCENIUM D52W136DBYX1

Страница 1: ...mmcR sc m m m l J I U l vl _ i _ i ii i_ ii_ iiiii iiiiiiiiiiiiiiiiiiiiiiiii _ _ _i_iiiiiiiiiiiiiii ii iiiiiiiiiiiiiiiiiiiiiiiiiii_ _iiiiii _ iiiiiii_i_ _iiiiiii_ _iiiiii _iiiiiiiiii ...

Страница 2: ...ed changes or modifications to this equipment may void the user s authority to operate it Caution Using video games or any external accessory with fixed images for extended periods of time can cause them to be permanently imprinted on the picture tube or projection TV picture tubes ALSO some network program Iogos phone numbers black borders sides top and bottom etc may cause similar damage This da...

Страница 3: ... tripod bracket or table specified by the manufacturer or sold with the apparatus When a _ call is used use caution when moving the cant apparatus combination to avoid injm T from tip over I3 Unplug this apparatus dming lightning storms or when unused for long periods of time I4 l _ f_ r all servicing to qualified service personnel Sel_ icing is required when the apparatus has been damaged in any ...

Страница 4: ...ect a component with a DVI Digital Visual Interface output DVI provides an uncompressed digital video interface developed for high bandwidth digital connection It supports lhe overlay of high resolution graphics needed by some electronic program guide navigation and olher interactive services DVI when combined with HDCP High bandwidth Digital Content Protection technology creates a protected digit...

Страница 5: ...u 25 Using the On Screen Info Display 25 Chapter 4 Using the TV s Features Channel Banner 28 Autotuning 28 Parental Controls and V Chip 30 PIP Picture in Picture and POP Picture outside Picture Operation 36 Chapter 5 Using the DVD Menu The DVD s Menu System 37 The Play Resume Play Option 37 The Play Mode Menu 37 The Lock Menu 39 The Display Menu 41 The Sound Menu 41 The Languages Menu 42 Chapter 6...

Страница 6: ... Cables Properly to Avoid Audio Interference Insert each cable firmly into the designated jack If you place components above the TV DVD route all cables down the side of the back of the TV DVD instead of straight down the middle of the TV DVD If your antenna uses 300 ohm twin lead cables do not coil the cables Also keep the twin lead cables away from audio video cables Important Stand and Base Saf...

Страница 7: ...le using your RCA Scenium product please visit www rcascenium com customersupport Components Cables Needed Coaxial Audio video Component video DVI HDTV Coaxial Audio video S Video Coaxial Audio video Component video Connection Title TV DVD HDTV Tuner VCR TV DVD Satellite Receiver VCR TV DVD VCR Go to page 6 page 8 page 10 For general intk_rmation on connecting an A V receiver or speakers to your T...

Страница 8: ... onn_ctiQns _ Setup OFF AIRANTERHA SATELLITERECDVER A_TOU_ ATk_ COMPOSITE _NF UTS I_ _ _ _i _ VCR TV DVD 6 Graphics contained within lhispublication arefi_r representation only Chapter 1 ...

Страница 9: ...e and red cables to the I VI HDTV L and R audio jacks on the back of lhe TV 1 VD and to lhe Audio Output jacks on the HDTV Tuner OR B If you used the Component Video jacks Connect the audio white and red cables to the CMP1 L and R audio jacks on the back of the TV DVD and to the Audio Output iacks on lhe HDTV Tuner 4 Connect your HDTV Tuner to your VCR A Connect a coaxial cable to the HDTV Tuner s...

Страница 10: ... onn_ctiQns _ Setup SATELLITE RECEIVER TV OVD 8 Graphics contained within thispublication ar_fi_r r_presentation only Chapter 1 ...

Страница 11: ...he coaxial cable from your cable outlet or antenna to tim antenna input on the VCR 3 Connect your Satellite Receiver to your TV DVD A Connect the audio white and red cables to the VID1 L MONO and R Audio jacks on the back of the TV DVD and to the Audio Output jacks on the Satellite Receiver B Connect the video cable to the VID1 V Video jack on the back of the TV DVD and to the Video Output jack on...

Страница 12: ... onn_ctiQns _ Setup COMPONENTI_PUTS COMPOS_INPUTS TV DVD VCR 10 Graphics contained within lhis publication ar_ fi_r r_presentation only Chapter 1 ...

Страница 13: ...dio jacks on the back of the TV DVI and to the Audio Output jacks on file VCR C Connect the video cable to the VID2 V Video jack on the back of file TV DVD and to the Video Output jack on the VCR 2 Make sure cable or antenna is connected to your VCR Connect the coaxial cable from your cable outlet or antenna to tim antenna input on the VCR Go to page 14 Chapter 1 Graphics contained within tbis pub...

Страница 14: ...me levels can be con_olled by the volume controls on the TV DVD s front panel and remote control OR 2 Use speaker wire Io connect the TV DVD to external speakers The EXT INT switch beside the iacks let you turn the TV DVD s internal speakers on or off If you connecl external speakei s slide the switch to EXT so the audio is sent to lhe external speakei s only Choosing INT sends the audio to the TV...

Страница 15: ...component such as a camcordei video game console or VCR S VIDEO in Allows you to connect an S Video cable from anolher component Make sure you also connect audio cables from the component to the TV DVD Note Do not connect an S Video and a regular video cable to the FRNrjacks at the same time Front Panel Buttons If you cannot locate your remote you can use the front panel btmons of your TV 1 VD to ...

Страница 16: ...eens highlight your choice and select it 1_ highlight a menu item press tile arrow buttons on file remote to highlight one of the items listed on llle screen Use the up or down mTOW button to move up or down Use the right or left arrow button to move right or left To select file item that you ve highlighted press OK Note Highlighted means that the menu item stands out from other menu items on the ...

Страница 17: ...ght llle second letter lllen press the 1 or 2 number button to change tim second letter etc 6 When you are finished creating your label press OK Select Go back to go to the Auto ConveE_ence _ qenu Note If you re using an HD source such as an HDTV tuner or HDTV satellite receiver on the CMPNT or DVI input you should run Auto convergence separately for that input as well Tune to the input you re usi...

Страница 18: ... also be programmed to operate some brands of an additional remote controllable components The Autotuning t eamm ti r this button works only with HDTV tunei s see page 28 for more information on Autotuning CH or CH Scans up or down through tlle cmTent channel list Press once to change the channel up or down press and hold to continue changing channels In DVD mode while a disc is playing CH advance...

Страница 19: ...IP window Press again to bring up the picture outside picture POP windows Press to remove POP See Chapter 4 tBr more intkmnation about using PIP PIP or PIP When using PIP or POP changes the channel in the PIP window PRESETS In IV mode displays the Picture and Sound preset seltings Use the up and down a_ow butlons to highlight either Picture or Sound sethngs Use the left and right mxow buttons to c...

Страница 20: ...ontrol the internal DVD playe_ Find Out If You Need to Program the Remote To determine whether _e unive_al remote needs to be programmed to operate one of the components connecled to your TV such as a VCR do the following 1 Turn on the component in this example a VCR 2 Point the remote at the component 3 Press the corresponding co_ qponent bulton in this example the VCR button 4 Press ON OFF to se...

Страница 21: ...the component you want to control does turn off 1 Press and release REV then wait 2 seconds Repeat this step until the component turns back on 2 To finish press and hold STOP until the component button on the remote turns off CornponentButtons Note Some of the remote s buttons might operate differently for other components especially when you re using another component s menu system How to Use the...

Страница 22: ...cess in low light areas because too much natural light or fluorescent light might cause the learning feature to fail because llle remote control functions are recorded learned by sending infrared IR signals The TV s remote and the original remote should be no more than 2 inches apart In order to record learn a function from one remote to the olher you must make sure llle Infrared IR transmitter of...

Страница 23: ...he selected component button stays on and remote remains in Clear Learned Function mode Repeat step 3 Press the CLEAR button and your TV 1 VD remote returns to its original operation mode Deleting ALL Learned Functions This procedure erases all learned functions in every component mode of the remote 1 Press and hold the CLEAR breton the current component bullon lights Then press and hold the ON OF...

Страница 24: ...rol back to the factoly defaults TV _r all modes except AUDIO press and hold the VOL button LED of the Volume Punchthrough component lights While holding dm VOL button enter dm code 000 using the number buttons All component LEDs turn on for 2 seconds and then turn off The remote returns _o the factory settings Note If an invalid button is pressed all component LEDsblink 4 times and turn off At th...

Страница 25: ...gnavllx 2017 2 118 2037 2038 2052 2054 2065 Marantz 2005 21K 6 2007 2012 20I i 2017 2037 Matsushita 2017 Memolcx 2007 2009 2oi0 2017 2019 2022 2 52 2068 MGA 202 i 2039 2059 Minlllta 2033 2034 2053 Mitsublshi 2024 2 133 203i 2039 AI diO DVD 20_10 2011 2059 2064 JBI 4031 3088 _VC 4032 3089 K_S 4033 3090 Onkyo 4034 309I Pana_lic 4035 3092 Pi_leer 4036 3093 RCA 4037 3094 _enture_ 4 138 3095 Satellite ...

Страница 26: ... discs CANNOT be used with this player Laserdiscs CD 1 CD ROM computer only discs CD RW DVD ROM Discs recorded using other broadcast standards i e PAL or SECAM This is an example of a one sided disc This is an example of a 2 sided disc The title is in the center To Load and Play a Disc To put the TV DVD in DVD mode and play a disc press the DVD button on the remote control 1 Press the OPEN CLOSE b...

Страница 27: ...t that Intk Display feature isn t available for the disc you re playing To make the Intk Display disappear from the screen press 1NFO on the remote Note For information about the Info Display for Audio CDs Video CDs or MP3 files go to page 49 Time Display This feature displays the audio video time For DVD discs the time displayed refers to the cmTent title time For Audio CDs it relk rs to the curr...

Страница 28: ...y showing in the lext box is the active selection The subtides will be shown in dmt language 5 To make llle lnfo Display disappear press llle INFO button on the remote Notes Subtitles are only available if the disc was created with subtitles Changing the subtitle language with the Info Display will only affect the disc currently being played When the disc is removed or the unit is turned off the s...

Страница 29: ...w buttons until the A B Repeat option is shown in the text box underneath the icons The text box reads Repeat Mode A B l ess OK to Set A Point 4 At lhe beginning of the scene you want to repeat press OK to set tim A point 5 When you gel to the part of the disc that you want to be the end of llle repeated seg_ qent the B point press OK The segment will repeat until you turn Repeat off 6 To make lll...

Страница 30: ...ptioning is available on the current channel Current time Current channel and label assigned to the channel Shows llle time remaining on llle commercial skip SKIP time_ Sound is muted Autotuning The autotuning l_ature automatically tunes dm TV to the correct vide input channel for different components you have connected to your TV DVD like a VCR HDTV Tuner etc When you set up atttotuning in tl_e m...

Страница 31: ...tically tune to llle correct channel input when you re using this component Channel3 or 4 Component is connected to tile CABLE ANTENNA jack on tlle back of the IV and you want tlle TV to tune to channel 3 when you press the corresponding button on the remote Reminder make sure the component s Channel 3 4 switch is set to channel 3 VID1 or VID2 Video InpuO Component is connected to a VIDEO or S Vid...

Страница 32: ...eived with no content themes will only be blocked if you block their age based rating You can also block out programs flint have been given an Exempt rating and programs that am considered unmted The next several pages have tables showing the IV age based ratings and content dmmes for the US and Canada US V Chip TV Rating Limit The V Chip TV Rating Limit lets you decide which IV programs can and c...

Страница 33: ...ater care in monitoring this program and TV I4 are cautioned against letting children under the age of 14 watch unattended This program contains one or more of the following content themes intensely suggestive dialogue D strong coarse language L intense sexual situations S or intense violence V Parental Guidance Suggested Contains material that parents may find unsuitable tbr younger children Many...

Страница 34: ... block age based ratings you can change sornc of tile ratings back to View 1 Use he up down arrows to select the rating wi h a status of Bk ck 2 Press OK to select View To change all V Chip movie or TV ratings to View press the 0 number button Blocking Specific Content Themes You can block programs based on their content Content is represented by the D L S V and FV on your screen When you block a ...

Страница 35: ...idance Programming intended for a general audience but which may not be suitable tbr younger children under dm age of 8 Parents may consider some content inappropriate tbr unsupervised viewing by children aged 8 13 Violence Guidelines Depictions of conflict and or aggression will be limited and moderate may include physical tantasy or supernatural violence Other Content Guidelines May contain infr...

Страница 36: ...ll not be portrayed as the preferred acceptable or only way to resolve conflict or encourage children to imitate dangerous acts which they may see on television Any realistic depictions of violence will be infrequent discreet of low intensity and will show the consequences of the acts Other Content Guidelines There will be no profanity nudity or sexual content General Audience This program is suit...

Страница 37: ... Press the down arrow to highlight Unrated Exempt Prog Then press the right arrow to toggle between View and Block Lock Unlock Parental Controls Selecting this option lets you lock and unlock parental controls settings using a password If you do not lock parental controls none of the settings for V Chip Channel Block or Front Panel Block will take effect If you forget your password press the MENU ...

Страница 38: ...dow works PIP Brings up tim 11P window tress again to ring up t 01 tress again to remove the window Up and down arrow buttons Let you move the PIP window to different corners of the screen Up arrow moves PIP counterclockwise down arrow moves PIP clockwise Left and right arrow buttons Switches the main POP window where tim sound is coming from wdth tim other window SWAP Switches or swaps the video ...

Страница 39: ... PIr4ywill not work unless you have cmamd a program list Selecting a Play Mode The lirst three options in the Play Mode menu determine in what order the titles or tracks will pIay on a disc _ tandardPlay plays the disc s titles and chapters in their del ault order i e dlapter 1 of Tithe 1 plays lirst then chapter 2 of Title I etc Random P_ I plays the chapters of each title in random order larogra...

Страница 40: ...the Play Mode ment_ appears 3 HighIight t Iil Pro _ram and press OK film Edit Pro_4ram scm ra appears 4 Use file lea right arrow k rys to move file highlight to the program list Use the up down arrow keTs m mark the spot in ele playlistwhere you want to insert a chapter _ the inserted chapter will be placed b_ ibre tile highlighted dlapter 5 Highlight the Chapter box and use the up down arrows or ...

Страница 41: ...The locked icon dmnges to un ocked If you forget your password simultaneously press and ho d OPEN CLOSE and the STOP on the TV I VI s front panel i_r 8 seconds Enter a new password vial the Lock menu Changing Your Password _le_ 1 _I mmst be lo_ed to clmnge the password 1 If the disc is pktying press STOP the DVI s main menu appears 2 tiighlight Lock and press OK tinter Pass_ _rd appears on the scr...

Страница 42: ...t Rated Titles and press OK the 8 level rating limits Iist appears 3 To change the ratting limit press the up or down arrow button The ratings that dent require a password _ ree access appear under the bar in the green part o the block l_le rating s that require a password appear above the bar in the red part of the block 4 When you have moved the bar to the desired setting press OK Youm returned ...

Страница 43: ...to New i6 9 i_rmatted l Vl s Most l_Vl s wilI force the Newing to this mode Also choose this if you war_t a 4 3 image to adjust horizontally to 1ill the 6 9 screen Bla _ side panels won t be added and the image is vertically unaImmd On Screen Displays This feature lets you seIect whether you want certain on screen displays to appear on the screen It contains three d_oices with check boxes next to ...

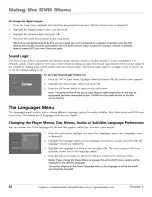
Страница 44: ...lef_ arrow button to remm to the main menlo Note The performance of the Sound Logic feature varies depending on the type of equipment you have connected to your TVIDVD and the audio format of the disc you re playing The Languages Menu The La_tguag _ ment_ enables you to choose different Iangl lage options for audio subtitles Disc M rrm ite_ns and DVD _nain snenu items The def ault for all Langl la...

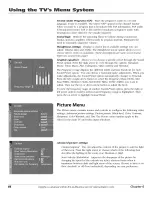
Страница 45: ...l_ and right chmmels Most TV programs and recorded mamrials have stereo audio The word Stereo appears in the channeI banner when you tune to a progra r_ that is broadcast in stereo A_alomaNc available for reg tier TV vi_qng onIy Chooses the sound type according to the current signal I_fl and Right avaiIable oraudio video inputs onIy Isolates either the le_ or right channel of the inco_ing audio So...

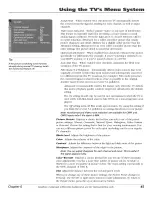
Страница 46: ...make adiustments the Sound Preset option automatically changes to Personal Press the lefi or right arrow button to select the frequency Bass 100Hz Mid Bass 500Hz Medium 1 5kHz Mid IYeble 5kHz Treble 10kHz you want to adiust Then use the up or down arrow button to adiust the level To view the tYequency range of another 5bund Preset option press the right or left arrow until no band is selected and ...

Страница 47: ... be improved Advanced is the del_ult setting The On setting should only be used in rare circmnstances when llle TV is used solely will1 film based sources like DVDs on a non progressive scan player The Offsetting turns off fihn mode upconversion Try using this setting if you drink tile mvense 3 2 pulldown is causing distortions in your picture Note Autoformat and Video noise reduction are availabl...

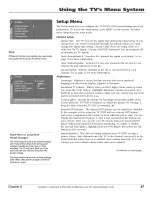
Страница 48: ...n itself on Wake up duration Lets you set how long you want the TV 1 VD to stay on when it turns on Channel number Lets you select a specific channel the IV tunes to when the wake up timer is set Daily Lets you choose if you want the wake up timer to turn on daily Note The Wake up timer is available only when the time has been set Parental Control Menu The Parental Control Menu was explained in Ch...

Страница 49: ... to page 15 for morn information Preferences Language Displays a choice list dmt lets you select your preferred language for the menus E_zglish Espa_ol or _ran_ai s Maximum 2 7volume Allows you to set how high volume turns up when you press llle VOL button Highlight Maximum volume then press and hold OK to hear the maximum volume Make sure the volume has not been muted or turned down all the way C...

Страница 50: ... the sound is not muted Closed Caption Mode Displays a choice list that lets you choose which captioning mode is used for displaying captioning intormation If you are unsure of lhe differences among the modes you may prefer to leave dm closed captioned mode set to CC1 which displays complete text of the program in the primm T language in your area Autotuning Displays a choice list that lets you se...

Страница 51: ... page 25 Audio CD Info Display Repeat i Play Mode I IntroScan I I I MP3 Info Display Repeat PlaylMode I lntroScan Video CD Info Display index Audiol Releat Using the Time Display The Clock part of the Info Display shows the current disc time To see the current disc time 1 Press 1NFO on the remote the lnfo Display appears 2 Highlight the Clock icon Press OK The amount of time the track has played a...

Страница 52: ...the choices until Random appem s in the text box The tracks on the disc will now play in random ordei Note The TVIDVD defaults to Standard playback whenever you put a new disc into your TV DVD Using the Program Play Feature lb use the Program Play feature you must enter the order in which you want the tracks on the CD or MP3 to play by creating a program This is done from the DVD s main menu To ed...

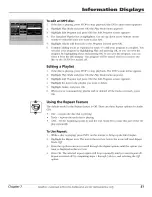
Страница 53: ...nd press OK 0he Play Mode menu appears 3 Highlight Edit Program and press OK the Edit Program screen appears 4 Highlight lhe item in the playiist you want to delete 5 Highlight Delete and press OK 6 When you ve rearranged the playiist and or deleted all the tracks necessary press OK Using the Repeat Feature The det_ult mode for tim Repeat feature is Oil There are three Repeat options for Audio CDs...

Страница 54: ...ncel Repeat Press STOP twice Go to the Repeat icon in the Info Display and select Off Eject the disc Changing the Audio Channel Output Available only on Video CDs If you are playing a stere Video CD you can change the channel output 1 Press INFO on the remote to bring up the Info Display 2 Highlight the Audio Channel icon on the lnfo Display 3 The audio channel choices appear in the text box Use t...

Страница 55: ...vies because the disc is programmed to prohibit that actkm The 0 icon appears on screen The fk aturc or action cannot _ completed at this tinl_ because 1 The disc s softwm e restricts it 2 The disc s software doesn t support that feature e g angles 3 The fL ature is not available at the moment 4 You ve requested a title or chapter nmnber that is out of range The picture is distorted The disc might...

Страница 56: ...t be perf_ rming a periodic diagnostic check Wait for a few minutes for the TV DVI to turn on Buttons don t work if you re using the remote control press the TV button first to make sure the remote is in IV mode The fiont panel controls may be locked disabled Use the remote control to unlock the front panel controls by selecting the Front Panel Block in the Parental Cbntrol menu and press OK to un...

Страница 57: ...uctions Freeze not working The ficeze fbature is not available for Component video CMP1 or CME2 or DVI inputs Low battery warning appears on screen Place n_ w batteries in remote TV picture keeps switching between screen formats abruptly Switch the Au_format feature to O _See page 45 for more in_ rmation The Remote Control Doesn t Work Someflfing might be between the remote and the remote sensor o...

Страница 58: ...cription is the same as CMP1 above When using CMP2 Y PB PR make sure you connect the left and right audio cables to the CMP2 Audio jacks COMPOSITE INPUTS Lets you connect another component such as a VCR DVD player or laserdisc player its AUDIO jacks are the same as described fi r CMP1 above VlD1 S VIDEO Provides better picture quality dlan the video jacks VII I and 2 Video because the color pan of...

Страница 59: ... the DVI jack The left audio connector is usually white R Audio Provides right audio connection when using the DVI jack The right audio connector is usually red Note Remember to connect the left and right audio cables because the DVI cable carries only the picture signal not the sound EXTERNAL SPEAKERS Right and Left Speaker Terminals Let you connect external left and right speakers to the IV to r...

Страница 60: ... not spray liquid directly on the screen or allow liquid to run down the screen and inside the TV DVD Mso never place drinks or vases with water on top of die W DVD This could increase the risk of fire or shock haTard or damage to the W DVD Caution Using video games or any external accessory with fixed images for extended periods of time can cause them to be permanently imprinted on the picture lu...

Страница 61: ...levision that has been moclified or incorporated into other products or is used for institutional or other commercial purposes A unit purchased or selw icecl outside the U S A Acts of nature such as but not limitec to lightning damage Product Registration Pleasv complete and mail the Product Registration Card packed with yore unit it will makv it vasivr to contact you should it ever be necessm T T...

Страница 62: ...tors called 75 ohm F type The ends push on for a quick connection VH89 64L price 5 95 w w 9 _ SCSFV4000C price 49 95 Surge Protector provides eight outlets coaxial and telephone line protection Audible alarm fbr surge failure 100 000 Surge Equipment Guarantee Component Video Cables Triple cable used to connect a video source with Y PR PB jacks to the IV VH976 6 ft price 7 95 VH913 12 fl price 14 9...

Страница 63: ...earning feature adding a f_ mction 20 clearing a f_ mction 21 deleting all functions 21 Lists and labels 15 47 Lock menu 39 M Maximum IV w lume 47 Menu button 17 channel guide 46 display 41 language 42 47 lock 39 parental control 46 picture 44 45 PIP 46 play mode 37 setup 47 48 sound 41 44 time 46 Mute 17 28 O On screen info display 25 49 ON OFF button 17 Optimized still picture 45 P Parental cont...

Страница 64: ...the Indianapolis address listed in this manual or on the carton This will only add delays in service for your product Thomson Inc 10330 North Meridian Street Indianapolis IN 46290 02003 Thomson Inc Trademark s Registered Marca s Registrada s Printed in USA TOCOM 16266190 O THOMSON THOMBON ...

Отзывы: