background image

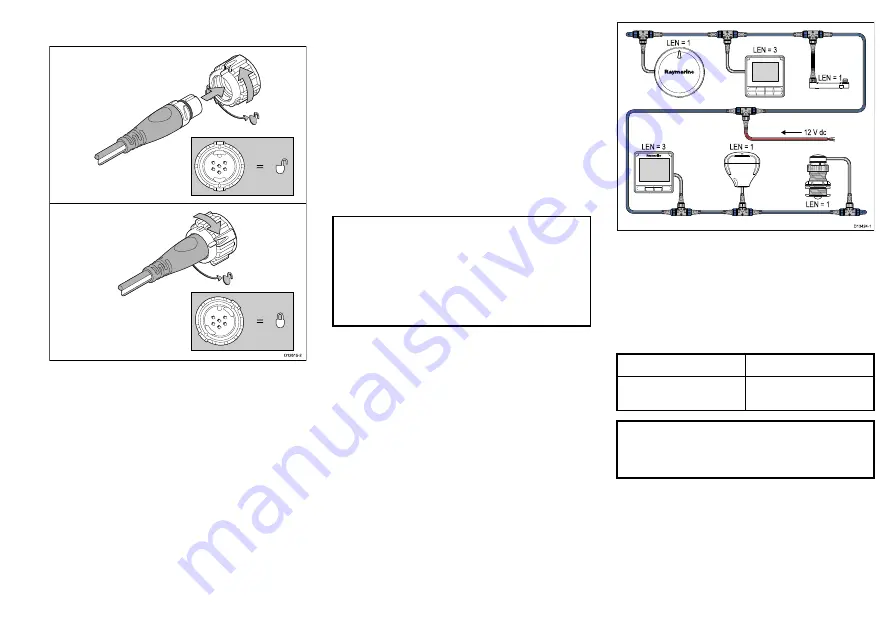
Connecting SeaTalkng® cables

1.

Rotate the locking collar on the unit to the unlocked

position.

2. Ensure the cable’s connector is correctly oriented.

3. Fully insert the cable connector.

4. Rotate locking collar clockwise (2 clicks) until it is in

the locked position.

SeaTalkng® product loading

The number of products that can be connected to
a SeaTalkng® backbone depends on the power
consumption of each product and the physical overall
length of the backbone.

SeaTalkng® products have a Load Equivalency
Number (LEN), which indicates the product’s power
consumption. The LEN for each product can be found
in the product’s Technical Specification.

4.3 SeaTalkng® power supply

Power is supplied to the product over the SeaTalkng®
backbone.

A SeaTalkng® backbone requires one 12 V dc power
supply, connected to the SeaTalkng® backbone. This
can be provided by:

• a battery

(1)

, via the distribution panel,

• an Autopilot Control Unit (ACU)

(2)

,

• an SPX course computer

(2)

,

• for 24 V vessels a 5 amp, regulated, continuous 24 V

dc to 12 V dc converter is required.

Note:

• (1) The battery used for starting the vessel’s

engine(s) should NOT be used to power the
SeaTalkng® backbone as this can cause sudden
voltage drops, when the engines are started.

• (2) The ACU-100 and SPX-5 cannot be used to

power the SeaTalkng® backbone.

SeaTalkng® power connection point

Small systems

If the backbone length is 60 m (197 ft) or less, the
power connection point may be connected at any point
in the backbone.

Large systems

If the backbone length is greater than 60 m (197 ft),
the power connection point should be connected at a
point that creates a balanced current draw from each
side of the backbone. The Load Equivalency Number
(LEN) is used to determine the power connection point
for the system.

In the example above the system has an overall LEN of
10, so the optimum connection point would be to have
5 LEN either side of the connection point.

In-line fuse and thermal breaker
ratings

The SeaTalkng® network’s power supply requires an
in-line fuse or thermal breaker to be fitted.

In-line fuse rating

Thermal breaker rating

5 A

3 A (if only connecting one
device)

Note:

The suitable fuse rating for the thermal

breaker is dependent on the number of devices you
are connecting. If in doubt consult an authorized
Raymarine dealer.

Cables and connections

19

Содержание Micro-Talk E70361

Страница 1: ...2016 Raymarine UK Limited 87265 1 Document number 07 2016 Date English en US INSTALLATION INSTRUCTIONS Micro Talk...

Страница 2: ......

Страница 3: ...pending or design patents pending Fair Use Statement You may print no more than three copies of this manual for your own use You may not make any further copies or distribute or use the manual in any...

Страница 4: ......

Страница 5: ...tware updates 14 3 4 Tools required for installation 15 3 5 Warnings and cautions 15 3 6 Selecting a location 15 Micronet device location requirements 15 Compass safe distance 16 EMC installation guid...

Страница 6: ...33 Chapter 7 Maintenance 35 7 1 Service and maintenance 36 7 2 Routine equipment checks 36 7 3 Product cleaning 36 Chapter 8 Technical support 37 8 1 Raymarine product support and servicing 38 Viewin...

Страница 7: ...ammonia based products Do NOT use a jet wash Caution Service and maintenance This product contains no user serviceable components Please refer all maintenance and repair to authorized Raymarine dealer...

Страница 8: ...important that you register your product to receive full warranty benefits Your unit package includes a bar code label indicating the serial number of the unit You will need this serial number when re...

Страница 9: ...hapter 2 Document and product information Chapter contents 2 1 Document information on page 10 2 2 Product overview on page 10 2 3 Networking restrictions on page 11 Document and product information 9...

Страница 10: ...mounting template Template for surface mounting the Micro Talk gateway 87272 Document illustrations Your product may differ slightly from that shown in the illustrations in this document depending on...

Страница 11: ...rate on 1 of 2 frequencies depending on geographic location 869 8 MHz for products operating in the UK Europe or Africa 915 9 MHz for products operating in the USA Canada South America and Australia M...

Страница 12: ...12...

Страница 13: ...n checklist on page 14 3 2 Parts supplied on page 14 3 3 Software updates on page 14 3 4 Tools required for installation on page 15 3 5 Warnings and cautions on page 15 3 6 Selecting a location on pag...

Страница 14: ...damage or loss of parts check the box contents against the list above Retain the packaging and documentation for future reference 3 3 Software updates The software running on the product can be update...

Страница 15: ...OT approved for use in hazardous flammable atmospheres Do NOT install in a hazardous flammable atmosphere such as in an engine room or near fuel tanks Micronet device location requirements Your unit i...

Страница 16: ...in a powered state EMC installation guidelines Raymarine equipment and accessories conform to the appropriate Electromagnetic Compatibility EMC regulations to minimize electromagnetic interference bet...

Страница 17: ...ctions Chapter contents 4 1 General cabling guidance on page 18 4 2 Connections overview on page 18 4 3 SeaTalkng power supply on page 19 4 4 Network examples on page 21 4 5 Autonetworking on page 22...

Страница 18: ...in place using tie wraps or lacing twine Coil any extra cable and tie it out of the way Where a cable passes through an exposed bulkhead or deckhead use a suitable watertight feed through Do NOT run...

Страница 19: ...y used for starting the vessel s engine s should NOT be used to power the SeaTalkng backbone as this can cause sudden voltage drops when the engines are started 2 The ACU 100 and SPX 5 cannot be used...

Страница 20: ...n the product s documentation If you need to extend the length of the power cable ensure you use suitably rated cable and that sufficient power 12 V dc is available at the SeaTalkng backbone s power c...

Страница 21: ...Where possible connect individual items of equipment to individual circuit breakers Where this is not possible use individual in line fuses to provide the necessary protection Warning Product groundi...

Страница 22: ...ducer 12 SeaTalkng heading source e g Fluxgate compass or EV sensor 4 5 Autonetworking Micronet wireless products are networked together using the Autonetworking procedure Autonetworking connects comp...

Страница 23: ...New products within 300 mm 11 8 in of the display you have chosen to perform Autonetworking Existing networked products do not need to be included 3 Ensure all products are powered off 4 Power on the...

Страница 24: ...f some units do not power up check that all new units are within 300 mm 11 8 in of the chosen display and if required are connected to a power source 12 Repeat the steps above until all units have joi...

Страница 25: ...age 26 5 2 Pole mounting on page 26 5 3 Surface mounting using the Deck mounting kit on page 27 5 4 Bracket mounting using the Deck mounting kit on page 28 5 5 Surface mounting using the Riser on page...

Страница 26: ...only 6 Position the unit so that the mounting studs pass through the holes in the mounting surface 7 Secure the unit to the mounting surface using the thumb nuts these should be hand tight only 5 2 P...

Страница 27: ...g in the groove located on the bottom of the mounting tray 2 Secure the tray to the mounting surface using the supplied fixings 3 Place the large sealing ring into the groove on the upper side of the...

Страница 28: ...rside of the unit and secure by rotating the locking collar clockwise 2 clicks 6 Secure the unit to the Mounting tray by positioning the unit with the LED facing forward and inserting the unit into th...

Страница 29: ...and inserting the unit into the grooves in the Mounting tray 8 Place the Mounting trim over the unit slightly offset and then twist the Mounting trim clockwise until it locks into position 5 6 Lockin...

Страница 30: ...30...

Страница 31: ...Chapter 6 System checks and troubleshooting Chapter contents 6 1 Troubleshooting on page 32 6 2 LED Diagnostics on page 33 System checks and troubleshooting 31...

Страница 32: ...prior to packing and shipping subjected to comprehensive test and quality assurance programs However if you experience problems with the operation of your product this section will help you to diagnos...

Страница 33: ...Red Multiple Micro Talk gateways detected on SeaTalkng Remove all but 1 Micro Talk gateway from SeaTalkng Green SeaTalkng powered up Micronet powering up None Red Micronet connection failed Power cyc...

Страница 34: ...Check network connections Red No data being received on SeaTalkng Micronet will revert to searching mode after 30 seconds 1 Power cycle unit 2 Check network connections Amber Device failed to commenc...

Страница 35: ...Chapter 7 Maintenance Chapter contents 7 1 Service and maintenance on page 36 7 2 Routine equipment checks on page 36 7 3 Product cleaning on page 36 Maintenance 35...

Страница 36: ...ne checks to ensure the correct and reliable operation of your equipment Complete the following checks on a regular basis Examine all cables for signs of damage or wear and tear Check that all cables...

Страница 37: ...Chapter 8 Technical support Chapter contents 8 1 Raymarine product support and servicing on page 38 8 2 Learning resources on page 39 Technical support 37...

Страница 38: ...yma rine com Software updates http www raymarine com soft ware Telephone and e mail support Region Tele phone E mail United Kingdom UK EMEA and Asia Pacific 44 0 1329 246 777 support uk raymarine com...

Страница 39: ...in depth training courses to help you make the most of your products Visit the Training section of the Raymarine website for more information http www raymarine co uk view id 2372 FAQs and Knowledge B...

Страница 40: ...40...

Страница 41: ...Chapter 9 Technical specification Chapter contents 9 1 Technical specification on page 42 Technical specification 41...

Страница 42: ...at nominal supply voltage Environmental Installation environment Operating temperature 20 C to 55 C 4 F to 131 F Storage temperature 30 C to 70 C 22 F to 158 F Relative humidity max 93 Waterproof to...

Страница 43: ...Chapter 10 Spares and accessories Chapter contents 10 1 Accessories on page 44 10 2 SeaTalkng cabling components on page 44 10 3 SeaTalkng cables and accessories on page 44 Spares and accessories 43...

Страница 44: ...cable Used to connect devices to the backbone Devices may be daisy chained or connected directly to the T pieces SeaTalkng 5 way connector Used to branch split or make additional connections in SeaTal...

Страница 45: ...Talkng system SeaTalkng Inline terminator A80001 Provides direct connection of a spur cable to the end of a backbone cable No T piece required SeaTalkng Blanking plug A06032 ACU SPX SeaTalkng spur cab...

Страница 46: ...46...

Страница 47: ...1269 96 Product information 1269 98 Configuration information 1272 37 Heading track control 1272 50 Vessel heading 1272 58 Magnetic variation 1282 59 Speed water referenced 1282 67 Water depth 1282 75...

Страница 48: ...48...

Страница 49: ......

Страница 50: ......

Страница 51: ...Distribution panel connection 20 Double damping 11 E Electromagnetic Compatibility 16 EMC See Electromagnetic Compatibility Environmental parameters 42 F Frequency See Operating frequency Fuse rating...

Страница 52: ...See Dimensions Product features 10 Product loading See Load Equivalency Number Product orientation See Orientation Product support 38 R Rail mounting 26 Range 15 Riser 28 Routine checks 36 S SeaTalkng...

Страница 53: ...Owner notes...

Страница 54: ...Owner notes...

Страница 55: ......

Страница 56: ...Raymarine UK Limited Marine House Cartwright Drive Fareham PO15 5RJ United Kingdom Tel 44 0 1329 246 700 www raymarine com...

Отзывы: