6.5 Calibration
Before first use calibration procedures must be carried out to
ensure optimum performance of the instrument with the vessel.
The calibration procedures are:
• User calibration
• Intermediate calibration
• Group setup
• Dealer calibration
Note:
Group setup is for group illumination and is not part of
the calibration process.
User calibration
The i60 Close hauled wind is a repeat display and as such does
not require calibration, the steps below apply to the calibration of
the i60 Wind instrument only.
User calibration options include:
• Wind angle offset
• Wind speed units
Linearizing and aligning the wind transducer
You can linearize and align the wind transducer by following
the steps below.
You will need to be underway, with sufficient space to turn in a
large circle unhindered.
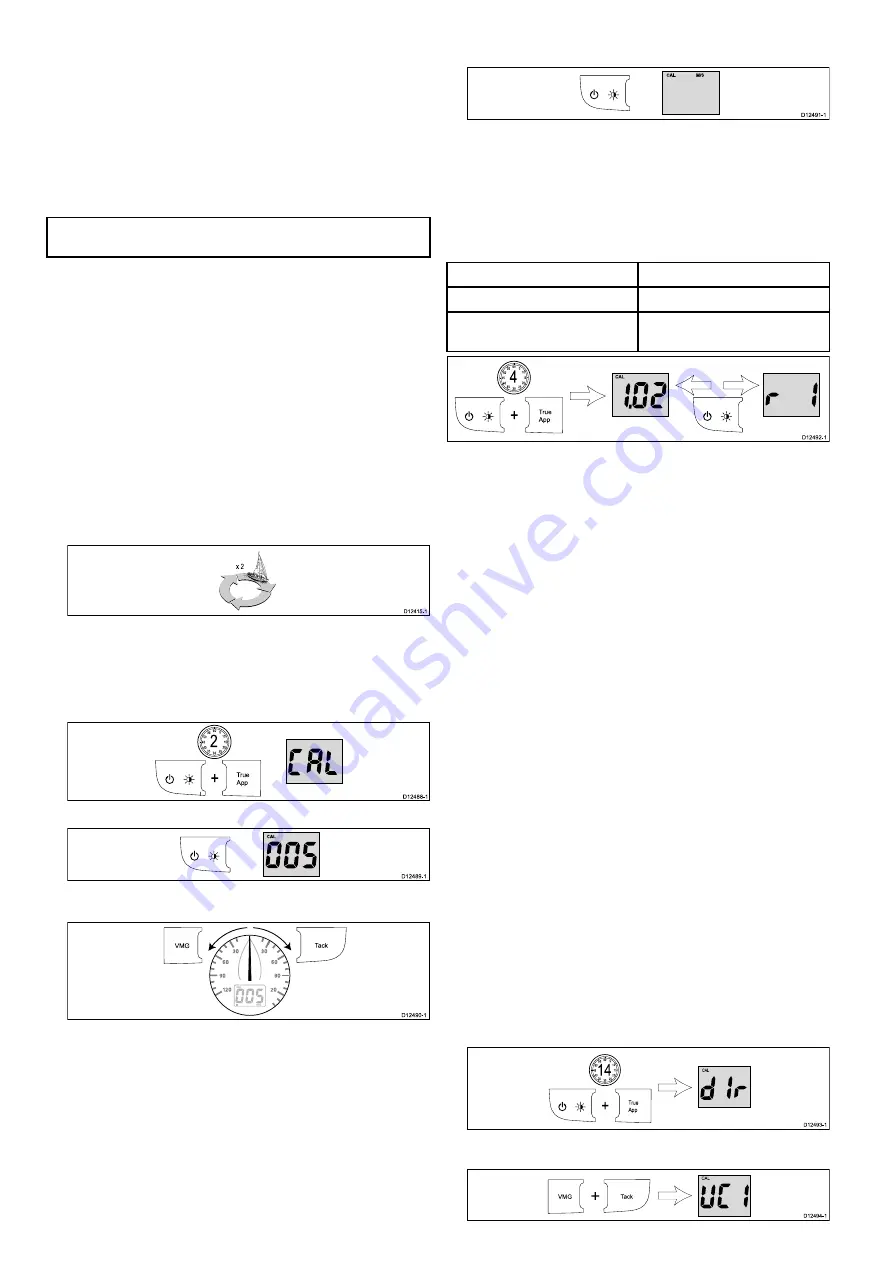
1. Slowly turn the vessel through 2 complete circles.
x 2
D12415-1
This procedure automatically linearizes the wind vane. A
successful linearization is indicated by the digital display
flashing and a buzzer sounding three beeps.
2. Press and hold the
Power
and
True / App
button
simultaneously for approximately 2 seconds to enter the user
calibration menu.
True
App
+
D12488-1
1
0
15
20
25
30
35
40
45
50
55
60 5
2
3. Press the
Power
button to display the wind angle offset page.
D12489-1
4. Sail your vessel directly into the wind and adjust the analog
pointer to 0, using the
VMG
and
Tack
buttons.
D12490-1
Ta ck
VMG
The VMG button will decrease the current value and the
Tack button will increase the current value. As you do this,
the wind angle offset shows the amount of correction you
have applied.
5. To exit the user calibration pages at any time press and
hold the
Power
and
True / App
buttons simultaneously for
approximately 2 seconds.
Selecting wind speed units
Wind speed units can be displayed in either knots or meters per
second. To change the wind speed units follow the steps below.
From the user calibration pages:
1. Press the
Power
button to display the wind speed units
page, or
D12491-1
2. Use the
VMG
and
Tack
buttons to select the required wind
units.
3. To exit the user calibration pages at any time press and
hold the
Power
and
True / App
buttons simultaneously for
approximately 2 seconds.
Intermediate calibration
Intermediate calibration allows you to:
i60 Wind
i60 Close hauled wind
Check instrument software version.
Check instrument software version.
Check the instrument status (either
master or repeater).
1
0
15
20
25
30
35
40
45
50
55
60 5
4
+
D12492-1
CAL
True
App
Checking the software version
You can check the software version of the unit by following the
steps below.
During normal operation:
1. Press and hold the
Power
and
True / App
buttons
simultaneously for approximately 4 seconds.
The current software version is displayed. The software
version page will time-out automatically after 8 seconds of
inactivity.
2. Press the
Power
button to display the instrument status.
Checking the instrument status
You can check the instrument display's status by following the
steps below.
From the software version page:
1. Press the
Power
button.
The instrument status is displayed (r0 = master and r1
= repeater). The instrument status page will time-out
automatically after 8 seconds of inactivity.
Dealer calibration
The dealer calibration procedures include:
• Setting User calibration options on or off.
• Setting required wind angle and speed response.
• Setting the velocity made good (VMG) response.
• Setting boat show mode on or off.
• Restore factory default
Setting dealer calibration options
To set the dealer calibration options follow the steps below:
During normal operation:
1. Press and hold the
Power
and
True / App
buttons for
approximately 14 seconds to display the dealer cal entry
page.
1
0
15
20
25
30
35
40
45
50
55
60 5
14
+
D12493-1
True
App
CAL
2. Press the
VMG
and
Tack
buttons simultaneously to display
the user calibration access page.
+
D12494-1
Ta ck
VMG
CAL
CAL
32
i60
Содержание E70061
Страница 2: ......
Страница 4: ......
Страница 6: ...6 i60...
Страница 18: ...18 i60...
Страница 24: ...24 i60...
Страница 34: ...34 i60...
Страница 38: ...38 i60...
Страница 39: ...Chapter 8 Using alarms Chapter contents 8 1 Alarms on page 40 Using alarms 39...
Страница 58: ...13 4 Converters Part number Description E22158 SeaTalk to SeaTalkng Converter 58 i60...
Страница 60: ...60 i60...
Страница 61: ......
Страница 62: ...www raymarine com...


