background image

13.1 Technical speciication

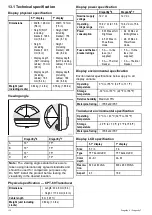
Display physical speciication

5.7” display

7” display

Dimensions

• Width: 148 mm

(5.8 in)

• Height (NOT

including

bracket): 148.3

mm (5.8 in)

• Height

(including

bracket): 203

mm (8 in)

• Display depth

(NOT including

cables): 73 mm

(2.9 in)

• Display depth

(including

cables): 163

mm (6.4 in)

• Width: 191 mm

(7.5 in)

• Height (NOT

including

bracket): 156

mm (6.1 in)

• Height

(including

bracket): 208

mm (8.2 in)

• Display depth

(NOT including

cables): 78 mm

(3 in)

• Display depth

(including

cables): 168

mm (6.6 in)

Weight (unit

including cradle)

0.64 kg (1.4 lbs)

0.76 kg (1.68 lbs)

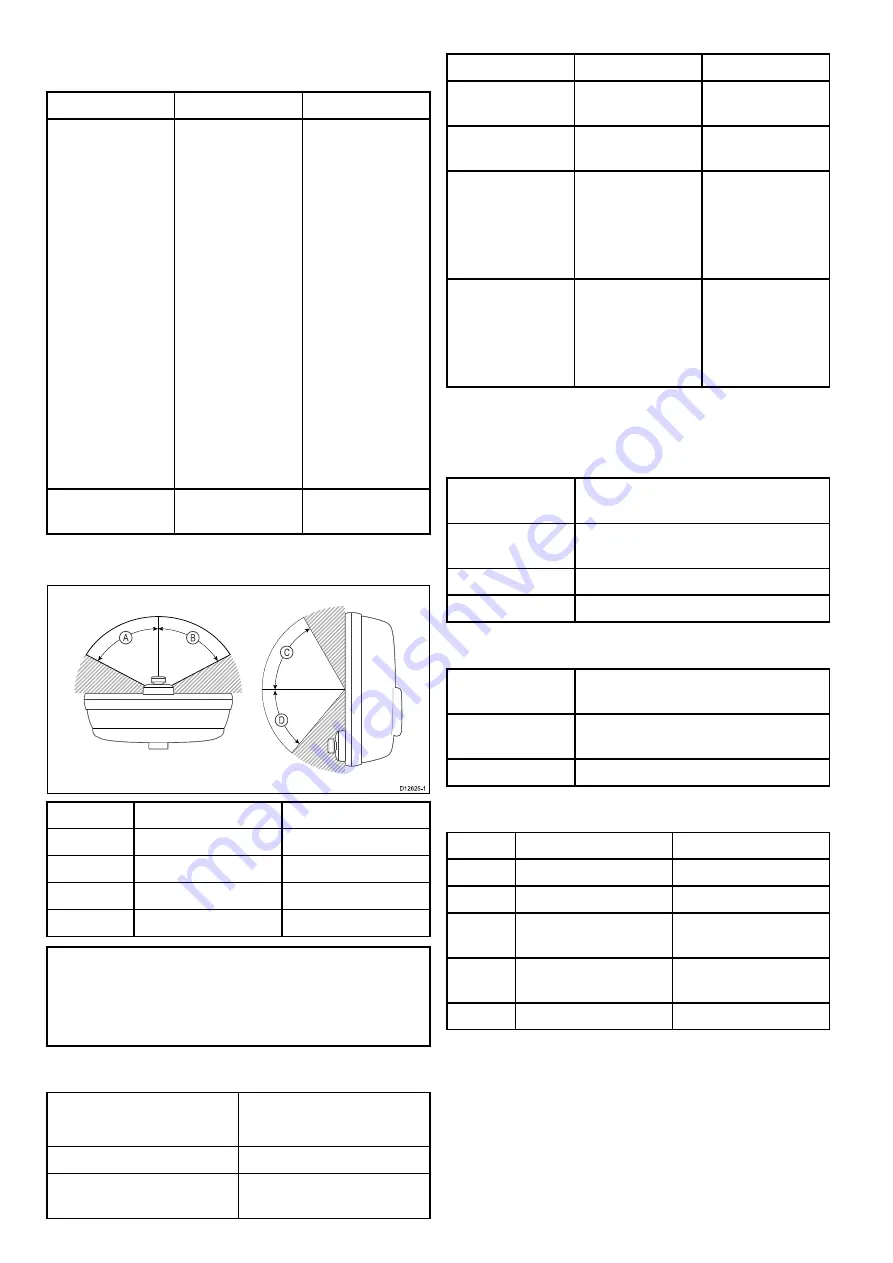
Viewing angle

Dragonly

®

6

Dragonly

®

7

A

70º

75º

B

70º

75º

C

70º

75º

D

45º

70º

Note:

The viewing angles stated above were

taken using internationally agreed standards and

should be used for comparison purposes only.

Do NOT install the product before testing the

viewability in the desired location.

Physical speciication — CPT-60 Transducer

Dimensions

• Length: 202.6 mm (8 in)
• Height: 117.4 mm (4.6 in)

Cable length

6 m (19.7 ft)

Weight (unit including

cradle)

0.60 kg (1.3 lbs)

Display power speciication

Dragonly

®

6

Dragonly

®

7

Nominal supply

voltage

12 V dc

12 V dc

Operating

voltage range

10.8 V dc to 15.6

V dc

10.8 V dc to 15.6

V dc

Power

consumption

• 8 W Max at full

brightness.

• 4.5 W Max in

PowerSave

mode.

• 9.4 W Max at

full brightness.

• 4.8 W Max in

PowerSave

mode.

Fuse and thermal

breaker ratings

• 5 A — In-line

fuse (not

supplied)

• 3 A — Thermal

breaker

• 5 A — In-line

fuse (not

supplied)

• 3 A — Thermal

breaker

Display environmental speciication

Environmental speciications below apply to all

display variants

Operating

temperature

0 ºC to +55 ºC (32 ºF to 131 ºF)

Storage

temperature

-30 ºC to +70 ºC (-22 ºF to 158 ºF)

Relative humidity

Maximum 75%

Waterproof rating

• IPX6 and IPX7

Transducer environmental speciication

Operating

temperature

0 ºC to + 40 ºC (32 ºF to 104 ºF)

Storage

temperature

–20 ºC to + 70 ºC (23 ºF to 158 ºF)

Waterproof rating

• IPX6 and IPX7

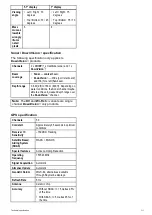
Display LCD speciication

5.7” display

7” display

Size

5.7 in

7 in

Type

TFT backlit LED

TFT backlit LED

Color

depth

24–bit

24–bit

Resolu-

tion

640 x 480 VGA

800 x 480 WVGA

Aspect

4:3

16:9

110

Dragonly 6 / Dragonly 7

Содержание Dragonfly 6

Страница 1: ...Dragonfly 6 Dragonfly 7 Installation and operation instructions English EN Date 02 2016 Document number 81345 5 2016 Raymarine UK Limited Release 12...

Страница 2: ......

Страница 3: ...nd The World s Sixth Sense are registered or claimed trademarks of FLIR Systems Inc All other trademarks trade names or company names referenced herein are used for identiication only and are the prop...

Страница 4: ......

Страница 5: ...nsion cable connection 38 Chapter 6 Getting started 39 6 1 Controls 40 6 2 Switching the unit on and off 41 6 3 Initial set up procedures 41 6 4 Satellite based navigation 42 6 5 Checking the sonar ap...

Страница 6: ...11 4 Sonar DownVision troubleshooting 101 11 5 Miscellaneous troubleshooting 103 Chapter 12 Technical support 105 12 1 Raymarine product support and servicing 106 12 2 Learning resources 107 Chapter 1...

Страница 7: ...oltage Connecting this product to a voltage supply greater than the speciied maximum rating may cause permanent damage to the unit Refer to the Technical speciication section for voltage rating Warnin...

Страница 8: ...acy of such information and you are advised that errors in such information may cause the product to malfunction Raymarine is not responsible for damages or injuries caused by your use or inability to...

Страница 9: ...age at www raymarine com Pixel defect policy In common with all TFT units the screen may exhibit a few wrongly illuminated dead pixels These may appear as black pixels in a light area of the screen or...

Страница 10: ...issions it may contain In addition our policy of continuous product improvement may change speciications without notice As a result Raymarine cannot accept liability for any differences between the pr...

Страница 11: ...Chapter 2 Document and product information Chapter contents 2 1 Document information on page 12 2 2 Product overview on page 13 Document and product information 11...

Страница 12: ...re and user manuals www raymarine com Product documentation The following documentation is applicable to your product Description Part number Dragonly 6 mounting and getting started guide Installation...

Страница 13: ...ormat These PDF iles can be viewed on a PC laptop tablet smartphone or on the latest generation of Raymarine multifunction displays 2 2 Product overview The unit connects directly to a Raymarine DownV...

Страница 14: ...ical beam is the water column directly beneath the vessel Conical beam Sonar is effective at a range of speeds In deeper waters the CHIRP bandwidth is automatically optimized to improve bottom lock an...

Страница 15: ...r compatibility on page 18 3 4 Tools required for installation on page 19 3 5 Software updates on page 19 3 6 Warnings and cautions on page 20 3 7 Selecting a location for the transducer on page 20 3...

Страница 16: ...stallation Task 1 Plan your system 2 Obtain all required equipment and tools 3 Site all equipment 4 Route all cables 5 Drill cable and mounting holes 6 Make all connections into equipment 7 Secure all...

Страница 17: ...le mounting ixings 3 Documentation pack 1 Supplied with E70085 and E70231 Item Description Qty 00 CPT 60 DownVisionTM transom mount transducer including itted 6 m 19 7 ft transducer cable and 2 m 6 6...

Страница 18: ...nly 6 Legacy Dragonly 7 DVS Pro Note Adaptor cable required for connection Note Connecting a CPT DV to a DVS or a Pro will prevent the Sonar application from functioning Connecting a CPT DVS to a DV o...

Страница 19: ...can update the software for your product using a connected and compatible multifunction display Refer to www raymarine com software for the latest software updates and the software update procedure f...

Страница 20: ...aeration The most effective way to determine this is by checking the water low around the transom whilst underway The transducer should be mounted close to the keel centreline of the vessel so that t...

Страница 21: ...avoid interference the cable must be routed as far away from VHF radio antenna cables as possible The cable can be routed through or over the transom Check that the cable is long enough to reach the e...

Страница 22: ...such as a structural bulkhead or the interior of larger vessels may result in a reduced GPS signal Before locating equipment with an internal GPS antenna below decks seek professional assistance Prev...

Страница 23: ...entation Cradle Up Cradle Down The cradle mounting steps are the same regardless of orientation 3 10 Installation process The steps listed below are required to successfully install your product and e...

Страница 24: ...24 Dragonly 6 Dragonly 7...

Страница 25: ...ng the display in the cradle on page 28 4 4 Fitting the 7 inch display in the cradle Cradle down on page 28 4 5 Security on page 29 4 6 Removing the display from the bracket on page 30 4 7 Surface mou...

Страница 26: ...om propeller 2 Ensure the template is parallel to the waterline 3 Drill 2 x holes for the adjustment slot screws as indicated on the template Note Do NOT drill the third mounting hole at this stage 4...

Страница 27: ...cer be struck by an object when underway Note The third locking screw is not used until the transducer has been successfully tested 4 2 Cradle mounting Follow the steps below to mount the display s cr...

Страница 28: ...n the display must still be itted the correct way up 1 Ensure the cradle is securely mounted 2 Position the display so that the guide on the right hand side of the display lines up with the guide on t...

Страница 29: ...rt and over the safety latch The safety latch and retaining ring should be kept in case required for future use 4 5 Security The display can be locked into the bracket using a proprietary lock i e the...

Страница 30: ...d with the lock 4 6 Removing the display from the bracket The display can be easily removed from its mounting bracket 1 If a lock has been itted ensure it is in the unlocked position 2 Disconnect the...

Страница 31: ...sket onto the surface mount adaptor and press irmly onto the lange 7 Place the surface mount adaptor into the prepared hole and secure using the nuts washers and bolts provided 8 Attach the front gask...

Страница 32: ...and re tested each time until you obtain optimum performance 7 To adjust the angle of the transducer loosen the pivot bolt approximately 3 turns and then pivot the transducer either up or down 8 Re ti...

Страница 33: ...les and connections Chapter contents 5 1 General cabling guidance on page 34 5 2 Connections overview on page 34 5 3 Cable connection on page 35 5 4 Extension cable connection on page 38 Cables and co...

Страница 34: ...power lines antennae Strain relief Ensure adequate strain relief is provided Protect connectors from strain and ensure they will not pull out under extreme sea conditions Cable shielding Ensure that...

Страница 35: ...ion date 3 keyway introduction serial number Dragonly 6 E70085 January 2015 E700850150001 Dragonly 7 E70231 November 2014 E702311140712 CPT 60 A80195 December 2014 A801951240023 CPT 70 A80278 January...

Страница 36: ...to provide the correct level of protection please consult an authorized Raymarine dealer or a suitably qualiied professional marine electrician Implementation direct connection to battery The power c...

Страница 37: ...ommends a minimum wire gauge of 18AWG 0 82 mm2 for any length of cable extension For all lengths of extension to the power cable ensure there is a continuous minimum voltage at the product s power con...

Страница 38: ...up to 4 m 13 1 ft 1 Existing cable 2 Extension cable connected to the vessel s power supply and to the existing cable 3 Isolated power supply wires on existing transducer cable Note Only 1 extension c...

Страница 39: ...es on page 41 6 4 Satellite based navigation on page 42 6 5 Checking the sonar application on page 44 6 6 Checking the DownVision application on page 44 6 7 Shortcuts page on page 45 6 8 Applications...

Страница 40: ...essing the power button will display the Shortcuts page Press and hold to turn the display off UniControl The UniControl consists of Rotary Joystick and push button controls 1 Rotary use this to navig...

Страница 41: ...or after a system reset the Startup Wizard is displayed after you have accepted the Limitations On Use disclaimer The Startup Wizard guides you through the following initial settings 1 Language selec...

Страница 42: ...the status of the available satellites that are compatible with your receiver The satellite constellations are used to position your boat in the Chart application You can set up your receiver and che...

Страница 43: ...position of your receiver Date Time Displays the current date and time generated by the position ix in UTC format Mode Identiies wether the receiver is working in differential mode or non differentia...

Страница 44: ...ructure you should also see a depth reading in the top left databox 6 6 Checking the DownVision application Products which include the DownVision application and the CPT DV or CPT DVS transducer can u...

Страница 45: ...owerSave Mode The display is now in PowerSave mode 3 You can wake the display from PowerSave mode at anytime by pressing a physical button Note PowerSave mode is automatically cancelled if an alarm ev...

Страница 46: ...s DVS Pro 6 9 View switcher Products that include more than 1 application use the View Switcher to cycle through available views Fullscreen and splitscreen application views are available 1 View thumb...

Страница 47: ...SC Micro Secure Digital High Capacity MicroSDHC Note The maximum supported memory card capacity is 32 GB MicroSD cards must be formatted to use either the FAT or FAT 32 ile system format to enable use...

Страница 48: ...nt water ingress and damage to the display ensure the card door is closed 6 Press the OK button to close the conirmation dialog 6 11 Learning resources Raymarine has produced a range of learning resou...

Страница 49: ...on page 50 7 3 Fishinder applications features on page 52 7 4 Fishinder applications controls on page 52 7 5 Zoom on page 53 7 6 Range on page 54 7 7 Scrolling on page 54 7 8 A Scope mode on page 55...

Страница 50: ...bjects The Sonar application uses CHIRP processing with a centered 200 KHz ping frequency which provides a greater depth range than DownVision but less detail The Sonar application displays a scrollin...

Страница 51: ...he target to thicken and arch slightly at fast speeds the mark resembles a double vertical line Target depth The closer the target to the surface the larger the mark on screen The depth of individual...

Страница 52: ...crolling mode the controls behave as follows from the default view turning the Rotary control clockwise enables Zoom mode when in Zoom mode use the Rotary control to increase and decrease the zoom lev...

Страница 53: ...1 Use the Joystick to highlight an object or area 2 Press the OK button The context menu is displayed 7 5 Zoom The Zoom function displays more detail onscreen by magnifying a speciic area of the imag...

Страница 54: ...ct Range so that Man is selected 3 Select Shallow Range The Shallow Range deines the depth that will be shown at the top of the screen 4 Adjust the Shallow Range to the required depth 5 Select Deep Ra...

Страница 55: ...features and manipulate the image to enable easier ish targeting Available depth features Target Depth ID Not available in DownVision application Depth Lines White Line Not available in DownVision ap...

Страница 56: ...cation however for optimum performance in most conditions it is recommended that you use the auto setting All echoes with a signal strength above the speciied value are displayed in the strongest colo...

Страница 57: ...3 Use the Up and Down Directional controls to adjust the Noise Filter to the required value or 4 Press the OK button to switch between Auto and Manual 7 11 Color Palettes Various color palettes are a...

Страница 58: ...tes Copper default Inv Copper Slate Gray Inv Slate Gray Selecting a Color Palette From the application s menu 1 Select Display Options 2 Select Sonar Colors DownVision Colors 3 Select the palette you...

Страница 59: ...torage capacity on page 74 8 8 Navigation on page 74 8 9 Chart settings menu cartography compatibility on page 75 8 10 Chart selection on page 75 8 11 Chart Detail on page 76 8 12 High resolution bath...

Страница 60: ...e to the cursor s location from your vessel is displayed 11 Waypoint TTG During active navigation the estimated time to go to the target cursor waypoint based on your current speed is displayed 12 Cur...

Страница 61: ...ing LightHouse Charts to MicroSD card using the LightHouse Download Manager Raster charts Raster charts are an exact copy scan of an existing paper chart All information is embedded directly in the ch...

Страница 62: ...card into the card reader of your multifunction display 8 Open the Chart application on your multifunction display 9 Select the new chart from the Chart selection menu Menu Presentation Chart Selecti...

Страница 63: ...at symbol remains centered onscreen and the Chart area moves around the boat symbol In Motion mode the controls behave as follows turning the Rotary control clockwise ranges in turning the Rotary cont...

Страница 64: ...d Pilot Book only available at certain ports Chart Objects 8 4 Waypoints overview Waypoints are position markers used for the purposes of navigation Your display can create waypoints which can then be...

Страница 65: ...esired location with the cursor 2 Press the OK button The context menu is displayed 3 Select Place Waypoint A conirmation pop up message is displayed 4 Select Ok to place the waypoint or Edit to edit...

Страница 66: ...new waypoint group With the Waypoint Group List displayed 1 Select New Group The on screen keyboard is displayed 2 Use the on screen keyboard to enter the required name for the new group 3 select SAVE...

Страница 67: ...hat has been created and stored The following information is assigned or captured for each waypoint Symbol a default symbol is assigned or you can select an alternative Name a default name is assigned...

Страница 68: ...nsure that you backup any data that you want to keep on to a MicroSD card From the Backup Reset menu 1 Select Erase from System 2 Select Erase Waypoints from System A conirmation dialog is displayed 3...

Страница 69: ...ct the location for the irst corner point of the search area 5 Select the location for the opposite corner of the search area A box is drawn on the screen which covers the selected area If the box is...

Страница 70: ...e End Diver Down Diver Down 2 Oil Rig Filled Circle FAD Fish Attracting Device Concrete Rubble Seaweed Oyster Green Can Green Nun Red Can Red Nun Yellow Can Yellow Nun Fish Trap Brushpile Preferred Ma...

Страница 71: ...the track Note If the maximum number of tracking points is reached you will be warned The track will continue to be recorded with the earlier tracking points being overwritten 4 To complete your track...

Страница 72: ...The on screen keyboard is displayed 3 Use the on screen keyboard to change the track name 4 When inished Select SAVE You can also edit track details by selecting Edit Track from the track context men...

Страница 73: ...g waypoints or tracks from a memory card Chartplotter variant displays can import waypoints and tracks from MicroSD card Ensure that the MicroSD card that contains your saved waypoints and or tracks i...

Страница 74: ...From the Chart application 1 If required press the Back button to enter motion mode 2 Press the OK button to open the menu 3 Select Waypoints The Waypoints list is displayed 4 Select the waypoint you...

Страница 75: ...nics Charts Jeppesen Deep Water From LightHouse Charts Navionics Charts Jeppesen 8 10 Chart selection You can select the cartography type to be used in the Chart application The Chart selection applie...

Страница 76: ...Chart Settings 3 Select Chart Detail Selecting Chart Detail switched the detail between High and Low 8 12 High resolution bathymetry The High Res Bathy setting is available when using Jeppesen charts...

Страница 77: ...gly This is the default orientation for the Chart application Course Up In Course Up mode during active navigation the Chart application displays the vessel s current destination waypoint directly up...

Страница 78: ...Size so that Normal is selected to reduce text and symbol size to normal 8 15 Boat position The Boat position function determines the position of the boat symbol on screen Center With Boat position se...

Страница 79: ...selected to display UGC or 3 Select Community Edits so that Off is selected to turn off UGC 8 17 Sonar logging When using compatible Navionics cartography you can share sonar information using Navion...

Страница 80: ...r The depth at which water color turns from blue shading to white can be changed to suit user requirements Example 1 Deep water from 60 ft Example 2 Deep water from 6 ft The deep water feature can als...

Страница 81: ...sing for your system For full details of the features available for your chart cards contact your chart card supplier Displaying pilot book information From the chart application when a port symbol is...

Страница 82: ...82 Dragonly 6 Dragonly 7...

Страница 83: ...Chapter 9 Tools Settings Chapter contents 9 1 System Settings menu on page 84 9 2 Alarms on page 89 9 3 Backup and reset on page 91 Tools Settings 83...

Страница 84: ...up Allows selection of date and time formats Date Format Time Format Local Time Simulator Switches simulator mode On or Off Off default On On Demo movie Maintenance Provides diagnostic information Al...

Страница 85: ...n the Chart application You can set up your receiver and check its status from the GPS Set up menu For each satellite the screen provides the following information 1 Sky view 2 Satellite status 3 Posi...

Страница 86: ...hart application In order for your receiver and MFD to correlate accurately with your paper charts they must be using the same datum COG SOG Filter The COG SOG ilter averages the velocity vectors to c...

Страница 87: ...d Time in 0 5 hour increments 13 to 13 hours in 0 5 hour increments Simulator mode The Simulator mode enables you to practice operating your display without data from the GPS receiver or transducer Th...

Страница 88: ...ect your waypoints or tracks Yes No Settings and Data Reset In addition to the settings reset detailed above performing a settings and data reset will also remove ALL waypoint and track data Yes No Ba...

Страница 89: ...rms menu Accessing the alarms menu The Alarms menu can be accessed at any time by following the steps below From any application 1 Press Back to open the View switcher If the application is currently...

Страница 90: ...ches ish alarm On and Off Fish Sensitivity If the Fish alarm is set to On an alarm is triggered when the ish return strength reaches the sensitivity that you specify Fish Depth Limits Switches depth l...

Страница 91: ...isplay BEFORE proceeding ensure that you backup any data that you want to keep on to a MicroSD card From the Backup Reset menu 1 Select Erase from System 2 Select Erase Waypoints from System A conirma...

Страница 92: ...ge is displayed prompting you to conirm the action 4 Select Yes to proceed with the settings reset or No to cancel If Yes is selected the system will reboot and the settings will be reset to factory d...

Страница 93: ...Chapter 10 Maintenance Chapter contents 10 1 Service and maintenance on page 94 10 2 Product cleaning on page 94 10 3 Transducer cleaning on page 95 Maintenance 93...

Страница 94: ...The display unit is a sealed unit and does not require regular cleaning If it is necessary to clean the unit follow this basic procedure 1 Switch off the power to the display 2 Wipe the display with...

Страница 95: ...emperature sensor may not work properly if painted Note Never use ketone based paint Ketones can attack many plastics possibly damaging the sensor Note Never use spray paint on your transducer Sprayin...

Страница 96: ...96 Dragonly 6 Dragonly 7...

Страница 97: ...contents 11 1 Troubleshooting on page 98 11 2 Power up troubleshooting on page 99 11 3 GPS troubleshooting on page 100 11 4 Sonar DownVision troubleshooting on page 101 11 5 Miscellaneous troubleshoot...

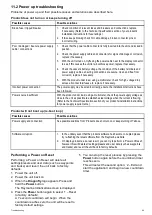
Страница 98: ...cking and shipping subjected to comprehensive test and quality assurance programs However if you experience problems with the operation of your product this section will help you to diagnose and corre...

Страница 99: ...oduct under load using a multi meter check the power supply voltage as close to the unit as possible to establish actual voltage when the current is lowing Refer to the Technical Speciication section...

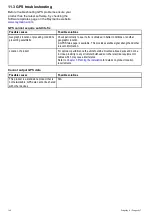
Страница 100: ...ic location A GPS Status page is available This provides satellite signal strength and other relevant information Location of product For optimum performance the unit should be mounted above decks and...

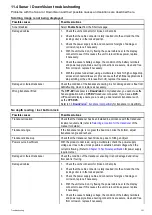
Страница 101: ...ay ensure you are using a dual element transducer such as the CPT DVS Refer to 3 3 DownVision transducer compatibility for transducer compatibility No depth reading lost bottom lock Possible causes Po...

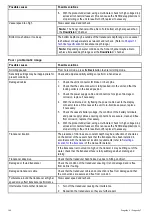
Страница 102: ...to see if this causes the unit to re boot loose power replace if necessary 5 Check the vessel s battery voltage the condition of the battery terminals and power supply cables ensuring connections are...

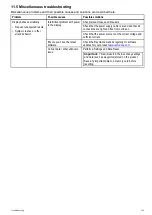
Страница 103: ...k that the power source is of the correct voltage and suficient current Ensure you have the latest software Check the Raymarine website regularly for software updates for your product www raymarine co...

Страница 104: ...104 Dragonly 6 Dragonly 7...

Страница 105: ...Chapter 12 Technical support Chapter contents 12 1 Raymarine product support and servicing on page 106 12 2 Learning resources on page 107 Technical support 105...

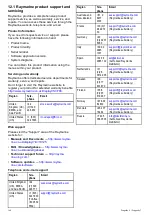
Страница 106: ...y id 10125 FAQ Knowledgebase http www rayma rine co uk knowledgebase Technical support forum http rayma rine ning com Software updates http www rayma rine com software Telephone and e mail support Reg...

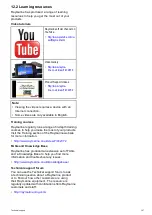
Страница 107: ...in depth training courses to help you make the most of your products Visit the Training section of the Raymarine website for more information http www raymarine co uk view id 2372 FAQs and Knowledge...

Страница 108: ...108 Dragonly 6 Dragonly 7...

Страница 109: ...Chapter 13 Technical speciication Chapter contents 13 1 Technical speciication on page 110 Technical speciication 109...

Страница 110: ...Cable length 6 m 19 7 ft Weight unit including cradle 0 60 kg 1 3 lbs Display power speciication Dragonly 6 Dragonly 7 Nominal supply voltage 12 V dc 12 V dc Operating voltage range 10 8 V dc to 15 6...

Страница 111: ...ons the Sonar channel maybe able to achieve increased depth range over the DownVision channel Note The DV and Wi Fish variants are single channel DownVision only products GPS speciication Channels 50...

Страница 112: ...112 Dragonly 6 Dragonly 7...

Страница 113: ...Chapter 14 Spares and accessories Chapter contents 14 1 Accessories on page 114 Spares and accessories 113...

Страница 114: ...s Dragonly 7 part numbers Carrying case A80206 N A Trolling Motor Mount A80207 A80207 4 m 13 1 ft extension cable A80224 A80224 Surface mount adaptor A80223 A80287 Sun cover R70134 A80285 Mounting bra...

Страница 115: ......

Страница 116: ......

Отзывы:

Похожие инструкции для Dragonfly 6