background image

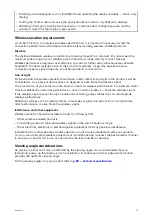
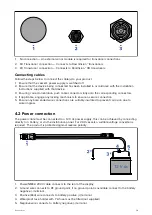
1.

Trunnion mount

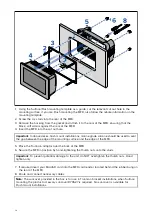
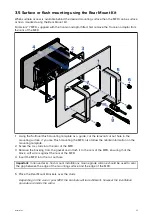
2. Flush mount (Mounting surface and MFD screen a level))

3.

Surface mount (MFD screen protrudes slightly form mounting surface)

4.

Front mount (using the Front Installation Kit accessory: 7”: A80498, 9”: A80500, 12”: A80502)

Legacy MFD adaptor plates are also available to enable you to easily swap out older MFDs for new
Axiom MFDs, please refer to

Chapter 9

Spares and accessories

for a list of available adaptors.

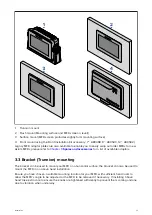
3.3 Bracket (Trunnion) mounting

The bracket can be used to mount your MFD on a horizontal surface, the bracket can also be used to
mount the MFD in an above head installation.

Ensure you have chosen a suitable mounting location for your MFD, with sufficient head room to
allow the MFD’s angle to be adjusted or the MFD to be removed if necessary. If installing ‘above
head’ take extra care to ensure the knobs are tightened sufficiently to prevent them coming undone
due to vibration when underway.

Installation

31

Содержание axiom 12

Страница 1: ...2020 Raymarine UK Limited 87298 3 Document number 01 2020 Date English en US Installation instructions...

Страница 2: ......

Страница 3: ...r design patents pending Fair Use Statement You may print no more than three copies of this manual for your own use You may not make any further copies or distribute or use the manual in any other way...

Страница 4: ......

Страница 5: ...le products 14 Axiom Multifunction Displays 14 2 3 Compatible transducers for Axiom MFDs 16 RealVision transducers 16 DownVision transducers 17 CHIRP conical beam transducers using DownVision type con...

Страница 6: ...n 47 4 6 Accessory connection 48 Chapter 5 Maintaining your display 49 5 1 Service and maintenance 50 Routine equipment checks 50 5 2 Product cleaning 50 Cleaning the display case 50 Cleaning the disp...

Страница 7: ...ernal GNSS GPS GLONASS receiver specification 72 Chapter 9 Spares and accessories 73 9 1 AXIOM accessories 74 Axiom transducer adaptor cables 74 Legacy MFD adaptor plates 75 9 2 AXIOM spares 75 9 3 Ra...

Страница 8: ...8...

Страница 9: ...by errors in chart data or information utilized by the product and supplied by third parties This product supports electronic charts provided by third party suppliers which may be embedded or stored...

Страница 10: ...on fonctionnement Cet appareil num rique de la classe B est conforme la norme NMB 003 du Canada Japanese approvals In the frequency band used for this device campus radio stations radios stations that...

Страница 11: ...es under which residents can dispose of waste electrical and electronic equipment at a recycling center or other collection point For more information about suitable collection points for waste electr...

Страница 12: ...12...

Страница 13: ...2 Applicable products on page 14 2 3 Compatible transducers for Axiom MFDs on page 16 2 4 Parts supplied Axiom 7 on page 19 2 5 Parts Supplied Axiom 7 DISP on page 19 2 6 Parts supplied Axiom 9 and 1...

Страница 14: ...87316 RCR SDUSB Installation instructions 87317 LightHouse 3 Basic operation instructions 81369 LightHouse 3 Advanced operation instructions 81370 LightHouse 3 MFD Operation instructions For operation...

Страница 15: ...d with Rear mount kit only E70366 Axiom 9 9 MFD Chartplotter E70366 DISP Axiom 9 9 MFD Chartplotter supplied with Rear mount kit only E70367 Axiom 9 RV 3D 9 MFD with built in RealVision 3D sonar modul...

Страница 16: ...er to Chapter 9 Spares and accessories for a list of available adaptor cables Non CHIRP transducer can be connected using available adaptor cables Refer to Chapter 9 Spares and accessories for a list...

Страница 17: ...l 20 thru hull split pair transducer T70451 RV 420P port transducer A80618 RV 420S starboard transducer A80619 DownVision transducers The transducers listed below can be connected directly to DownVisi...

Страница 18: ...E70339 CPT S plastic thru hull 12 angled element plastic A80448 CPT S plastic thru hull 20 angled element plastic A80447 3 CPT S bronze thru hull 0 angled element A80446 CPT S bronze thru hull 12 angl...

Страница 19: ...tion pack 9 Power NMEA 2000 cable with 1 5 m 4 92 ft power lead and 0 5 m 1 64 ft NMEA 2000 lead E70364 01 is also supplied with a CPT S transom transducer and associated fittings E70364 02 is also su...

Страница 20: ...ounting 5 M5x58 Threaded studs x 4 6 M5 Thumb nuts x 4 7 Documentation pack 8 Power NMEA 2000 cable with 1 5 m 4 92 ft power lead and 0 5 m 1 64 ft NMEA 2000 lead 2 6 Parts supplied Axiom 9 and 12 The...

Страница 21: ...ed studs x 4 10 M5 Thumb nuts x 4 E70367 02 is also supplied with a DownVision CPT 100DVS transducer and associated fittings E70367 03 is also supplied with a RealVision 3D RV 100 transducer and assoc...

Страница 22: ...ounting 3 Suncover 4 M5x58 Threaded studs x 4 5 M5 Thumb nuts x 4 6 Rear mounting brackets a supplied with 9 MFD b supplied with 12 MFD 7 Documentation pack 8 Power NMEA 2000 cable with 1 5 m 4 92 ft...

Страница 23: ...3 1 Selecting a location on page 24 3 2 Mounting options on page 30 3 3 Bracket Trunnion mounting on page 31 3 4 Axiom 7 flush and surface mounting on page 33 3 5 Surface or flush mounting using the R...

Страница 24: ...ows proper routing support and connection of cables Minimum bend radius of 100 mm 3 94 in unless otherwise stated Use cable clips to prevent stress on connectors If your installation requires multiple...

Страница 25: ...GPS AIS or VHF products and their antennas as possible Ensure that any power cables for external equipment are not entangled with the power or data cables for these devices Consider fitting one or mo...

Страница 26: ...alm clear conditions provide a more accurate position fix Vessels at extreme northerly or southerly latitudes may also receive a weaker signal An antenna mounted below decks will be more susceptible t...

Страница 27: ...nal The construction of your vessel can also have an impact on wireless performance For example metal structural bulkheads and roofing will reduce and in certain situations block the wireless signal I...

Страница 28: ...7 trunnion mount dimensions A 250 4 mm 9 86 in B 162 5 mm 6 4 in C 76 4 mm 3 in D Straight connectors 218 mm 8 58 in Right angled connectors 198 mm 7 79 in Axiom 7 surface and flush mount dimensions...

Страница 29: ...mm 0 32 in D Surface mounting 19 05 mm 0 75 in Maximum Flush mounting 27 05 mm 1 06 in Maximum E Straight connectors 218 mm 8 58 in Right angled connectors 198 mm 7 79 in F 73 mm 2 87 in G 132 mm 5 2...

Страница 30: ...Axiom 9 and 12 surface and flush mount dimensions Axiom 9 Axiom 12 A 244 08 mm 9 64 in 314 mm 12 36 in B 157 78 mm 6 21 in 217 mm 8 54 in C 8 mm 0 31 in D 27 05 mm 1 06 in Maximum E 157 mm 6 18 in 222...

Страница 31: ...ares and accessories for a list of available adaptors 3 3 Bracket Trunnion mounting The bracket can be used to mount your MFD on a horizontal surface the bracket can also be used to mount the MFD in a...

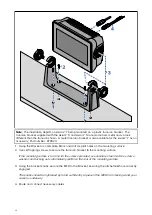
Страница 32: ...x pilot holes on the mounting surface 2 Use self tapping screws to secure the trunnion bracket to the mounting surface If the mounting surface is too thin for the screws provided use stainless steel...

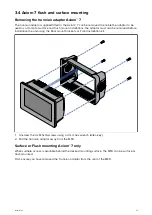
Страница 33: ...o be removed before installation the unit using the Rear mount brackets or Front Installation kit 1 Unscrew the 4 x M5x16 screws using a 4 mm hex wrench Allen key 2 Pull the trunnion adaptor away from...

Страница 34: ...e should be used to seal the gap between the edge of the mounting surface and the edge of the MFD 5 Place the Trunnion adaptor over the back of the MFD 6 Secure the MFD in position by hand tightening...

Страница 35: ...g the MFD also follow the rebate information on the mounting template 2 Screw the 4 x studs into the rear of the MFD 3 Remove the backing from the gasket and attach it to the rear of the MFD ensuring...

Страница 36: ...he studs Important To prevent potential damage to the unit do NOT overtighten the thumb nuts Hand tighten only 7 If required insert your MicroSD card into the MFD card reader located behind the rubber...

Страница 37: ...s 4 1 Connections overview on page 38 4 2 Power connection on page 39 4 3 NMEA 2000 SeaTalkng connection on page 45 4 4 Transducer connection on page 45 4 5 Network connection on page 47 4 6 Accessory...

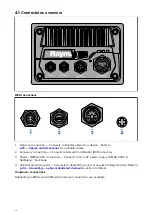
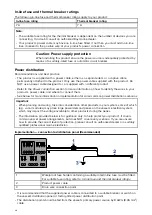
Страница 38: ...to Remote Card Reader RCR accessory 3 Power NMEA 2000 connection Connects to 12 V DC power supply NMEA 2000 or SeaTalkng backbone 4 Optional grounding point Connects to Vessel RF ground or negative b...

Страница 39: ...locking mechanism to ensure a secure connection 5 Ensure any bare ended wire connections are suitably insulated to prevent corrosion due to water ingress 4 2 Power connection The power cable must be c...

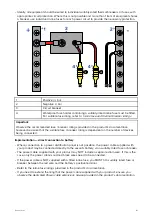
Страница 40: ...r product s power cable and where to connect them See below for more information on implementation for some common power distribution scenarios Important When planning and wiring take into considerati...

Страница 41: ...number of devices being connected Implementation direct connection to battery Where connection to a power distribution panel is not possible the power cable supplied with your product may be connected...

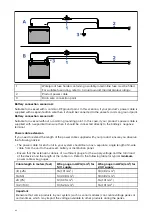
Страница 42: ...ed to extend the length of the power cable supplied with your product ensure you observe the following advice The power cable for each unit in your system should be run as a separate single length of...

Страница 43: ...ounding Ensure that you observe any additional grounding advice provided in the product s documentation More information It is recommended that best practice is observed in all vessel electrical insta...

Страница 44: ...m the negative battery terminal The dc power system should be either Negative grounded with the negative battery terminal connected to the vessel s ground or Floating with neither battery terminal con...

Страница 45: ...le connector 4 Adaptor cable connects to SeaTalkng backbone or DeviceNet spur cable connects to NMEA 2000 network Available cables A06045 Female DeviceNet to SeaTalkng cable shown E05026 Female Device...

Страница 46: ...es are available part numbers 3 m A80475 5 m A80476 8 m A80477 It is recommended that a maximum of two cable extensions are used with the total cable length not exceeding 18 m 59 ft DownVision transdu...

Страница 47: ...plice the transducer cable Do NOT remove the connector If the cable is cut it cannot be repaired Cutting the cable will also void the warranty 4 5 Network connection Your MFD can be directly connected...

Страница 48: ...and viewing video files mov files installation of third party LightHouse app apk files for installation only apps cannot be run directly from storage device Important 1 To store External SD or Extern...

Страница 49: ...Chapter 5 Maintaining your display Chapter contents 5 1 Service and maintenance on page 50 5 2 Product cleaning on page 50 Maintaining your display 49...

Страница 50: ...g towed Routine equipment checks It is recommended that you perform the following routine checks on a regular basis to ensure the correct and reliable operation of your equipment Examine all cables fo...

Страница 51: ...cover The supplied sun cover features an adhesive surface In certain conditions unwanted contaminants may stick to this surface To avoid damaging the monitor display clean the sun cover regularly fol...

Страница 52: ...52...

Страница 53: ...iagnostics on page 54 6 3 Power up troubleshooting on page 55 6 4 GNSS GPS troubleshooting on page 56 6 5 Sonar troubleshooting on page 57 6 6 Wi Fi troubleshooting on page 60 6 7 Touchscreen troubles...

Страница 54: ...ing to this section you are still having problems with your product please refer to the Technical support section of this manual for useful links and Raymarine Product Support contact details 6 2 LED...

Страница 55: ...ible solutions Power supply and connection See possible solutions from the table above entitled Product does not turn on or keeps turning off Software corruption 1 In the unlikely event that the produ...

Страница 56: ...location GNSS GPS connection fault Ensure that external GNSS connections and cabling are correct and fault free External GNSS GPS receiver in poor location For example Below decks Close proximity to...

Страница 57: ...ransducer fitted Ensure the transducer is compatible with your system External sonar module SeaTalkhs RayNet network problem Check that the unit is correctly connected to the multifunction display or...

Страница 58: ...s as relevant and recheck Poor problematic image Possible causes Possible solutions Vessel stationary Fish arches are not displayed if the vessel is stationary fish will appear on the display as strai...

Страница 59: ...uled transducer Check the condition of the transducer ensuring it is not damaged and is free from debris fouling Damaged transducer cable Check that the transducer cable and connection is free from da...

Страница 60: ...ve power Power cycle reboot devices and retry the connection Trying to connect to the wrong Wi Fi network Ensure you are trying to connect to the correct Wi Fi network the Wi Fi network s name can be...

Страница 61: ...i enabled or older Bluetooth enabled devices Bluetooth and Wi Fi both operate in the 2 4 GHz frequency range some older bluetooth devices may interfere with Wi Fi signals 1 Change the Wi Fi Channel of...

Страница 62: ...t installed Install mobile app from relevant app store Raymarine app version not compatible with MFD software Ensure mobile app and MFD software are latest available versions Mobile apps not enabled o...

Страница 63: ...ross the Power button swipe area to de activate the TouchLock Screen is not being operated with bare fingers for example gloves are being worn Bare fingers must make contact with the screen for correc...

Страница 64: ...the display Check that the power source is of the correct voltage and sufficient current Software mismatch on system upgrade required Go to www raymarine com and click on support for the latest softwa...

Страница 65: ...Chapter 7 Technical support Chapter contents 7 1 Raymarine product support and servicing on page 66 7 2 Learning resources on page 68 Technical support 65...

Страница 66: ...Tel 44 0 1329 246 932 United States US E Mail rm usrepair flir com Tel 1 603 324 7900 Web support Please visit the Support area of the Raymarine website for Manuals and Documents http www raymarine c...

Страница 67: ...LightHouse 3 Use the Settings menu to view hardware and software information about your MFD and connected products 1 Select Settings from the Homescreen The Getting started menu contains hardware and...

Страница 68: ...ailable in English Training courses Raymarine regularly runs a range of in depth training courses to help you make the most of your products Visit the Training section of the Raymarine website for mor...

Страница 69: ...8 Technical specification Chapter contents 8 1 Axiom tech spec on page 70 8 2 Internal sonar specification on page 71 8 3 Internal GNSS GPS GLONASS receiver specification on page 72 Technical specific...

Страница 70: ...ting temperature range 25 C to 55 C Storage temperature range 30 C to 70 C Humidity up to 93 40 C Water ingress protection IPx6 and IPx7 LCD specification Axiom 7 Axiom 9 Axiom 12 Size diagonal 7 0 9...

Страница 71: ...r specification The following specification only applies to DownVision products Channels 2 channels 1 x CHIRP sonar 1 x DownVision Beam coverage CHIRP sonar conical beam DownVision Wide port starboard...

Страница 72: ...NASS Beidou Galileo SBAS compatibility EGNOS GAGAN MSAS QZSS WAAS Operating frequency 1574 MHz to 1605 MHz Signal Acquisition Automatic Almanac Update Automatic Geodetic Datum WGS 84 alternatives can...

Страница 73: ...d accessories Chapter contents 9 1 AXIOM accessories on page 74 9 2 AXIOM spares on page 75 9 3 RayNet to RayNet cables and connectors on page 76 9 4 SeaTalkng cables and accessories on page 78 Spares...

Страница 74: ...Axiom transducer adaptor cables The following adaptor cable are available to enable connection of a wider selection of transducers Axiom DV adaptor cables A80484 Axiom DV to 7 pin Embedded Transducer...

Страница 75: ...the new fixing holes 9 2 AXIOM spares Part number Name Details R70523 Power DeviceNet combined cable 1 5m 4 92 ft R70561 Right angled Power DeviceNet combined cable 1 5m 4 92 ft R70525 7 Trunnion moun...

Страница 76: ...t female socket on the other end Suitable for connecting at 90 right angle to a device for installations where space is limited 3 RayNet cable puller 5 pack 4 RayNet to RayNet right angle coupler adap...

Страница 77: ...5 socket on the other end along with a locking gland for a watertight fit 3 Adapter cable with a RayNet male plug on one end and an RJ45 SeaTalk hs waterproof male plug on the other end 4 Adapter cabl...

Страница 78: ...cable 3 m 9 8 ft A06036 Backbone cable 5 m 16 4 ft A06068 Backbone cable 9 m 29 5 ft A06037 Backbone cable 20 m 65 6 ft A06043 SeaTalkng to bare wire spur cable 1 m 3 3 ft A06044 SeaTalkng to bare wi...

Страница 79: ...adaptor cable 1 5 m 4 92 ft Allows the connection of NMEA 2000 devices to a SeaTalkng system A06076 SeaTalkng to DeviceNet Male adaptor cable 1 m 3 3 ft Allows the connection of NMEA 2000 devices to a...

Страница 80: ......

Страница 81: ...mount 28 Axiom 7 trunnion mount 28 Axiom 9 flush mount 30 Axiom 9 surface mount 30 Axiom 9 trunnion mount 29 DownVision transducers 17 E Electromagnetic Compatibility 24 EMC See Electromagnetic Compa...

Страница 82: ...RCR SDUSB 14 RealVision transducers 16 Recovery mode 55 Removing trunnion adaptor 33 Routine checks 50 S SeaTalkhs connection 47 SeaTalkng cables 78 Service Center 66 Servicing 50 Support forum 68 T...

Страница 83: ......

Страница 84: ...FLIR Belgium BVBA Luxemburgstraat 2 2321 Meer Belgium Tel 44 0 1329 246 700 www raymarine com a brand by...

Отзывы: