


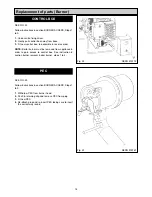


IMPORTANT: DURING BURNER REMOVAL CARE
MUST BE TAKEN NOT TO DAMAGE THE CERAMIC
FIBRE INSULATION.
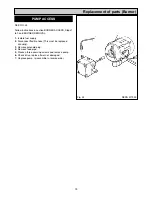
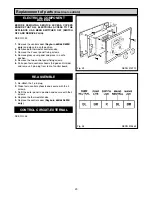
SEE FIGS. 2, 3 & 4
BOILER BURNER
1.
Place a sheet on the floor in front of the cooker to act
as a working area.
2.
Remove lower LH door
(Rayburn 660/680/699K only)
and burner aperture cover and store in a safe place.
3.
Unscrew jubilee clip and remove flexi air intake pipe
from burner.
4.
Using a 5mm Allen key, remove top securing bolt and
remove burner by rotating it approximately 90°
counterclockwise and drawing it away from the boiler.
COOKER BURNER
FLEXIHEAD
1.
Using a 13mm spanner, unscrew top securing bolt and
remove the horseshoe clamp.
2.
Withdraw the burner head.
BODY
1.
Using a 10mm spanner remove 2 baseplate securing
screws.
2.
Withdraw burner body complete with flexi-head.
7
BURNER REMOVAL
Fig. 2
Fig. 3
Fig. 4
DESN 515761
DESN 515762
DESN 515763
Burner Removal
Содержание 660
Страница 21: ...21 Fig 27 DESN 514774 Replacement of parts Electrical controls ...
Страница 22: ...22 Fault Finding Fig 28 Rayburn 600 700 Wiring Diagram 111MB for Individual Satronic boxes ...
Страница 23: ...23 Fault Finding Fig 29 Rayburn 600 700 Wiring Diagram 111MB self contained control ...
Страница 29: ...Fault Finding 29 Fig 31A DESN 516838 ...
Страница 30: ...30 Fault Finding ...
Страница 31: ...31 Fault Finding ...
Страница 33: ...33 ...
Страница 34: ...34 ...
Страница 35: ...35 ...