Chapter 6: Using the Web Interface
74
For feet (ft), the value ranges between 0 and 9842.
4. Click
OK.
Setting Data Logging
The PXE can store 120 measurements for each sensor in a memory
buffer. This memory buffer is known as the data log. Sensor readings in
the data log can be retrieved using SNMP.
You can configure how often measurements are written into the data log
using the Measurements Per Log Entry field. Since the PXE internal
sensors are measured every second, specifying a value of 60, for
example, would cause measurements to be written to the data log once
every minute. Since there are 120 measurements of storage per sensor,
specifying a value of 60 means the log can store the last two hours of
measurements before the oldest one in the log gets overwritten.
Whenever measurements are written to the log, three values for each
sensor are written: the average, minimum and maximum values. For
example, if measurements are written every minute, the average of all
measurements that occurred during the preceding 60 seconds along with
the minimum and maximum measurement values are written to the log.
Note that the outlet-level measurement data is NOT available for Raritan
models described in this online help.
Note: The PXE device's SNMP agent must be enabled for this feature to
work. See
Enabling SNMP
(on page 185) for more details. In addition,
using an NTP time server ensures accurately time-stamped
measurements.
Enabling Data Logging
By default, data logging is disabled. Only users having the
"Administrator" or "Change Pdu, Inlet, Outlet & Overcurrent Protector
Configuration" permissions can enable or disable this feature. See
Setting Up Roles
(on page 83).
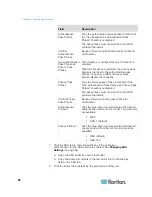
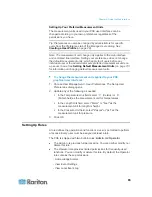
To configure the data logging feature:
1. Choose Device Settings > Data Logging. The Data Logging Options
dialog appears.
2. To enable the data logging feature, select the "enable" checkbox in
the Enable Data Logging field.
3. Type a number in the Measurements Per Log Entry field. Valid range
is from 1 to 600. The default is 60.
4. Verify that all sensor logging is enabled. If not, click Enable All to
have all sensors selected.
5. Click
OK.
Содержание PXE
Страница 1: ...Copyright 2014 Raritan Inc PXE 0C v3 0 E August 2014 255 80 0008 00 Raritan PXE User Guide Release 3 0...
Страница 12: ...Contents xii To Assert and Assertion Timeout 352 To De assert and Deassertion Hysteresis 354 Index 357...
Страница 16: ......
Страница 50: ...Chapter 5 Using the PDU 34 4 Pull up the operating handle until the colorful rectangle or triangle turns RED...
Страница 200: ...Chapter 6 Using the Web Interface 184 10 To print the currently selected topic click the Print this page icon...
Страница 339: ...Appendix A Specifications 323 RS 485 Pin signal definition al 4 5 6 D bi direction al Data 7 8...
Страница 353: ...Appendix D LDAP Configuration Illustration 337 5 Click OK The PX_Admin role is created 6 Click Close to quit the dialog...
Страница 380: ...Index 364 Z Zero U Products 1...
Страница 381: ......


