background image

Chapter 4: Connecting Environmental Sensor Packages (Optional) 
 

22


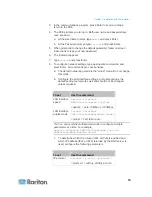
2.  A Y cable has two RJ-12 sensor ports. Connect DPX sensor 

packages to the Y cable's sensor ports. 


3.  Repeat the above steps if there are additional SENSOR ports on 

your PXE. 


Supported Maximum DPX Sensor Distances 

A maximum connection distance of 98' (30 m) is supported when 
connecting the following DPX packages to the PXE. This maximum 
includes the 16' (5 m) sensor cable length:   


DPX-CC2-TR 


DPX-T1 


DPX-T3H1 


DPX-AF1 


DPX-T1DP1 

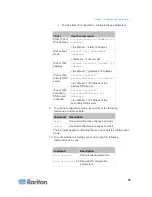
The following configurations were tested when connecting DPX sensor 
packages to a PXE via a sensor hub:   

PXE 

  16' (5 m) 

cable 

  1 sensor hub 

  16' (5 m) 

cable 

  Up to 4 

DPX-T3H1 
sensors 


Содержание PXE

Страница 1: ...Copyright 2014 Raritan Inc PXE 0C v3 0 E August 2014 255 80 0008 00 Raritan PXE User Guide Release 3 0...

Страница 2: ...duct s receptacle lamps receptacle relay switches or any other receptacle power on off indicator to determine whether power is being supplied to a receptacle Unplug a device connected to this product...

Страница 3: ...ing point on the case may be used as an additional means of protectively grounding this product and the rack 4 Examine the branch circuit receptacle that will supply electric power to this product Mak...

Страница 4: ...FCC Rules These limits are designed to provide reasonable protection against harmful interference in a commercial installation This equipment generates uses and can radiate radio frequency energy and...

Страница 5: ...Mounting Zero U Models Using Two Rear Buttons 4 Mounting Zero U Models Using L Brackets and Buttons 6 Chapter 3 Installation and Configuration 8 Before You Begin 8 Unpacking the Product and Components...

Страница 6: ...2 Resetting the Button Type Circuit Breaker 32 Resetting the Handle Type Circuit Breaker 33 Chapter 6 Using the Web Interface 35 Supported Web Browsers 35 Logging in to the Web Interface 36 Login 36 C...

Страница 7: ...n SSL Certificate 101 Certificate Signing Request 102 Creating a Self Signed Certificate 104 Installing Existing Key and Certificate Files 105 Downloading Key and Certificate Files 106 Setting Up Exte...

Страница 8: ...ental Sensors or Actuators 162 Viewing Sensor or Actuator Data 167 Unmanaging Environmental Sensors or Actuators 171 Disabling the Automatic Management Function 172 Controlling Actuators 172 Bulk Conf...

Страница 9: ...Inlet Sensor Threshold Information 206 Inlet Pole Sensor Threshold Information 207 Environmental Sensor Threshold Information 209 Environmental Sensor Default Thresholds 210 Security Settings 211 Exi...

Страница 10: ...uffer Length 311 Multi Command Syntax 311 Actuator Control Operations 312 Switching On the Actuator s 313 Switching Off the Actuator s 314 Example Turning On a Specific Actuator 314 Unblocking a User...

Страница 11: ...Configure LDAP Authentication on the PXE Device 332 Step D Configure User Groups on the PXE Device 334 Appendix E Integration 338 Power IQ Configuration 338 Adding PDUs to Power IQ Management 338 dcTr...

Страница 12: ...Contents xii To Assert and Assertion Timeout 352 To De assert and Deassertion Hysteresis 354 Index 357...

Страница 13: ...on page 35 Login on page 36 Remembering User Names and Passwords on page 38 Status Bar on page 43 Alerted Sensors on page 51 Alarms List on page 52 Modifying IPv4 Settings on page 57 Modifying IPv6 S...

Страница 14: ...Event Rules and Actions on page 121 Creating Actions on page 122 Creating Rules on page 133 Scheduling an Action on page 137 Default Log Messages on page 139 Email and SMS Message Placeholders on pag...

Страница 15: ...ge 179 Firmware Update via SCP on page 180 Using the Command Line Interface on page 191 Using the CLI Command on page 328 dcTrack on page 340 Locking Outlets and Cords on page 343 Unbalanced Current C...

Страница 16: ......

Страница 17: ...Product Models The PXE comes in several models that are built to stock and can be obtained almost immediately Raritan also offers custom models that are built to order and can only be obtained on requ...

Страница 18: ...low through the rack environment Mount equipment in the rack carefully to avoid uneven mechanical loading Connect equipment to the supply circuit carefully to avoid overloading circuits Ground all equ...

Страница 19: ...bracket with the two screw holes on the top of the PXE device 2 Screw the L bracket to the device and ensure the bracket is fastened securely 3 Repeat Steps 1 to 2 to screw another L bracket to the bo...

Страница 20: ...in the rack The recommended torque for the button is 1 96 N m 20 kgf cm Mounting Zero U Models Using Two Rear Buttons The following describes how to mount a PDU using two buttons only If your PDU has...

Страница 21: ...button is 1 96 N m 20 kgf cm 4 Screw a button in the screw hole near the top The recommended torque for the button is 1 96 N m 20 kgf cm 5 Ensure that the two buttons can engage their mounting holes i...

Страница 22: ...plemented read Circuit Breaker Orientation Limitation on page 2 before mounting it To mount Zero U models using L brackets and two buttons 1 Align the two central holes of the L bracket with the two s...

Страница 23: ...he device in the rack Using rack screws fasten the device to the rack through two identical holes near the edge of each L bracket Mount the device by screwing a mounting button in the back center of e...

Страница 24: ...e Package Contents on page 1 for a complete list of the contents of the box 2 Compare the serial number of the equipment with the number on the packing slip located on the outside of the box and make...

Страница 25: ...be in accordance with national and local electrical codes Connecting the PDU to a Power Source 1 Verify that all circuit breakers on the PXE device are set to ON If not turn them ON Or make sure that...

Страница 26: ...t px2 px2 support files There are two ways to install this driver automatic and manual installation Automatic driver installation is highly recommended Automatic driver installation in Windows 1 Make...

Страница 27: ...m the following commands set line dev ttyACM0 connect Connecting the PXE to a Computer To configure the PXE using a computer it must be connected to the computer via the USB port The PXE device can em...

Страница 28: ...s connected to your network you must provide it with an IP address and some additional networking information This section describes the initial configuration via the USB connection Note To configure...

Страница 29: ...he wired mode Do not change this mode b Configure the LAN interface settings In most scenarios the default setting auto works well and should not be changed unless required To set Use this command LAN...

Страница 30: ...v6 ipConfigurationMode mode mode automatic default or static Configure the preferred host name for the IPv4 DHCP or IPv6 automatic configuration Note The version variable in all of the following comma...

Страница 31: ...address IP address of the primary DNS server IPv4 or IPv6 secondary DNS server optional network version secondaryDNSServer ip address ip address IP address of the secondary DNS server 9 To quit the c...

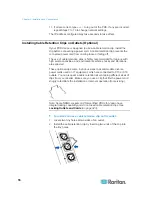
Страница 32: ...d environments where shocks and vibrations are expected These optional clips come in various sizes to accommodate diverse power cords used on IT equipment which are connected to C13 or C19 outlets You...

Страница 33: ...ss the clip toward the power cord until it holds the cord firmly The clip s central part holding the plug should face downwards toward the ground like an inverted U This allows gravity to keep the cli...

Страница 34: ...25 In This Chapter DPX Sensor Packages 18 DPX2 Sensor Packages 23 DX Sensor Packages 25 DPX Sensor Packages Most DPX sensor packages come with a factory installed sensor cable whose sensor connector i...

Страница 35: ...l air pressure sensor Using an Optional Sensor Hub A Raritan sensor hub increases the number of connected DPX environmental sensors per SENSOR port Make sure the total number of sensors connected to a...

Страница 36: ...itan sensor hubs CANNOT be cascaded so at most a sensor hub can be connected to each SENSOR port on the PXE device This diagram illustrates a configuration with a sensor hub connected The PXE device R...

Страница 37: ...le A Raritan Y cable doubles the number of connected environmental sensors per SENSOR port It supports DPX sensor packages only Do NOT connect DPX2 or DX To connect DPX sensor packages via a Raritan Y...

Страница 38: ...your PXE Supported Maximum DPX Sensor Distances A maximum connection distance of 98 30 m is supported when connecting the following DPX packages to the PXE This maximum includes the 16 5 m sensor cabl...

Страница 39: ...s shipped with a DPX2 sensor package This cable has one RJ 12 connector and several one to three head connectors You need to manually connect DPX2 sensors to the sensor cable For more information on D...

Страница 40: ...nectors prior to the final sensor with a DPX2 sensor To connect a DPX2 sensor package to the PXE 1 Connect a DPX2 sensor to the first head connector of the DPX2 sensor cable 2 Connect remaining DPX2 s...

Страница 41: ...DX packages and each package contains 3 functions a function is a sensor or actuator because the total 36 12 3 36 exceeds 32 by 4 the PXE ignores the last 4 functions Tip To manage the last 4 function...

Страница 42: ...he remaining RJ 45 port on the prior DX package b Plug the other end into either RJ 45 port on an additional DX package Repeat the same steps to cascade more DX packages 3 Connect the first DX sensor...

Страница 43: ...DUs come with an installed power cord which is ready to be plugged into an appropriate receptacle for receiving electricity Such devices cannot be rewired by the user Connect each PXE to an appropriat...

Страница 44: ...future release SENSOR Connection to Raritan s environmental sensors A sensor hub is required if you want to connect more than one DPX sensor package ETHERNET Connecting the PXE device to your company...

Страница 45: ...XE device powers up it proceeds with the power on self test and software loading for a few moments When the software has completed loading the LED display illuminates Three Digit Row The three digit r...

Страница 46: ...is lit only when PXE detects the physical connection of any environmental sensor The five LEDs look similar to this diagram but may slightly vary according to the model you purchased Two Digit Row Th...

Страница 47: ...uttons simultaneously to switch between voltage active power and current readings Current of the selected component is shown in the three digit row Simultaneously the CURRENT A LED is lit See LEDs for...

Страница 48: ...sually branch circuit breakers These circuit breakers automatically trip disconnect power when the current flowing through the circuit breaker exceeds its rating When a circuit breaker trips power flo...

Страница 49: ...le type circuit breakers may look slightly different from the images shown in this section but the reset procedure remains the same To reset the handle type breakers 1 Lift the hinged cover over the b...

Страница 50: ...Chapter 5 Using the PDU 34 4 Pull up the operating handle until the colorful rectangle or triangle turns RED...

Страница 51: ...nt Protector Management 115 Setting Power Thresholds 119 Event Rules and Actions 121 Managing Event Logging 151 Viewing Connected Users 152 Monitoring Server Accessibility 153 Environmental Sensors an...

Страница 52: ...uccessfully logging in you can create user profiles for your other users These profiles define their login names and passwords See Creating a User Profile on page 78 Login The web interface allows a m...

Страница 53: ...curity agreement is displayed on the Login page accept it To select the agreement checkbox using the keyboard press the Space bar Note If you do not accept the security agreement you cannot log in suc...

Страница 54: ...Type your new password in the Password and Confirm Password fields The password can be 4 to 64 characters long It is case sensitive 4 Click OK Tip If you have the Administrator Privileges you can cha...

Страница 55: ...p right corner of the web interface Close the web browser by clicking the Close button on the top right corner of the browser Close the web browser by choosing File Close or File Exit The command vari...

Страница 56: ...Add Page icon and a logout button throughout every page Number Web interface element Menus PX Explorer pane Setup button Status bar Add Page icon Logout button Data pane The Setup button is not avail...

Страница 57: ...bedded on the PXE In addition you can access the online help from this menu PX Explorer Pane The hierarchical tree to the left displays the PXE device you are accessing as well as all physical compone...

Страница 58: ...t The name can be customized See Naming the PDU on page 55 If it is not expanded click the white arrow prior to the folder icon or double click the folder The arrow then turns into a black gradient ar...

Страница 59: ...omponent group folder that you want to collapse or double click the folder The arrow then turns into a white arrow and all items below the folder disappear 2 Repeat Step 1 for other component groups y...

Страница 60: ...o this PXE device last time When the mouse pointer hovers over the last login time detailed information about the last login is displayed including the access client and IP address For the login via a...

Страница 61: ...ese actions To switch to one of the opened data pages click the corresponding tab If there are too many tabs to be all shown two arrows and appear at the left and right borders of the pane Click eithe...

Страница 62: ...ellow or Red Highlighted Sensors When a numeric sensor s reading crosses any upper or lower threshold the background color of the whole row turns to yellow or red for alerting users For a discrete on...

Страница 63: ...shown in the State or Status column below lower critical The numeric sensor s reading drops below the lower critical threshold below lower warning The numeric sensor s reading drops below the lower wa...

Страница 64: ...gs support the sorting or column change functions Changing the Column You can hide some columns of a list or table or adjust a specific column s width To change displayed columns 1 Hover your mouse po...

Страница 65: ...indicated by a blue downward pointing triangle Select a sorting command from the column menu a Hover your mouse pointer over the column header against which you want to sort the list A black triangle...

Страница 66: ...example the Back command on the Internet Explorer IE shortcut menu works the same as the Back button in the IE browser Both of these functions take you to the previous page For information on each sho...

Страница 67: ...hen the Dashboard page is opened you can do the following to uncover or hide specific data To collapse any section 1 Locate the section you want to collapse 2 Click the upward arrow prior to the secti...

Страница 68: ...h column of the alarms list Column Description Name The customized name of the Alarm action Reason The first event that triggers the alert First Appearance The date and time when the event indicated i...

Страница 69: ...nowledge it That alarm then disappears from the Alarms section Tip When browsing through all events you can sort the list of all events shown in the dialog by clicking the header row See Changing the...

Страница 70: ...formation 1 Choose Maintenance Device Information The Device Information dialog appears 2 Click a tab to view type specific information The number of available tabs varies according to the model you p...

Страница 71: ...devices such as environmental sensors 3 Enlarge the dialog if necessary 4 You can re sort the list or change the columns displayed 5 Click Close to quit the dialog Tip The firmware version is also av...

Страница 72: ...list 4 To change the LAN speed click the drop down arrow in the Speed field and select an option from the list Auto System determines the optimum LAN speed through auto negotiation 10 Mbit s The LAN s...

Страница 73: ...rnet protocol s you want to enable IPv4 only Enables IPv4 only on all interfaces This is the default IPv6 only Enables IPv6 only on all interfaces IPv4 and IPv6 Enables both IPv4 and IPv6 on all inter...

Страница 74: ...nually checkbox if necessary Then type the address of the primary DNS server in the Primary DNS Server field The secondary DNS server and DNS suffix are optional Static To manually assign an IP addres...

Страница 75: ...ect Automatic With this option selected you can enter a preferred host name which is optional Type the host name in the Preferred Hostname field The host name Consists of alphanumeric characters and o...

Страница 76: ...on IP address of the current subnet and prefix length using the format IP address prefix Next Hop IP address of the next hop router See Static Route Examples on page 61 for illustrations 4 Click OK No...

Страница 77: ...rk interface controllers NIC have been installed in one network server leading to two available subnets and IP forwarding has been enabled All of the NICs and PXE devices in the examples use static IP...

Страница 78: ...any device in the other subnet 192 168 200 0 In the IPv4 Append new Route dialog you should specify Destination 192 168 200 0 24 Next Hop 192 168 100 88 IPv6 example Your PXE fd07 2fa 6cff 2405 30 Two...

Страница 79: ...server s name to an IP address for establishing a connection If the SSL encryption is enabled the DNS server settings become critical since only fully qualified domain name can be used for specifying...

Страница 80: ...TTP access checkbox To enable or disable the HTTPS port select or deselect the HTTPS access checkbox To enable or disable HTTPS redirection In the HTTP Settings dialog the Enforce use of HTTPS redirec...

Страница 81: ...lick OK If the public key authentication is selected you must type a valid SSH public key for each user profile to log in over the SSH connection See Creating a User Profile on page 78 Changing Telnet...

Страница 82: ...MP The SNMP Settings dialog appears 2 Select the enable checkbox in the SNMP v1 v2c field to enable communication with an SNMP manager using SNMP v1 or v2c protocol Type the SNMP read only community s...

Страница 83: ...Enabled checkbox 4 Select an SNMP notification type SNMP v2c Trap SNMP v2c Inform SNMP v3 Trap and SNMP v3 Inform 5 Specify the SNMP notification destinations by doing the following a Specify the SNMP...

Страница 84: ...PS Telnet SSH Modbus json rpc SNMP This feature is enabled by default The service advertisement feature supports both IPv4 and IPv6 protocols If you have set a preferred host name for IPv4 and or IPv6...

Страница 85: ...ime zone verify the Automatic Daylight Saving Time Adjustment checkbox is selected If the daylight saving time rules are not available for the selected time zone the checkbox is not configurable 4 Cho...

Страница 86: ...e PXE device s IP address is assigned through IPv4 or IPv6 DHCP the NTP servers can be automatically discovered When this occurs the data you entered in the fields of First and Second Time Server will...

Страница 87: ...ional years 2 To change the month shown in the calendar do one of the following Press Ctrl Right arrow or Ctrl Left arrow to switch between months Click or on the top of the calendar to switch between...

Страница 88: ...nd therefore cannot synchronize with the PXE When the NTP synchronization issue occurs change the dispersion settings to resolve it To change the Windows NTP s root dispersion settings 1 Access the re...

Страница 89: ...n the Length Unit field select Meter or Feet as the measurement unit for length or height In the Pressure Unit field select Pascal or psi as the measurement unit for pressure 3 Click OK Specifying the...

Страница 90: ...inute the average of all measurements that occurred during the preceding 60 seconds along with the minimum and maximum measurement values are written to the log Note that the outlet level measurement...

Страница 91: ...r Name field 3 Type the port number for the SMTP server in the Port field The default is 25 4 Type an email address for the sender in the Sender Email Address field 5 Type the number of email retries...

Страница 92: ...re 3 In the Domain name field type the name of a Cisco EnergyWise domain where the PXE belongs The domain name comprises up to 127 printable ASCII characters Spaces and asterisks are NOT acceptable 4...

Страница 93: ...adings An active energy reading is a value of total accumulated energy which is never reset even if the power fails or the PXE is reset However you can manually reset this reading to restart the energ...

Страница 94: ...e the user s permissions See Setting Up Roles on page 83 Tip By default multiple users can log in simultaneously using the same login name Creating a User Profile Creating new users adds a new login t...

Страница 95: ...default a To permit the SNMPv3 access by this user select the Enable SNMPv3 access checkbox Otherwise leave the checkbox disabled Note The SNMPv3 protocol must be enabled for SNMPv3 access See Config...

Страница 96: ...e in this field if the Use Authentication Pass Phrase as Privacy Pass Phrase checkbox is disabled The pass phrase must consist of 8 to 32 ASCII printable characters Confirm Privacy Pass Phrase Re type...

Страница 97: ...this new user click the Preferences tab and do any of the following In the Temperature Unit field select Celsius or Fahrenheit as the measurement unit for temperatures In the Length Unit field select...

Страница 98: ...To change the measurement unit for temperature length or pressure click the Preferences tab and select a different option from the drop down list Note The measurement unit change only applies to the...

Страница 99: ...measurement units applied to your PXE graphical user interfaces 1 Choose User Management User Preferences The Setup User Preferences dialog opens 2 Update any of the following as needed In the Temper...

Страница 100: ...ltiple permissions a Click Add The Add Privileges to new Role dialog appears b Select the permission you want from the Privileges list c If the permission you selected contains any argument setting th...

Страница 101: ...ns do this a Click Add The Add Privileges to Role XXX dialog appears where XXX is the role name b Select the permission you want from the Privileges list c If the permission you selected contains any...

Страница 102: ...confirm the operation Click Yes to confirm the deletion Changing the Role List View You may re sort the list for better viewing the data See Changing the View of a List on page 48 Forcing HTTPS Encry...

Страница 103: ...ult Policy on page 88 3 Create firewall rules specifying which addresses to accept and which ones to discard See Creating Firewall Rules on page 89 Changes made to firewall rules take effect immediate...

Страница 104: ...in the Inbound Rules section d The default policy is shown in the Default Policy field To change it select a different policy from the drop down list Accept Accepts traffic from all IPv4 addresses Dro...

Страница 105: ...from the PXE device the rules are executed in numerical order Only the first rule that matches the IP address determines whether the traffic is accepted or discarded Any subsequent rules matching the...

Страница 106: ...address es and an ICMP message is sent to the source or destination host for failure notification Click OK The system automatically numbers the rule Insert a rule between two existing rules Select the...

Страница 107: ...tings dialog 7 Click OK The rules are applied Editing Firewall Rules When an existing firewall rule requires updates of IP address range and or policy modify them accordingly To modify a firewall rule...

Страница 108: ...rt the firewall rules 1 Choose Device Settings Security IP Access Control The Configure IP Access Control Settings dialog appears 2 To sort the IPv4 firewall rules click the IPv4 tab To sort the IPv6...

Страница 109: ...empt to log in to the PXE and fail authentication before the user is blocked Note that this function applies only to local authentication instead of authentication through external AA servers Note If...

Страница 110: ...mitations section 3 To prevent more than one person from using the same login at the same time select the Prevent concurrent login with same username checkbox 4 To adjust how long users can remain idl...

Страница 111: ...east one uppercase character Required At least one numeric character Required At least one special character Required Number of restricted passwords in history 5 Note The maximum password length accep...

Страница 112: ...ed You can edit or replace the default text as needed by typing directly in the security dialog or pasting text into it A maximum of 10 000 characters can be entered or pasted into the security banner...

Страница 113: ...based on their IP addresses To set up role based access control rules 1 Enable the feature See Enabling the Feature on page 97 2 Set the default policy See Changing the Default Policy on page 98 3 Cre...

Страница 114: ...r s role 3 To determine the default policy for IPv6 addresses a Click the IPv6 tab b Ensure the Enable Role Based Access Control for IPv6 checkbox is selected c Select the action you want from the Def...

Страница 115: ...user is a member of the specified role Deny Drops traffic from the specified IP address range when the user is a member of the specified role Click OK The system automatically numbers the rule Insert...

Страница 116: ...he rule to be modified in the rules list 5 Click Edit or double click the rule The Edit Rule dialog appears 6 Make changes to the information shown 7 Click OK Sorting Role Based Access Control Rules S...

Страница 117: ...ete 6 A message appears prompting you to confirm the operation Click Yes to confirm the deletion 7 Click OK Setting Up an SSL Certificate Having an X 509 digital certificate ensures that both parties...

Страница 118: ...try_codes iso_3166_code_lists htm State or Province The full name of the state or province where your company is located Locality The city where your company is located Organization The registered nam...

Страница 119: ...tal certificate c If intended click Delete Certificate Signing Request to remove the CSR file permanently from the PXE device 6 To store the newly created private key on your computer click Download K...

Страница 120: ...Organizational Unit The name of your department Common Name The fully qualified domain name FQDN of your PXE device Email Address An email address where you or another administrative user can be reach...

Страница 121: ...ting Key and Certificate Files If the SSL certificate and private key files are already available you can install them directly without going through the process of creating a CSR or a self signed cer...

Страница 122: ...er 5 Click Close to quit the dialog Setting Up External Authentication For security purposes users attempting to log in to the PXE must be authenticated The PXE supports the access using one of the fo...

Страница 123: ...rver Whether the Secure LDAP protocol LDAP over SSL is being used If Secure LDAP is in use consult your LDAP administrator for the CA certificate file The network port used by the LDAP server The type...

Страница 124: ...s priority Adding LDAP Server Settings To activate and use external LDAP LDAPS server authentication enable LDAP authentication and enter the information you have gathered for any LDAP LDAPS server No...

Страница 125: ...box When a Bind DN and password are required to bind to the external LDAP LDAPS server deselect this checkbox 12 Use Bind Credentials For Microsoft Active Directory use this checkbox to enable or disa...

Страница 126: ...ditional LDAP LDAPS servers repeat Steps 3 to 19 21 Click OK The LDAP authentication is now in place To duplicate LDAP LDAPS server settings If you have added any LDAP LDAPS server information to the...

Страница 127: ...rypted while in PAP they are transmitted in the clear 6 By default the PXE uses the standard RADIUS port 1812 authentication and 1813 accounting If you prefer to use non standard ports change the port...

Страница 128: ...Move down until the selected server reaches the desired position in the list 4 Click OK Testing the Server Connection You can test the connection to any external authentication server to verify the s...

Страница 129: ...the remote authentication server that you want to remove To make multiple selections press Ctrl click or Shift click to highlight multiple ones 3 Click Delete 4 A message appears prompting you to con...

Страница 130: ...g appears 2 Make sure you have selected one external authentication radio button such as the LDAP radio button 3 Select the Use Local Authentication if Remote Authentication service is not available c...

Страница 131: ...ll outlets Click Outlets in the PX Explorer pane and the Outlets page opens in the right pane All outlets are listed with outlet specific information To check the information of an individual outlet 1...

Страница 132: ...pe a new name in the Name field 4 Click OK Monitoring the Inlet You can view the inlet s details including its Label number Customized name Inlet sensor readings RMS current per line A RMS voltage per...

Страница 133: ...tup dialog appears Tip You can also trigger the same dialog by selecting the Overcurrent Protectors folder then selecting an overcurrent protector and clicking Setup on the Overcurrent Protectors page...

Страница 134: ...let All of the sensor readings states warnings event or alarm notifications for the outlets and overcurrent protectors associated with the disabled inlet The outlet switching functionality if availabl...

Страница 135: ...er and Lower Critical thresholds indicate the sensor reading enters the critical level To avoid generating a large amount of alert events you can set the assertion timeout and deassertion hysteresis F...

Страница 136: ...mpanying text box 6 To set the deassertion hysteresis type a numeric value in the Deassertion Hysteresis field See To De assert and Deassertion Hysteresis on page 354 7 To set the assertion timeout ty...

Страница 137: ...Unavailable This causes the PXE to sends alarm notifications if a DX PIR tamper sensor has been connected and the PXE detects that the communication with the connected tamper sensor is lost If these...

Страница 138: ...shboard until a person acknowledges it By default this action has been assigned to the built in tamper detection event rules For information on acknowledging an alarm see Alarms List on page 52 Note N...

Страница 139: ...Syslog Message on page 130 Send Sensor Report Reports the readings or status of the selected sensors including internal or external sensors See Send Sensor Report on page 131 Switch Peripheral Actuat...

Страница 140: ...1 5 In the Action field click the drop down arrow and select the desired action Execute an action group 6 To mark an action as part of the action group select it from the Available Actions list box an...

Страница 141: ...Action field click the drop down arrow and select the desired action Alarm 5 In the Alarm Notifications list box specify one or multiple ways to issue the alert notifications a In the Available Actio...

Страница 142: ...l a In the Available Actions field select the method to send the acknowledge notification Available methods are identical to those for generating alarm notifications b Click the Add button to add the...

Страница 143: ...tion The default name is New Action number where number is a sequential number starting at 1 5 In the Action field click the drop down arrow and select the desired action Send SMTP message 6 In the Re...

Страница 144: ...otification 6 Select the type of SNMP notification See either procedure below according to your selection To send SNMP v2c notifications 1 From the Notification Type drop down select SNMPv2c Trap or S...

Страница 145: ...Type drop down select SNMPv3 Trap or SNMPv3 Inform 2 For SNMP TRAPs the engine ID is prepopulated 3 For SNMP INFORM communications leave the resend settings at their default or a In the Timeout sec f...

Страница 146: ...hrase Select the Privacy Protocol DES or AES Enter the privacy passphrase and then confirm the privacy passphrase Syslog Message Use this action to automatically forward event messages to the specifie...

Страница 147: ...midity sensors To configure a sensor report action 1 Choose Device Settings Event Rules The Event Rules Settings dialog opens 2 Click the Actions tab 3 Click New 4 In the Action name field type a new...

Страница 148: ...sors list box select it and click the Delete button To make multiple selections press Ctrl click or Shift click to highlight multiple ones 9 To immediately send out the sensor report click Send Report...

Страница 149: ...ones To remove all actuators click 8 Click OK Creating Rules After required actions are available you can create event rules to determine what actions are taken to respond to specific events By defaul...

Страница 150: ...e described event transits from TRUE to FALSE Both The PXE takes the action both when the event occurs asserts and when the event condition disappears deasserts Discrete on off sensor state change Ava...

Страница 151: ...only when the chosen function is disabled Both The PXE takes the action when the chosen function is either enabled or disabled User logon state Available radio buttons include Logged in Logged out and...

Страница 152: ...oth The PXE takes the action when any specified server becomes either inaccessible or accessible Device connection or disconnection such as a USB cascaded slave device Available radio buttons include...

Страница 153: ...ed by a specific event For example you can make the PXE report the reading or state of a specific environmental sensor regularly by scheduling the Send Sensor Report action When scheduling an action m...

Страница 154: ...ate and time must be specified for the monthly option The dates range from 1 to 31 and the time is specified in 24 hour format Note that NOT every month has the date 31 and February in particular does...

Страница 155: ...Blade Extension Connected Blade extension with ID TAGID connected at rack unit RACKUNIT of asset strip STRIPID STRIPNAME Blade extension with ID TAGID disconnected at rack unit RACKUNIT of asset strip...

Страница 156: ...RSION by user USERNAME from host USERIP Device Firmware update completed Firmware upgraded successfully from version OLDVERSION to version VERSION by user USERNAME from host USERIP Device Firmware upd...

Страница 157: ...USERNAME from host USERIP enabled EnergyWise User USERNAME from host USERIP disabled EnergyWise Peripheral Device Slot Numeric Sensor Unavailable Peripheral device EXTSENSORNAME in slot EXTSENSORSLOT...

Страница 158: ...d Sensor INLETSENSOR on inlet INLET asserted above upper critical Sensor INLETSENSOR on inlet INLET deasserted above upper critical Inlet Sensor Above upper warning threshold Sensor INLETSENSOR on inl...

Страница 159: ...onitoring Error Error monitoring server MONITOREDHOST ERRORDESC Server Monitoring Monitored Server SERVER is now being monitored Server SERVER is no longer being monitored Server Monitoring Unreachabl...

Страница 160: ...le TARGETROLE deleted by user USERNAME from host USERIP Webcam Management Webcam attached Webcam WEBCAMNAME WEBCAMUVCID added to port WEBCAMUSBPORT Webcam Management Webcam detached Webcam WEBCAMNAME...

Страница 161: ...le timestamp of the event occurrence DEVICEIP The IP address of the device the event occurred on DEVICENAME The name of the device the event occurred on ERRORDESC The error message EVENTRULENAME The n...

Страница 162: ...connected to RADIUSERRORDESC A Radius error occurred ROMCODE The rom code of an attached peripheral device SENSORREADINGUNIT The unit of a sensor reading SENSORREADING The value of a sensor reading S...

Страница 163: ...g Sample Inlet Level Event Rule In this example we want the PXE to send SNMP notifications to the SNMP manager for any sensor change event of the Inlet I1 Note The SNMP notifications may be SNMP v2c o...

Страница 164: ...e Loop You should avoid building an infinite loop when creating event rules The infinite loop refers to a condition where the PDU keeps busy because the action or one of the actions taken for a certai...

Страница 165: ...an click the admin tab to display a pull down submenu showing all user names and then select a different user name or all users shown as Any user 5 If the Trigger condition field is available you may...

Страница 166: ...ick Edit or simply double click that action 4 Make necessary changes to the information shown 5 Click OK to save the changes Note If you do not click OK before quitting the current settings page a mes...

Страница 167: ...es See To De assert and Deassertion Hysteresis on page 354 Managing Event Logging By default the PXE captures certain system events and saves them in a local internal event log Viewing the Local Event...

Страница 168: ...nt history you can remove all of it from the local log To delete all event entries 1 Choose Maintenance View Event Log The Event Log dialog appears 2 Click Clear Event Log 3 Click Yes on the confirmat...

Страница 169: ...user remains idle The unit min represents minutes 2 To disconnect any user click the corresponding Disconnect button a A dialog appears prompting you to confirm the operation b Click Yes to disconnec...

Страница 170: ...rver Reachability dialog appears 2 Click New The Add New Server dialog appears 3 By default the Enable ping monitoring for this server checkbox is selected If not select it to enable this feature 4 Pr...

Страница 171: ...before the PXE can declare that the monitored device is reachable or unreachable Editing Ping Monitoring Settings You can edit the ping monitoring settings for any IT device whenever needed To modify...

Страница 172: ...Status indicates the accessibility of each monitored equipment Status Description Reachable The monitored equipment is accessible Unreachable The monitored equipment is inaccessible Waiting for relia...

Страница 173: ...c readings and sensor states to indicate environmental or internal conditions while discrete on off sensors show sensor states only to indicate state changes Only numeric sensors have the threshold se...

Страница 174: ...s rear side The serial number for each sensor or actuator appears listed in the web interface after each sensor or actuator is detected by the PXE To identify each detected environmental sensor or act...

Страница 175: ...or two pieces of position information the sensor port number and if the sensor package is DPX2 or DX the sensor or actuator s location in a chain For DPX the PXE only displays the sensor port where i...

Страница 176: ...ripheral Devices page opens in the right pane 2 Select the checkbox of the desired sensor or actuator on the Peripheral Devices page To manage multiple ones select multiple checkboxes Note To identify...

Страница 177: ...nage additional sensors or actuators unless you remove or replace any managed ones To remove a sensor or actuator see Unmanaging Environmental Sensors or Actuators on page 171 Identifying Sensor or Ac...

Страница 178: ...e in the Binary Sensor Subtype field Contact The detector switch is designed to detect the door lock or door open closed status Smoke Detection The detector switch is designed to detect the appearance...

Страница 179: ...ertion timeout type a numeric value in the Assertion Timeout samples field See To Assert and Assertion Timeout on page 352 To use the default threshold settings select the Use Default Thresholds radio...

Страница 180: ...hese location values to track records of environmental conditions in fixed locations around your IT equipment The X Y and Z values act as additional attributes and are not tied to any specific measure...

Страница 181: ...eral Devices in the PX Explorer pane and the Peripheral Devices page opens in the right pane 2 Click Default Thresholds Setup on the Peripheral Devices page A dialog appears showing a list of all nume...

Страница 182: ...1 Click Peripheral Devices in the PX Explorer pane and the Peripheral Devices page opens in the right pane 2 Select the checkboxes of those environmental sensors whose threshold settings should be th...

Страница 183: ...nsor daisy chain DPX2 and DX sensor packages show this information If a sensor row is colored it means the sensor reading already crosses one of the thresholds the sensor enters an alarmed state or th...

Страница 184: ...or discrete sensors For example a contact closure sensor is a discrete on off sensor so it switches between three states only unavailable alarmed and normal Note Numeric sensors show both numeric rea...

Страница 185: ...anagement For DPX2 or DX sensor packages all of the connected sensor packages also enter the unavailable states if any of them is upgrading its VHQVRU firmware normal State This state indicates the se...

Страница 186: ...ide can be downloaded from the Raritan website s PX2 Support Files page https www raritan com support product px2 px2 support files Tip A contact closure sensor s LED is lit after entering the alarmed...

Страница 187: ...Sensors or Actuators When it is unnecessary to monitor a particular environmental factor you can unmanage or release the corresponding environmental sensor so that the PXE device stops retrieving the...

Страница 188: ...t The name can be customized See Naming the PDU on page 55 2 Click Setup in the Settings section The Pdu Setup dialog appears 3 Deselect the Peripheral Device Auto Management checkbox 4 Click OK Contr...

Страница 189: ...file to copy that configuration to other PXE devices of the same model and firmware version You must have the administrator privileges to save and copy the PXE configurations Note No device specific d...

Страница 190: ...let status Environmental sensor and actuator names States and values of environmental sensors and actuators SSL certificate Because the date and time settings are saved in the configuration file users...

Страница 191: ...01 Line cord color which is indicated as Bn such as B2 and B5 Line cord length meters which is indicated as An such as A0 and A14 Line cord length centimeters which is indicated as Ln For example Rari...

Страница 192: ...ackup Restore The Backup Restore of Device Settings dialog opens 2 In the Save Device Settings section click Download Device Settings Save the file to your computer The file is saved in the XML format...

Страница 193: ...st the value by clicking either arrow This number determines how many packets are sent for pinging the host 4 Click Run Ping to start pinging the host A dialog appears displaying the Ping results 5 Cl...

Страница 194: ...port You can download the diagnostic file from the PXE device to a client machine The file is compressed into a tgz file and should be sent to Raritan Technical Support for interpretation This feature...

Страница 195: ...irmware Update via SCP on page 180 Firmware Update via Web Interface After downloading the latest firmware log in to the PXE web interface to upgrade the firmware To update the firmware using the web...

Страница 196: ...ons are suspended and all login attempts fail during the firmware update For details see Firmware Update via Web Interface on page 179 To update the firmware using the SCP command 1 Type the following...

Страница 197: ...ranges from approximately 3 minutes without any microcontroller updated to almost 7 minutes with all microcontrollers for 48 outlets updated Take the above factors into account when estimating the PDU...

Страница 198: ...Contact Raritan Technical Support for the recovery utility which works in Windows XP Vista 7 and Linux In addition an appropriate PXE firmware file is required in the recovery procedure Accessing the...

Страница 199: ...lick the white arrow prior to the topic or double click that topic The arrow turns into a black gradient arrow and sub topics appear below the topic To collapse any expanded topic click the black grad...

Страница 200: ...Chapter 6 Using the Web Interface 184 10 To print the currently selected topic click the Print this page icon...

Страница 201: ...Configuring Users for Encrypted SNMP v3 186 Configuring SNMP Notifications 187 SNMP Gets and Sets 188 Enabling SNMP By default SNMP v1 v2c is enabled on the PXE so the PXE can communicate with an SNMP...

Страница 202: ...sysLocation the location of the system 5 Select the MIB to be downloaded The SNMP MIB for your PXE is used by the SNMP manager Important You must download the SNMP MIB for your PXE to use with your SN...

Страница 203: ...provided If the inform communication fails it is resent You can define the number of times and the intervals to resend the inform communication or leave the defaults of five 5 resends in three 3 secon...

Страница 204: ...The PXE MIB The SNMP MIB file is required for using your PXE device with an SNMP manager An SNMP MIB file describes the SNMP functions Downloading SNMP MIB The SNMP MIB file for the PXE can be easily...

Страница 205: ...he individual outlet level As standard these objects are first presented at the beginning of the file listed under their parent group The objects then appear again individually defined and described i...

Страница 206: ...ion when certain parameters are exceeded See Setting Power Thresholds on page 119 for a description of how thresholds work Note When configuring the thresholds via SNMP set commands ensure the value o...

Страница 207: ...terface The PXE provides a command line interface that enables data center administrators to perform some basic management tasks Using this interface you can do the following Reset the PXE device Disp...

Страница 208: ...ms prior to Windows Vista To log in using HyperTerminal 1 Connect your computer to the PXE via a local connection 2 Launch HyperTerminal on your computer and open a console window When the window firs...

Страница 209: ...ing an SSH or Telnet client such as PuTTY Note PuTTY is a free program you can download from the Internet See PuTTY s documentation for details on configuration To log in using SSH or Telnet 1 Ensure...

Страница 210: ...e In this mode the prompt changes to config or config and you can change PXE device and network configurations See Entering Configuration Mode on page 219 Diagnostic Mode You can enter the diagnostic...

Страница 211: ...er the administrator mode Help command under the configuration mode config Help command under the diagnostic mode diag Press Enter after typing the help command and a list of main commands for the cur...

Страница 212: ...query available role configuration parameters config role To query available parameters for the role create command config role create Showing Information You can use the show commands to view curren...

Страница 213: ...k show network ip option Variables option is one of the options all v4 or v6 Option Description all This options shows both IPv4 and IPv6 settings Tip You can also type the command without adding this...

Страница 214: ...d Modbus TCP services and SNMP settings show network services option Variables option is one of the options all http https telnet ssh snmp modbus and zeroconfig Option Description all Displays the set...

Страница 215: ...formation add the parameter details to the end of the command show outlets n details Variables n is one of the options all or a number Option Description all Displays the information for all outlets T...

Страница 216: ...inlets Tip You can also type the command without adding this option all to get the same data A specific inlet number Displays the information for the specified inlet only An inlet number needs to be...

Страница 217: ...n details Variables n is one of the options all or a number Option Description all Displays the information for all overcurrent protectors Tip You can also type the command without adding this option...

Страница 218: ...s applied to the PXE web and CLI interfaces across all users especially those users authenticated through remote authentication servers show user defaultPreferences Note If a user has set his her own...

Страница 219: ...ype Temperature Reading 31 8 deg C normal Serial number AEI0950133 Description Not configured Location X Not configured Y Not configured Z Not configured Position Port 1 Using default thresholds yes V...

Страница 220: ...on to the ID number and sensor reading such as the serial number sensor position and X Y and Z coordinates Note DPX sensor packages do not provide chain position information Actuator Information This...

Страница 221: ...externalsensors commands which show the reading status and configuration of an individual environmental sensor the following command syntax shows the information of all connected environmental sensor...

Страница 222: ...one of the following sensor types Sensor type Description current Current sensor voltage Voltage sensor activePower Active power sensor apparentPower Apparent power sensor powerFactor Power factor se...

Страница 223: ...inletpole n p sensor type details Variables n is the number of the inlet whose pole sensors you want to query For a single inlet PDU n is always the number 1 p is the label of the inlet pole whose sen...

Страница 224: ...ing state threshold deassertion hysteresis and assertion timeout settings of the specified inlet pole sensor are displayed With the parameter details more sensor information is displayed including res...

Страница 225: ...ure Reading 31 8 deg C State normal Active Thresholds Sensor specific thresholds Default Thresholds for Temperature sensors Lower critical threshold 10 0 deg C Lower warning threshold 15 0 deg C Upper...

Страница 226: ...f sensor the threshold related and accuracy related data is NOT available Environmental Sensor Default Thresholds This command syntax shows a certain sensor type s default thresholds which are the ini...

Страница 227: ...settings Security Settings This command shows the security settings of the PXE show security To show detailed information add the parameter details to the end of the command show security details Disp...

Страница 228: ...tions all or a user s name Option Description all This option shows all existing user profiles Tip You can also type the command without adding this option all to get the same data a specific user s n...

Страница 229: ...following options Option Description all This option shows all existing roles Tip You can also type the command without adding this option all to get the same data a specific role s name This option s...

Страница 230: ...events only show eventlog limit n class event_type Variables n is one of the options all or a number Option Description all Displays all entries in the event log An integer number Displays the specifi...

Страница 231: ...ent types in the CLI because the PXE does not support them assetManagement cardReader lhx modem transferSwitch and webcam Reliability Data This command shows the reliability data show reliability data...

Страница 232: ...ously entered in the current session is displayed History Buffer Length This command syntax shows the length of the history buffer for storing history commands show history bufferlength Displayed info...

Страница 233: ...and Line Interface 217 Example 2 In Depth Security Information More information is displayed when typing the show security details command Example 3 Basic PDU Information The diagram shows the output...

Страница 234: ...it Note Depending on your login name the prompt may be replaced by the prompt See Different CLI Modes and Prompts on page 194 Clearing Event Log This command removes all data from the event log clear...

Страница 235: ...de you may have limited permissions to make configuration changes See Different CLI Modes and Prompts on page 194 2 Type config and press Enter 3 The config prompt appears indicating that you have ent...

Страница 236: ...ce Changing the PDU Name This command syntax changes the PXE device s name config pdu name name Variables name is a string comprising up to 32 ASCII printable characters The name variable must be encl...

Страница 237: ...ensor is attached This is because the device s altitude is associated with the altitude correction factor See Altitude Correction Factors on page 347 config pdu deviceAltitude altitude Variables altit...

Страница 238: ...alDeviceAutoManagement option Variables option is one of the options enable or disable Option Description enable Enables the automatic management feature for environmental sensors disable Disables the...

Страница 239: ...mand syntax enables the wired or wireless networking mode config network mode mode Variables mode is one of the modes wired or wireless Mode Description wired Enables the wired networking mode wireles...

Страница 240: ...esses This command syntax determines which IP address is used when the DNS server returns both of IPv4 and IPv6 addresses You need to configure this setting only after both of IPv4 and IPv6 protocols...

Страница 241: ...cify the preferred host name which is optional The following is the command syntax config network ipv4 preferredHostName name Variables name is a host name which Consists of alphanumeric characters an...

Страница 242: ...work ipv4 gateway ip address Variables ip address is the IP address of the gateway The value ranges from 0 0 0 0 to 255 255 255 255 Setting the IPv4 Primary DNS Server After selecting the static IP co...

Страница 243: ...he secondary DNS server The value ranges from 0 0 0 0 to 255 255 255 255 Note The PXE supports a maximum of 3 DNS servers If two IPv4 DNS servers and two IPv6 DNS servers are available the PXE only us...

Страница 244: ...dify an existing static route config network ipv4 staticRoutes modify route_ID dest 2 hop Variables dest 1 is a combination of the IP address and subnet mask of the other subnet The format is IP addre...

Страница 245: ...tic static The IPv6 configuration mode is set to static IP address Setting the IPv6 Preferred Host Name After selecting DHCP as the IPv6 configuration mode you can specify the preferred host name whic...

Страница 246: ...nfiguration mode you can use this command syntax to specify the gateway config network ipv6 gateway ip address Variables ip address is the IP address of the gateway This value uses the IPv6 address fo...

Страница 247: ...ss of the secondary DNS server This value uses the IPv6 address format Note The PXE supports a maximum of 3 DNS servers If two IPv4 DNS servers and two IPv6 DNS servers are available the PXE only uses...

Страница 248: ...outes delete route_ID Modify an existing static route config network ipv6 staticRoutes modify route_ID dest 2 hop Variables dest 1 is the IP address and prefix length of the subnet where the PXE belon...

Страница 249: ...Mbps The LAN speed is always 100 Mbps Changing the LAN Duplex Mode This command syntax determines the LAN interface duplex mode config network interface LANInterfaceDuplexMode mode Variables mode is o...

Страница 250: ...ces http Change the HTTP port config network services http port n Enable or disable the HTTP port config network services http enabled option Variables n is a TCP port number between 1 and 65535 The d...

Страница 251: ...is one of the options true or false Option Description true Forces any access to the PXE via HTTP to be redirected to HTTPS false No HTTP access is redirected to HTTPS Changing the Telnet Configurati...

Страница 252: ...5 The default Telnet port is 23 Changing the SSH Configuration You can enable or disable the SSH service or change its TCP port using the CLI commands An SSH command begins with network services ssh E...

Страница 253: ...command begins with network services snmp Enabling or Disabling SNMP v1 v2c This command syntax enables or disables the SNMP v1 v2c protocol config network services snmp v1 v2c option Variables optio...

Страница 254: ...community string config network services snmp writeCommunity string Variables string is a string comprising 4 to 64 ASCII printable characters The string CANNOT include spaces Setting the sysContact V...

Страница 255: ...ith network services modbus Enabling or Disabling Modbus This command syntax enables or disables the Modbus protocol config network services modbus enabled option Variables option is one of the option...

Страница 256: ...guration protocol which enables advertising or auto discovery of network services See Enabling Service Advertisement on page 68 for details config network services zeroconfig enabled option Variables...

Страница 257: ...tatic Time Configuration Commands A time configuration command begins with time Determining the Time Setup Method This command syntax determines the method to configure the system date and time config...

Страница 258: ...chronization with the NTP server is enabled config time ntp secondServer second_server Variables The second_server is the IP address or host name of the secondary NTP server Overriding DHCP Assigned N...

Страница 259: ...zone command as shown below and press Enter config time zone 2 The system shows a list of time zones Type the index number of the desired time zone and press Enter 3 Type apply for the selected time z...

Страница 260: ...ntp firstServer 192 168 80 66 Security Configuration Commands A security configuration command begins with security Firewall Control You can manage firewall control features through the CLI The firewa...

Страница 261: ...e default IPv4 firewall control policy for outbound traffic config security ipAccessControl ipv4 defaultPolicyOut policy IPv6 commands Enable or disable the IPv6 firewall control feature config securi...

Страница 262: ...me See Multi Command Syntax on page 311 Managing Firewall Rules You can add delete or modify firewall rules using the CLI commands An IPv4 firewall control rule command begins with security ipAccessCo...

Страница 263: ...k policy Variables direction is one of the options in or out Direction Description in Inbound traffic out Outbound traffic ip_mask is the combination of the IP address and subnet mask values or prefix...

Страница 264: ...o insert the new rule above or below Modifying a Firewall Rule Depending on what to modify in an existing rule the command syntax varies IPv4 commands Modify an IPv4 rule s IP address and or subnet ma...

Страница 265: ...out Outbound traffic rule_number is the number of the existing rule that you want to modify ip_mask is the combination of the IP address and subnet mask values or prefix length which are separated wit...

Страница 266: ...ut Outbound traffic rule_number is the number of the existing rule that you want to remove Restricted Service Agreement The CLI command used to set the Restricted Service Agreement feature begins with...

Страница 267: ...greement bannerContent After performing the above command do the following 1 Type the text comprising up to 10 000 ASCII characters when the CLI prompts you to enter the content 2 To end the content a...

Страница 268: ...as password aging simultaneous logins using the same user name and the idle time permitted before forcing a user to log out A login limitation command begins with security loginLimits You can combine...

Страница 269: ...d aging feature Password Aging Interval This command syntax determines how often the password should be changed config security loginLimits passwordAgingInterval value Variables value is a numeric val...

Страница 270: ...rity userBlocking blockTime value2 Variables value1 is an integer between 3 and 10 or unlimited which sets no limit on the maximum number of failed logins and thus disables the user blocking function...

Страница 271: ...strong password feature Minimum Password Length This command syntax determines the minimum length of the password config security strongPasswords minimumLength value Variables value is an integer bet...

Страница 272: ...acter config security strongPasswords enforceAtLeastOneUpperCaseCharacter option Variables option is one of the options enable or disable Option Description enable At least one uppercase character is...

Страница 273: ...be repeated when changing the password config security strongPasswords passwordHistoryDepth value Variables value is an integer between 1 and 12 Role Based Access Control In addition to firewall acces...

Страница 274: ...control policy config security roleBasedAccessControl ipv6 defaultPolicy policy Variables option is one of the options true or false Option Description true Enables the role based access control featu...

Страница 275: ...ding on where you want to add a new rule in the list the command syntax for adding a rule varies IPv4 commands Add a new rule to the bottom of the IPv4 rules list config security roleBasedAccessContro...

Страница 276: ...ember of the specified role insert is one of the options insertAbove or insertBelow Option Description insertAbove Inserts the new rule above the specified rule number Then new rule s number the speci...

Страница 277: ...ipv4 rule modify rule_number startIpAddress start_ip endIpAddress end_ip role role policy policy IPv6 commands Modify a rule s IPv6 address range config security roleBasedAccessControl ipv6 rule modi...

Страница 278: ...en the user is a member of the specified role deny Drops traffic from the specified IP address range when the user is a member of the specified role Deleting a Role Based Access Control Rule These com...

Страница 279: ...its location in the list config security ipAccessControl ipv4 rule add 192 168 84 123 24 accept insertAbove 5 Results A new IPv4 firewall control rule is added to accept all packets sent from the IPv4...

Страница 280: ...e role admin The newly added IPv4 rule is inserted above the 3rd rule That is the new rule becomes the 3rd rule and the original 3rd rule becomes the 4th rule Outlet Configuration Commands An outlet c...

Страница 281: ...be enclosed in quotes when it contains spaces Enabling or Disabling an Inlet for Multi Inlet PDUs Enabling or disabling an inlet takes effect on a multi inlet PDU only This command syntax enables or d...

Страница 282: ...ging the Overcurrent Protector Name This command syntax names a circuit breaker or a fuse on your PXE config ocp n name name Variables n is the number of the overcurrent protector that you want to con...

Страница 283: ...disable Option Description enable Enables the newly created user profile disable Disables the newly created user profile roles is a role or a list of comma separated roles assigned to the specified u...

Страница 284: ...how to change the password of the user May 1 Verify that you have entered the configuration mode See Entering Configuration Mode on page 219 2 Type the following command to change the password for the...

Страница 285: ...Change a user s telephone number config user modify name telephoneNumber phone_number Change a user s email address config user modify name eMailAddress email_address Variables name is the name of th...

Страница 286: ...se Option Description true Enables the specified user profile false Disables the specified user profile Forcing a Password Change This command syntax determines whether the password change is forced w...

Страница 287: ...u want to change option1 is one of the options enable or disable Option Description enable Enables the SNMP v3 access permission for the specified user disable Disables the SNMP v3 access permission f...

Страница 288: ...authentication_passphrase Variables name is the name of the user whose settings you want to change authentication_passphrase is a string used as an authentication passphrase comprising 8 to 32 ASCII...

Страница 289: ...er modify name authenticationProtocol option5 Variables name is the name of the user whose settings you want to change option5 is one of the options MD5 or SHA 1 Option Description MD5 MD5 authenticat...

Страница 290: ...t you can set all measurement units at a time To combine all commands see Multi Command Syntax on page 311 Note The measurement unit change only applies to the web interface and command line interface...

Страница 291: ...y name preferredPressureUnit option3 Variables name is the name of the user whose settings you want to change option3 is one of the options pascal or psi Option Description pascal This option displays...

Страница 292: ...Password Every user can change their own password via this command syntax if they have the Change Own Password privilege Note that this command does not begin with user config password After performi...

Страница 293: ...ministrator Diverse measurement unit commands can be combined so that you can set all default measurement units at a time To combine all commands see Multi Command Syntax on page 311 Note The measurem...

Страница 294: ...dPressureUnit option3 Variables option3 is one of the options pascal or psi Option Description pascal This option displays the pressure value in Pascals Pa psi This option displays the pressure value...

Страница 295: ...ces preferredTemperatureUnit F preferredLengthUnit feet preferredPressureUnit psi Results The default temperature unit is set to Fahrenheit The default length unit is set to feet The default pressure...

Страница 296: ...rivilege All Privileges This table lists all privileges Note that available privileges vary according to the model you purchased Privilege Description acknowledgeAlarms Acknowledge Alarms adminPrivile...

Страница 297: ...w Local User Management Modifying a Role You can modify diverse parameters of an existing role including its privileges Modify a role s description config role modify name description description Vari...

Страница 298: ...assigned to the role Separate each privilege with a semi colon See All Privileges on page 280 argument1 argument2 and the like are arguments set for a particular privilege Separate a privilege and it...

Страница 299: ...names of the privileges assigned to the role Separate each privilege with a semi colon See All Privileges on page 280 argument1 argument2 and the like are arguments set for a particular privilege Sep...

Страница 300: ...haracters The name variable must be enclosed in quotes when it contains spaces Specifying the Sensor Type Raritan s contact closure sensor DPX CC2 TR supports the connection of diverse third party or...

Страница 301: ...hat you want to configure The ID number is available in the PXE web interface or using the show command in the CLI It is an integer between 1 and 32 coordinate is a string comprising up to 24 ASCII pr...

Страница 302: ...tring comprising up to 24 ASCII printable characters and it must be enclosed in quotes Rack units coordinate is an integer number in rack units Note To specify the Z coordinate using the rack units Se...

Страница 303: ...ption true Default thresholds are selected as the threshold option for the specified sensor false Sensor specific thresholds are selected as the threshold option for the specified sensor Setting the A...

Страница 304: ...t as its threshold settings config externalsensor 1 useDefaultThresholds true Sensor Threshold Configuration Commands A sensor configuration command begins with sensor You can use the commands to conf...

Страница 305: ...rentPower Apparent power sensor powerFactor Power factor sensor activeEnergy Active energy sensor unbalancedCurrent Unbalanced load sensor lineFrequency Line frequency sensor residualCurrent Residual...

Страница 306: ...rentPower Apparent power sensor powerFactor Power factor sensor activeEnergy Active energy sensor unbalancedCurrent Unbalanced load sensor lineFrequency Line frequency sensor residualCurrent Residual...

Страница 307: ...rentPower Apparent power sensor powerFactor Power factor sensor activeEnergy Active energy sensor unbalancedCurrent Unbalanced load sensor lineFrequency Line frequency sensor residualCurrent Residual...

Страница 308: ...rentPower Apparent power sensor powerFactor Power factor sensor activeEnergy Active energy sensor unbalancedCurrent Unbalanced load sensor lineFrequency Line frequency sensor residualCurrent Residual...

Страница 309: ...ent Current sensor peakCurrent Peak current sensor voltage Voltage sensor activePower Active power sensor apparentPower Apparent power sensor powerFactor Power factor sensor activeEnergy Active energy...

Страница 310: ...sensor activeEnergy Active energy sensor unbalancedCurrent Unbalanced load sensor lineFrequency Line frequency sensor residualCurrent Residual current sensor phaseAngle Inlet phase angle sensor Note I...

Страница 311: ...vePower Active power sensor apparentPower Apparent power sensor powerFactor Power factor sensor activeEnergy Active energy sensor unbalancedCurrent Unbalanced load sensor Note If the requested sensor...

Страница 312: ...L3 L3 L3 L1 sensor type is one of the following sensor types Sensor type Description current Current sensor voltage Voltage sensor activePower Active power sensor apparentPower Apparent power sensor...

Страница 313: ...n is the number of the inlet whose pole sensors you want to configure p is the label of the inlet pole that you want to configure Pole Label p Current sensor Voltage sensor 1 L1 L1 L1 L2 2 L2 L2 L2 L3...

Страница 314: ...r an Inlet Pole This command syntax configures the Lower Warning threshold of an inlet pole config sensor inletpole n p sensor type lowerWarning option Variables n is the number of the inlet whose pol...

Страница 315: ...this threshold at the same time Setting the Inlet Pole s Deassertion Hysteresis This command syntax configures the deassertion hysteresis value of an inlet pole config sensor inletpole n p sensor typ...

Страница 316: ...config sensor inletpole n p sensor type assertionTimeout value Variables n is the number of the inlet whose pole sensors you want to configure p is the label of the inlet pole that you want to config...

Страница 317: ...e in the PXE web interface or using the show command in the CLI It is an integer between 1 and 32 sensor type is one of these sensor types temperature humidity airPressure or air Flow Note If the spec...

Страница 318: ...e does not match the type of the specified environmental sensor this error message appears Specified sensor type XXX does not match the sensor s type sensortype where XXX is the specified sensor type...

Страница 319: ...error message appears Specified sensor type XXX does not match the sensor s type sensortype where XXX is the specified sensor type and sensortype is the correct sensor type option is one of the option...

Страница 320: ...rror message appears Specified sensor type XXX does not match the sensor s type sensortype where XXX is the specified sensor type and sensortype is the correct sensor type option is one of the options...

Страница 321: ...and Deassertion Hysteresis on page 354 Setting the Sensor s Assertion Timeout This command syntax configures the assertion timeout value of a numeric environmental sensor config sensor externalsensor...

Страница 322: ...ld has not been enabled yet The Lower Warning threshold for the inlet 1 RMS current is set to 12A It also enables the lower warning threshold if this threshold has not been enabled yet Example 2 Upper...

Страница 323: ...of an actuator config actuator n xlabel coordinate Variables n is the ID number of the actuator that you want to configure The ID number is assigned and shown in the PXE web interface It is an integer...

Страница 324: ...ring comprising up to 24 ASCII printable characters and it must be enclosed in quotes Rack units coordinate is an integer number in rack units Note To specify the Z coordinate using the rack units See...

Страница 325: ...nes whether the Cisco EnergyWise endpoint implemented on the PXE device is enabled config energywise enabled option Variables option is one of the options true or false Option Description true The Cis...

Страница 326: ...erisks are NOT acceptable Changing the UDP Port This command syntax specifies the UDP port for communications in the Cisco EnergyWise domain config energywise port port Variables port is the UDP port...

Страница 327: ...config history length n Variables n is an integer number between 1 and 250 Multi Command Syntax To shorten the configuration time you can combine various configuration commands in one command to perfo...

Страница 328: ...esholds for the RMS current of the inlet config sensor inlet 1 current upperCritical disable upperWarning 20 Results The Upper Critical threshold of the inlet s RMS current is disabled The Upper Warni...

Страница 329: ...n on y Variables n is one of the options all or an actuator number Option Description all Switches ON all actuators A specific actuator s ID number Switches ON the specified actuator The ID number is...

Страница 330: ...umber Option Description all Switches OFF all actuators A specific actuator s ID number Switches OFF the specified actuator The ID number is available in the PXE web interface or using the show comman...

Страница 331: ...s indicating that the specified user was unblocked successfully Resetting the PXE You can reset the PXE device to factory defaults or simply restart it using the CLI commands Restarting the PDU This c...

Страница 332: ...ctiveEnergy pdu OR reset activeEnergy pdu y To reset one inlet s active energy readings reset activeEnergy inlet n OR reset activeEnergy inlet n y If you entered the command without y a message appear...

Страница 333: ...nter either of the following modes Administrator mode The prompt is displayed User mode The prompt is displayed 2 Type diag and press Enter The diag or diag prompt appears indicating that you have ent...

Страница 334: ...ookup host Variables host is the name or IP address of the host whose DNS information you want to query Showing Network Connections This command syntax displays network connections and or status of po...

Страница 335: ...address whose networking connectivity you want to check Options You can include any or all of additional options listed below in the ping command Options Description count number1 Determines the numb...

Страница 336: ...ommands If you would like to retrieve any command that was previously typed in the same connection session press the Up arrow on the keyboard until the desired command is displayed Automatically Compl...

Страница 337: ...cond word of the reset factorydefaults command that is reset f Then press Tab or Ctrl i to complete the second word Example 2 Type the first word and initial letters of the second word of the security...

Страница 338: ...same for all models Specification Measure Max Ambient Temperature 45 degrees Celsius Sensor RJ 12 Port Pinouts RJ 12 Pin signal definition Pin No Signal Direction Description 1 12V Power 500mA fuse pr...

Страница 339: ...Appendix A Specifications 323 RS 485 Pin signal definition al 4 5 6 D bi direction al Data 7 8...

Страница 340: ...umber ____________ OUTLET 1 OUTLET 2 OUTLET 3 MODEL MODEL MODEL SERIAL NUMBER SERIAL NUMBER SERIAL NUMBER USE USE USE OUTLET 4 OUTLET 5 OUTLET 6 MODEL MODEL MODEL SERIAL NUMBER SERIAL NUMBER SERIAL NU...

Страница 341: ...L MODEL MODEL SERIAL NUMBER SERIAL NUMBER SERIAL NUMBER USE USE USE OUTLET 10 OUTLET 11 OUTLET 12 MODEL MODEL MODEL SERIAL NUMBER SERIAL NUMBER SERIAL NUMBER USE USE USE OUTLET 13 OUTLET 14 OUTLET 15...

Страница 342: ...etup Worksheet 326 OUTLET 16 OUTLET 17 OUTLET 18 MODEL MODEL MODEL SERIAL NUMBER SERIAL NUMBER SERIAL NUMBER USE USE USE OUTLET 19 OUTLET 20 OUTLET 21 MODEL MODEL MODEL SERIAL NUMBER SERIAL NUMBER SER...

Страница 343: ...SERIAL NUMBER SERIAL NUMBER SERIAL NUMBER USE USE USE Types of adapters _________________________________________________________ Types of cables _____________________________________________________...

Страница 344: ...aults after logging in to the CLI 1 Connect to the PXE device See Logging in to CLI on page 192 or Connecting the PXE to a Computer on page 11 2 Launch a terminal emulation program such as HyperTermin...

Страница 345: ...sier way to reset the product to factory defaults in the CLI prior to login 1 Connect to the PXE and launch a terminal emulation program as described in the above procedure 2 At the Username prompt in...

Страница 346: ...AD Server 331 Step C Configure LDAP Authentication on the PXE Device 332 Step D Configure User Groups on the PXE Device 334 Step A Determine User Accounts and Groups Determine the user accounts and gr...

Страница 347: ...ed PX_Admin and PX_User User accounts pxuser pxuser2 usera and userb already exist on the AD server To configure the user groups on the AD server 1 On the AD server create new groups PX_Admin and PX_U...

Страница 348: ...d an LDAP LDAPS authentication server The Create new LDAP Server Configuration dialog appears 4 Provide the PXE with the information about the AD server IP Address Hostname Type the domain name techad...

Страница 349: ...e the LDAP server is Microsoft Active Directory User Entry Object Class Ensure the field is set to user because the LDAP server is Microsoft Active Directory User Search Subfilter The field is optiona...

Страница 350: ...ess the outlets Users assigned to the PX_Admin role have the Administrator permissions so they can both configure PXE and access the outlets To create the PX_User role with appropriate permissions ass...

Страница 351: ...ermissions beginning with View 6 Click OK The PX_User role is created 7 Keep the Manage Roles dialog opened to create the PX_Admin role To create the PX_Admin role with full permissions assigned 1 Cli...

Страница 352: ...le includes all privileges to describe the role 4 Click the Privileges tab to select the Administrator permission The Administrator permission allows users to configure or change all PXE settings a Cl...

Страница 353: ...Appendix D LDAP Configuration Illustration 337 5 Click OK The PX_Admin role is created 6 Click Close to quit the dialog...

Страница 354: ...Online Help page http www raritan com support online help Adding PDUs to Power IQ Management Once Power IQ is configured add Raritan PX or other PDUs to its management Power IQ can then gather data fr...

Страница 355: ...nsor naming and buffered data retrieval For SNMP version 3 PDUs enter the Username and select an Authorization Level The authorization levels are noAuthNoPriv No Authentication Passkey No Encoding Pas...

Страница 356: ...ure how often Power IQ polls PDU See Configuring Polling Intervals in the Power IQ User Guide dcTrack dcTrack is a Raritan product that allows you to manage the data center You can use dcTrack to Reco...

Страница 357: ...nter information in spreadsheet format that data can be imported into dcTrack using the Import wizard Isolate potential problems with end to end power and data circuits by visually tracing them This a...

Страница 358: ...rted per cabinet Horizontally mounted rack mounted rack PDUs do not apply to this step since there is no side to select 9 If you are adding a Raritan PX2 device for asset sensor management purposes se...

Страница 359: ...mber and MAC address If necessary you can find its IP address through the MAC address by using commonly used network tools Contact your LAN administrator for assistance Locking Outlets and Cords In ad...

Страница 360: ...his design do NOT use the SecureLock cords with it Tip The SecureLock outlets can accept regular power cords for power distribution but the SecureLock mechanism does not take effect To lock a power co...

Страница 361: ...utton type locking outlet has a button on it Such outlets do not require any special power cords to achieve the locking purpose All you need to do is simply plug a regular power cord into the locking...

Страница 362: ...ing each line current subtracted and divided with the average current L1 current unbalance L1 average current average current L2 current unbalance L2 average current average current L3 current unbalan...

Страница 363: ...ion Factors If a Raritan differential air pressure sensor is attached to your device the altitude you enter for the device can serve as an altitude correction factor That is the reading of the differe...

Страница 364: ...n training website anytime Having access to the training website could be helpful for learning or getting some ideas regarding Raritan products and making correct decisions on purchasing them For exam...

Страница 365: ...er use the PXE device s serial number as the unique ID instead of the MAC address Convert the serial number into ASCII codes for the IP address reservation entry For example if the PXE device s serial...

Страница 366: ...sensor and the range of each sensor state The diagram below shows how each threshold relates to each state above upper critical Upper Critical above upper warning Upper Warning normal Lower Warning be...

Страница 367: ...warning above upper critical below lower warning and below lower critical Both states of above upper warning and below lower warning are warning states to call for users attention Both states of abov...

Страница 368: ...to assert 1 above upper warning above upper critical 2 normal above upper warning 3 normal below lower warning 4 below lower warning below lower critical Assertion Timeout In the threshold setup dialo...

Страница 369: ...Assertion Timeout Example for Temperature Sensors Assumption Upper Warning threshold is enabled Upper Warning 25 degrees Celsius Assertion Timeout 5 samples that is 5 seconds When a temperature senso...

Страница 370: ...ve upper warning 2 above upper warning normal 3 below lower warning normal 4 below lower critical below lower warning Deassertion Hysteresis In the threshold settings dialog the Deassertion Hysteresis...

Страница 371: ...tion level 10 2 12 Lower Warning 18 so its deassertion level 18 2 20 To use each threshold as the deassertion level instead of determining a new level set the Deassertion Hysteresis to 0 zero When Dea...

Страница 372: ...detects that a temperature sensor s reading drops below 20 degrees Celsius moving from the above upper warning range to the normal range either of the following may occur If the temperature falls bet...

Страница 373: ...Certificate Signing Request 102 Changing a User s Password 269 Changing Default Thresholds xiv 163 165 Changing HTTP S Settings xiii 64 86 Changing Measurement Units 276 279 Changing Modbus TCP Settin...

Страница 374: ...Overview 343 Deassertion Hysteresis Example for Temperature Sensors 357 Default Log Messages xiv 96 127 139 Default Measurement Units 203 Deleting a Firewall Rule 252 Deleting a Role 86 285 Deleting...

Страница 375: ...ample Outlet Naming 266 Example Ping Command 322 Example Setting Up EnergyWise 313 Example Turning On a Specific Actuator 316 Example 1 148 Example 1 Basic Security Information 217 Example 1 Combinati...

Страница 376: ...lets and Cords xv 16 345 Log an Event Message 123 126 Logging in to CLI 193 330 Logging in to the Web Interface 36 Logging out of CLI 195 Login xiii 36 Login Limitation 254 Logout 39 Logout Button 45...

Страница 377: ...on 200 PDU Configuration Commands 221 Pinging a Host 177 Power Cord 27 Power IQ Configuration 340 Preparing the Installation Site 8 Product Models 1 PX Explorer Pane 41 Q Querying Available Parameters...

Страница 378: ...Upper Critical Threshold 291 Setting the Inlet s Upper Warning Threshold 292 Setting the IPv4 Address 227 Setting the IPv4 Configuration Mode 226 Setting the IPv4 Gateway 228 Setting the IPv4 Preferr...

Страница 379: ...mum DPX Sensor Distances 18 22 Supported Web Browsers xiii 35 Switch Peripheral Actuator 123 132 Switching Off the Actuator s 316 Switching On the Actuator s 315 Syslog Message 123 130 T Testing the N...

Страница 380: ...Index 364 Z Zero U Products 1...

Страница 381: ......

Страница 382: ...India Monday Friday 9 a m 6 p m local time Phone 91 124 410 7881 Japan Monday Friday 9 30 a m 5 30 p m local time Phone 81 3 5795 3170 Email support japan raritan com Europe Europe Monday Friday 8 30...

Отзывы: