Chapter 3: Installation and Configuration
9
Note: If necessary, contact Raritan Technical Support for the
maximum operating temperature for your model. See
Maximum
Ambient Operating Temperature
(on page 322).
2. Allow sufficient space around the PXE device for cabling and outlet
connections.
3. Review
Safety Instructions
(on page iii) listed in this online help.
Filling Out the Equipment Setup Worksheet
An Equipment Setup Worksheet is provided in this online help. See
Equipment Setup Worksheet
(on page 324). Use this worksheet to
record the model, serial number, and use of each IT device connected to
the PDU.
As you add and remove devices, keep the worksheet up-to-date.
Checking the Branch Circuit Rating
The rating of the branch circuit supplying power to the PDU shall be in
accordance with national and local electrical codes.
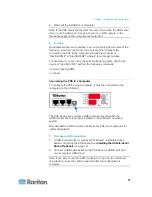
Connecting the PDU to a Power Source
1. Verify that all circuit breakers on the PXE device are set to ON. If not,
turn them ON.
Or make sure that all fuses are inserted and seated properly. If there
are any fuse covers, ensure that they are closed.
Note: Not all PXE devices have overcurrent protection mechanisms.
2. Connect each PXE to an appropriately rated branch circuit. See the
label or nameplate affixed to your PXE for appropriate input ratings
or range of ratings.
3. When a PXE device powers up, it proceeds with the power-on self
test and software loading for a few moments.
4. When the software has completed loading, the LED display
illuminates and shows numeric digits.
Configuring the PXE
There are two alternatives to initially configure a PXE device:
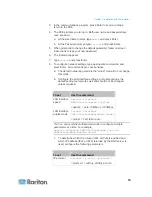
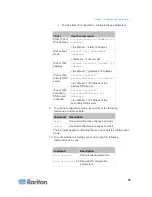
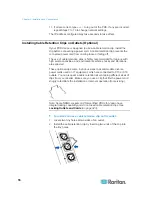
Connect the PXE device to a computer via a USB cable to configure
it.
The computer must have a communications program such as
HyperTerminal or PuTTY.
Содержание PXE
Страница 1: ...Copyright 2014 Raritan Inc PXE 0C v3 0 E August 2014 255 80 0008 00 Raritan PXE User Guide Release 3 0...
Страница 12: ...Contents xii To Assert and Assertion Timeout 352 To De assert and Deassertion Hysteresis 354 Index 357...
Страница 16: ......
Страница 50: ...Chapter 5 Using the PDU 34 4 Pull up the operating handle until the colorful rectangle or triangle turns RED...
Страница 200: ...Chapter 6 Using the Web Interface 184 10 To print the currently selected topic click the Print this page icon...
Страница 339: ...Appendix A Specifications 323 RS 485 Pin signal definition al 4 5 6 D bi direction al Data 7 8...
Страница 353: ...Appendix D LDAP Configuration Illustration 337 5 Click OK The PX_Admin role is created 6 Click Close to quit the dialog...
Страница 380: ...Index 364 Z Zero U Products 1...
Страница 381: ......


