


Chapter 6: Using the Web Interface
101
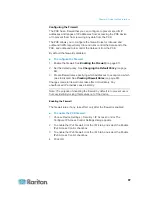
6. Click
OK.
Deleting Role-Based Access Control Rules
When any access control rule becomes unnecessary or obsolete,
remove it.
To delete a role-based access control rule:
1. Choose Device Settings > Security > Role Based Access Control.
The Configure Role Based Access Control Settings dialog appears.
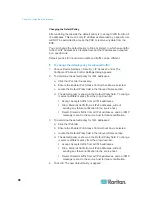
2. To delete the IPv4 firewall rules, click the IPv4 tab. To delete the
IPv6 firewall rules, click the IPv6 tab.
3. Ensure the "Enable Role Based Access Control for IPv4" checkbox
is selected on the IPv4 tab, or the "Enable Role Based Access
Control for IPv6" checkbox is selected on the IPv6 tab.
4. Select the rule to be deleted in the rules list. To make multiple
selections, press Ctrl+click or Shift+click to highlight multiple ones.
5. Click
Delete.
6. A message appears, prompting you to confirm the operation. Click
Yes to confirm the deletion.
7. Click
OK.
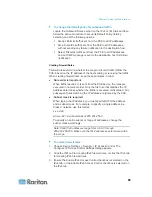
Setting Up an SSL Certificate
Having an X.509 digital certificate ensures that both parties in an SSL
connection are who they say they are.
To obtain a certificate for the PXE, create a Certificate Signing Request
(CSR) and submit it to a certificate authority (CA). After the CA
processes the information in the CSR, it provides you with an SSL
certificate, which you must install on the PXE device.
Note: If you are using an SSL certificate that is part of a chain of
certificates, each part of the chain is signed during the validation
process.
Note: See
Forcing HTTPS Encryption
(on page 86) for instructions on
forcing users to employ SSL when connecting to the PXE.
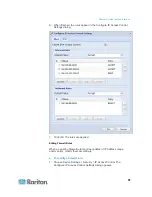
A CSR is not required in either of the following scenarios:
You decide to generate and use a
self-signed
certificate on the PXE
device.
Appropriate, valid certificate and key files are already available.
Содержание PXE
Страница 1: ...Copyright 2014 Raritan Inc PXE 0C v3 0 E August 2014 255 80 0008 00 Raritan PXE User Guide Release 3 0...
Страница 12: ...Contents xii To Assert and Assertion Timeout 352 To De assert and Deassertion Hysteresis 354 Index 357...
Страница 16: ......
Страница 50: ...Chapter 5 Using the PDU 34 4 Pull up the operating handle until the colorful rectangle or triangle turns RED...
Страница 200: ...Chapter 6 Using the Web Interface 184 10 To print the currently selected topic click the Print this page icon...
Страница 339: ...Appendix A Specifications 323 RS 485 Pin signal definition al 4 5 6 D bi direction al Data 7 8...
Страница 353: ...Appendix D LDAP Configuration Illustration 337 5 Click OK The PX_Admin role is created 6 Click Close to quit the dialog...
Страница 380: ...Index 364 Z Zero U Products 1...
Страница 381: ......


