


Chapter 4: Connecting External Equipment (Optional)
71
Connecting Asset Management Strips
You can remotely track the locations of up to 64 IT devices in the rack by
connecting asset management strips (asset strips) to the PX3 after IT
devices are tagged electronically.
To use the asset management feature, you need the following items:
Raritan asset strips: An asset strip transmits the asset management
tag's ID and positioning information to the PX3.
Raritan asset tags: An asset management tag (asset tag) is adhered
to an IT device. The asset tag uses an electronic ID to identify and
locate the IT device.
Warning: The PX3 does NOT support simultaneous connection of both
DX-PD2C5 and asset management strip(s) so do NOT connect both of
them at the same time.
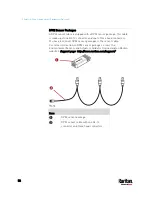
Combining Regular Asset Strips
Each tag port on the regular asset strips corresponds to a rack unit and
can be used to locate IT devices in a specific rack (or cabinet).
For each rack, you can attach asset strips up to 64U long, consisting of
one MASTER and multiple SLAVE asset strips.
The difference between the master and slave asset strips is that the
master asset strip has an RJ-45 connector while the slave does not.
The following diagram illustrates some asset strips. Note that Raritan
provides more types of asset strips than the diagram.
Содержание PX3-3000 series
Страница 5: ......
Страница 18: ...Contents xviii Index 841...
Страница 66: ...Chapter 3 Initial Installation and Configuration 42 Number Device role Master device Slave 1 Slave 2 Slave 3...
Страница 93: ...Chapter 4 Connecting External Equipment Optional 69...
Страница 787: ...Appendix J RADIUS Configuration Illustration 763 Note If your PX3 uses PAP then select PAP...
Страница 788: ...Appendix J RADIUS Configuration Illustration 764 10 Select Standard to the left of the dialog and then click Add...
Страница 789: ...Appendix J RADIUS Configuration Illustration 765 11 Select Filter Id from the list of attributes and click Add...
Страница 792: ...Appendix J RADIUS Configuration Illustration 768 14 The new attribute is added Click OK...
Страница 793: ...Appendix J RADIUS Configuration Illustration 769 15 Click Next to continue...
Страница 823: ...Appendix K Additional PX3 Information 799...
Страница 853: ...Appendix L Integration 829 3 Click OK...


