Chapter 8: Using the Command Line Interface
618
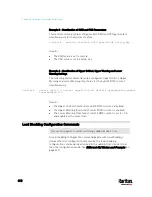
Example 3 - Combination of SSID and PSK Parameters
This multi-command syntax configures both SSID and PSK parameters
simultaneously for the wireless feature.
config:#
network wireless SSID myssid PSK encryp_key
Results:
The SSID value is set to myssid.
The PSK value is set to encryp_key.
Example 4 - Combination of Upper Critical, Upper Warning and Lower
Warning Settings
The following multi-command syntax configures Upper Critical, Upper
Warning and Lower Warning thresholds for the outlet 5 RMS current
simultaneously.
config:#
sensor outlet 5 current upperCritical disable upperWarning enable
lowerWarning 1.0
Results:
The Upper Critical threshold of outlet 5 RMS current is disabled.
The Upper Warning threshold of outlet 5 RMS current is enabled.
The Lower Warning threshold of outlet 5 RMS current is set to 1.0A
and enabled at the same time.
Load Shedding Configuration Commands
This section applies to outlet-switching capable models only.
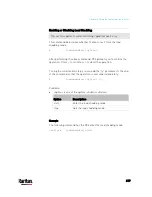
A load shedding configuration command begins with
loadshedding.
Unlike other CLI configuration commands, the load shedding
configuration command is performed in the
administrator mode rather
than the configuration mode. See
Different CLI Modes and Prompts
(on
page 447).
Содержание PX3-3000 series
Страница 5: ......
Страница 18: ...Contents xviii Index 841...
Страница 66: ...Chapter 3 Initial Installation and Configuration 42 Number Device role Master device Slave 1 Slave 2 Slave 3...
Страница 93: ...Chapter 4 Connecting External Equipment Optional 69...
Страница 787: ...Appendix J RADIUS Configuration Illustration 763 Note If your PX3 uses PAP then select PAP...
Страница 788: ...Appendix J RADIUS Configuration Illustration 764 10 Select Standard to the left of the dialog and then click Add...
Страница 789: ...Appendix J RADIUS Configuration Illustration 765 11 Select Filter Id from the list of attributes and click Add...
Страница 792: ...Appendix J RADIUS Configuration Illustration 768 14 The new attribute is added Click OK...
Страница 793: ...Appendix J RADIUS Configuration Illustration 769 15 Click Next to continue...
Страница 823: ...Appendix K Additional PX3 Information 799...
Страница 853: ...Appendix L Integration 829 3 Click OK...


