


Chapter 6: Using the Web Interface
432
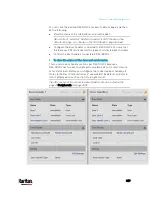
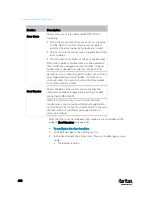
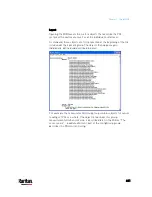
Card Readers
To open the Card Readers page, choose Card Readers in the
Menu
(on
page 139).
This page lists all card readers connected to PX3, indirectly or directly.
When a user scans his/her smart card with the card reader, PX3 will
retrieve the card 's type and ID and show them in the corresponding Card
Type and Card ID column. If no data is shown in the two columns, it
means the scanned card may not be supported by the card reader.
Tip: You can use a third-party application, such as Power IQ, to retrieve
the card's data from PX3 to perform security features like cabinet access
control. Refer to that application's user documentation for more
information.
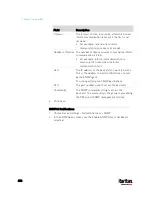
The listed card readers can be one or both of the following types.
Door handle-integrated card readers:
This type of card reader is integrated in the door handle, which is
either one below:
Emka Agent E
SouthCo H3-EM (H3-EM-67-100 or H3-EM-66-100)
It is indirectly connected to PX3 via DX2-DH2C2.
The Channel column indicates which port (channel) on DX2-DH2C2 it
is connected to.
Note that the serial number displayed for this card reader is the
serial number of DX2-DH2C2.
Each DX2-PD2C2 can show two card readers because they have two
ports for connecting two door handles with internal card readers.
Содержание PX3-3000 series
Страница 5: ......
Страница 18: ...Contents xviii Index 841...
Страница 66: ...Chapter 3 Initial Installation and Configuration 42 Number Device role Master device Slave 1 Slave 2 Slave 3...
Страница 93: ...Chapter 4 Connecting External Equipment Optional 69...
Страница 787: ...Appendix J RADIUS Configuration Illustration 763 Note If your PX3 uses PAP then select PAP...
Страница 788: ...Appendix J RADIUS Configuration Illustration 764 10 Select Standard to the left of the dialog and then click Add...
Страница 789: ...Appendix J RADIUS Configuration Illustration 765 11 Select Filter Id from the list of attributes and click Add...
Страница 792: ...Appendix J RADIUS Configuration Illustration 768 14 The new attribute is added Click OK...
Страница 793: ...Appendix J RADIUS Configuration Illustration 769 15 Click Next to continue...
Страница 823: ...Appendix K Additional PX3 Information 799...
Страница 853: ...Appendix L Integration 829 3 Click OK...


