


Chapter 2: Rackmount, Inlet and Outlet Connections
7
Connect equipment to the supply circuit carefully to avoid
overloading circuits.
Ground all equipment properly, especially supply connections, to
the branch circuit.
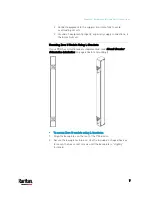
Mounting Zero U Models Using L-Brackets
If your PDU has circuit breakers implemented, read
Circuit Breaker
Orientation Limitation
(on page 6) before mounting it.
To mount Zero U models using L-brackets:
1.
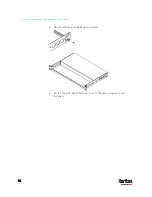
Align the baseplates on the rear of the PX3 device.
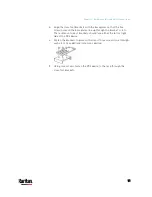
2.
Secure the baseplates in place. Use the included L-shaped hex key
to loosen the hex socket screws until the baseplate is "slightly"
fastened.
Содержание PX3-3000 series
Страница 5: ......
Страница 18: ...Contents xviii Index 841...
Страница 66: ...Chapter 3 Initial Installation and Configuration 42 Number Device role Master device Slave 1 Slave 2 Slave 3...
Страница 93: ...Chapter 4 Connecting External Equipment Optional 69...
Страница 787: ...Appendix J RADIUS Configuration Illustration 763 Note If your PX3 uses PAP then select PAP...
Страница 788: ...Appendix J RADIUS Configuration Illustration 764 10 Select Standard to the left of the dialog and then click Add...
Страница 789: ...Appendix J RADIUS Configuration Illustration 765 11 Select Filter Id from the list of attributes and click Add...
Страница 792: ...Appendix J RADIUS Configuration Illustration 768 14 The new attribute is added Click OK...
Страница 793: ...Appendix J RADIUS Configuration Illustration 769 15 Click Next to continue...
Страница 823: ...Appendix K Additional PX3 Information 799...
Страница 853: ...Appendix L Integration 829 3 Click OK...


