


Chapter 6: Using the Web Interface
280
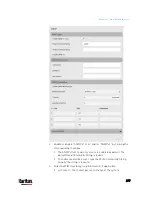
Field/setting
Description
Allow expired and
not yet valid
certificates
Select this checkbox to make the
authentication succeed regardless of the
certificate's validity period.
After deselecting this checkbox, the
authentication fails whenever any certificate in
the selected certificate chain is outdated or not
valid yet.
1.
Now that you have set the SMTP settings, you can test it to ensure it
works properly.
a.
Type the recipient's email address in the Recipient Email
Addresses field. Use a comma to separate multiple email
addresses.
b.
Click Send Test Email.
c.
Check if the recipient(s) receives the email successfully.
2.
Click Save.
Special note for AES ciphers:
The PX3 device's SSL/TLS-based protocols, including SMTP over
StartTLS, support AES 128- and 256-bit ciphers. The exact cipher to use
is negotiated between the PX3 and the client (such as a web browser),
which is impacted by the cipher priority of the PX3 and the client's cipher
availability/settings.
Tip: If intending to force the PX3 to use a specific AES cipher, refer to
your client's user documentation for information on configuring AES
settings.
Changing SSH Settings
You can enable or disable the SSH access to the command line interface,
change the TCP port, or set a password or public key for login over the
SSH connection.
To change SSH settings:
1.
Choose Device Settings > Network Services > SSH.
2.
To enable or disable the SSH access, select or deselect the
checkbox.
3.
To use a different port, type a port number.
4.
Select one of the authentication methods.
Содержание PX3-3000 series
Страница 5: ......
Страница 18: ...Contents xviii Index 841...
Страница 66: ...Chapter 3 Initial Installation and Configuration 42 Number Device role Master device Slave 1 Slave 2 Slave 3...
Страница 93: ...Chapter 4 Connecting External Equipment Optional 69...
Страница 787: ...Appendix J RADIUS Configuration Illustration 763 Note If your PX3 uses PAP then select PAP...
Страница 788: ...Appendix J RADIUS Configuration Illustration 764 10 Select Standard to the left of the dialog and then click Add...
Страница 789: ...Appendix J RADIUS Configuration Illustration 765 11 Select Filter Id from the list of attributes and click Add...
Страница 792: ...Appendix J RADIUS Configuration Illustration 768 14 The new attribute is added Click OK...
Страница 793: ...Appendix J RADIUS Configuration Illustration 769 15 Click Next to continue...
Страница 823: ...Appendix K Additional PX3 Information 799...
Страница 853: ...Appendix L Integration 829 3 Click OK...


