


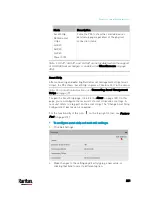


Chapter 6: Using the Web Interface
219
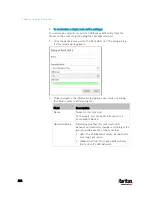
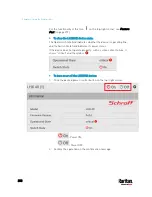
Sensor/Actuator Location Example
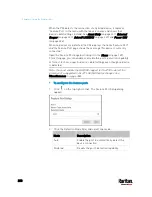
Use the X, Y and Z coordinates to describe each sensor's or actuator's
physical location in the data center. See
Individual Sensor/Actuator
Pages
(on page 214).
The X, Y and Z values act as additional attributes and are not tied to any
specific measurement scheme. Therefore, you can use
non-measurement values.
Example:
X =
Brown Cabinet Row
Y =
Third Rack
Z =
Top of Cabinet
Values of the X, Y and Z coordinates:
X and Y: They can be any alphanumeric values comprising 0 to 24
characters.
Z: When the Z coordinate format is set to
Rack Units, it can be any
number ranging from 0 to 60. When its format is set to
Free-Form, it
can be any alphanumeric value comprising 0 to 24 characters. See
PDU
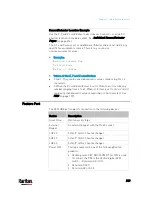
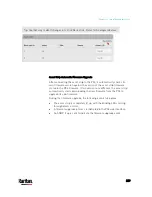
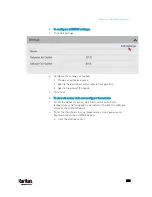
Feature Port
The FEATURE port supports connection to the following devices.
Device
Description
Asset Strip
Raritan asset strips
External
Beeper
An external beeper with the RJ-45 socket.
LHX 20
Schroff
®
LHX-20 heat exchanger.
SHX 30
Schroff
®
SHX-30 heat exchanger.
LHX 40
Schroff
®
LHX-40 heat exchanger.
Power CIM
This type represents one of the following Raritan
products:
Raritan power CIM, D2CIM-PWR. This CIM is used
to connect the PX3 to the Raritan digital KVM
switch -- Dominion KX II / III.
Dominion KSX II
Dominion SX or SX II
Содержание PX3-3000 series
Страница 5: ......
Страница 18: ...Contents xviii Index 841...
Страница 66: ...Chapter 3 Initial Installation and Configuration 42 Number Device role Master device Slave 1 Slave 2 Slave 3...
Страница 93: ...Chapter 4 Connecting External Equipment Optional 69...
Страница 787: ...Appendix J RADIUS Configuration Illustration 763 Note If your PX3 uses PAP then select PAP...
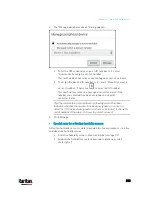
Страница 788: ...Appendix J RADIUS Configuration Illustration 764 10 Select Standard to the left of the dialog and then click Add...
Страница 789: ...Appendix J RADIUS Configuration Illustration 765 11 Select Filter Id from the list of attributes and click Add...
Страница 792: ...Appendix J RADIUS Configuration Illustration 768 14 The new attribute is added Click OK...
Страница 793: ...Appendix J RADIUS Configuration Illustration 769 15 Click Next to continue...
Страница 823: ...Appendix K Additional PX3 Information 799...
Страница 853: ...Appendix L Integration 829 3 Click OK...


