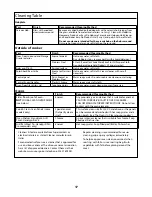
Rangemaster Toledo XT Electric Скачать руководство пользователя страница 17

17

Cleaning Table

Hobplate

Part

Finish

Recommended Cleaning Method

Ceramic Hob

Glass with anodised 
aluminium surround.

Remove any dried baked on food deposits with a ceramic hob scraper from 
the glass, available from electrical retailers i.e. Curry’s. Clean with HobBrite 
Homecare Products or Easy-Do Hobcare Ceramic and Halogen Hob Cleaner 
and Conditioner Easy-Do Products Ltd (Curry’s) and polish with a soft cloth. 

Do not use cleaners intended for the ceramic hob on the hob surround.


Only use hot soapy water and a soft cloth on the surround.

Outside of cooker

Part

Finish

Recommended Cleaning Method

Door, Door surround and Storage 
Drawer exterior.

Enamel or paint 

Hot soapy water, soft cloth.
Any stubborn stains, remove gently with a liquid detergent.

Stainless Steel

E Cloth (Comet) or Vileda Microfi bre Plus All Purpose Cloth 
Freudenberg Household Products LP (supermarket)

Sides and Plinth

Painted surface

Hot soapy water, soft cloth.

Splashback/Rear Grille

Enamel or Stainless 
Steel

Hot soapy water, soft cloth. Cream cleaner, with care, if 
necessary.

Control panel

Paint, Enamel or 
Stainless Steel

Warm soapy water. Do not use abrasive cleaners on lettering.

Control Knobs/Handles

Plastic/ Chrome

Warm soapy water, soft cloth.

Oven Door Glass/Glass Lid

Toughened glass

Hot soapy water, cream cleaner/scourer if necessary.

Ovens

Part

Finish

Recommended Cleaning Method

Sides, fl oor & roof of oven -

NOT

 COOK & CLEAN OVEN PANELS 

(see below)

Enamel

Any proprietary oven cleaner that is suitable for enamel.
CAUTION: CORROSIVE/CAUSTIC OVEN CLEANERS - 
FOLLOW MANUFACTURERS INSTRUCTIONS. Do not allow 
contact with the oven elements.

Cook & Clean Oven Panels (some 
models only)

Special enamel 
that partly cleans 
itself

This surface cleans itself at 200°C and above, or the panels 
can be removed and washed with hot soapy water and a 
nylon brush. (see ‘The Ovens’ in ‘Cleaning your cooker’)

Oven Shelves, Handyrack, Grill 
Trivet, Handygrill rack

Chrome

An oven interior cleaner that is suitable for chrome. Soap 
fi lled pad. Dishwasher.

Grill Pan/Meat Tin, Handygrill Pan 
(some models only)

Enamel

Hot soapy water. Soap fi lled pad (Brillo). Dishwasher.

Cleaners listed are available from Supermarkets or 
electrical retailers as stated. Cleaner manufacturerin 
Italics

For enameled surfaces use a cleaner that is approved for 
use on vitreous enamel. The vitreous enamel association 
has a list of approved cleaners. Contact them via their 
website www.ive.org.uk or telephone: 01527 893031.

Regular cleaning is recommended. For easier 
cleaning, wipe up any spillages immediately.

To help keep your oven clean, cover meat when 
roasting, with foil or use a roasting bag. Brush 
vegetables with fat before placing around the 
meat.

Содержание Toledo XT Electric

Страница 1: ...110 Ceramic Electric Users Guide Installation Service Instructions U107230 01...

Страница 2: ...o be careful with little children If the younger members of your family are allowed into the kitchen we strongly advise that they are kept under supervision at all times If you have not used a ceramic...

Страница 3: ...ge 11 Oven shelves Page 12 Oven light Page 12 Storage Page 12 Multi function Oven cooking guide Page 14 Cooking chart Conventional and full Fan oven functions Page 15 Cleaning your cooker Page 16 Clea...

Страница 4: ...the same size as or slightly larger than the areas marked on the hob top Using smaller pans wastes heat and any spillage will be burnt on Using a lid will help the contents boil more quickly 5 Always...

Страница 5: ...y mean the pan is not suitable perhaps too small or too uneven for a ceramic hob Sugar spillage will permanently damage the hob and therefore must be cleaned o with care immediately Never let sugar sp...

Страница 6: ...d element de ector when placing or removing items from the oven For more detail on this oven see the section Multi function oven The fan in the right hand oven circulates hot air continuously which me...

Страница 7: ...cook period which is the period of time you want the oven to cook The stop time which is the time of day you want the oven to stop cooking You cannot set a start time directly this is set automaticall...

Страница 8: ...s pork or sh should be avoided if a long delay period is planned especially in hot weather Don t place warm food in the oven Don t use an oven already warm Don t use if an adjoining oven is warm Avoid...

Страница 9: ...tion oven The left hand oven of your cooker is Multi function It has many varied uses We suggest you keep a careful eye on your cooking until you are familiar with each function Remember not all funct...

Страница 10: ...also possible to bake on two shelves at one time although they will need to be swapped over during the cooking time as the heat at the top of the oven is greater than at the base when using this funct...

Страница 11: ...will depend upon the size of the food being grilled Pre heat the oven on the fanned grilling function with the oven door closed for 5 10 minutes before use Always decide on the level at which to grill...

Страница 12: ...push the shelf back until the ends hit the shelf stop Lift up the front so the shelf ends clear the shelf stops and then lower the front so that the shelf is level and push it fully back Steam When co...

Страница 13: ...s and at the same time pull the drawer forward and away from the side runners For safety s sake push the drawer runners back out of the way To refit the draw Rest the drawer back on the side runners a...

Страница 14: ...at least one runner space between them Place baking trays individual cake tins or baking dishes centrally on the oven shelf For best results pre heat the oven until the oven indicator light goes out C...

Страница 15: ...s per 500g 20 25mins 200 C 2 3 190 C 15 20mins per 500g 15 20mins Turkey 160 C 2 150 C 20 25mins per 500g 20 25mins 200 C 2 190 C 15 20mins per 500g 15 20mins Stu ed Poultry Cook at 200 C or at 200 C...

Страница 16: ...REMOVE the spill IMMEDIATELY with a razor scraper while the unit is still hot IMPORTANT Use an oven glove to protect your hand from potential burns Scrape the major spill or melted material from the c...

Страница 17: ...Glass Glass Lid Toughened glass Hot soapy water cream cleaner scourer if necessary Ovens Part Finish Recommended Cleaning Method Sides oor roof of oven NOT COOK CLEAN OVEN PANELS see below Enamel Any...

Страница 18: ...ect cleaning methods Pots and pans with rough bottoms or coarse particles salt or sand between the pan and the surface of the hob may cause scratches Use the recommended cleaning methods Make sure pan...

Страница 19: ...cooker is not level arrange for your supplier to level it for you The left hand Multi function oven not coming on when turned on manually Is the power on Is the clock illuminated If not there may be s...

Страница 20: ...ything of interest to children in cabinets above a cooker children climbing on the cooker to reach them could be seriously injured Clean only parts listed in this guide In the interests of hygiene and...

Страница 21: ...in temperature Use proper pan size select pans having at bottoms large enough to cover the surface unit s heating area The use of undersized pans will expose a portion of the surface unit to direct co...

Страница 22: ...you Installer s Name Installer s Company Installer s Telephone number Installation Regulations This appliance must be installed by a quali ed electrician to comply with the relevant regulations and al...

Страница 23: ...65 C above room temperature For safety reasons curtains must not be tted immediately behind the cooker We recommend a gap of 1110mm between units to allow for moving the cooker Do not box the cooker i...

Страница 24: ...nd removing the levelling tool 20 times Make sure you lower BOTH REAR ROLLERS There are two adjusting nuts one for each roller at both the front bottom corners of the cooker Unfold the rear edge of pa...

Страница 25: ...by removing the electrical terminal cover box on the back panel Connect the mains cable to the correct terminals for your electrical supply type see g Check that the links are correctly tted and that...

Страница 26: ...Reassemble in reverse order 2 To Lift up the Ceramic Hob Pull the cooker forward Pull o the push t control panel end caps at each end and remove the end xing screws under the end cap Remove the lower...

Страница 27: ...holding the thermostat phial to the oven fan cover at the rear of the oven Pull the unit forward to access the rear of the cooker Remove the both cover boxes by removing the xing screws and lifting c...

Страница 28: ...lly tightened For the LH oven unscrew the 2 thermostat phial xing screws Remove the screws that secure the inner back to the oven rear Lift the removable panel away Re assemble in reverse order Ensure...

Страница 29: ...cover and lift it clear Remove the 2 screws A and allow the plate to drop down Remove the 2 screws B lower the upper plate and remove through the slot in the cooker back Undo the terminal connections...

Страница 30: ...right hand P1 Oven light bulb left hand P2 Oven light bulb right hand Q1Base element 1 0kW Q2Top element 1 2kW Q3Browning element 1 15kW Circuit Diagram Q4Fan oven element 2 5kW R Left hand oven fan...

Страница 31: ...mum space above hotplate 650mm Ratings Total Load At 230V 50Hz 13 6kW approximate total including oven lights oven fan etc Hob Ovens Left hand Multifunction Oven Right hand Fan Oven Fan element 2 5kW...

Страница 32: ......

Отзывы: