Digital BBQ Fork and Probe
Thermometer
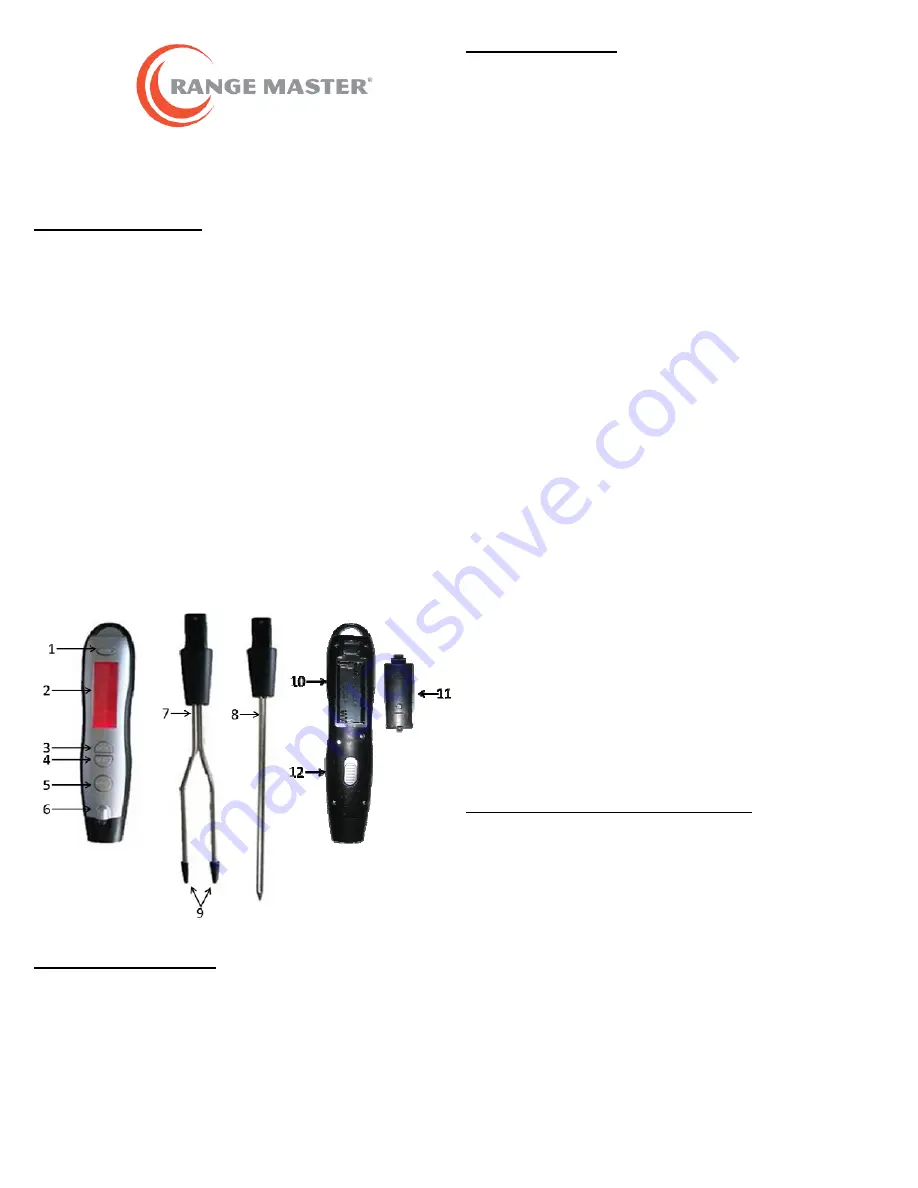
List of Main Parts:
1.
Mode Button
Switch Device On
Change Mode
2.
LCD Display
3.
Taste Button
Select Degree of Cooking
Use Timer
4.
Meat Button
Select Type of Meat
Select Temperature Unit
5.
Light Button
Switch LED light on and off
6.
LED light
7.
Plug-in Fork Attachment
8.
Plug-in Probe Attachment
9.
Protective Caps
10.
Battery Compartment
11.
Battery Compartment Lid
12.
Release Button (for attachments)
Inserting Batteries:
1.
Press down on the catch of the battery compartment
lid to remove.
2.
Insert the enclosed batteries as shown inside the
compartment. Observe the correct polarity (+/-).
3.
Replace Battery compartment lid. Lid must snap
audibly into place.
4.
Digital BBQ Fork and Probe Thermometer is now
ready for use.
Basic Functions:
Inserting and removing attachments
Inserting: Push the fork/probe attachment into the
front of the handle matching the grooves inside the
handle. You should hear it snap into place.
Removing: Push the release button on the back of
the device towards the “open lock” icon. Hold button
in place and pull out the attachment.
Switching on thermometer
Press MODE to switch on device. An acoustic signal
sounds and all possible displays appear briefly on the
LCD display screen.
Then display will show current temperature at the
top with selected type of meat below and degree of
cooking below that. This is “Normal” mode.
When pre-set temperature is reached (default setting
is 140°F) an alarm sounds for 60 sec and display
illumination flashes.
Automatic Switch-Off Function
To save the batteries, the LCD screen will
automatically dim. To light up the screen, press any
button once.
The thermometer cannot be switched off manually.
If you do not press any button for approximately 60
seconds, and the timer has not been activated, the
device switches off automatically.
Press MODE once more to switch the device on
again with the functions last selected.
Switching Temp Mode (°F / °C)
Press MODE and MEAT button together and
hold until 2 acoustic signals sound.
Measuring Temperature
Insert prong(s) at least 0.5” deep into the
thickest part of the meat and wait 15-20 sec.
Pull fork/probe out and read temperature.
* Do not take measurement immediately next
to the bone or in a layer of fat.
* Always check poultry in several places.
Pre-Setting Your Thermometer
Selecting Type of Meat
In “Normal Mode” press MEAT button
repeatedly until required type of meat is shown
in display:
BEEF, VEAL, LAMB, PORK, CHICKEN,
TURKEY, FISH
* If the type of meat cannot be set, the device
is in the wrong mode.
Degree of Cooking
Specifies how well done you would like your
meat. Cooking Table indicates temperature
ranges to which the thermometer is set.
* Degrees of cooking that are not
recommended for particular type of meat are
not available for selection. (Example: If
CHICKEN is chosen for type of meat, RARE is
not an available choice.


