background image

MP 4 - OPERATOR’S MANUAL 

1.8.2

13

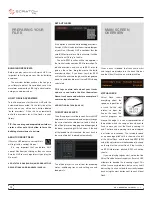
tIp: use the keyboard shortcut shift-alt-arrow 
to unload a track from the virtual deck.

vISuaL aIdS

When the track is playing several waveforms are 
displayed.  Each shows a different aspect of the 
track being played.

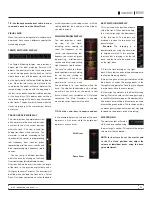
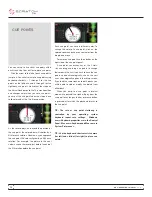
tempo matchInG dISpLay

The  Tempo  Matching  display  area  provides  a 
helpful  tool  for  beat  matching.  Scratch  LIVE 
detects  the  beats  within  the  track,  and  places 
a row of orange peaks (for the track on the left 
side)  above  a  row  of  blue  peaks  (for  the  track 
on the right side) in the Tempo Matching display 
area.  When  the  two  tracks  are  matched  to  the 
same tempo, the peaks will line up. Note that the 
tempo  display  is  aligned  with  the  beginning  of 
the bar, so the peaks keep their relative position 
as the track plays. This display does not show 
the relative timing of the beats, only the tempos 
of the tracks. The peaks will still line up when the 
tracks  are  playing  at  the  same  tempo,  but  are 
out of sync.

track overvIeW dISpLay

This view provides a complete overview 
of the waveform of the track, and includes 
a  marker  to  show  the  current  position 
within the track.  This view is useful for 
finding transitions within the track.  The 
waveform  is  colored  according  to  the 
spectrum of the sound – red representing 
low  frequency  bass  sounds,  green 
representing mid frequency sounds and 
blue  representing  high  frequency  treble 
sounds.
  You  can  jump  to  different  positions 
within the track by clicking on the Track 
Overview display (disabled in 

abs mode).  

Grey lines behind the overview show the length 
of the track – a thin grey line every minute, and a 
thick grey line every 5 minutes. The overview will 
be filled when you load the track onto a Virtual 
Deck. On slower computers, you should disable 

auto fill overviews in the setup screen – with this 
setting  disabled,  the  overview  will  be  filled  as 
you play the track.

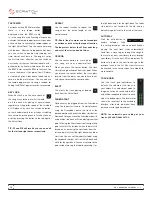
maIn Waveform dISpLay

This  view  provides  a  close-
up  view  of  the  track, 
including  color  coding  to 
show  the  frequency  of  the 
sound;  red  representing  low 
frequency bass sounds, green 
representing 

mid-frequency 

sounds  and  blue  representing 
high-frequency  treble  sounds. 
You can also switch to a three-
band spectrum view by holding 
the  ctrl  key  and  clicking  on 
the  waveform.    Click  on  the 
waveform  to  ‘scrub’  or  make 
fine  adjustments  to  your  position  within  the 
track.  This  applies  to 

int  mode  only,  and  may 

be  useful  if  you  wish  to  set  cue  points  in  your 
tracks  without  your  turntables  or  CD  players 
connected.  The  Main  Waveform  is  zoomed 
around the current position in the track.

tIp: use the + and – keys to zoom in and out.

In the example below, the red part of the wave 
represents  a  kick  drum,  while  the  purple  part 
represents a snare drum.


kick drum


Snare drum

beat matchInG dISpLay

This view shows the position of beats 
within the track. When beat matching, 
this  view  helps  align  the  downbeats 
of  the  two  tracks.  The  markers  are 
matched  up  when  the  two  tracks  are 
beat matched.
 

example:  The  following  is  a 

demonstration of using the visual aids 
to  help  beat  match.  In  this  example, 
the  track  that  is  playing  is  on  the  left 
deck, and the track to be mixed in is 
on the right deck.

1. Start the track playing on the right 
deck. After a few seconds, blue peaks appear in 
the Tempo Matching display.
2. Adjust the pitch of the right turntable until the 
blue  peaks  sit  under  the  orange  peaks  in  the 
Tempo Matching display. Once they are aligned, 
the two tracks have the same tempo.
3. Next align the markers in the Beat Matching 
display. Watch the color of the items passing by 
in the Main Waveform display. Remember that a 
kick or bass drum will be red in color, and a snare 
drum will be green or blue. This technique will by 
no means guarantee perfect mixes, but may help 
to speed up the process of beat matching.

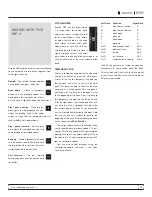
maSter GaIn

The master output of Scratch 
LIVE can be controlled using 
the master gain control. This adjusts the output 
volume of all tracks played. 

note:  for  best  results,  set  the  master  gain 
to  the  12  o’clock  position,  and  adjust  the 
volume  of  individual  tracks  using  the  track 
gain adjustment.

Содержание MP 4

Страница 1: ...TTM 57SL OPERATOR S MANUAL 1 8 1 1 MP 4 OPERATOR S MANUAL 1 8 2...

Страница 2: ...MP 4 OPERATOR S MANUAL 1 8 2 2...

Страница 3: ...aratus to rain or moisture Apparatus shall not be exposed to dripping or splashing and no objects filled with liquids such as vases shall be placed on the apparatus Introduction Beyond the Quick Start...

Страница 4: ...ARING YOUR FILES 12 BuIlding Overviews 12 How to Build Overviews 12 About Corrupt Files 12 Set Auto BPM 12 The Offline Player 12 main screen overview 12 Virtual Deck 12 Visual Aids 13 Tempo Matching D...

Страница 5: ...Shift 23 Lock Playing Deck 23 Sort Cues Chronologically 23 Auto Gain 23 Modifying the Auto Gain Level 23 Hi Fi Resampler 23 Play From Start 23 Instant Doubles 23 Play From First Cue Point 23 Audio Out...

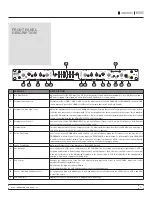
Страница 6: ...h a 48 kHz sample rate Inputs PROGRAM A and B INPUT switches select between the two LINE and two USB Inputs LINE 1 and LINE 2 are set for PHONO level or LINE level using the associated push switch on...

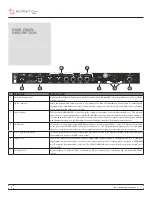
Страница 7: ...nd on the Crossfader setting see 6 5 Program Meter This four segment meter shows signal presence at 24 dBu optimum signal level at around 0 dBu and a warning to turn down the associated LEVEL control...

Страница 8: ...not affected by the front panel HOUSE LEVEL control These balanced TRS tip ring sleeve Outputs connect to a balanced equalizer or amplifier for a possible second listening zone and follow the same int...

Страница 9: ...bbles appear MP 4 USB Composite Device MP 4 USB1 Out USB Audio Device MP 4 USB2 Out USB Audio Device MP 4 Line In USB Audio Device MP 4 USB Human Interface Device Your new hardware is installed and re...

Страница 10: ...the MP 4 The ASIO Bit Depth and Ask host to process during callback settings should not be adjusted unless you are having problems Uncheck Ask host to process during callback if you have audio dropou...

Страница 11: ...can also import by dragging files and folders directly from Windows Explorer PC version or Finder Mac version into the Scratch LIVE library SuppOrted File Types Scratch LIVE supports fixed and variabl...

Страница 12: ...cular progress bar around the edge is a visual representation of the position within the song and can be set to flash to warn you that the track is nearing its end The time and remaining time are disp...

Страница 13: ...ck including color coding to show the frequency of the sound red representing low frequency bass sounds green representing mid frequency sounds and blue representing high frequency treble sounds You c...

Страница 14: ...half time start of each bar etc The range is set by the first two taps after that you can switch to any steady rhythm you feel comfortable with quarter notes half note whole notes Esc resets the BPM E...

Страница 15: ...mporary cue point that can be used like the Cue button on many DJ CD players Press ctrl I to set this temporary cue point on the left deck and ctrl K to set it on the right deck This temp cue point is...

Страница 16: ...Each cue point can have a different color To change the color of a cue point click on the colored square and choose a new color from the drop down menu To remove a cue point use the x button on the ri...

Страница 17: ...ou unlock it by clicking on the number again Auto Looping Auto looping allows you to create loops instantly If the track has a BPM value simply click the number of bars you wish to loop and Scratch LI...

Страница 18: ...nger respond directly to the mouse If you need to change a control using the mouse disable MIDI assign mode While in MIDI assign mode controls which have MIDI inputs assigned show a green box indicato...

Страница 19: ...area can be customized to display the columns listed below Added Album Artist Bitrate BPM Comment Composer Filename Genre Grouping Label Length Location Remixer Sampling Size Track Video Track Year T...

Страница 20: ...h LIVE has detected some corruption in the MP3 file Solution If possible re encode the MP3 The track cannot be found Most likely the file has been renamed or moved Scratch LIVE is trying to import a t...

Страница 21: ...out saving simply click the record button again Recordings can be loaded onto the decks renamed and managed like other files Recordings are saved in MyDocuments My Music ScratchLIVE Recording on a PC...

Страница 22: ...move track from library remove track from crate delete crate does not delete the file Remove track from crate and from library Delete the file from your library and send to the recycle bin Note to iTu...

Страница 23: ...dicated by the LED meter red lining If the track is too quiet unload the track then go to the setup screen and boost that auto gain db value more Once you ve made that adjustment load that same track...

Страница 24: ...file tags Use this function if you have edited or modified file tags outside of Scratch LIVE TIP Rescanning the tags is a handy way to identify all the files that Scratch LIVE can t find for example i...

Страница 25: ...Music ScratchLIVE on a PC Crates have the file extension crate and are located in your subcrates folder If your library contains tracks that are stored on a drive other than your boot drive a folder c...

Страница 26: ...s an audio file Unsupported file This MP3 contains multiple layers While scanning this file Scratch LIVE found frames belonging to multiple MPEG layers Scratch LIVE does not support MP3s that contain...

Страница 27: ...064 Phone 858 486 8388 Fax 858 486 8398 Web www caig com Cleaning Instructions A Fader assembly replacement part 11646 1 Unplug the MP 4 2 Remove the bottom cover 3 Remove the fader screws from the fr...

Отзывы: