background image

Instrument Functions

R&S

®

NGL200

43

User Manual 1178.8736.02 ─ 02.01

The R&S


NGL200 applies the fast transient response on the operating condition

and displays the "Fast Transient Response" icon on the selected channel status
bar information.

6.2.3


Output

The "Output" dialog provides the settings for output impedance, output delay and trig-
ger action on the output mode.

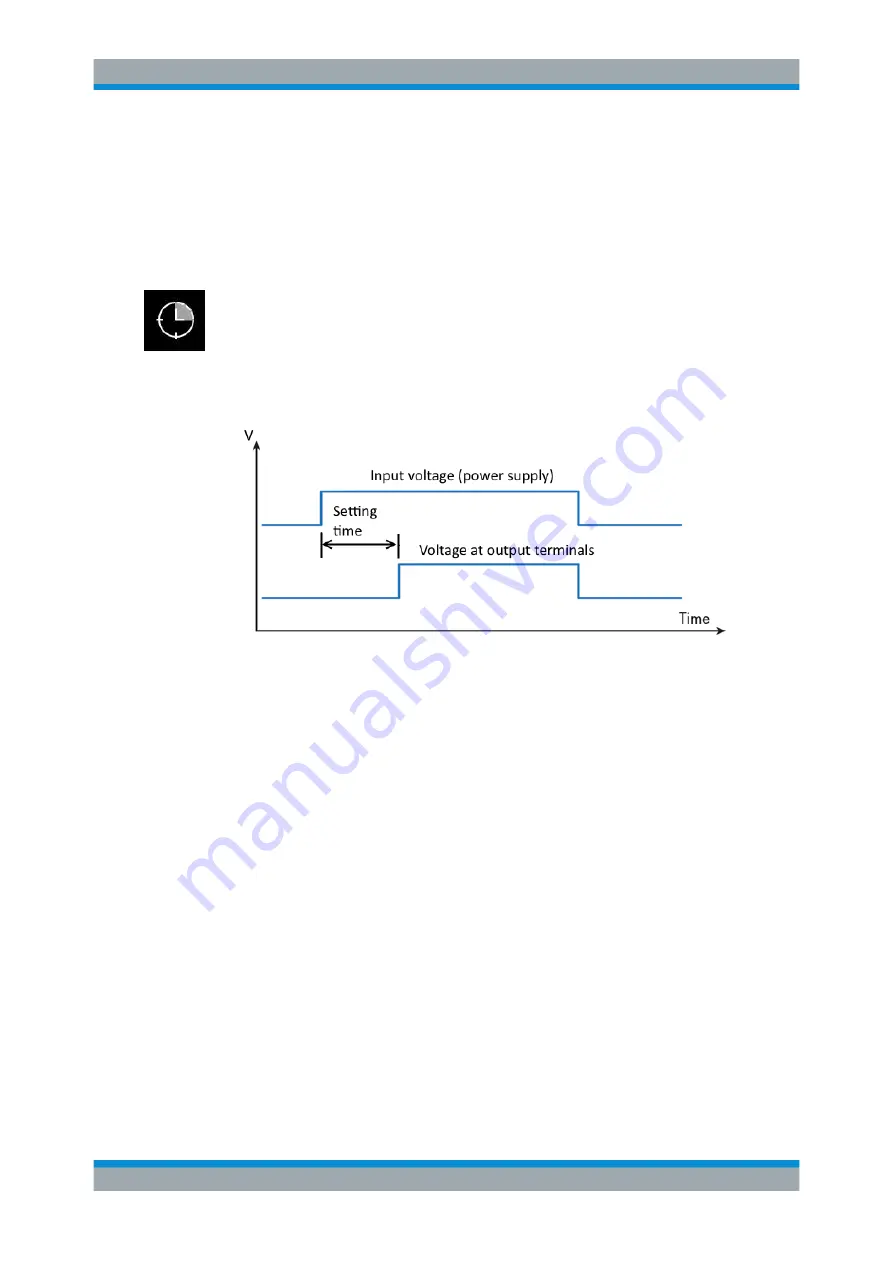
The output delay is the time taken for the output switches to operating condition after
applying the power supply, see 

"Output delay"


on page 44.

Figure 6-6: Setting time at the output terminals

1. Press [Settings] key.

The R&S


NGL200 displays the main menu window.

2. Select the required channel tab to apply output delay.

The R&S


NGL200 displays the selected channel menu.

3. Select "Output" menu item.

The R&S


NGL200 displays the "Output" dialog.

Activating the Channels Output

Содержание NGL200 series

Страница 1: ...GL200 Power Supply User Manual 1178873602 T2 User Manual Version 02 01 Distributed by dataTec Ferdinand Lassalle Str 52 72770 Reutlingen Tel 07121 51 50 50 Fax 07121 51 50 10 info datatec de www datat...

Страница 2: ...available for download from the R S NGL200 product page at www rohde schwarz com product ngl200 Downloads Firmware Rohde Schwarz would like to thank the open source community for their valuable contri...

Страница 3: ...ic Safety Instructions and the product documentation in a safe place and pass them on to the subsequent users Riesgo de lesiones y da os en el instrumento El instrumento se debe usar de manera adecuad...

Страница 4: ...die Produktdokumentation gut auf und geben Sie diese an weitere Benutzer des Produkts weiter Risque de blessures et d endommagement de l appareil L appareil doit tre utilis conform ment aux prescript...

Страница 5: ...ument up to date and to be informed about new application notes related to your instrument please send an e mail to the Customer Support Center stating your instrument and your wish We will take care...

Страница 6: ...eenshots 9 1 2 4 Other Conventions 9 2 Welcome to R S NGL200 10 3 Important Notes 11 3 1 Symbols 11 3 2 Ambient Conditions 11 3 3 Measurement Categories 12 3 4 Mains Voltage 12 3 5 Limits 13 4 Getting...

Страница 7: ...ngs Button 30 5 2 2 2 Voltage and Current Buttons 31 5 2 2 3 Expand Collapse Button 32 5 2 3 Input Data 32 5 3 Front Panel Keys 33 5 3 1 Menu Controls 34 5 3 1 1 Home Button 34 5 3 1 2 Settings Button...

Страница 8: ...6 10 Interfaces 67 6 10 1 Network Connection 68 6 10 1 1 LAN Connection 68 6 10 1 2 Wireless LAN Connection 70 6 10 2 USB Connection 71 6 10 3 GPIB Address 72 6 11 General Instrument Settings 73 6 11...

Страница 9: ...13 7 8 Advanced Operating Commands 118 7 8 1 Ramp 118 7 9 Data and File Management Commands 119 7 10 Status Reporting 127 7 10 1 STATus OPERation Registers 127 7 10 2 STATus QUEStionable Registers 129...

Страница 10: ...s of the getting started manual The online version of the user manual provides the complete contents for immediate display on the internet Basic safety instructions Contains safety instructions operat...

Страница 11: ...are enclosed by square brackets Filenames commands program code Filenames commands coding samples and screen output are distin guished by their font Input Input to be entered by the user is displayed...

Страница 12: ...esent realistic usage scenarios The screenshots usually show a fully equipped product that is with all options instal led Thus some functions shown in the screenshots may not be available in your par...

Страница 13: ...nally the R S NGL200 is protected with overtemperature protection OCP This safey feature protects the R S NGL200 from getting overheated when activated the channel outputs are turned off The Arbitrary...

Страница 14: ...ry indoor environment Do not operate with high dust and humidity levels if danger of explosion exists or with aggres sive chemical agents Any operating position may be used however adequate air circul...

Страница 15: ...asurement CAT IV Measurements at the source of the low voltage installations e g meters Measurement CAT III Measurements in building installations e g power distribu tion installations power switches...

Страница 16: ...tect against a possible electrical shock The maximum values for the instrument must not be excee ded The protection limits are listed on the front panel of the R S NGL200 to ensure the safe operation...

Страница 17: ...e following sections Notice that the data sheet may specify additional operating conditions Risk of radio interference This instrument is compliant with Class A of CISPR 32 In a residential environmen...

Страница 18: ...user manual Casing chassis and all measuring ports are connected to a protective earth conductor The instrument is designed in compliance with the regulations of protection class I For safety reasons...

Страница 19: ...nly be connected to properly installed wall outlets Separating the ground is prohibited The power plug must be inserted before signal circuits may be connected Use only the power cord included in the...

Страница 20: ...hod Capacitive touch input Rack mount capability R S HZN96 rack adapter 2U P N 3638 7813 02 Dimensions W x H x D 222 mm x 97 mm x 436 mm 8 74 in x 3 82 in x 17 17 in Weight R S NGL201 7 1 kg 15 65 lb...

Страница 21: ...k the instrument in antistatic wrap to protect it from electrostatic charging Secure the instrument to prevent any movement and other mechanical effects dur ing transportation Delivery package The pac...

Страница 22: ...d and must be installed with sufficient space along the sides to ensure free flow of air 4 2 Instrument Tour This chapter provides an overview of all the controls available in the R S NGL200 models an...

Страница 23: ...howing the device operating mode and respective channel settings of the instrument For a detailed description on screen layout see section Display Overview in the User Manual Menu control keys 2 The m...

Страница 24: ...both channels USB connector 6 The USB connector is a Type A connector You can connect a USB flash drive to this connector to perform a firmware update store logging data or screen shots Power key 7 T...

Страница 25: ...put terminals at the front panel or those at the back panel can be used Using both terminals at the same time can cause instrument malfunction DVM pins on the channel connector are only available in t...

Страница 26: ...ll out the removable part of the fuse holder 4 Turn this part until correct voltage label 100 115 or 230 is displayed in the win dow of the holder 5 Return the fuse holder to its position in the panel...

Страница 27: ...hown as negative current 4 3 1 Setting the Output Voltage and Current 1 Press Home key The R S NGL200 displays the home window 2 Select voltage or current parameter in the home window The R S NGL200 d...

Страница 28: ...Constant resistance mode CR Note Instrument is operated in sink mode and Constant Resistance is activated Also the operating symbol mode CV CC or CR is displayed at the channel status bar of the resp...

Страница 29: ...of R S NGL200 with 2 channels 1 Device status bar 2 Channel status bar 3 Expand Collapse channel button 4 Settings button 5 Output voltage level 6 Set voltage level 7 Output current level 8 Set curren...

Страница 30: ...hlighted in white Ethernet LAN interface If active the icon is highlighted in white See Chapter 6 10 Interfaces on page 67 Time Display of time in hh mm ss format See Chapter 6 11 4 Date and Time on p...

Страница 31: ...age recovery 20 mV switches between 30 s and 100 s See Chapter 6 2 2 Fast Transient Response on page 42 Internal Impedance If enabled the icon is highlighted in white Safety Limits If enabled the icon...

Страница 32: ...s in Ampere The display resolution for current is five digits after the decimal point 8 Set current level This level is limited by the set value defined in Safey Limits Operating mode Different font c...

Страница 33: ...the different touchscreen features that can be performed on the instrument 5 2 1 Using Gestures Tap Tap on the screen to select or toggle the value Swipe up and down Swipe in the menu to scroll it 5 2...

Страница 34: ...in the respective channel display area 1 Select the voltage or current field in the channel display area The R S NGL200 displays the on screen keypad to enter value 2 Set the required value See Chapte...

Страница 35: ...and collapse button to revert to the home window Figure 5 5 Display of channel overview window 1 Minimum maximum and average value for power voltage and current 2 Calculation of energy result 3 Number...

Страница 36: ...r alphanumeric input the on screen keypad works the same way 1 Select the arrow key to switch between capital letters and small letters The arrow key toggles between displaying in green and gray 2 Sel...

Страница 37: ...sts of the Device menu and up to two channels Channel 1 Channel 2 menu Figure 5 8 Main menu window Device menu The Device menu provides access to general instrument settings file arrangement and user...

Страница 38: ...occur Data Time Configures date time and clock format of the instrument Device Infos Displays instrument information Update Device Performs firmware update on the instrument Save Recall Device Settin...

Страница 39: ...r Button The key provides a shortcut function to one of the followings screenshot trigger data logging reset statistics or toggle touchscreen input The shortcut key is configurable in the Device User...

Страница 40: ...ombination of the set voltage and current limit results in the following output perform ance graph Figure 5 9 Output performance graph 5 5 Output Modes The R S NGL200 includes three operating modes i...

Страница 41: ...ases to almost zero with a short circuit In CC mode the font text in the channel display area changes to red See Figure 5 2 CR mode To go into CR mode the R S NGL200 must operates in sink more where c...

Страница 42: ...s advisable to set the current limit prior to operating the instrument to prevent damage to the load and instrument in the case of malfunction like short circuit 1 Press Home key The R S NGL200 displa...

Страница 43: ...tomatically turned off when no channel is selected This design prevents a con nected load from being damaged unintentionally 1 Press the required channel keys Selected channel keys Ch1 Ch2 illuminate...

Страница 44: ...your application 1 Press Settings key The R S NGL200 displays the main menu window 2 Select the required channel tab to apply constant resistance The R S NGL200 displays the selected channel menu 3 Se...

Страница 45: ...s or 100 s for the output voltage to recover and stay within 20 mV of the nominal output voltage follows by a step change in the load current typically equal to the full load current rating of the su...

Страница 46: ...utput delay and trig ger action on the output mode The output delay is the time taken for the output switches to operating condition after applying the power supply see Output delay on page 44 Figure...

Страница 47: ...lected output channel is turned on Output Off If triggered the selected output channel is turned off Gated If triggered the selected output channel is gated 5 Activate the Enabled menu item to activat...

Страница 48: ...Current Protection OCP When the drawn current is exceeding the limit sets in the respective channels an alert is triggered and the affected channels are turned off according to the settings config ur...

Страница 49: ...with the unit key ms or s 7 Activate the Link to Channel 2 or Link to Channel 1 menu item ON The linked channel is turned off when an OCP event is triggered OFF The linked channel is not affected whe...

Страница 50: ...6 Confirm value with the unit key mV or V 6 3 3 Over Power Protection OPP When the output power is exceeding the limit sets in the respective channels an alert is triggered and the affected channels a...

Страница 51: ...keypad to set the value 6 Confirm value with the unit key mW or W 6 3 4 Safety Limits With safety limits set in the instrument the range of the output voltage and or output current can be limited Thi...

Страница 52: ...rm value with the unit key 6 4 Advanced Features The Arbitrary and Ramp are two functions which can be used to control the wave form of voltage and current output 6 4 1 Arbitrary The Arbitrary dialog...

Страница 53: ...required source and file location Alternatively select New file to edit a new arbitrary file The R S NGL200 opens the arbitrary editor dialog to edit the arbitrary file See Chapter 6 4 1 1 Arbitrary...

Страница 54: ...n menu window 2 Select Device tab to edit the arbitrary file The R S NGL200 displays the Device menu 3 Select Arb Editor from the menu The R S NGL200 displays the Arb Editor dialog 4 Select Edit exist...

Страница 55: ...ry data is added to the end of the table The new addi tion is a copy of the last arbitrary data in the table To delete select the row of arbitrary data for deletion follows by the Minus icon 11 Set th...

Страница 56: ...me The output voltage can be increased continu ously within a 10 ms to 10 s timeframes See Figure 6 15 Figure 6 15 Ramping voltage output 1 Press Settings key The R S NGL200 displays the main menu win...

Страница 57: ...Digital I O pins 5 25 V max when supplying voltages to the pins R S NGL K103 3652 6385 02 option is required for the Digital I O signals Option is not required for User Button and TRG trigger in signa...

Страница 58: ...n pin 10 of DIO connector If detected corresponding trigger out parameters are triggered See Table 6 2 In Digital In pin 3 of DIO connector If detected corresponding trigger out parameters are trigger...

Страница 59: ...Trigger in signal Output On Ch 2 If detected a trigger signal is sent out at pin 12 of the DIO connector Logging Trigger in signal If detected the data logger starts recording the instru ment Arb Star...

Страница 60: ...nd 7 Gnd 15 Gnd 8 Gnd 1 Press Settings key The R S NGL200 displays the main menu window 2 Select Trigger menu item to set the trigger in parameter The R S NGL200 displays the Trigger dialog Figure 6 1...

Страница 61: ...d set as Trigger The R S NGL200 generates a trigger in signal when user button key is pressed 12 If Logging is set as a trigger out signal select Logging menu item The R S NGL200 displays the Logging...

Страница 62: ...lays the device menu 3 Select User Button from the menu The R S NGL200 displays the User Button dialog Figure 6 21 User button action 4 Select the User Button Action to configure the user key action T...

Страница 63: ...splays the device menu 3 Select Screenshot from the menu The R S NGL200 displays the Screenshot dialog Figure 6 22 Screenshot dialog 4 Select the Save Location to configure the screenshot file locatio...

Страница 64: ...he main menu window 2 Select the Device tab to configure data logger The R S NGL200 displays the device menu 3 Select Logging from the menu The R S NGL200 displays the Logging dialog 4 Select the Save...

Страница 65: ...ount Data logging with number of counts and time interval setting 10 Depending on the mode selected configure the required settings for the logging duration 11 Set the CSV Settings See Chapter 6 7 1 C...

Страница 66: ...The CSV Settings provides you ways to format the fields that are stored in the data logging See Figure 6 24 Figure 6 24 Sample of data logging 1 Select CSV Settings from Device menu or Logging menu i...

Страница 67: ...tween USB stick and the internal memory of the instrument You can copy and delete files in both the USB stick and the internal memory of the instrument 1 Press Settings key The R S NGL200 displays the...

Страница 68: ...applied when any of the following parameters are changed Chapter 6 11 General Instrument Settings on page 73 USB connection mode Ethernet settings Inaddition of the auto saved instrument settings the...

Страница 69: ...tings from file to load instrument settings The R S NGL200 opens a dialog to select source and file location 7 Set the source and file location The R S NGL200 resets the instrument with the loaded ins...

Страница 70: ...displays the main menu window 2 Select the Device tab to configure network connection The R S NGL200 displays the device menu 3 Select Interfaces The R S NGL200 displays the Interfaces dialog Figure 6...

Страница 71: ...to open a raw TCP IP connection to send raw SCPI commands to the instrument Hostname The name assigned to the instrument used to identify it in the net work When the connection is alive the network ic...

Страница 72: ...ured to use dynamic TCP IP configuration and obtain all address information automatically This means that it is safe to establish a physical connection to the LAN without any previous instrument confi...

Страница 73: ...ss Subnet Mask and Gateway The R S NGL200 displays the IP dialog for configuration Figure 6 31 IP dialog 6 Set the required IP for IP Address Subnet Mask and Gateway 7 Select Set to confirm the value...

Страница 74: ...shows Connected See Figure 6 33 When the connection is alive the WLAN icon turns white on the device status bar See device status bar Figure 6 33 WLAN connected 4 To disconnect select the Disconnect...

Страница 75: ...hould not exceed 2m A wired OR connection is used if several instruments are connected in parallel To be able to control the instrument via the GPIB bus the instrument and the controller must be linke...

Страница 76: ...Select the Device tab The R S NGL200 displays the device menu 6 11 1 Licenses Options are enabled by entering a registered license key code You may choose to install from an xml file on USB or by manu...

Страница 77: ...ad File to load the license file from the USB stick 4 Select the license file to install in the instrument The R S NGL200 install the license option accordingly If the installation is successful the o...

Страница 78: ...igure 6 36 5 Enter the key code 30 digit number of the option in the entry box 6 Confirm entry with the enter key If the correct key code is entered the R S NGL200 popup a message Devicekey is removed...

Страница 79: ...le beep alert when a fuse tripped occurs See Chapter 6 3 Protection on page 45 CC Mode Continuous Beep A continue beep sound alert when the selected output channel go into CC mode See CC mode 6 11 4 D...

Страница 80: ...the instrument i e NGL201 or NGL202 ID Instrument orderable part number Serial No Unique identification number for the instrument Version Software version that is installed in the instrument Hardware...

Страница 81: ...nstrument firmware The R S NGL200 displays the update device dialog Figure 6 41 Update device dialog 2 Select the source and file location to update instrument firmware 3 Select UPDATE to update the i...

Страница 82: ...ifferent devi ces The headers of these commands consist of followed by three letters Many common commands are related to the Status Reporting System CLS 79 ESE 79 ESR 80 IDN 80 OPC 80 RST 80 SRE 80 ST...

Страница 83: ...commands have been execu ted This bit can be used to initiate a service request The query writes a 1 into the output buffer when all preceding commands have been executed which is useful for command s...

Страница 84: ...nitiates self tests of the instrument and returns an error code Return values ErrorCode integer 0 in decimal format An error occurred 0 No errors occurred Usage Query only WAI Wait to continue Prevent...

Страница 85: ...DATE 83 SYSTem TIME 83 SYSTem BEEPer STATe Mode SYSTem BEEPer STATe Activates Deactivates or Queries the beeper tone Parameters Mode 1 0 ON OFF Control beeper is deactivated OFF ON Control beeper is a...

Страница 86: ...ommand SYSTem LOCal Usage Setting only SYSTem KEY BRIGhtness brightness SYSTem KEY BRIGhtness Sets Queries the front panel key brightness Parameters brightness Sets the key brightness Range 1 0 to 1 0...

Страница 87: ...SPlay WINDow TEXT CLEar 84 DISPlay WINDow TEXT DATA 84 DISPlay BRIGhtness brightness DISPlay BRIGhtness Sets Queries the display brightness Parameters brightness Displays brightness for the instrument...

Страница 88: ...pe of EXTERNAL trigger input 7 5 Configuration Commands The following subsystems contain the commands for channel selection voltage and current settings for the instrument 7 5 1 Channel Selection The...

Страница 89: ...nel number 1 INST NSEL queries number of the channel selection response 1 INSTrument NSELect 86 INSTrument SELect 86 INSTrument NSELect channel INSTrument NSELect Selects Queries the channel by number...

Страница 90: ...mmands R S NGL200 87 User Manual 1178 8736 02 02 01 7 5 2 Voltage Setting The SOURce VOLTage subsystem contains the commands for setting the voltage of the output channels The default unit is V Config...

Страница 91: ...safety limits for the upper voltage reponse 15 000 VOLT ALIM LOW 0 sets the safety limits for the lower voltage VOLT ALIM queries the safety limits for the lower voltage reponse 0 000 Set the voltage...

Страница 92: ...91 SOURce ALIMit STATe state SOURce ALIMit STATe Activates Deactivates or Queries the safety limit for voltage Parameters state 1 0 1 Activates the safety limit for voltage 0 Deactivates the safety li...

Страница 93: ...Configuring the output voltage on page 88 SOURce VOLTage LEVel IMMediate AMPLitude voltage SOURce VOLTage LEVel IMMediate AMPLitude Sets Queries the voltage value of the selected channel Parameters v...

Страница 94: ...lue in V DEFault Default value of stepsize Range 0 001 to 5 000 Increment 0 001 RST 0 100 Default unit V Query parameters stepsize DEFault Queries the default voltage step size Example INST OUT1 VOLT...

Страница 95: ...mits for the lower current VOLT ALIM queries the safety limits for the lower current reponse 0 001 Set the current value CURR 2 selects a channel and sets the current CURR queries the current of the s...

Страница 96: ...umeric MIN MAX numeric Numeric value for lower safety limit MIN Min value for lower safety limit MAX Max value for lower safety limit Range 0 001E 00 to 6 000E 00 Increment 0 001 RST 0 001E 00 Example...

Страница 97: ...STEP DEF VOLT STEP DEF 0 1000E 00 Returns the default stepsize for current See also Example Configuring the current limit on page 92 SOURce CURRent LEVel IMMediate AMPLitude current SOURce CURRent LE...

Страница 98: ...P INCRement on page 94 Query parameters current MIN MAX MIN Return minimum current MAX Return maximum current See also Example Configuring the current limit on page 92 7 5 4 Resistance Setting The SOU...

Страница 99: ...t resistance mode RES STAT 1 selects a channel and activate the constant resistance mode RES STAT queries the constant resistance mode response 1 SOURce RESistance LEVel IMMediate AMPLitude 96 SOURce...

Страница 100: ...tivates constant resistance mode Example See Example Configuring the resistance limit on page 96 7 5 5 Combined Setting of Voltage and Current Setting The APPLy subsystem provides a command that enabl...

Страница 101: ...ent at 6 000 A DEFault Numeric value for current RST 1 000 Default unit A output OUT1 OUTP1 OUTPut1 OUT2 OUTP2 OUTPut2 OUT1 OUTP1 OUTPut1 Output for channel 1 OUT2 OUTP2 OUTPut2 Output for channel 2 E...

Страница 102: ...channels simultaneously INST OUT1 VOLT 12 CURR 0 1 OUTP SEL 1 INST OUT2 VOLT 12 CURR 0 2 OUTP SEL 1 selects channels 1 and 2 sets the voltage and current values for both channels activates both chann...

Страница 103: ...on page 99 OUTPut DELay DURation duration OUTPut DELay DURation Sets Queries the duration for output delay Parameters duration numeric MIN MAX numeric Numeric value of the duration in seconds MIN Min...

Страница 104: ...tes fast transient response Example OUTPut FTResponse 1 OUTPut FTResponse 1 Return fast transient response state as on OUTPut IMPedance resistance OUTPut IMPedance Outputs Queries source impedance for...

Страница 105: ...t state OUTPut SELect Activates Deactivates or Queries the selected channel Parameters state OFF ON 0 1 OFF 0 Deactivates the selected channel ON 1 Activates the selected channel RST OFF 0 Example See...

Страница 106: ...y time to maximum minimum respectively Query the range of the fuse delay time FUSE DEL MIN response 0 FUSE DEL MAX queries the upper and lower limit of the fuse delay time in ms response 10000 Set a i...

Страница 107: ...fuses of the selected channel response 0 FUSE DELay INITial 104 FUSE DELay BLOWing 105 FUSE LINK 105 FUSE TRIPped 105 FUSE UNLink 105 FUSE STATe 106 FUSE DELay INITial delay FUSE DELay INITial Sets Q...

Страница 108: ...age 102 FUSE LINK arg0 FUSE LINK arg0 Sets Queries the fuses of several serlected channels fuse linking Parameters for setting and query arg0 1 2 3 4 Example INST OUT1 FUSE LINK 2 Channel 2 is linked...

Страница 109: ...Sets Queries the fuse function in the selected channel Parameters state OFF ON 0 1 ON 1 Fuse function is activated OFF 0 Fuse function is not activated Example See Example Configuring fuses on page 10...

Страница 110: ...T PROT LEV MIN sets the overvoltage protection to maximum or minimum respectively Query the range of the overvoltage protection values VOLT PROT LEV MIN reponse 0 100 VOLT PROT LEV MAX queries the upp...

Страница 111: ...PROTection CLEar Resets the OVP state of the selected channel If an OVP event has occurred before the reset also erases the message on the display Example See Example Configuring the overvoltage prote...

Страница 112: ...n on the output of the instrument In addition the measured value is monitored Example See Example Configuring the overvoltage protection on page 107 SOURce VOLTage PROTection TRIPped state Queries the...

Страница 113: ...um respectively Query the range of the overpower protection values POW PROT LEV MIN reponse 0 100 POW PROT LEV MAX queries the upper and lower limit reponse 100 000 Query a tripped overpower protectio...

Страница 114: ...LEVel power SOURce POWer PROTection LEVel Sets Queries the overvoltage protection value of the selected channel Parameters power numeric MIN MAX DEFault numeric Numeric value of the power protection l...

Страница 115: ...e MEAS CURR 1 000E 00 Usage Query only MEASure SCALar ENERgy Queries the measured the current released energy value of the previous selected channel Please notice that the energy meter has to be activ...

Страница 116: ...es the currently emitted power of the selected channel Example MEAS POW 3 00E 00 Usage Query only MEASure SCALar VOLTage DC Queries the currently measured voltage of the selected channel Example MEAS...

Страница 117: ...by 1 ARB REP 10 sets the repetition rate ARB REP queries the set number of repetitions ARB BEH END HOLD sets the arbitrary endpoint behavior when the arbitrary function is finished ARB TRAN 1 transfe...

Страница 118: ...See Example Configuring an arbitrary sequence on page 114 ARBitrary BEHavior END state ARBitrary BEHavior END Sets Queries the arbitrary endpoint behavior when arbitrary function is finished Paramete...

Страница 119: ...0 5 0 Defines one arbitrary point with Voltage1 10 V and Current1 1 A Time1 500 ms and Interpolation mode1 0 disabled ARB DATA 10 000 1 000 0 50 1 Return defined arbitrary points for the previous sel...

Страница 120: ...selected channel will be repeated infin itely Parameters repetition_rate Range 0 to 65535 The 0 indicates infinite repetition Example INST OUT1 ARB REP 10 ARB REP 10 The return repetition rate of the...

Страница 121: ...y TRIGgered STATe Activates Deactivates or Queries the trigger input at the rear connector terminal block for arbitrary functionality Parameters state 0 1 0 OFF Trigger input is deactivated 1 ON Trigg...

Страница 122: ...n SOURce VOLTage RAMP DURation Sets Queries the duration of the voltage ramp Parameters duration numeric MIN MAX DEFault numeric Duration of the ramp function in seconds MIN Minimum duration of the ra...

Страница 123: ...he logging file data values of the selected storage location and file name If no logging file is found the message No Logging Files found is displayed If no storage location is selected the instrument...

Страница 124: ...selected storage location and file name If no storage location is selected the instrument uses the internal memory Please notice that the logging function has to be activated if you want to use the m...

Страница 125: ...0003 CSV Usage Query only DATA POINts filename location Queries the number of measurements from the selected storage location and filename If no storage location is selected the instrument queries the...

Страница 126: ...MP Example HCOPY FORM BMP Return the current setting of the screenshot format HCOPy SIZE X Returns the horizontal expansion of the screenshots Usage Query only HCOPy SIZE Y Usage Query only Returns th...

Страница 127: ...ON LOG CHAN 1 Data logging function for the previous selected channel is activa ted LOG COUNt count LOG COUNt count Sets Queries the number of measurement values to be captured Setting parameters cou...

Страница 128: ...captured at 3 49 10 5 s Default unit s Query parameters span MIN MAX Return the duration of the data logging Example LOG DUR MAX LOG DUR MAX 349000 LOG FNAMe filename loaction LOG FNAMe location Sets...

Страница 129: ...t at 600 s Default unit s Query parameters interval MIN MAX Return the measurement interval Example LOG INT 10 LOG INT 10 LOG MODE mode LOG MODE Sets Queries the data logging mode Parameters mode UNLi...

Страница 130: ...activated ON 1 Manual trigger function will be activated Example LOG TRIG ON LOG TRIG 1 7 10 Status Reporting 7 10 1 STATus OPERation Registers The commands of the STATus OPERation subsystem control t...

Страница 131: ...ABle arg0 STATus OPERation INSTrument ISUMmary Channel ENABle arg0 Controls Queries the ENABle part of the STATus OPERation register The ENABle defines which events in the EVENt part of the status reg...

Страница 132: ...n in the corresponding bit of the associated condition regis ter to cause a 1 to be written in the associated bit of the corresponding event register Suffix Channel 1 n Parameters PositiveTransition R...

Страница 133: ...Enable_Value Set Query the enable mask that allows true conditions in the EVENt part to be reported in the summary bit If a bit in the ENABle part is 1 and the corresponding EVENt bit is true a posit...

Страница 134: ...ameters NegativeTransition Range 1 to 65535 Example STATus QUEStionable INSTrument ISUMmary1 NTRansition Query for negative transition STATus QUEStionable INSTrument PTRansition arg0 STATus QUEStionab...

Страница 135: ...according to two criteria Effects on the instrument Setting commands cause instrument settings such as a reset of the instrument or setting the output voltage Queries return data for remote control e...

Страница 136: ...d to the bus and do not require address ing Addressed commands only act on instruments previously addressed as listeners addressed commands are encoded in the range 00 through 0F hex They only affect...

Страница 137: ...enter either the short form or the long form other abbreviations are not permitted Example MEASure CURRent is equivalent to MEAS CURR Case insensitivity Uppercase and lowercase notation only serves to...

Страница 138: ...Example VOLTage LEVel IMMediate AMPLitude voltage MIN MAX UP DOWN The following are valid commands VOLT MAX VOLT MIN VOLT 10 SCPI Parameters Many commands are supplemented by a parameter or a list of...

Страница 139: ...mmand A comma separates several parameters of a command A question mark forms a query An asterisk marks a common command Quotation marks introduce a string and terminate it A whitespace ASCII Code 0 t...

Страница 140: ...g has been completed Sending OPC directly after the command whose processing should be terminated before other commands can be executed WAI Stops further command process ing until all commands have be...

Страница 141: ...you can draw conclusions on the current status of the device For example when the unit operates in constant voltage the result of the returned ISUM register is a decimal 2 which corresponds the binar...

Страница 142: ...e to use the CONDition regis ter The CONDition register delivers a 1 first bit set in constant current mode CC and a 2 second bit set in constant voltage mode CV If the correct channel is selected and...

Страница 143: ...the command ESR The ESE corresponds to the ENABle part of an SCPI register If a bit is set in the ESE and the associated bit in the ESR changes from 0 to 1 the ESB bit in the STB is set The ESE regist...

Страница 144: ...if the over voltage protection has tripped 10 Fuse Tripped This bit is set if the fuse protection has tripped 11 to 15 Not used Query of an instrument status Each part of any status register can be re...

Страница 145: ...instrument leads to an entry in the error queue The entries of the error queue are detailed plain text error messages You can look them up in the error log or via remote control using SYSTem ERRor NEX...

Страница 146: ...VOLTage PROTection LEVel 108 SOURce VOLTage PROTection MODE 109 SOURce VOLTage PROTection TRIPped 109 SOURce VOLTage PROTection STATe 108 SOURce VOLTage RAMP DURation 119 SOURce VOLTage RAMP STATe 11...

Страница 147: ...TRIGgered 127 LOG STATe 123 MEASure SCALar CURRent DC 112 MEASure SCALar ENERgy RESet 112 MEASure SCALar ENERgy STATe 112 MEASure SCALar ENERgy 112 MEASure SCALar POWer 113 MEASure SCALar VOLTage DC 1...

Страница 148: ...on 130 STATus QUEStionable INSTrument ISUMmary Channel ENABle 130 STATus QUEStionable INSTrument ISUMmary Channel NTRansition 131 STATus QUEStionable INSTrument ISUMmary Channel PTRansition 131 STATus...

Страница 149: ...19 Navigation keys 19 Output and channel keys 19 Output terminals 19 Power key 19 Rotary knob 19 USB connector 19 Front panel keys 33 Menu controls 34 Navigation controls 36 Output and channel control...

Страница 150: ...Self test Remote 81 Service manual 7 Service request enable register SRE Remote 80 Setting the output voltage and current limit 24 Setting Up the Instrument Bench Operation 18 Rack Mounting 18 Sound...

Отзывы: