9
Bump Stop Spacer & Coil Spring Installation
1.
≤
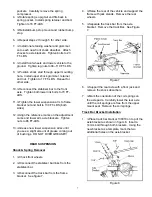
Remove the rubber bump stop and bump
stop bracket from the upper spring mount.
2.
≤
Insert a Rancho spacer from kit 8567 and
reinstall the bracket with the 10mm hardware
from kit 860073. See figure 10.
Figure 10
3.
≤
Insert the bump stop into the bump stop
bracket. Repeat steps 1 through 3 for other
side.
4.
≤
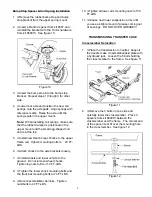
Lower rear axle and position the new coil
springs onto the axle pads. Align springs with
reference marks. Raise the axle until the
spring seats in the upper mount.
Note: When installing coil springs, make sure
that the rubber damper is positioned in the
upper mount and the small egg-shaped coil
end is at the top.
5.
≤
Install new Rancho rear shocks to the upper
frame rail. Tighten mounting bolts to 23 FT-
LBS.
6.
≤
Attach shocks to the axle brackets loosely.
7.
≤
Install wheels and lower vehicle to the
ground. Do not remove wheel chocks.
Tighten lug nuts to 80—110 FT-LBS.
8.
≤
Tighten the lower shock mounting bolts and
the track bar mounting bolts to 74 FT-LBS.
9.
≤
Reconnect stabilizer bar links. Tighten
nuts/bolts to 40 FT-LBS.
10.
≤
Tighten all lower arm mounting nuts to 130
FT-LBS.
11.
≤
Grease new lower suspension arms until
you see a slight amount of grease coming out
of bushings. DO NOT OVER GREASE!!!
TRANSMISSION & TRANSFER CASE
Crossmember Relocation
1.
≤
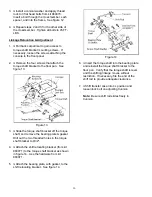
Place the transmission in neutral. Support
the transfer case crossmember/skid plate with
a hydraulic jack. Loosen the 6 bolts holding
the crossmember to the frame. See figure 11.
Figure 11
2.
≤
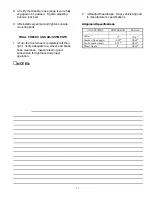
Remove the 3 bolts on one side and
carefully lower the crossmember. Place 3
spacers from kit 860073 between the
crossmember and the frame. The conical end
of the spacer must fit over the mounting hole
in the crossmember. See figure 12.
Figure 12


