background image

29 


Содержание R750B-ST-BLC

Страница 1: ...R750B ST ODG Assembly Operation Scan the QR code for a video of step by step assembly and operation Rambo Bikes 22844 230th Ave Centerville IA 52544 First Edition April 2023 Published by Rambo Bikes...

Страница 2: ...2...

Страница 3: ...TENANCE AND CARE 24 25 TROUBLESHOOTING GUIDE 26 STANDARD LIMITED WARRANTY 27 Contact Information Email cs rambobikes com Phone 952 283 0777 Website rambobikes com Serial Number This is a good time to...

Страница 4: ...TH RIDING A BIKE CAUTION IS REQUIRED CAUTION OBSERVE CONDITIONS AND MAINTAIN SAFE RIDING PRACTICES WARNING PRODUCT UNDER POWER AND MOVING PARTS WARNING BEWARE OF ELECTRICAL FIRE OR SHOCK ALWAYS WEAR A...

Страница 5: ...that you understand the safe operation of this bike and follow all traffic bike laws and regulations in the area in which the bike is being operated These may include rules regarding helmets reflector...

Страница 6: ...damage All lighting should be inspected to be sure they have fresh batteries and work properly Check Frame Fork and Components If you notice that the frame or fork has any visible damage cracks dents...

Страница 7: ...risk of serious injury or death Pay attention and avoid distractions while riding Always maintain both hands on the handlebars Avoid bike stunts and or aggressive riding When carrying gear make sure i...

Страница 8: ...u can ride your bike may have specific regulations Always respect private property and never trespass Respect the rights of others you may be sharing the trail with i e hikers cyclists equestrians Sta...

Страница 9: ...ize yourself with which hand brake stops each wheel You can complete this task by spinning the front wheel and squeezing each brake lever one at a time to determine which one stops the wheel from spin...

Страница 10: ...10 IDENTIFYING BIKE PARTS...

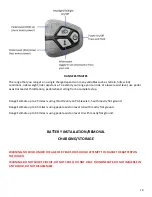
Страница 11: ...l assist level 1 5 the motor will assist you while pedaling Pedal assist 1 being the slowest and least powerful and 5 being the fastest and most powerful If on Pedal Assist level 0 you will not have a...

Страница 12: ...om of the LCD screen while Megatron and Krusader models are located at the bottom of the power off on switch Dual Battery Technology With the battery installed from the bottom of your bike frame you c...

Страница 13: ...KE CABLES Once the packaging material is removed from the bike remove the Allen bolts from the handlebar clamp using a 4mm Allen wrench At this time be sure to turn the stem so it is facing forward As...

Страница 14: ...h bolts from the axle then loosen the axle nut and axle Slide the axle out of the fork Then apply grease to the axle and install the wheel into the fork making sure the brake rotor is aligned in betwe...

Страница 15: ...t pedal for the correct side there is an R or L marked on the end of the pedal bolt Be sure to note that the left pedal is reverse threaded It is recommended to add general purpose grease to the threa...

Страница 16: ...e installed flip the bike over onto the wheels and be sure to check that the handlebars are aligned with the front tire Then tighten both sides of the stem to the fork using a 5mm Allen wrench tighten...

Страница 17: ...TIRE INCLUDING SHOES THROTTLE OPERATION Your bike is equipped with a thumb throttle the throttle can be used from a complete stop all the way to the top speed and at any time The thumb throttle is act...

Страница 18: ...18 Each PAS Pedal Assist Level is approximately 20 motor power Level 1 is 20 Level 2 is 40 Level 3 is 60 Level 4 is 80 and Level 5 is 100 motor power...

Страница 19: ...up to 25 miles is using throttle only on PAS levels 3 5 with mostly flat ground Range Estimate up to 35 miles is using pedal assist on level 3 4 with mostly flat ground Range Estimate up to 45 miles i...

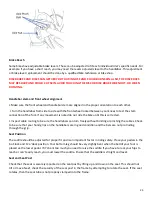
Страница 20: ...frame When installing the battery be sure the battery clicks twice into the frame and the battery is sitting flush with the frame The first click is the safety latch and the second click is the lock s...

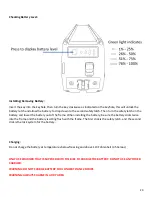
Страница 21: ...charging the battery and or removing the battery Install the charging plug into the battery charging port as shown below When charging the charger will display red and once fully charged the charger...

Страница 22: ...tely Inspect the rim for trueness by spinning it and watching for any side to side or up and down wobble If any movement is noted do not ride this bike until the rim is repaired Check the tire inflati...

Страница 23: ...bike until this is corrected Inspect cable routing to be sure the handlebars can turn freely without binding or pinching the cables Check to be sure that your hand grips on the handlebars are in good...

Страница 24: ...pedal to make sure they are not loose Make sure there is no rust or kinks in the control cables or cable housing Check your wheel rims for excessive wear and dents or for any loose or damaged spokes C...

Страница 25: ...RIDE YOUR BIKE TAKE YOUR BIKE IMMEDIATELY TO A LOCAL BIKE SHOP FOR REAIR AND SERVICE Replacement parts can be purchased by contacting Rambo bikes at rambobikes com A list of Certified Repair Centers c...

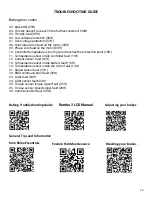
Страница 26: ...0H 11 Temperature sensor inside controller fault 11H 12 Current sensor fault 12H 13 Temperature sensor inside battery fault 13H 14 Temperature sensor inside the motor fault 14H 21 Speed sensor fault 2...

Страница 27: ...is warranty in certain states Terms and Conditions of this Limited Warranty This limited warranty does not cover installation disassembly adjustments of components normal wear and tear damage caused b...

Страница 28: ...28 Rambo Bikes 22844 230th Ave Centerville IA 52544 First Edition April 2023 Published by Rambo Bikes Centerville Iowa All rights reserved...

Страница 29: ...29...

Отзывы: