Raise3D Pro2-401 Скачать руководство пользователя страница 1

Version 1.0                                                                                                                                                                    Date

29/08/2018 


-  1- 

www.raise3d.com 


Manual Pro2-401 Nozzle Replacement Installation-V1.0 


For the instructions on removing or re-installing the assembled hotend onto the extruder head, please 

refer to the Manual Pro2 

– 402 Hotend Replacement. 
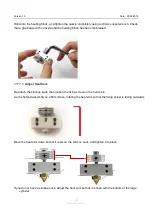
STEP 1: 

Nozzle Removal 

First remove the Silicone sock from the hotend.   
Use an 8mm socket wrench to remove the old nozzle from the heating block. 

To prevent damage to components of the hotend, DO NOT exert force on the throat tube.    Hold the solid section of 

the heating block during adjustments.   


STEP 2: 

Nozzle Installation 

Insert a cleaning rod completely through the hotend and ensure that tube is completely clear of 

blockages. 


Содержание Pro2-401

Страница 1: ...d Replacement STEP 1 Nozzle Removal First remove the Silicone sock from the hotend Use an 8mm socket wrench to remove the old nozzle from the heating block To prevent damage to components of the hotend DO NOT exert force on the throat tube Hold the solid section of the heating block during adjustments STEP 2 Nozzle Installation Insert a cleaning rod completely through the hotend and ensure that tu...

Страница 2: ...n the Throat Tube Hold onto the heating block and tighten the throat tube by rotating the heat sink Rotate until the nozzle catches on to the tube begins to spin The heat sink may be askew when the right position is achieved This is normal and will be adjusted in the latter steps If the heat sink is loose on the throat tube secure the fixing screw prior to tightening the throat tube STEP 4 Tighten...

Страница 3: ...ined STEP 5 Adjust Heat Sink Re attach the silicone sock then loosen the fixing screw on the heat sink Lie the hotend assembly on a flat surface rotating the heat sink so that the fixing screw is facing outwards Move the heat sink down so that it rests on the silicone sock and tighten into place If you do not have a silicone sock adjust the heat sink so that it is flush with the bottom of the larg...

Страница 4: ...Version 1 0 Date 29 08 2018 4 www raise3d com To reinstall the hot end assembly into the extruder head please refer to the instructions in Manual Pro2 402 Hotend Replacement ...

Отзывы: