8
5. Maintenance
This filter, while automatic in function, is not maintenance free. It is expected that the screen will require pressure washing on a periodic
schedule to remove contaminants that have stapled into the screen. Depending on the contaminant, the frequency can vary from once
a week to twice a year. This schedule will have to be determined based on the effectiveness of the backwash on the contaminants being
filtered. The filter must be de-pressurized to remove the screen.
5.1 Cleaning Filter Screen
The HN-G Filter Screen should be inspected every 3 months for wear and tear and be cleaned using a pressure washer directed alternately
on the outside and inside of the screen (3-4 times each). If the Filter Screen shows signs of damage, it should be replaced. Periodic cleaning
of the filter screen is necessary for removal of trapped particles.
WARNING
It is dangerous to open the filter while under pressure
De-Pressurizing the System
1.
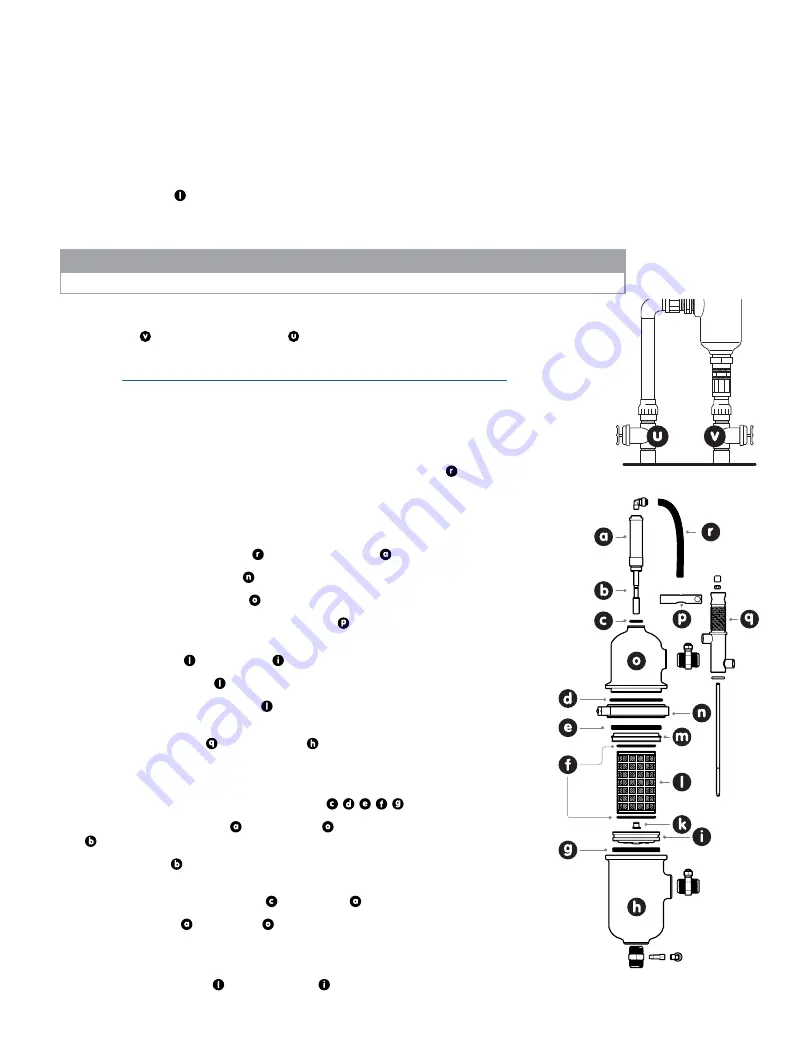
Close Inlet and Outlet isolation valves .
2.
Perform Manual Backwash from the Filtron 1-10 Backwash controller by pressing the M
button
or from the irrigation controller (HN-G-01-2-XXX HN-G-02-2-XXX models only)
.
3.
Verify pressure has been released running a second backwash and observing no
backwash flow, or by checking the reading on the pressure gauges (if installed).
4.
(HN-G-01-1-XXX HN-G-02-1-XXX models only)
- Remove Low Pressure 5/16” plastic
tube from the Inlet to release the pressure and drain the HN-G filter.
5.
(HN-G-01-2-XXX HN-G-02-2-XXX models only)
- Remove the
1/4" Tubing
from filter flush port.
6.
Disconnect the drain pipe from the Drain valve at the union connection.
5.1.1 Disassembly
7.
Disconnect the ¼”
Plastic Tubing
connecting the
Piston
to the drain outlet.
8.
Release and remove the
Clamp
.
9.
Carefully remove the filter
Cover
.
10.
Carefully hold and pull up on the
Hydraulic Motor
.
11.
This will remove the collector assembly, giving you access
to the
Filter Screen
, and
Inlet Disc
.
12.
Remove the
Filter Screen
.
13.
Inspect and clean the
Filter Screen
, using a pressure washer as necessary.
14.
Inspect and remove any foreign objects or large particles from
the
Collector Assembly
and the
Housing
.
5.1.2
Lubrication
15.
Grease (silicone recommended) all rubber parts: , , , , .
16.
Carefully unscrew the
Piston
from the
Cover
, clean and grease
Piston Shaft
(silicone grease recommended). Make sure the
Piston Shaft
moves freely.
17.
The
Piston Shaft
should be cycled in and out a few times to get the grease distributed
to the inner O-ring seal. Two applications of grease and cycling is adequate.
18.
Clean and grease the
Piston O-Ring
on the
Piston
.
19.
Replace the
Piston
on the
Cover
, hand tighten only, no tools.
5.1.3
Re-assembly
20.
Replace the
Filter Screen
into the
Inlet Disc


