background image

iR2301 User Manual

3

5. Hardware Installation Procedure

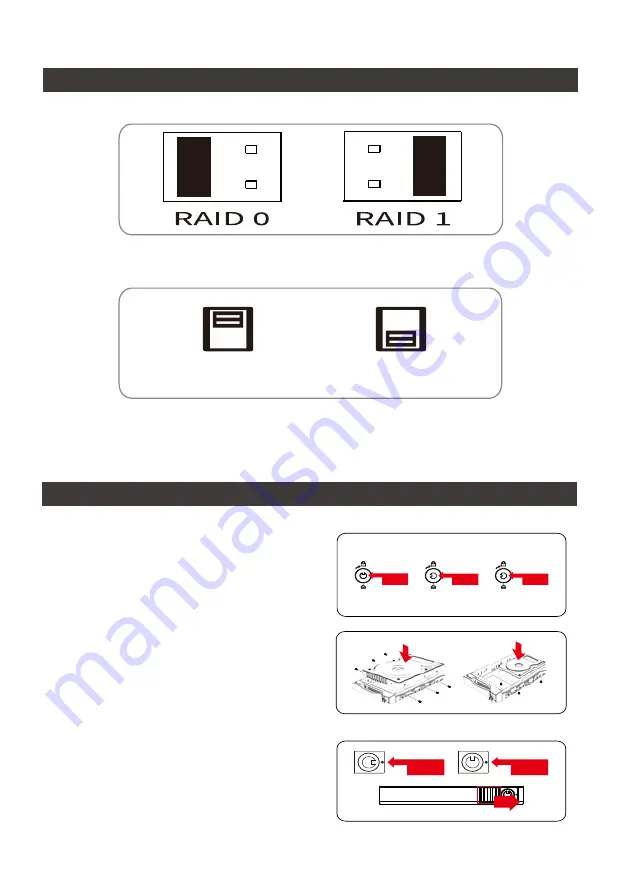
4. RAID Mode & Buzzer Setting

Please follow the instructions below to complete the hardware installation. 

Lock

Unlock

Press

2.  For 3.5" HDD/SSD, please secure it by use six 

the larger screws included in the accessory kit. 

For 2.5" HDD/SSD, please secure it by use four 

the smaller screws included in the accessory kit.

3.  For the 2.5" HDD tray, please use  the key 

included in the accessory  kit to unlock the 2.5" 

HDD  tray  key   lock  and  push  the  HDD  eject 

 button to the right, the 2.5" HDD  tray handle will 

pop up to remove  the tray. Install the 2.5-inch 

hard  disk and secure it with the small  screws 

included in the 4 parts  package.

Lock

Unlock

1.  For the 3.5" HDD tray, please use the key 

included in the accessory kit to unlock the HDD 

tray key lock, and then press the HDD tray key 

lock. The removable drive tray will pop open and 

extract the removable drive tray.

Buzzer ON

Buzzer OFF

RAID Mode Setting:

Buzzer Setting:

Содержание InTANK iR2301

Страница 1: ...iR2301 User Manual InTANK ...

Страница 2: ...ct Appearance and Packaging Content 1 3 Hardware Requirements and Precautions 2 4 RAID Mode Setting 3 5 Hardware Installation Procedure 3 6 Computer Set Up 5 7 Frequently Asked Questions 6 InTANK iR2301 產品使用說明 7 1 環境需求 7 2 產品外觀及包裝內容 7 3 硬體需求與注意事項 8 4 設定 RAID 層級 9 5 硬體安裝 9 6 電腦設定 11 7 常見問題 12 ...

Страница 3: ...ate please contact your local supplier or visit www raidon com tw for further information Copyright RAIDON TECHNOLOGY INC All rights reserved Open the package and you should find the following Please check the product and accessories for any defect or missing parts If you have any questions please contact your product supplier Please visit the official website www raidon com tw to download drivers...

Страница 4: ...tual storage capacity of iR2301 recognized by the system may differ from the total capacity stated on the hard drives combined once the drives have been formatted 7 It is highly recommended for users to back up important data contained within theiR2301 unit on a regular basis or whenever the user feels necessary to a remote or a separate storage device RAIDON will not be responsible for any lost o...

Страница 5: ... 5 HDD tray please use the key included in the accessory kit to unlock the 2 5 HDD tray key lock and push the HDD eject button to the right the 2 5 HDD tray handle will pop up to remove the tray Install the 2 5 inch hard disk and secure it with the small screws included in the 4 parts package Lock Unlock 1 For the 3 5 HDD tray please use the key included in the accessory kit to unlock the HDD tray...

Страница 6: ... Port iR Internal Case RAID SATA Port SATA SATA cm SATA Cable 5 Properly connect SATA cable and power cable from your system to the device 6 Power on your system after hardware installation is completed and your operating system will automatically detect the hard drives from booting Then follow the steps from your operating system to partition and format the drives when necessary device will be re...

Страница 7: ...formation 1 In iR2301 the installed hard drive can be detected by the Device Manager of Computer Management for Windows 2 Customers can choose to format the hard drive by using the Disk Management tool of the operating system before using the iR2301 At this point the installation process is completely finished The user can freely retrieve and save data to iR2301 just like retrieving and saving dat...

Страница 8: ...ID 1 what will be the system s total storage capacity when adding a brand new hard drive 1 The total storage capacity for iR2301 is determined by the storage capacity of the primary hard drive installed during the initial usage 2 The storage capacity will not increase after initial installation even when place a brand new hard drive with larger storage capacity Why does the error message appear wh...

Страница 9: ...知 若您想 獲得 RAIDON 最新產品訊息 使用手冊 韌體或對 RAIDON 產品有任何疑問 請您聯絡當地供應商 或到 www raidon com tw 取得相關訊息 本手冊相關產品內容歸 銳銨科技股份有限公司 版權所有 打開包裝外盒後 包裝內容應包含下列組件 正面與背面示意圖 1 環境需求 工作溫度 0 40 32 104 儲存溫度 20 47 4 116 工作電壓 5V DC 請確認相關配件與產品本身是否有受損或配件缺少 若有任何疑問請與本產品供應商聯絡 請前往官網 www raidon com tw 下載驅動程式以及其餘相關資源 InTANK iR2777 S3 產品使用說明 iR2301 IR2301 產品本體 X1 內含抽取盒 x3 SATA 線 x2 快速安裝導引 x 1 螺絲及鑰匙 A B B C F G H I J D E D A F I C E G B H J ...

Страница 10: ...系統允許使用不同廠牌的硬碟 但如果要獲得更好的效能 我們強烈建議使用相同廠牌型號的硬碟 5 安裝硬碟前請先確認所使用的硬碟並無壞軌或是其他問題 以免導致系統損毀或資料遺失 6 硬碟格式化後 iR2301 的總使用儲存容量或許會與硬碟容量加總後的有所不同 7 強烈建議除了使用 iR2301 的資料儲存功能外 請針對重要資料備份到另一個儲存裝置上或遠端備 份 雙重備援您重要的資料 若您儲存在 iR2301 的資料損毀或遺失 RAIDON 將不負任何的責任 注意 一旦使用模式確認後 使用相同的硬碟進行模式切換將會導致資料遺失 如果需要進行模 式變更 請於變更前先進行資料備份 硬碟閒置 無硬碟 硬碟故障 資料存取 資料重建 來源 資料重建 目標 恆亮 恆亮 恆亮 藍色LED 恆亮 閃爍 閃爍 鳴叫 紅色LED 蜂鳴器 狀態 ...

Страница 11: ... Unlock Press 2 安裝 3 5 吋硬碟 請使用 6 顆零件包內附的大顆 螺絲加以固定 安裝 2 5 吋硬碟 請使用 4 顆零 件包內附的小顆螺絲加以固定 3 2 5 吋硬碟抽盒的部份 請使用零件包內附的鑰 匙解鎖硬碟抽取盒鎖 將頂出按鍵向右推移 硬碟抽取盒把手便會彈開 即可取出抽取盒 Lock Unlock 1 3 5 吋硬碟抽盒的部份 請使用零件包內附的鑰 匙解鎖卡榫按鍵 再將按下卡榫按鍵 硬碟抽 取盒把手便會彈開 即可取出抽取盒 Buzzer ON Buzzer OFF RAID 模式切換設定 Buzzer 切換設定 ...

Страница 12: ...鍵向右推移 硬碟抽取盒把手便會彈開 即可取出抽取盒 安裝 2 5 吋硬碟 請使用 4 顆零件包內附的小 顆螺絲加以固定 5 將硬碟安裝到抽取盒上 將抽取盒放入主機內並關上把手 6 連接 SATA 連接線與電源線 參照以下圖 SATA SATA cm SATA連接線 電源連接線 電源 主機版 SATA連接埠 iR 內接主機殼示意圖 RAID SATA連接埠 SATA SATA cm SATA連接線 7 硬體安裝完成 您可開啟電源進行相關設定與應用 8 你的作業系統將會自行辨識硬體 辨識成功後請先完成硬碟格式化 完成後即可使用 ...

Страница 13: ...設定 當 iR2301 的硬體安裝完成 即可準備進行開機動作 硬體安裝完成後 將 BIOS 的硬碟偵測設定為自動 iR2301 將會被視為如同一顆硬碟一般 當電腦開 機後 系統會顯示下列偵測訊息 1 安裝在 iR2301 中的硬碟能夠被 Windows 的裝置管理員偵測到 2 使用 iR2301 前 使用者可以透過磁碟管理選擇硬碟的格式 到此完成整個安裝程序 使用者可以如同存取一般硬碟般的使用 iR2301 如果使用上仍有問題 請參 閱附件的 Q A ...

Страница 14: ...自動進行資料備份 Rebuild 當 iR2301 重建完成 兩個硬碟內就已經是完全相同資料 可以 但是將會喪失原本 RAID 1 的資料安全功能 建議您在 RAID 1 模式下 應使用兩顆硬碟以 確保資料安全 在單顆硬碟下 RAID 1 將無法進行鏡射功能 一旦單一硬碟損毀則內部的資料將 全數損毀 建議用戶只要發生有一個硬碟損壞的狀態 應儘快購買一個新硬碟回來更換 若您使用的是 RAID 0 模式 請您先確認哪顆硬碟發生錯誤並關掉 iR2301 電源 將損毀的硬碟抽 出並置換上新的硬碟 再度開啟電源後系統將重建您的 RAID 0 系統 原本的資料將全數遺失 若您使用的是 RAID 1 模式 請用戶在不關機的情況下直接將損毀的硬碟抽出並置換上新的硬碟 當新硬碟置入後 系統將會自動開始 重建 程序 當重建完成 即可正常使用 請注意 當系 統處於資料重建中時 請勿將任一硬碟抽出 以確保資料的完...

Страница 15: ...iR2301 User Manual 13 www raidon com tw ...

Отзывы: