background image

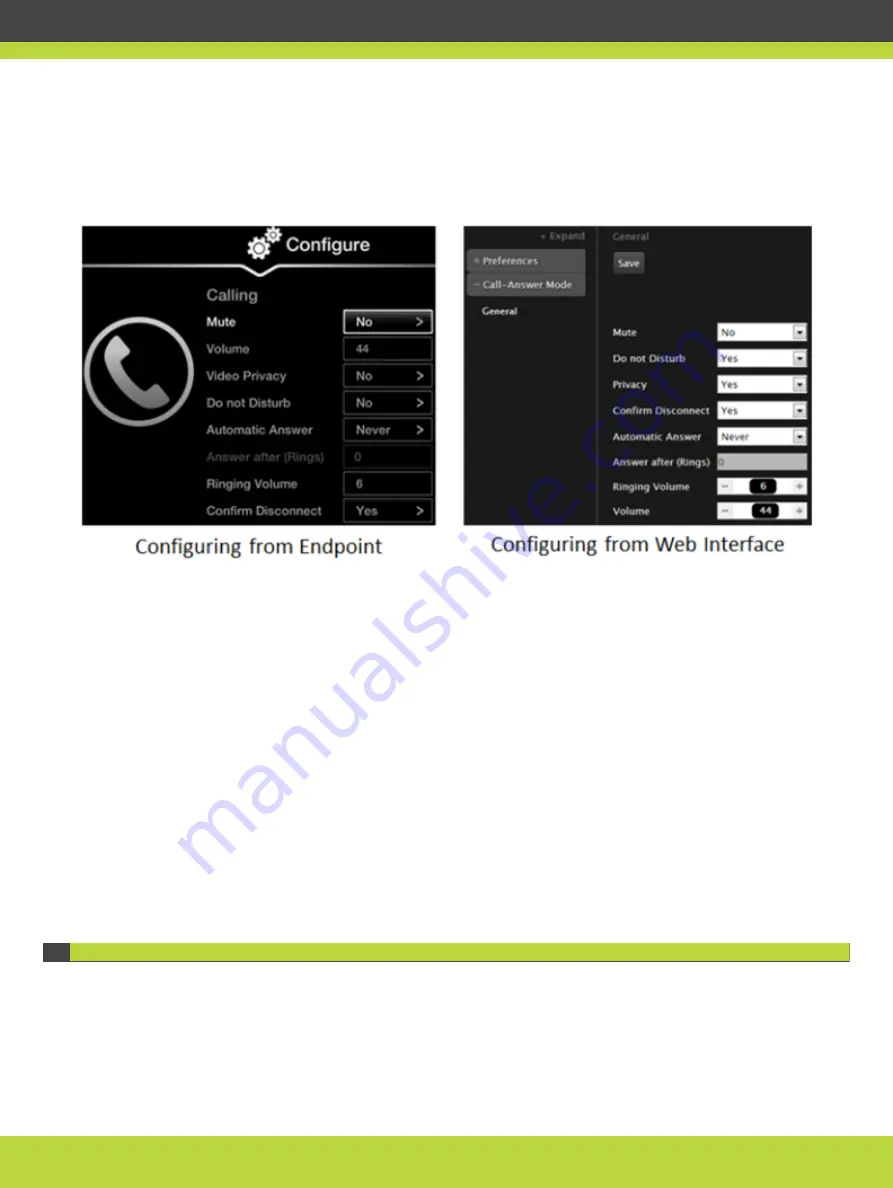
From the XT Series web interface, select Basic Settings > Call-Answer Mode > General.

From the endpoint's main menu, select Configure > Calling.

Figure 4-2

Calling preferences

Step 2

Select the required option from the Automatic answer list:

Yes always: Enables automatic answer to an incoming call. The system will not prompt
you to accept a call if the display shows the Home page.

Never: Disables automatic answer to an incoming call. The system will always prompt
you to accept a call.

Yes if not in a call (available only for XT Series with a built-in MCU): Enables automatic
answer only if the system is not in a call. If the system is in a call, it displays a
notification about another incoming call, allowing you to accept it. When you are already
in a call and accept an incoming call, the built-in MCU is activated, adding the caller to a
videoconference.

Step 3

(Optional) Enter the number of rings in the Answer after (Rings) list to specify after how
many rings the system accepts a call. This option is relevant only if automatic answering is
enabled.

Step 4

From the web interface only, select Save.

Confirming Call Disconnections


To prevent accidental disconnection from a call, you can configure the system to confirm
before a call is disconnected. By default, calls are disconnected when a participant ends the
call, without requiring a confirmation.

RADVISION | User Guide for Scopia XT4000 Series Version 3.1.1

Customizing Your User Experience | 61

Содержание SCOPIA XT4000 Series

Страница 1: ...User Guide Version 3 1 1 For Solution 7 7 8 0 x Scopia XT4000 Series...

Страница 2: ...DVISION Ltd reserves the right to revise this publication and make changes without obligation to notify any person of such revisions or changes RADVISION Ltd may make improvements or changes in the pr...

Страница 3: ...emote Control Unit 12 Pairing an XT Remote Control Unit with a XT Codec Unit 15 Performing Basic Configuration 17 Accessing the Quick Setup Procedure 18 Setting the System Name and Language 19 Adjusti...

Страница 4: ...opia XT Series 46 Selecting the Computer Display Resolution 48 Start Sharing Content Automatically 49 Sharing Content in the Local Conference Room 50 Sharing Content during a Call 51 Controlling your...

Страница 5: ...66 Resolving Monitor Display Problems 68 Resolving Problems with PC Presentations 70 Resolving XT Remote Control Unit Problems 70 Restoring Default User Settings 70 Resolving Video or Audio Disruption...

Страница 6: ...sampling rate audio encoding capability depending on the model The sampling rate is a measure of the accuracy of the audio when it is digitized As the frequency with which the audio data is collected...

Страница 7: ...int video calls and videoconferences via encrypted connections You can have up to three remote encrypted participants in a videoconference Note Using encryption is subject to local regulation in some...

Страница 8: ...a XT Series endpoints see Comparing Between Scopia XT Series Models on page 7 The Scopia XT Series includes the following models Scopia XT5000 With HD 1080p video at 60 frames per second fps Scopia XT...

Страница 9: ...for unparalleled large room coverage Figure 1 4 Scopia XT1200 Scopia XT Telepresence Experience the immersive feeling of telepresence using the Scopia XT Telepresence platform The excellent video qua...

Страница 10: ...place calls join videoconferences and navigate the system menus with your computer s keyboard and mouse The XT Remote Control Unit can be used as well The Scopia XT Executive has a built in high quali...

Страница 11: ...he powerful XT5000 Series codec Figure 1 7 Scopia XT Meeting Center The XT5000 Scopia XT1200 and Scopia XT Executive can also locally host HD continuous presence videoconferences with their built in M...

Страница 12: ...ng Scopia Mobile you can include up to 7 remote endpoints since one port is reserved for connecting to the Scopia XT Desktop Server For more information on the SMB Solution deployment see Solution Gui...

Страница 13: ...al camera Dual Video Resolution Dual video at 1080p 60 fps Dual video at 720p 60fps Dual video at 1080p 30fps Dual video at 720p 60fps Dual video at 1080p 60 30 fps Dual video at 1080p 60 fps High net...

Страница 14: ...ll and activate your XT Series For details see the following documentation Quick Setup Guide for Scopia XT Series Explains the simplest configuration necessary for the system to work properly Safety I...

Страница 15: ...answers calls or request a confirmation prompt before calls are disconnected How to Control the XT Series You can set up and control your XT Series as well as make calls in the following ways From the...

Страница 16: ...for Scopia XT Series Step 3 Optional Select the web interface language from the Language list Step 4 Select Login Accessing the Scopia XT Series Main Menu After switching on the Scopia XT Series the m...

Страница 17: ...ccess to the phonebook Present start sharing content from your computer Control Camera adjust camera position Configure perform basic configuration and check the system status Note When you access the...

Страница 18: ...ty to give you a smoother and more efficient videoconferencing experience Figure 2 3 on page 13 describes the functions of the XT Remote Control Unit Figure 2 3 The new XT Remote Control Unit RADVISIO...

Страница 19: ...ist press ok menu repeatedly to scroll through the options Use the XT Remote Control Unit keypad to enter letters and digits The default input method is abc1 you must press the required character key...

Страница 20: ...pairing them This is done by configuring the same numeric code in your XT Remote Control Unit and the system software An XT Remote Control Unit is configured with code 01 by default Before you begin...

Страница 21: ...On the XT Remote Control Unit press the and keys simultaneously The red led blinks twice Figure 2 5 Setting the code on the XT Remote Control Unit Step 5 Using the keypad type the number you just ent...

Страница 22: ...em administrator might already have set these parameters for you and customized certain features described in this guide to suit the environment of your company If your administrator set up PIN protec...

Страница 23: ...ring default settings and re installing software Note Your system administrator might already have set these parameters for you If your administrator set up PIN protection you need the PIN number befo...

Страница 24: ...ference call for example Hong Kong or 9th Floor Room or NY Office You can also select the country in which the system is located and the language in which the system menus are displayed Alternatively...

Страница 25: ...osition If your monitor does not center the image correctly perform this procedure Before you begin This procedure is performed as part of the Quick Setup Wizard after Setting the System Name and Lang...

Страница 26: ...corner Figure 2 9 Adjusting the image position Step 3 Use the arrow keys on the XT Remote Control Unit to position the image and then press ok menu Step 4 Press 2 to align the bottom right corner RAD...

Страница 27: ...the Quick Setup Procedure on page 18 Note If you are modifying the network settings after initial setup navigate to Configure Network GLAN 1 from the Main menu Procedure Step 1 Press ok menu and sele...

Страница 28: ...address automatically this field displays the subnet mask that has been assigned Gateway Enter the default gateway static IP address The gateway is used to route information between two subnets for ex...

Страница 29: ...is procedure completes the basic system configuration Before you begin This procedure is performed as part of the basic configuration after Configuring Network Settings on page 22 Consult with your ne...

Страница 30: ...ge This procedure describes how to set the name and language of the endpoint from the Scopia XT Series web interface You can also do this as part of the quick setup from the endpoint itself as describ...

Страница 31: ...Step 5 Select Save RADVISION User Guide for Scopia XT4000 Series Version 3 1 1 Getting Started 26...

Страница 32: ...om the Scopia XT Series Web Interface page 29 Modifying the Default Call Settings page 31 Answering and Ending a Video Call page 33 Joining a Videoconference page 34 Managing the Phone Book page 34 Ab...

Страница 33: ...dlock appears on your display For more information see Administrator Guide for Scopia XT Series Note Using encryption is subject to local regulation in some countries it is restricted or limited for u...

Страница 34: ...g the XT Remote Control Unit press or select Call and press ok menu Note To modify advanced calling options such as the call rate see Modifying the Default Call Settings on page 31 Figure 3 1 Dialing...

Страница 35: ...ber for a lower bandwidth call or 6 for an audio only call For more information on the dial plan in your organization contact your system administrator Procedure Step 1 Access the XT Series web interf...

Страница 36: ...se customized settings as described in Adding and Modifying Contacts in the Phone Book on page 34 Procedure Step 1 Access the Advanced Calling Options menu as follows From the endpoint choose the numb...

Страница 37: ...ing this personal endpoint or meeting room H 323 Select for H 323 endpoints such as other XT Series endpoints or when joining a videoconference hosted by a Scopia Elite MCU SIP Select for SIP endpoint...

Страница 38: ...wering a video call Table 3 2 Accepting and rejecting calls using XT Remote Control Unit Action Description Using XT Remote Control Unit Accept Select to answer the call Press or ok menu Reject Select...

Страница 39: ...sing encryption is subject to local regulation in some countries it is restricted or limited for usage Please consult your local reseller for further details Managing the Phone Book If you are using t...

Страница 40: ...Add From the XT Series web interface select Make your call Basic Options Recent Calls to add a recent number or select Make your call Contacts Add Contact Figure 3 5 Accessing recent calls and contac...

Страница 41: ...ting room Meeting Call Select to include this endpoint in a predefined set of endpoints to be called together Last Name Conference Name Enter a name to identify the contact either by last name or conf...

Страница 42: ...copia Elite MCU SIP Select for SIP endpoints such as when calling Microsoft Lync clients ISDN If enabled select to call ISDN endpoints Call Type Select whether the call is Audio Video or Audio Only Ra...

Страница 43: ...oint itself or from the Scopia XT Series web interface Procedure Step 1 Access the Contacts list as follows From the endpoint s main menu select Contacts From the XT Series web interface select Make y...

Страница 44: ...During the Call page 44 Selecting your Video Layout with One Monitor A video layout is the arrangement of participant images as they appear on the monitor in a videoconference If the meeting includes...

Страница 45: ...is in the small image If the remote endpoint does not show any content the display shows the remote video in the main part of the screen and the local presentation in the small image PaP The PaP Pictu...

Страница 46: ...participant images as they appear on the monitor in a videoconference If the meeting includes a presentation a layout can also refer to the arrangement of the presentation image together with the meet...

Страница 47: ...and both monitors show the available video and presentation local and remote according to the selected monitor configuration described below You can further arrange the monitor layouts and content by...

Страница 48: ...presentation local or remote if available and the local video in a small overlapping window HD2 shows the received video The audio is automatically enabled on HD1 HD1 Present HD2 Menu Video Rx HD1 sho...

Страница 49: ...ing the call you can change your monitor s current layout to the options described in Table 3 6 on page 44 For more information about video layouts in point to point calls see About Video Layouts on p...

Страница 50: ...he main part of the screen and the local presentation in the small image Access the In call menu by pressing ok menu on the XT Remote Control Unit and then select Layouts Alternatively press and hold...

Страница 51: ...ries feature that allows to easily connect a PC laptop to the DVI connector of the XT Codec Unit and immediately display a presentation or any other PC content on the monitors see Start Sharing Conten...

Страница 52: ...r This cable is not supplied with the system c Connect the VGA cable to the PC Laptop VGA out socket Step 2 Connect the computer audio to the XT Codec Unit When you share content from the PC during a...

Страница 53: ...ons and refresh frequencies This procedure assumes computers running Microsoft Windows Procedure Step 1 From the Windows Control Panel navigate to the screen resolution settings Step 2 Select the desi...

Страница 54: ...ur XT Series automatically starts presenting PC content on the monitors to others in the same room when you connect a PC When local presentation mode is enabled the XT Series Automatically starts pres...

Страница 55: ...cipants in the local conference room when the Scopia XT Series is not in a call This mode is called local presentation When in the local presentation mode the XT Series Does not automatically accept i...

Страница 56: ...tation mode automatically connect your computer to the DVI I connector of the XT Codec Unit The content appears on the monitors of your local conference room For more information about automatically e...

Страница 57: ...nnecting a Computer to the Scopia XT Series on page 46 To hear the PC input locally and remotely you need to route PC audio through the input audio port Navigate to Administrator settings I O connecti...

Страница 58: ...yed to control the audio output and input Blocking Video From the Scopia XT Series page 53 Adjusting the Volume page 54 Muting the Microphone Pod page 55 Blocking Video From the Scopia XT Series Durin...

Страница 59: ...Control Unit to adjust the sound you hear when receiving a call and during a videoconference To change the default speaker volume perform the procedure in this section This can be done from the endpo...

Страница 60: ...Microphone Pod in your room if you do not want participants at the remote site to hear you by doing one of the following Press the Mute key on the XT Remote Control Unit or press the Mute button on th...

Страница 61: ...upports H 243 which enables remote videoconference management You are not connecting to the videoconference via SIP This can be done from the endpoint itself or from the Scopia XT Series web interface...

Страница 62: ...eoconference by choosing one of the following actions Select Make Lecturer to broadcast the video of the endpoint like a lecturer All participants see only the video of the selected endpoint Select Di...

Страница 63: ...ing remote participants Step 5 To stop moderating select Release chair Or To end the videoconference select End Meeting RADVISION User Guide for Scopia XT4000 Series Version 3 1 1 Making Point to Poin...

Страница 64: ...opia XT Series Endpoint You can set a PIN code to access basic settings such as the language displayed on the interface If set you are required to enter this code before viewing or modifying any basic...

Страница 65: ...ield Step 5 Save your changes as follows From the endpoint select Done From the web interface select Save Use this new PIN the next time you are required access basic settings Setting Call Answering P...

Страница 66: ...ystem is in a call it displays a notification about another incoming call allowing you to accept it When you are already in a call and accept an incoming call the built in MCU is activated adding the...

Страница 67: ...the call is disconnected The icon appears in the system information area of the monitor display The caller receives a message to indicate that your endpoint is currently busy To block an incoming call...

Страница 68: ...disconnected You can also block each incoming call manually as described in Blocking an Incoming Call on page 62 Even when the system is set to blocking all incoming calls by default you can temporar...

Страница 69: ...our local endpoint Alternatively you can block video manually during a call as described in Blocking Video From the Scopia XT Series on page 53 Procedure Step 1 Access the call settings as follows Fro...

Страница 70: ...inistrator may have configured the screen saver to start automatically when Scopia XT Series is not used for some time You can activate the screen saver at any moment by pressing the Power key on the...

Страница 71: ...tion for Customer Support When contacting customer support or your system administrator you may need to provide information about the system This procedure describes how to view the following system i...

Страница 72: ...ote Control Unit Note If your system is currently in a call press ok menu and select Stats Configure About Figure 5 1 Viewing system information Step 2 To view additional system information such as IP...

Страница 73: ...a call you can set the refresh frequency of the monitor display Set to 50 Hz by pressing then 5 Set to 60 Hz by pressing then 6 Problem The system displays a blank screen Solution Verify the power cor...

Страница 74: ...ribed in Administrator Guide for SCOPIA XT Series 1 Access the monitor settings as follows From the endpoint s main menu select Configure Advanced I O connections Monitor Graphic Adjustments From the...

Страница 75: ...described in Scopia XT Series Installation Guide When the XT Remote Control Unit s battery power is low an icon appears in the system menus letting you know that you should replace the battery Half ch...

Страница 76: ...lect Configure General Figure 5 3 Enabling advanced settings Step 2 Set Show Advanced Settings to Yes Step 3 Press the Back key on the XT Remote Control Unit Step 4 Select Advanced Step 5 Enter your f...

Страница 77: ...can occur due to electromagnetic interference EMI caused by other devices such as cellular phones Solution Avoid using your cellular phones during your meeting to avoid electromagnetic interference P...

Страница 78: ...n video conferencing systems innovative converged mobile services and highly scalable video enabled desktop platforms on IP 3G and emerging next generation networks For more information about RADVISIO...

Отзывы: