

VIDEO MENU
Resolution
FHD 1080P
1920x1080 /1080i
144x1080 / 720P
1280x720/ WVGA
848x480 / VGA
640 x480 / QVGA
320x240
Video resolution
Loop Recording *
Off / 1Minute /
2 Minutes * / 3
Minutes
Cycle recording:
Saving time of each
section on SD card
Exposure
+2/3 / +1/3 / +0.0 /
- 1/3/ - 2/3 / -1.0 /
-4/3 / -5/3 / -2.0
A
Luminance
adjustment
Motion Detection *
Off *
Automatic recording
when movement is
detected
On
Audio
Off
Sound recording
On
Date stamp
Off
Date indication while
recording
On
G-sensor *
Off
Adjust gravity accele-
ration for activation
of the G-sensor
2G
4G
8G *
Button sound
On
Off
GB
NL
ILLUSTRATIONS
USER’S
MANUAL
GB NL FR D
DECLARATION OF CONFORMITY
We, the undersigned
Company:
TE-GROUP nv
Address:
Kapelsestraat 61, 2950 Kapellen - BELGIUM
declare, that the following equipment:
Product Name:
Quintezz EC -Q35
Product Type:
AC/DC compressor cooler / freezer
Conforms with the following requirements:
EN 60335-2-24: 2003 + A11: 2004 + A1: 2005 + A2: 2007
EN 60335-1: 2002 + A11: 2004 + A1: 2004 + A12: 2006 + A2: 2006
EN 55014-1: 2006
EN 61000-3-2: 2006
EN 55014-2: 1997 + A1: 2001
EN 61000-3-3: 1995 + A1: 2001 + A2: 2005
Quintezz FULL HD
Dashboard camera
Complies with the essential requirements, which are specified in the directive 2004/108/EC on the approximation of the
laws on the Member States relating to electromagnetic compatibility.
This product has been tested against following
standards and specifications, applying versions
valid on June 2013:
EN 55022:2010
EN 55024:2010
Hereby,
------------------- Manual/FULL HD-Dashcam/09-13/V02 ---------------------
Copyright©Quintezz
QUINTEZZ FULL HD D
INTRODUCTION
Congratulations on your purchase. Please read all instructions carefully before using
your device.
You can use the QUINTEZZ FULL HD D inside your car to record your drives
and dangerous situations or accidents on the road while driving.
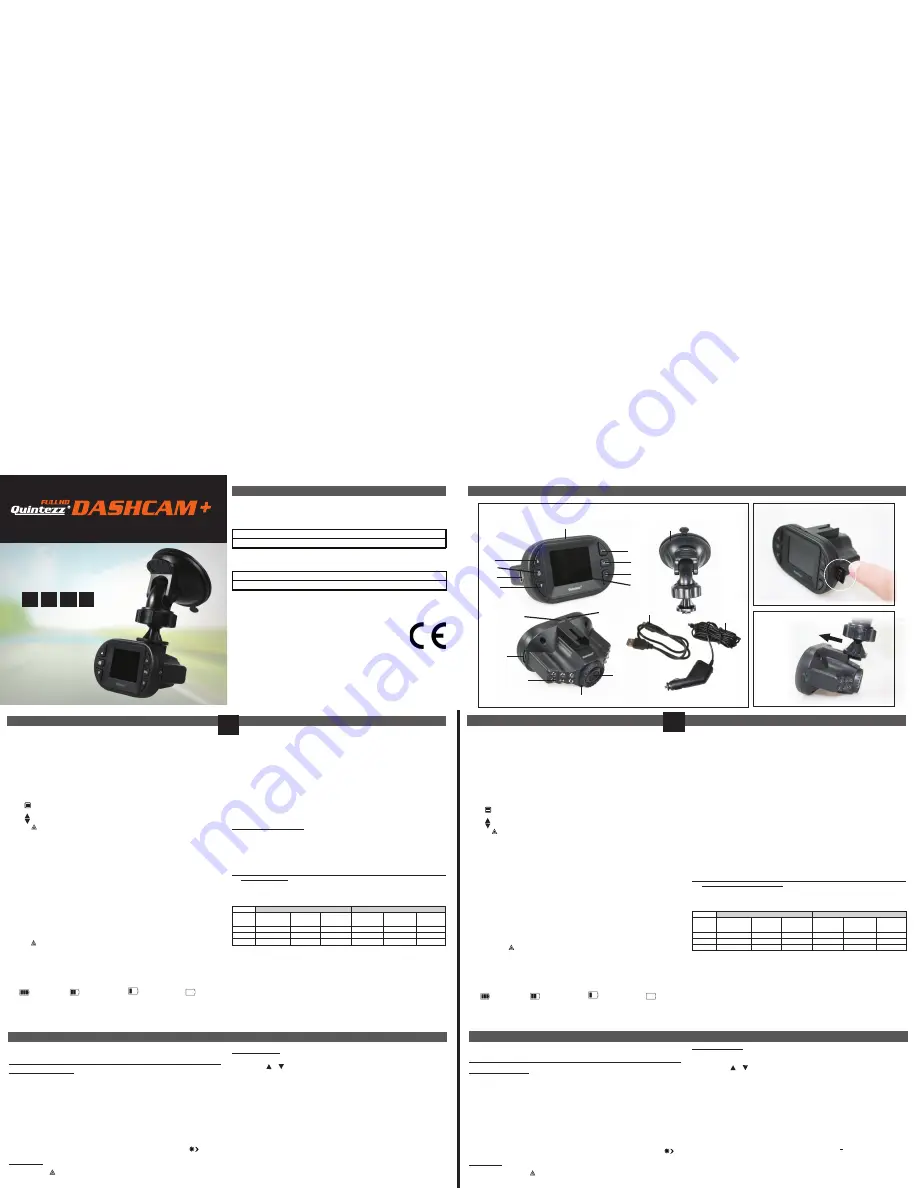
PACKAGE CONTENTS
See illustration I
1. Camera DVR unit
a. POWER : Turn device on/off (Press shortly to turn the device on. Press and hold
to shut it off when not connected to power source) + press shortly to turn on/off
the IR LED lights
b. : Enter/exit the menu
c. OK : Confirm the selected option
d. : Go up in the menu or zoom in digitally x 1/2/3/4
e. : Go down in the menu or zoom out digitally x 1/2/3/4
f. M/ : Mode switching between VIDEO recording/PHOTO recording/ PLAYBACK/
Browse images
g. USB connection
h. 1.5” TFT LTPS screen
i. Microphone
j. Reset : If your device stops working (crashes), you can reset your device and
turn it on again.
k. Micro SD TF card slot
l. IR LED’s
m. Lens
n. Speaker
2. Mounting bracket with suction cup
3. 12/24V DC 5V – 700 mA Car charger
4. USB connection cable
G-SENSOR FUNCTION:
When gravity acceleration reaches 8 g (1g = 9.8m/s), the camera will automatically
store the video and protect it against being auto-deleted. You can change this setting
manually if desired.
SOS FUNCTION:
Press M/ (f) shortly to immediately save and lock the video while it’s being recorded.
shortly to immediately save and lock the video while it’s being recorded.
On the micro-SD card, this file will be tagged with SOSxxxxx.
CHARGING
• The device has a built-in Li-ion rechargeable battery that has to be fully charged
and discharged 4 times on battery function to activate the maximum capacity of
the battery. Charging time is about 2 hours maximum.
• The status of the battery is indicated by following symbols:
100%
70%
25%
0%
The red indication light turns on while charging and turns off once the battery has
been fully charged.
• The camera records for approximately 1h when not connected to any power source.
Charging options:
Connect the device to a computer/laptop using the USB connection cable (4). OR
OR
Plug the device into the included car charger (3) for use in car or truck.
As soon as the car engine turns on, the device will start recording. The QUINTEZZ
FULL HD D will now also be charged while recording. When the car charger
is disconnected from the unit, the QUINTEZZ FULL HD D will shut down
automatically and save the files.
Caution:
• With low battery, the QUINTEZZ FULL HD D will enter a protection mode.
Please charge the battery to ensure you can turn on the device and continue to use it.
• QUINTEZZ FULL HD D can only be used with the supplied 5V (12/24V) car
power supply. Any other power supply may cause errors and/or permanent damage to
the device.
USING MICRO SD CARD (TF) (not included, optionally available)
See illustration II
• Insert your micro SD card into the SD slot until it clicks into place.
• To remove the micro SD Card, press the card lightly. It is partially ejected allowing
you to pull the card out.
• With no card in the SD slot, the display will inform you with an ‘Insert micro SD
card’ message.
Note:
1. We recommend using a 8GB SDHC micro card (or higher) with class 10, 15 MB/s
writing (or higher).
2. Without SD card, the device will NOT work�
Without SD card, the device will NOT work�
3. If the micro SD card is inserted in a wrong way (difficult to insert), it may damage
the device and the memory card.
4. The device will automatically set up the micro SD-card after it’s been inserted.
VIDEO *
IMAGE *
MICRO
SD CARD
1920xFHD
1080p
1440 x1080i
1280x 720p
4032x3024
12MP
2592x1944
5MP
2048X1536
3MP
32GB
225 min
185 min
252 min
12624
31600
48316
16 GB
112 min
92 min
126 min
6312
15080
24158
8GB
56 min
46 min
63 min
3156
7540
12079
* Depends on the brand, model and type (class) of the micro SD card�� Data are appro�imate�� �o rights
micro SD card�� Data are appro�imate�� �o rights
SD card�� Data are appro�imate�� �o rights
reserved for these data’s��
MOUNTING
See illustration III
• Slide the QUINTEZZ FULL HD D (1) into the mounting bracket (2).
• Moisten the suction cup, place it on the inside of your windshield and close the cup
using the lever. We recommend placing the QUINTEZZ FULL HD D on
the right side of the rear view mirror.
• Adjust the bracket by using the adjustment knobs.
• Make sure the camera is mounted horizontal for the best view.
• Connect the car charger (3) to the car lighter for power.
USE OF THE QUINTEZZ FULL HD D
A. MODES
Attention: This menu will not work if PC Camera and/or Mass Storage mode is activated.
VIDEO RECORDING MODE
A camera icon would be shown in the upper left corner of the display��
• When the QUINTEZZ FULL HD DASHCAM + is connected to your cars power
supply, it will start Video recording as soon as the car engine is started. It will stop
recording after the car is stopped.
• When the QUINTEZZ FULL HD DASHCAM + is not connected to the cars power
supply, press the POWER button (a), and press the OK button (c) to start recording.
The unit will automatically be in Video recording mode. Press OK (c) again to stop
recording and save the files automatically.
• Loop recording: During recording, the device will save each video file every 1, 2 or
3 minutes automatically. When the micro SD card is full, the device will delete the
oldest video files automatically one by one.
Note:
The infrared video recording function can be turned on manually in case of low-light
circumstances if necessary. The display will show the following symbol:
)
PHOTO MODE
A photo icon would be shown in the upper left corner of the display��
• Press the M/
M/ - button (f) 1x if you want to make pictures instead of recordings.
button (f) 1x if you want to make pictures instead of recordings.
• Press the OK button (c) every time you want to take a picture.
PLAYBACK MODE
A playback icon would be shown in the upper left corner of the display��
• For Playback mode, press the M/
M/ - button (f) 2x.
button (f) 2x.
• Use the & buttons (d-e) to scroll through the recordings.
buttons (d-e) to scroll through the recordings.
• Press OK (c) to start playback.
• Press the OK button (c) to pause or begin playback again.
OK button (c) to pause or begin playback again.
button (c) to pause or begin playback again.
PC CAMERA MODE
• You can connect the QUINTEZZ FULL HD D to your PC by using the supplied
USB cable. You can also use it to backup or playback files/videos on your PC.
• Press the & buttons (d-e) to choose the mode and then press OK (c):
buttons (d-e) to choose the mode and then press OK (c):
- Mass storage (USB mode) : It is a computer interface between a computer and
Mass storage (USB mode) : It is a computer interface between a computer and
: It is a computer interface between a computer and
a digital camera which shows the digital camera as a removable disk drive
attached to the computer.
- PC Camera: A webcam is a
: A webcam is a video camera which feeds its images in real time to a
computer or computer network via USB.
You don’t need to install drivers to use the HD D with your PC because these
are already installed by Windows/Macintosh in the Windows/Macintosh pack.
You should connect the HD D as following :
1. Make sure the battery is charged.
2. Only use the SUPLLIED USB cable.
3. Turn the DASHCAM ON.
4. Connect the USB cable with the D before connecting it to the PC.
5. Select “MASS STORAGE”on the DASHCAM and press the OK button (c).
6. The driver will now install itself and in the folder “My computer” on your desktop
you will see a new (hard)disk (it is possible that a window will appear in which you
can indicate how you would like to view the files). The PC camera driver will be
installed separately when PC Camera is selected.
7. You can now see all files in the folder and double-click them to watch the videos
using the standard Windows Media Player or Apple Quicktime (you can select
yourself).
Note:
• You can also remove the micro SD card from the DASHCAM and place it in a (built-
in) micro SD card reader from your PC or a separate micro SD card reader if you
have one. This is a quick and easy-to-use solution.
B. MENU SETTINGS
Attention: This menu will not work if PC
Camera and/or Mass Storage mode is
activated.
1. Power on the unit with the supplied
car charger or by using a fully charged
battery.
2. Press M/
M/ (f) until you have selected
(f) until you have selected
the desired mode
#
.
3. Press (b) to enter the menu
#
.
4. Press & buttons (d-e) to scroll
buttons (d-e) to scroll
through the submenu’s.
5. After selection, click OK (c) to confirm
and save the setting.
6. Press (b) to exit the menu.
For example: to set date and time, please
follow these steps:
1. Make sure the battery is charged.
2. Turn the DASHCAM ON (or use it with
the car charger in the car).
3. Press (b).
4. Press (b) again.
5. Use the (e) button to go to DATE &
TIME.
6. Press the OK button (c).
7. You can now use the & buttons
buttons
(d-e) to change the date and time and
confirm each setting by pressing the
OK button (c). You can exit this menu by
pressing the (b) button.
C. SYSTEM SETTINGS
Attention: This menu will not work if PC Camera and/or Mass Storage
mode is activated.
1. Power on the unit.
2. Press (b) to enter the menu when the device is in recording mode
#
.
3. Press (b) again to select the set up menu.
4. Use the & buttons (d-e) to scroll through the submenu’s.
buttons (d-e) to scroll through the submenu’s.
5. After selection, click OK (c) to confirm and save the setting.
6. Press (b) to exit.
7. The new settings will be applied after restart of the device.
* Recommended setting
#
Only works when no recording has been started.
PHOTO MENU
Timer
Single / 2S Timer / 5S Timer / 10S Timer
Resolution
12MP 4032x3024 / 10MP 3648 x2736 / 8MP 3264 x 2448
/ 5MP 2592x1944 / 3MP 2048x1536/ 2MP HD 1920x1080
/ VGA 640x 480 / 1.3MP 1280x960
Burst
Off
Burst mode
On
Quality
Fine / Normal / Low
Sharpness
Strong / Normal / Soft
White Balance
Auto* / Daylight / Cloudy / Tungsten / Fluorescent
Color
Standard / Black & White / Sepia
ISO
Auto* / 100 / 200 / 400
Exposure
+2/3 / +1/3 / +0.0 / - 1/3 / - 2/3 / -1.0 / -4/3 / -5/3 / -2.0
Luminance adjustment
Anti-Shaking *
Off
On *
Quick Review
Off / 2 Seconds / 5 Seconds
Date Stamp
Off / Date / Set Date/Time
Date indication on photo
PLAYBACK MENU
Delete
Delete One / Delete All
File removal
Protect
Lock One / Unlock One / Lock All/ Unlock All
File locking
Set Date/Time
MM/DD/YY
DD/MM/YY
YY/MM/DD
Auto Power Off *
Off */ 1Minute / 3 Minutes
Automatic power off when use on battery
Language
English, Dutch, French, Spanish, Italian, Portuguese, Czech,
Hungarian, Swedish, Russian, Polish, German, Turkish, Greek
HZ frequency
50 Hz / 60 Hz
Backlight Saver *
Off */ 3 Minutes/ 5 Minutes/ 10 Minutes
*/ 3 Minutes/ 5 Minutes/ 10 Minutes
/ 3 Minutes/ 5 Minutes/ 10 Minutes
Screensaver when use on battery
Screen rotation
Off / On
Format
Internal memory / Micro SD card
In case of problems with your micro SD-card (f��e��� “Memory full”) we recommend formatting your
card from this menu��
Default Setting
Cancel / OK
Reset to factory settings
Firmware version
TROUBLE SHOOTING
I cannot take pictures or record a video.
→ Check if the TF-card has enough free storage left and make sure it is unlocked.
The device does not stop recording automatically .
→ Use the compatible high-speed Micro SD TF card with SDHC because of big HD video data.
The SDHC TF card needs to be class 6 or higher.
I get the message “file error” while watching pictures or playing a recorded video.
→ The files have not been saved correctly due to a micro SD card storage error. Please use the
format option in the menu of your device to reformat your TF-card.
My recordings are blurry.
→ Make sure the lens is clean. Remove dust or finger prints if necessary.
I only see a black screen while trying to record air or water scenery.
→ Scenes with big contrasts will influence your automatic image control function. You can adjust
the settings manually in the “Exposure” menu.
The colour is not perfect on cloudy day or in natural daylight.
→ Reset the “White Balance” option to automatic.
Cross-stripe interference in image.
→ This is caused by an incorrect light frequency. Please adjust the setting to 50 or 60 Hz
depending on the local power supply values.
My device keeps crashing.
→ Reset the device by pressing the reset button with a sharp object (f.ex. a paperclip).
→ Reset the Dashcam back to original factory settings through the menu in the device.
CUSTOMER SUPPORT
For all product related questions, please contact:
support
@
quintezz.com
or consult our website
www.quintezz.com
for more information.
GUARANTEE
Copyright © Quintezz. Quintezz is a registered trademark of TE-Group NV.
The Quintezz brand stands for superior product quality and outstanding
customer service. That is why Quintezz warrants this product against all
defects in material and workmanship for a period of
two (2) years
from the
date of original purchase of the product. The conditions of this guarantee
and the extent of responsibility of Quintezz under this guarantee can be
downloaded from our website: www.quintezz.com.
VIDEO MENU
Resolutie
FHD 1080P
1920x1080 / 1080i
144x1080 / 720P
1280x720 / WVGA
848x480 / VGA
640 x480 / QVGA
320x240
Videoresolutie
Loop Opname*
Uit / 1 min. / 2
min. * / 3 min.
Cyclusopname: tijd
van ieder deel op
de micro SD-kaart
opslaan
Belichting
+2/3 / +1/3 / +0.0 /
- 1/3 / - 2/3 / -1.0 /
-4/3 / -5/3 / -2.0
Manuele instelling
helderheid
Bewegingsdetect.*
Uit*
Automatisch
opnemen wanneer
er beweging wordt
gedetecteerd
Aan
Audio
Uit
Opname geluid
Aan
Datumstempel
Uit
Weergave datum op
de opname
Aan
G-sensor *
Uit
Instelling
zwaartekracht
versnelling voor
activatie G-sensor
2G
4G
8G *
Bieptoon
Aan
Uit
FOTO MENU
Timer
Eén / Timer 2 sec. / Timer 5 sec. / Timer 10 sec.
Resolutie
12MP 4032x3024 / 10MP 3648x2736 / 8MP 3264 x
2448 / 5MP 2592x1944 / 3MP 2048x1536 / 2MP HD
1920x1080 / VGA 640x480 / 1.3MP 1280x960
Serie
Uit
Burst mode
Aan
Kwaliteit
Fijn / Normaal / Laag
Scherpte
Sterk / Normaal / Zwak
Witbalans
Auto* / Daglicht / Bewolkt / Tungsten / Fluorescerend
Kleur
Standaard / Zwart/wit / Sepia
ISO
Auto* / 100 / 200 / 400
Belichting
+2/3 / +1/3 / +0.0 / - 1/3 / - 2/3 / -1.0 / -4/3 / -5/3 / -2.0
Instelling helderheid
Anti-schok*
Uit
Aan *
Snel bekijken
Uit / 2 sec. / 5 sec.
Date Stamp
Uit / Datum / Datum&tijd
Weergave datum op de foto
AFSPEELMENU
Wissen
1 wissen / Alles verwijderen
Verwijdering bestand
Beveiligen
1 vergrend. / 1 ontgrend. / Alles vergrend. / Alles
ontgrend.
Vergrendeling bestand
QUINTEZZ FULL HD DASHCAM +
INLEIDING
Gefeliciteerd met uw aankoop. Gelieve alle instructies aandachtig te lezen voordat u
het apparaat gebruikt.
U kunt de QUINTEZZ FULL HD DASHCAM + in uw auto gebruiken om uw ritten en
gevaarlijke situaties en ongevallen op de weg tijdens het rijden op te nemen.
INHOUD VAN HET PAKKET
Zie afbeelding I
1. Camera DVR-systeem
a. AAN/UIT: apparaat in- en uitschakelen (1x kort indrukken om aan te zetten
apparaat in- en uitschakelen (1x kort indrukken om aan te zetten
en ingedrukt houden om uit te schakelen wanneer het apparaat niet op een
stroombron aangesloten is) + IR LED lampen aan- en uitschakelen (kort
indrukken)
b. : in/uit het menu gaan
c. OK: de geselecteerde optie bevestigen
de geselecteerde optie bevestigen
d. : omhoog in menu en voor 1/2/3/4 x digitaal inzoomen
omhoog in menu en voor 1/2/3/4 x digitaal inzoomen
e. : omlaag in menu en voor 1/2/3/4 x digitaal uitzoomen
f. M/ : mode omschakelen tussen VIDEO-opnamen/FOTO-opnamen/AFSPELEN/
Foto’s bekijken
g. USB aansluiting
h. 1.5” TFT LTPS scherm
i. Microfoon
j. Reset : als het toestel blokkeert (crash), kunt u een reset uitvoeren om het
toestel te herstarten
k. Micro SD TF kaartsleuf
l. IR LED’s
m. Lens
n. Luidspreker
2. Monteerhouder met zuignap
3. 12/24V DC 5V – 700 mA autolader
4. USB-aansluitkabel
G-SENSOR FUNCTIE:
Wanneer de zwaartekracht versnelling 8g (1g = 9.8m/s) bereikt, zal de camera auto-
matisch de beelden als niet-verwijderbaar opslaan. U kunt deze instelling zelf wijzigen
indien gewenst.
SOS FUNCTIE:
Druk kort op M/ (f) om de huidige video-opnamen onmiddellijk beveiligd op te slaan
tijdens de opname. Op de micro-SD kaart wordt dit bestand aangeduid als SOSxxxxx.
OPLADEN
• In het apparaat is een oplaadbare Li-ion batterij ingebouwd die 4 keer volledig
opgeladen en ontladen moet worden op batterij-functie om de maximale capaciteit
van de batterij te activeren. De oplaadtijd bedraagt ongeveer 2 uur (maximum).
De oplaadtijd bedraagt ongeveer 2 uur (maximum).
•
De status van de batterij wordt aangegeven door de volgende symbolen:
100%
70%
25%
0%
Het rode indicatielampje brandt tijdens het opladen en gaat uit als de batterij
volledig opgeladen is.
• De camera werkt max. 1 uur wanneer hij niet op een stroombron aangesloten is.
Opties voor het opladen:
Sluit het apparaat met behulp van de USB-aansluitkabel (4) op een computer/laptop aan.
OF
Plug het apparaat in de meegeleverde autolader (3) voor gebruik in een auto/vrachtwagen.
Zodra de motor van de auto wordt opgestart, begint de camera beelden op te nemen.
De QUINTEZZ FULL HD D wordt nu tijdens het opnemen ook opgeladen.
Wanneer de autolader van het toestel wordt losgekoppeld, valt de QUINTEZZ FULL HD
D automatisch uit en slaat hij alle bestanden op.
Opgelet:
• Wanneer het batterijlaadniveau laag is, gaat de D in de beschermingsstand
staan. Laad de batterij op, zodat u het apparaat zeker kunt inschakelen en verder
kunt gebruiken.
• De DASHCAM + kan enkel gebruikt worden met de bijgeleverde 5V (12/24V)
autolader anders kan er een defect optreden.
GEBRUIK VAN EEN MICRO SD-KAART (TF) (niet meegeleverd, optioneel te
verkrijgen)
Zie afbeelding II
• Schuif uw micro SD-kaart in de micro SD-sleuf tot ze op haar plaats klikt.
• Druk licht op de micro SD-kaart als u ze uit de sleuf wilt halen. De kaart wordt dan
gedeeltelijk uitgeworpen, waarna u ze gemakkelijk kunt uitnemen.
• Op het display staat het bericht ‘Micro SD kaart insteken’ wanneer er geen kaart in
de micro SD-sleuf zit.
Opmerking:
1. Wij adviseren het gebruik van een 8GB micro SDHC-kaart (of hoger) met klasse
10, 15 MB/s schrijven (of hoger).
2. Zonder SD-kaart, werkt het toestel NIET�
3. Als de micro SD-kaart verkeerd wordt ingevoerd (moeilijk om in te voeren), bestaat
het risico dat het apparaat en de geheugenkaart beschadigd raken.
4. Het apparaat stelt de micro SD-kaart in nadat ze werd ingevoerd.
VIDEO *
IMAGE *
MICRO
SD CARD
1920xFHD
1080p
1440 x1080i
1280x 720p
4032x3024
12MP
2592x1944
5MP
2048X1536
3MP
32GB
225 min
185 min
252 min
12624
31600
48316
16 GB
112 min
92 min
126 min
6312
15080
24158
8GB
56 min
46 min
63 min
3156
7540
12079
* Afhankelijk van het merk, model en “klasse”type van de micro SD-kaart en bij benadering
.
MONTAGE
Zie afbeelding III
• Schuif de QUINTEZZ FULL HD D (1) op de monteerhouder (2).
• Maak de zuignap vochtig, plaats ze op de binnenkant van de voorruit en sluit de
zuignap met behulp van de hendel. We adviseren u om de QUINTEZZ FULL HD
D rechts van de achteruitkijkspiegel op te stellen.
• Stel de beugel in met behulp van de steldraaiknoppen.
• Monteer de camera horizontaal, zodat u het beste zicht krijgt.
• Sluit de autolader (3) op de sigarettenaansteker in de auto aan voor de nodige
stroom.
GEBRUIK VAN DE QUINTEZZ FULL HD D
A.MODI
Let op! Dit menu werkt niet indien de PC Camera en/of Mass Storage modus geactiveerd is.
VIDEO-OPNAMEMODUS
In de linkerbovenhoek van het display wordt een camerapictogram weergegeven��
• Wanneer de QUINTEZZ FULL HD DASHCAM + op de voeding van uw auto is
aangesloten, begint hij videobeelden op te nemen zodra de motor van de auto
wordt opgestart. Hij stopt met opnemen zodra de auto tot stilstand is gekomen.
Hij stopt met opnemen zodra de auto tot stilstand is gekomen.
• Wanneer de QUINTEZZ FULL HD D niet op de voeding van uw auto is
aangesloten, moet u op de ON/OFF-knop (a) en daarna op de OK-knop (c) drukken
om beelden te beginnen op te nemen. Het toestel staat automatisch in de video-
opnamemodus. Druk nog eens op OK (c) als u de opname wilt stoppen en de
bestanden automatisch wilt opslaan.
• Opnemen in een lus: tijdens het opnemen slaat het apparaat ieder videobestand
elke 1,2 of 3 minuten automatisch op. Wanneer de micro SD-kaart vol is, wist het
toestel de oudste videobestanden automatisch 1 voor 1.
Opmerking:
In slechte belichtingsomstandigheden kan u de infrarood video-opnamefunctie zelf
inschakelen wanneer nodig. U zult dan in het scherm dit symbool zien staan:
FOTOMODUS
In de linkerbovenhoek van het display wordt een fotopictogram weergegeven��
• Druk 1 keer op de M/ -knop (f) als u foto's in plaats van videobeelden wilt nemen.
• Druk op de OK-knop (c) telkens wanneer u een foto wilt nemen.
AFSPEELMODUS
In de linkerbovenhoek van het display wordt een afspeelpictogram weergegeven��
• Druk 2 keer op de M/ -knop (f) als u de afspeelmodus kiest.
• Met behulp van de & knoppen (d-e) kunt u doorheen de opnamen scrollen.
• Druk op OK (c) om met het afspelen te beginnen.
• Druk op de OK knop (d) als u de opname tijdelijk wilt onderbreken of als u opnieuw
wilt beginnen af te spelen.
PC CAMERAMODUS
• U kunt de QUINTEZZ FULL HD D met behulp van de meegeleverde USB-
kabel op uw PC aansluiten. Hiermee kunt u een back-up maken of kunt u de video/
Hiermee kunt u een back-up maken of kunt u de video/
foto bestanden op uw PC afspelen.
• Druk op de & knoppen (d-e) om de mode te kiezen en druk dan op OK (c) :
- Mass storage (USB mode): dit is een computerinterface tussen een computer
en een digitale camera, die de digitale camera weergeeft als een losse diskdrive
die met de computer verbonden is.
- PC Camera: een webcam is een videocamera die beelden in real time naar een
computer of een computernetwerk stuurt via USB.
Om de DASHCAM + op uw PC te gebruiken zijn er geen drivers nodig aangezien
deze door Windows / Macintosh zelf geïnstalleerd en voorzien zijn in het Windows /
Macintosh pakket*.
U moet de D als volgt aansluiten:
1. Zorg dat de batterij geladen is.
2. Maak enkel gebruik van de MEEGELEVERDE USB kabel.
3. Zet de DASHCAM AAN.
4. Verbind vervolgens de USB kabel met de DASHCAM en dan pas met de PC.
5. Kies op de DASHCAM “Mass storage” en druk op de OK-knop (c).
6. De driver zal zichzelf nu installeren en onder “Deze computer” op uw bureaublad
zal dan een nieuwe (harde)-schijf aangemaakt zijn en te zien zijn (het kan ook zijn
dat er automatisch een venster geopend wordt waarin u kan aangeven hoe u de
bestanden wilt bekijken). De PC camera driver zal apart geïnstalleerd worden als
PC Camera geselecteerd is.
7. U kunt dan de bestanden zien in een map en deze dubbelklikken om de video te
laten afspelen door de standaard Windows Media Player of Apple Quicktime (kunt
u eventueel zelf selecteren).
Opmerking:
• U kunt ook de micro SD-kaart uit de Dashcam halen en deze in een (ingebouwde)
micro SD-kaart lezer plaatsen van uw PC of een losse micro SD-kaart lezer
gebruiken indien u deze zou hebben. Dit gaat sneller en is gemakkelijk in gebruik.
B. INSTELLINGEN MENU
Let op! Dit menu werkt niet indien de
PC Camera en/of Mass Storage modus
geactiveerd is.
1. Schakel het toestel in via de meegeleverde
autolader of via de reeds opgeladen batterij
2. Druk op M/ (f) tot u de gewenste mode
hebt geselecteerd
#
.
3. Druk op (b) om in het menu te gaan
#
.
4. Druk op de & knoppen (d-e) om
doorheen de submenu’s te scrollen.
5. Klik na de selectie op OK (c) om uw keuze
te bevestigen en de instelling op te slaan.
6. Druk op (b) om het menu te verlaten.
Bijvoorbeeld: Voor het instellen van datum en
tijd, volgt u de volgende stappen:
1. Zorg dat de batterij geladen is.
2. Zet de DASHCAM AAN (of gebruik hem
icm de auto lader in de auto).
3. Druk op (b).
4. Druk dan nogmaals op (b).
5. Ga dan met de (e) knop naar DATUM &
TIJD (Date & Time).
6. Druk op de OK knop (c) .
7. U kunt nu met de & knoppen (d-e)
de data wijzigen alsmede de tijd en deze
elke keer bevestigen met de OK knop (c).
Daarna gaat u uit het menu door op (b)
te drukken.
C. SYSTEEMINSTELLINGEN
Let op! Dit menu werkt niet indien de PC Camera en/of Mass Storage
modus geactiveerd is.
1. Schakel het toestel in.
2. Druk op (b) om in het menu te gaan wanneer het apparaat in de
opnamemodus staat
#
.
3. Druk op nogmaals op (b) om het instelmenu te selecteren.
4. Druk op de & knoppen (d-e) om doorheen de submenu’s te scrollen.
5. Klik na de selectie OK (c) om uw keuze te bevestigen en de instelling op te slaan.
6. Druk op (b) om het menu te verlaten.
7. De instellingen worden veranderd nadat het toestel opnieuw wordt
opgestart.
PROBLEEMOPLOSSING
Ik kan geen foto of opname maken.
→ Controleer of de TF-kaart genoeg ruimte heeft of vergrendeld is.
Het toestel stopt automatisch met opnemen.
→ Gebruik compatibele hoge-snelheid Micro SD TF kaart met SDHC omwille van de grote HD
videobestanden. De SDHC TF kaart dient klasse 6 of hoger te zijn.
De melding “bestandsfout” verschijnt bij het afspelen van de foto of video.
→ De bestanden zijn onvoltooid door een micro SD kaart opslagfout. Gebruik de formatteerfunctie
in het menu van de Dashcam om uw TF-kaart te formatteren.
Mijn opname is onduidelijk.
→ Controleer of er geen vuil of vingerafdrukken op de lens staan, maak de lens proper.
Ik krijg een zwart beeld bij het opnemen van lucht of water.
→ Landschappen met grote contrasten zullen de automatische belichtingsfunctie beïnvloeden,
u kunt de instellingen aanpassen in het menu “Belichting”.
De kleur is niet perfect op een bewolkte dag of in buitenlicht.
→ Stel de “Witbalans” functie in op automatisch.
Er staan strepen in mijn beeld.
→ Dit heeft te maken met de verkeerde lichtfrequentie, stel deze in op 50 of 60 Hz naargelang
de lokale waarden.
Mijn toestel blokkeert.
→ Reset het toestel door de reset knop in te drukken met een scherp object (bijvoorbeeld een
paperclip).
→ Stel de Dashcam terug in naar de fabriekinstellingen via het menu.
Datum&Tijd
MM/DD/YY
DD/MM/YY
YY/MM/DD
Autom. uitschakeling**
Uit */ 1 min. / 3 min
*/ 1 min. / 3 min
/ 1 min. / 3 min
Automatisch uitschakelen bij gebruik op batterij
Taal
Engels, Nederlands, Frans, Spaans, Italiaans, Portugees, Tsjechisch,
Hongaars, Zweeds, Russisch, Pools, Duits, Turks, Grieks
Hz frequentie
50 Hz / 60 Hz
Schermbeveiliging**
Uit */ 3min./ 5min./ 10min.
Screensaver bij gebruik op batterij
Scherm draaien
Uit / Aan
Formatteren
Intern geheugen / Micro SD kaart
Indien u problemen zou hebben met uw micro SD-kaart (zoals “memory full”) raden we u aan om
uw kaart via dit menu te formatteren��
Standaardinstelling
Annuleren / OK
Terug naar fabrieksinstellingen
Firmware versie
SUPPORT VOOR KLANTEN
Voor alle vragen in verband met het product kunt u contact opnemen met
support
@
quintezz.com of kijk op onze website www.quintezz.com voor
meer informatie.
GARANTIE
Copyright © Quintezz. Quintezz is een gedeponeerd handelsmerk van
TE-Group NV. Het Quintezz merk staat voor superieure productkwaliteit
en uitstekende dienstverlening aan de klanten. Dat is de reden waarom
Quintezz voor dit product een garantie van
twee (2) jaar
, vanaf de originele
aankoop van het product, biedt tegen alle materiaal- en verwerkingsfouten.
De voorwaarden van deze garantie en de reikwijdte van de aansprakelijkheid
van Quintezz in het kader van deze garantie kunnen van onze website op
www.quintezz.com worden gedownload.
* Recommended setting
#
Only works when no recording has been started.
* Aanbevolen instelling
#
Werkt enkel indien er geen opname gestart is
* Aanbevolen instelling
#
Werkt enkel indien er geen opname gestart is
d
b
e
g
1
c
a
h
f
j
l
i
k
m
n
ILLUSTRATION I
ILLUSTRATION II
2
4
3
ILLUSTRATION III


