


SIEPYEUOQ2A01G AC Drive Q2A Technical Manual
303
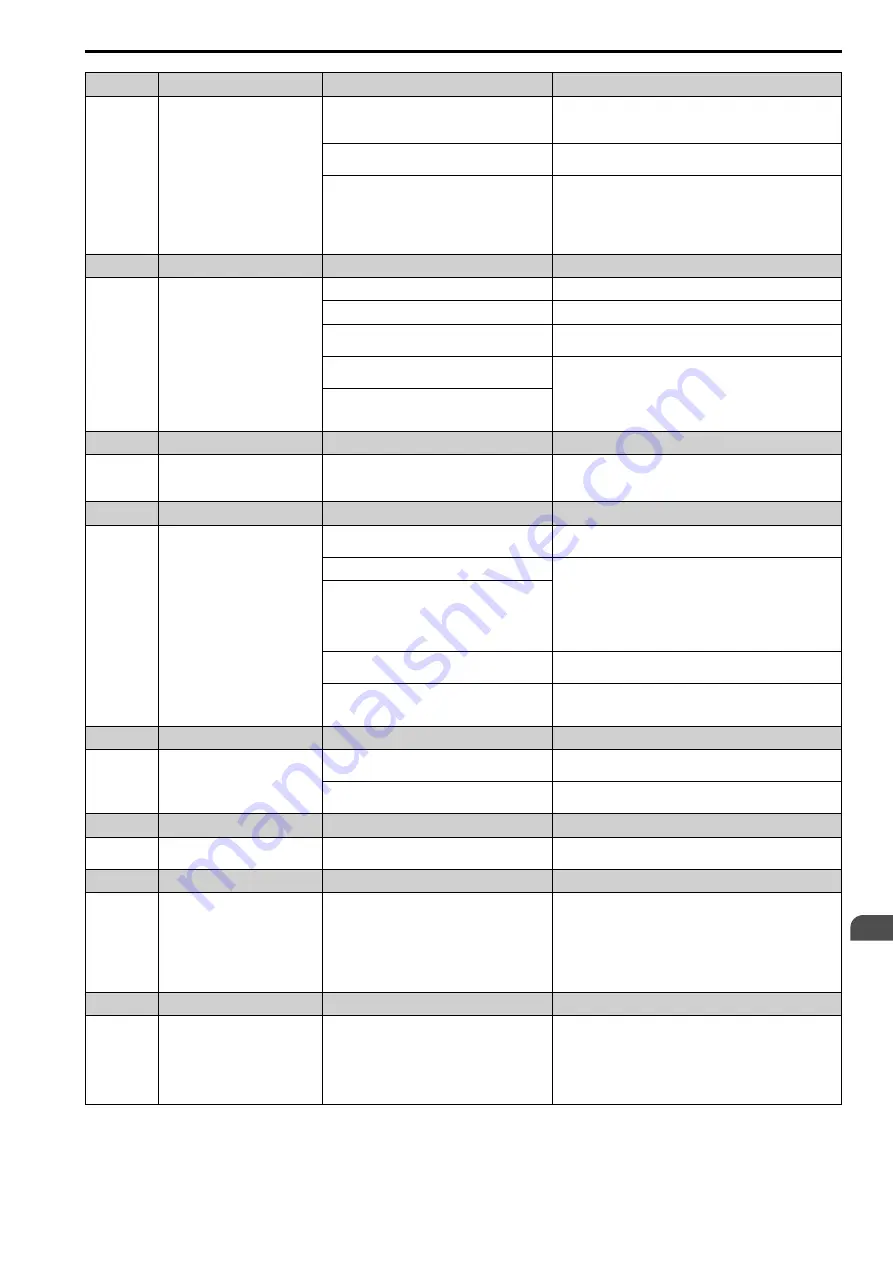
Code
Name
Causes
Possible Solutions
Er-09
Acceleration Error
The motor did not accelerate for the specified
acceleration time.
1.
Increase the value set in
C1-01 [Accel Time 1]
.
2.
Disconnect the machine from the motor and do Rotational
Auto-Tuning again.
The value of
L7-01 [FW Torque Limit] or L7-02
[RV Torque Limit]
is small.
Increase the value set in
L7-01 or L7-02
.
Rotational Auto-Tuning was done with a load that
was more than 30% of the rating connected to the
motor.
•
Disconnect the machine from the motor and do Rotational
Auto-Tuning again.
•
If you cannot uncouple the motor and load, make sure that the
load is less than 30% of the motor rating. If a mechanical
brake is installed in the motor, release the brake during
Rotational Auto-Tuning.
Code
Name
Causes
Possible Solutions
Er-10
Motor Direction Error
There is defective drive and motor wiring.
Examine and repair motor wiring.
There is defective drive and encoder wiring.
Examine and repair the wiring to the encoder.
The direction of the motor and the setting of
F1-05
[Enc1 Rotat Selection]
are opposite.
Set
F1-05
correctly.
The machine pulled the motor to rotate in the
opposite direction.
When the torque reference is 100% or higher, the
sign of the speed reference was opposite of the
detected speed.
Disconnect the machine from the motor and do Rotational Auto-
Tuning again.
Code
Name
Causes
Possible Solutions
Er-11
Motor Speed Error
The torque reference during acceleration is too high
(100%).
•
Increase the value set in
C1-01 [Accel Time 1]
.
•
Disconnect the machine from the motor and do Rotational
Auto-Tuning again.
Code
Name
Causes
Possible Solutions
Er-12
Current Detection Error
There is a phase loss in the drive input power. (U/
T1, V/T2, W/T3)
Examine and repair motor wiring.
The current exceeded the current rating of the drive.
The output current is too low.
•
Check the motor wiring for any short circuits between the
wires.
•
Check and turn ON any magnetic contactors used between
motors.
•
Replace the control board or the drive. For information about
replacing the control board, contact the manufacturer or your
nearest sales representative.
You tried Auto-Tuning without a motor connected
to the drive.
Connect the motor and do Auto-Tuning.
There was a current detection signal error.
Replace the control board or the drive. For information about
replacing the control board, contact the manufacturer or your
nearest sales representative.
Code
Name
Causes
Possible Solutions
Er-13
Leakage Inductance Error
The motor rated current value is incorrect.
Correctly set the rated current indicated on the motor nameplate
and perform Auto-Tuning again.
The drive could not complete tuning for leakage
inductance in fewer than 300 seconds.
Examine and repair motor wiring.
Code
Name
Causes
Possible Solutions
Er-14
Motor Speed Error 2
The motor speed was more than two times the
amplitude of speed reference during Inertia Tuning.
Decrease the value set in
C5-01 [ASR PGain 1]
.
Code
Name
Causes
Possible Solutions
Er-15
Torque Saturation Error
During Inertia Tuning, the output torque was more
than the value set in Torque Limit
L7-01 to L7-04
.
•
Increase the value set in
L7-01 [FW Torque Limit], L7-02 [RV
Torque Limit], L7-03 [FW Reg. TrqLimit], and L7-04 [RV Reg.
TrqLimit]
as much as possible.
•
Decrease the values set for the frequency and amplitude of the
test signals used when doing inertia tuning. First, decrease the
test signal amplitude, and then do Inertia Tuning. If the error
continues, decrease the test signal frequency and do Inertia
Tuning again.
Code
Name
Causes
Possible Solutions
Er-16
Inertia ID Error
The inertia found by the drive was too small or too
large during Inertia Tuning (10% or less, or
50000% or more).
•
Decrease the values set for the frequency and amplitude of the
test signals used when doing inertia tuning. First, decrease the
test signal amplitude, and then do Inertia Tuning. If the error
continues, decrease the test signal frequency and do Inertia
Tuning again
•
Correctly set the motor inertia as specified by the motor, and
do Inertia Tuning again.
Содержание Q2A
Страница 2: ...This Page Intentionally Blank 2 SIEPYEUOQ2A01G AC Drive Q2A Technical Manual...
Страница 12: ...12 SIEPYEUOQ2A01G AC Drive Q2A Technical Manual...
Страница 18: ...i 2 Legal Information 18 SIEPYEUOQ2A01G AC Drive Q2A Technical Manual...
Страница 28: ...1 2 Features and Advantages of Control Methods 28 SIEPYEUOQ2A01G AC Drive Q2A Technical Manual...
Страница 64: ...2 9 Installation Methods 64 SIEPYEUOQ2A01G AC Drive Q2A Technical Manual...
Страница 166: ...4 9 Test Run Checklist 166 SIEPYEUOQ2A01G AC Drive Q2A Technical Manual...
Страница 172: ...5 2 European Standards 172 SIEPYEUOQ2A01G AC Drive Q2A Technical Manual...
Страница 173: ...Standards Compliance 5 5 2 European Standards SIEPYEUOQ2A01G AC Drive Q2A Technical Manual 173...
Страница 174: ...5 2 European Standards 174 SIEPYEUOQ2A01G AC Drive Q2A Technical Manual...
Страница 175: ...Standards Compliance 5 5 2 European Standards SIEPYEUOQ2A01G AC Drive Q2A Technical Manual 175...
Страница 176: ...5 2 European Standards 176 SIEPYEUOQ2A01G AC Drive Q2A Technical Manual...
Страница 258: ...6 2 Modbus Communications 258 SIEPYEUOQ2A01G AC Drive Q2A Technical Manual...
Страница 356: ...8 7 Storage Guidelines 356 SIEPYEUOQ2A01G AC Drive Q2A Technical Manual...
Страница 357: ...SIEPYEUOQ2A01G AC Drive Q2A Technical Manual 357 9 Disposal 9 1 Safety Precautions 358 9 2 Disposal Instructions 359...
Страница 360: ...9 2 Disposal Instructions 360 SIEPYEUOQ2A01G AC Drive Q2A Technical Manual...
Страница 526: ...11 20 Parameters Changed by PM Motor Code Selection 526 SIEPYEUOQ2A01G AC Drive Q2A Technical Manual...


