background image

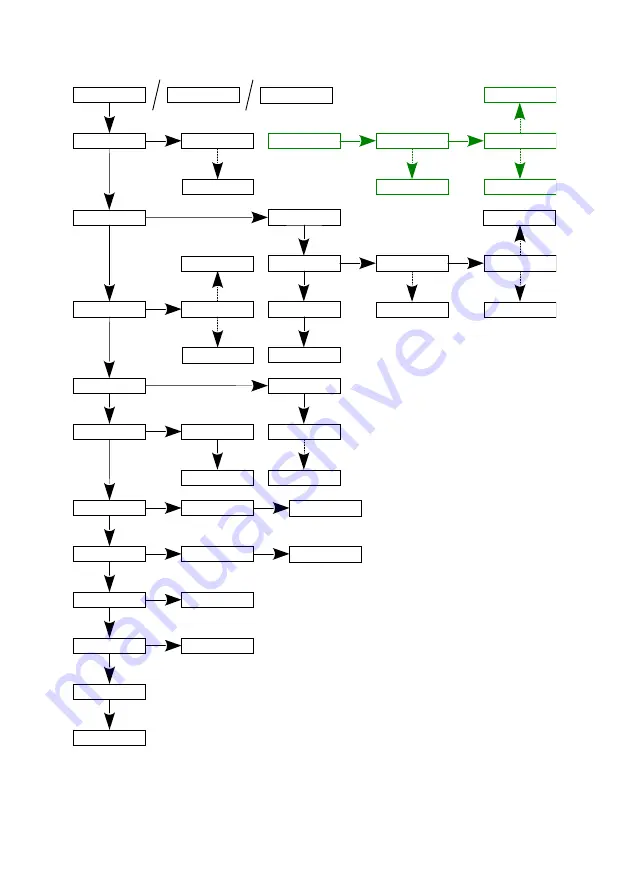
6.2 Scheme of the PX800-W menu in PX277

NOTE! The 

green

 color shows the DMX address setting in the 

2ch DW Adv.


operating mode.

12

PREV

DMX Addr. 

001 000 (2ch) **

PREV

Channel: 1 

Value: 0 *

ENTER

PX800-06 

PxArt+ 06

ENTER

DMX Addr. 

001 (2ch) *

NEXT

DMX Addr. 

001 (2ch)

DMX Addr. 

511 (2ch) *

NEXT

PX800-12 

PxArt+ 12

PX800-18 

PxArt+ 18

DMX Addr. 

001 002 (2ch) *

NEXT

DMX Addr. 

512 002 (2ch) *

ENTER

DMX Addr. 

001 002 (2ch)

DMX Addr. 

001 002 (2ch) **

NEXT

DMX Addr. 

001 512 (2ch) **

ENTER

NEXT

No Signal 

Off

NEXT

ENTER

No Signal 

Off *

NEXT

No Signal 

Scene *

NEXT

No Signal 

On *

No Signal 

Hold *

Channel: 1 

Value: 128 *

NEXT

Channel: 1 

Value: 255 *

Channel: 1 

Value: 128

NEXT

Channel: 2 

Value: 128

ENTER

PREV

No Signal Time 

0.0 s *

No Signal Time 

1.0 s *

NEXT

No Signal Time 

10.0 s *

ENTER

No Signal Time 

1.0 s

NEXT

Smooth 

Off

NEXT

ENTER

NEXT

Control Mode 

2ch DW Basic

NEXT

Smooth 

Off *

Smooth 

Level 1 *

NEXT

Smooth 

Level 4 *

Control Mode 

2ch DW Basic *

ENTER

NEXT

Control Mode 

2ch DW Adv. *

Driver Temp. 

40.9°C

NEXT

ENTER

Min  Max  Rec °C 

24.6 41.8 41.8 

ENTER

REC TEMP. RESET 

Hold PREV + NEXT

NEXT

Module Temp. 

67.8°C

ENTER

Min  Max  Rec °C 

22.3 71.1 71.1 

ENTER

REC TEMP. RESET 

Hold PREV + NEXT

NEXT

PWR time    9h 

ACT time    9h

ENTER

0d 09h 58m 

0d 05h 43m

NEXT

Factory Default

ENTER

Hold PREV + NEXT

NEXT

Firmware version 

1.01

NEXT

Serial Number 

20336110

Содержание PX800-W

Страница 1: ...PX800 W PxArt 06 Wall PxArt 12 Wall PxArt 18 Wall User manual...

Страница 2: ...arameters 10 6 2 Scheme of the PX800 W menu in PX277 12 7 RDM available parameters 13 8 DMX signal connecting 15 9 Mounting 15 10 Connection scheme 16 11 Dimensions 17 12 Technical data 18 Manufacture...

Страница 3: ...and small energy consumption Modern electronics allowed to create a lamp that is devoid of the effect of light vibration flicker free technology in the full control range which makes it useful in the...

Страница 4: ...s Warning Read the instruction manual Caution Do not look at the LEDs LEDs can cause damage or eye irritation Do not look at the light source with any optical devices that focus the light rays Light i...

Страница 5: ...d must meet the safety requirements the installation must be 3 wire and equipped with a residual current device 3 All the conductors should be protected against mechanical and thermal damage 4 In the...

Страница 6: ...AA XX Z AA version 06 6 LEDs 12 12 LEDs 18 18 LEDs XX beam angle 10 10 20 20 30 30 40 40 EL elliptical lenses WW Wall Washer Z housing colors 1 gray 2 black 3 white not available for the PX800 W 06 la...

Страница 7: ...ess adjustment button 1Hz frequency in the first minute after receiving the DMX signal after the start of the lamp in case of the loss of DMX signal diode lights continuously for 1 minute if the state...

Страница 8: ...rightness is increased release the control button for a moment The diode will signal the change of adjustment direction The pressing of the adjustment button again will cause the dimming of the lamp b...

Страница 9: ...lled via two DMX channels Channel 1 color Channel 2 brightness Setting the lamp parameters Value of the lamp parameter Value of the DMX signal Adjusting the color temperature 4500K 255 3600K 128 2700K...

Страница 10: ...DMX address of the color temperature and brightness channel in the range 1 512 No Signal behavior of the device when the DMX signal disappears Scene setting the scene displayed when the DMX signal di...

Страница 11: ...t and current operating temperature of the module with LEDs PWR time ACT time total lamp operation time total lamp lighting time Factory Default factory reset in PX800 W DMX Addr 001 No Signal Off Sce...

Страница 12: ...nal Hold Channel 1 Value 128 NEXT Channel 1 Value 255 Channel 1 Value 128 NEXT Channel 2 Value 128 ENTER PREV No Signal Time 0 0 s No Signal Time 1 0 s NEXT No Signal Time 10 0 s ENTER No Signal Time...

Страница 13: ..._PARAMETERS 0x0050 all supported parameters PARAMETER_DESCRIPTION 0x0051 description of additional parameters DEVICE_INFO 0x0060 information concerning the device SOFTWARE_VERSION_LABEL 0x00C0 firmwar...

Страница 14: ...ted temperature sensor SENSOR_VALUE 0x0201 information about sensors SMOOTH_OFF 1 2 3 4 0x801A selection of smoothing options NO_SIGNAL_OFF ON HLD S 0x801C behavior of the device when the DMX signal d...

Страница 15: ...below If the PX800 W is the last device in the DMX line then a terminator 120 Ohm resistor should be connected to the DMX and DMX terminals DMX IN GND CORRECT DMX 512 input DMX 512 output DMX IN GND...

Страница 16: ...10 Connection scheme 16 L N PE GND DMX DMX L N PE GND DMX DMX L N PE GND DMX DMX 230V AC DMX controller DMX PX800 W PX800 W PX800 W Max 32 devices on the line Terminator 120 Ohm resistor...

Страница 17: ...11 Dimensions PxArt 06 Wall PxArt 12 Wall 121 252 185 92 121 90 107 67 279 262 200 213 149 122 256239 wersja WW Wallwasher 239 WW Wallwasher version 17...

Страница 18: ...2 Technical data type PX800 W power supply 230V AC number of diodes 6 12 18 power consumption PX800 W 06 10W PX800 W 12 17 5W PX800 W 18 25W max temperature rise housing 30 C luminous flux PX800 W 06...

Страница 19: ...800 W 06 1 5kg PX800 W 12 1 9kg PX800 W 18 2 6kg dimensions height PX800 W 06 252mm diameter PX800 W 06 92mm height PX800 W 12 262mm diameter PX800 W 12 122mm height PX800 W 18 279mm diameter PX800 W...

Страница 20: ...directives 2011 65 UE DIRECTIVE OF THE EUROPEAN PARLIAMENT AND OF THE COUNCIL of 8 June 2011 on the restriction of the use of certain hazardous substances in electrical and electronic equipment Text...

Отзывы: