


11
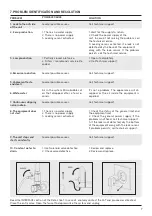
ATTENTION: in case of detecting that the treated
water does not comply with the current national
legislation, re-perform the measurement. If the pro-
blem persists, close the inlet valve of the equipment,
open the tap, disconnect it electrically and
contact your technical support.
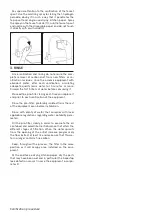
• Finally, clean the inside and bottom of the equipment
with single-use kitchen roll, in order to remove the wa-
ter that could have fallen onto it, as it could cause a
false alarm and blockage of the system.
7. MAINTENANCE
ATTENTION: Some components of your equip-
ment, such as pre-filters and membrane, are
consumables that have a limited duration.
The duration will depend on the quality of the local wa-
ter, consumption, type of use and specific aspects of
the water to be treated such as extreme turbidity, high
chlorination, excess iron, etc.
ATTENTION: In order to guarantee the quality of
the water supplied by your equipment, it must be
periodically maintained.
6. COMMISSIONING
6.1. FILTER RINSING
• It is necessary to remove dust and carbon grains from
the filter that is generated during transport and hand-
ling of the equipment and corresponding. This dust
must be eliminated since it could partially or comple-
tely obstruct the membrane as well as cause a malfunc-
tion of the equipment. To do this, first open the water
faucet. According to the appliance electrically. Then
press the power button for 1.5 seconds. The unit will
rinse the filters.
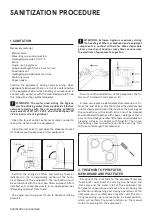
6.2. SANITIZATION OF EQUIPMENT
• Perform a sanitization of the equipment, according to
the model and procedure indicated by the manufactu-
rer (see the Sanitization Procedure). If you have any
questions, contact your dealer.
6.3. SYSTEM TIGHTNESS, SHUTDOWN AND START-UP
· Close the equipment tap on the worktop and keep the
equipment hydraulically or electrically powered by ca-
rrying out an ocular check of the system to ensure that
8
9
10
there are no leaks (for 5 min approx.)
Open the dispenser faucet. The equipment should start
and supply water. Turn off the faucet again and check
that the equipment stops.
6.4. RINSING AND CLEANING
• Open the equipment faucet and measure the quality
of the water being produced with a conductivity meter
or TDS, check that the salt reduction obtained is ade-
quate with respect to the water to be treated (14).
12
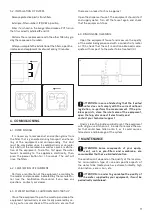
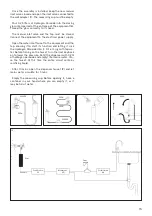
5.2. INSTALLATION OF FILTERS
• Remove protective plastic from filters.
· Install pre-filter number 1 (PP+CB) in position.
· Enter it as shown in the image (8) and make a 90º turn so
that it is correctly installed (9 and 10).
· Perform the same procedure with the other filters by gui-
ding the sequence of numbers.
· After you complete the installation of the filters, open the
inlet valve and equipment rinse faucet during 10 minutes.
Содержание VYRTA direct flow
Страница 1: ...1 USER MANUAL EQUIPMENT REVERSE OSMOSIS ...
Страница 2: ......
Страница 3: ...Index P 1 2 3 4 User manual Technical manual Sanitation procedure Technical Data sheet 4 8 14 19 ...
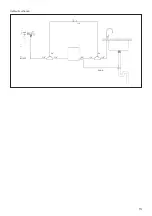
Страница 13: ...13 IN FEED DRAIN 3 8 1 4 RO 3 8 1 4 1 4 1 4 1 4 Hydraulic scheme ...
Страница 17: ...17 ...
Страница 28: ...NOTES ...
Страница 29: ...NOTES ...
Страница 30: ...NOTES ...
Страница 31: ...NOTES ...
Страница 32: ...MU RO VYRTA DIRECT FLOW 2021 910475 ...