background image

www.pulsar.pl


RUPS824P 


RACK POWER 


2.  Installation. 
 

2.1.  Requirements. 

The PSU RACK shall be mounted by a qualified installer with appropriate permissions and qualifications for 

230V/AC installations and low-voltage installations (required and necessary for a given country). The device shall 
be  mounted  in  confined  spaces,  according  to  the  environment  class  II,  with  normal  air  humidity  (RH=90%  max. 
without condensation) and the temperature from -

10°C do +45°C.  


 During normal operation the total current consumption of the cameras cannot exceed 

I=8A. Maximum battery charging current is: 1A.  

Total device c battery: 9A max. 

As the PSU is designed for a continuous operation and is not equipped with a power-switch, therefore an 

appropriate  overload  protection  shall  be  guaranteed  in  the  power  supply  circuit.  Moreover,  the  user  shall  be 
informed  about  the  method  of  unplugging  (usually  through  assigning  an  appropriate  fuse  in  the  fuse-box).  The 
electrical system shall follow valid standards and regulations.  


2.2. Installation procedure. 


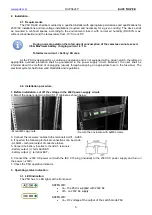
1. Before installation, cut off the voltage in the 230V power-supply circuit. 

2. Mount the power supply in a RACK 19" cabinet as shown below: 


- Mount M6 cage nuts 


- Secure the enclosure with 4xM6 screws 

 
3. Connect the 

receivers’ cables to the terminals AUX1...AUX8. 

4. If needed, the following technical connections can be made: 
- ALARM 

– technical output of collective failure 

5. Connect the battery in series to the +BAT- terminals: 
- battery output (+): terminal BAT+ 
- battery output (-): terminal BAT- 
 
6. Connect the ~230V AC power cord with the IEC C13 plug (included) to the 230V AC power supply and turn on 
the power (~230V). 
7. Check the PSU operation indicator. 


3.  Operating status indication. 
 

3.1.  LED indication. 

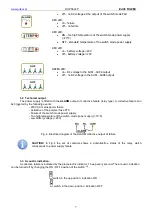
The PSU has 13 LED lights at the front panel: 


GREEN LED: 


on – the PSU is supplied with 230V AC 


off – no 230V AC supply 


GREEN LED: 


on – DC voltage at the output of the switch mode PSU 

Содержание RUPS824P

Страница 1: ...RUPS824P v 1 0 RUPS 27 6V 8x1A PTC RACK mounted buffer power supply EN Edition 2 from 30 03 2017 Supercedes the edition 1 from 16 08 2016 ...

Страница 2: ...arge current 1A batteries 2 7Ah 2x17Ah 2x28Ah control of voltage presence at the AUX1 AUX8 outputs acoustic indication of failure LED optical indication AC DC TEMP LoB ALARM AUX1 AUX8 the ALARM technical output of collective failure relay type activated by 230V AC power loss low voltage of the PSU 23V activation of the output fuse too high temperature of the PSU 70 C the PSU failure protections SC...

Страница 3: ...cay a battery back up is activated immediately The PSU is fitted with 8 outputs protected independently with polymer fuses PTC 1A The power supply is fitted with the ALARM output of collective failure In case of failure relay contacts are switched automatically which is accompanied by acoustic and optical indication the corresponding led goes on The power supply construction is based on the switch...

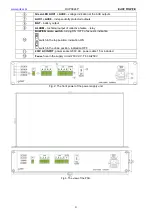
Страница 4: ...cal output of collective failure relay BUZZER micro switch turning ON OFF of acoustic indication switch in the top position indication ON switch in the down position indication OFF 230V AC INPUT power socket 230V AC power cable 1 5m included FMAINS fuse in the supply circuit 230V AC T 6 3A 250V Fig 2 The front power of the power supply unit Fig 3 The view of the PSU ...

Страница 5: ...e ALARM technical output of collective failure Relay type 1A 30VDC 50VAC FMAINS fuse in the power supply circuit 230V T 6 3A Mechanical parameters tab 3 Enclosure dimensions W 19 H 2U 482 x 88 x 223 mm WxHxD Fixation four point butt mounting to RACK profiles the set include 4 M6 screws cage nuts Net weight 5 8kg 6 2kg Enclosure Steel plate RAL 9005 black Connectors 230V AC input the IEC C14 socket...

Страница 6: ...d about the method of unplugging usually through assigning an appropriate fuse in the fuse box The electrical system shall follow valid standards and regulations 2 2 Installation procedure 1 Before installation cut off the voltage in the 230V power supply circuit 2 Mount the power supply in a RACK 19 cabinet as shown below Mount M6 cage nuts Secure the enclosure with 4xM6 screws 3 Connect the rece...

Страница 7: ...ctive failure can be triggered by the following events 230V AC mains power failure Activation of the polymer fuse PTC Failure of the switch mode power supply Too high temperature of the switch mode power supply 70 C Low battery voltage 23V Fig 4 Electrical diagram of the ALARM collective output of failure CAUTION In Fig 4 the set of contacts shows a potential free status of the relay which corresp...

Страница 8: ...ge below 19V at the battery terminals will cause battery disconnection 4 3 Maintenance Any and all maintenance operations may be performed following the disconnection of the PSU from the power supply network The PSU does not require performing any specific maintenance measures In case of fuse replacement use a replacement of the same parameters WEEE LABEL Waste electrical and electronic equipment ...

Отзывы: