This user manual applies to the Prowise Touchscreens with the following model numbers:
-
55": PW.1.15055.1001
65": PW.1.15065.1001
75": PW.1.15075.1001
86": PW.1.15086.1001
Страница 1: ...This user manual applies to the Prowise Touchscreens with the following model numbers 55 PW 1 15055 1001 65 PW 1 15065 1001 75 PW 1 15075 1001 86 PW 1 15086 1001...
Страница 2: ...cations 14 4 2 In the box 19 4 3 Product overview 21 4 4 Touchscreen operation 22 4 5 The control button 24 4 6 Microphone 25 4 7 NFC card reader and Remote control receiver 26 4 8 ProWrite technology...
Страница 3: ...43 10 1 Connecting the Prowise Touchscreen to an external PC 43 10 2 Connecting the Prowise Touchscreen to audio equipment 44 10 2 1 Connecting headphones 44 10 2 2 Connecting an amplifier 44 10 2 3...
Страница 4: ...the components and accessories supplied by Prowise Always turn off the touchscreen and unplug it from the electrical outlet when changing a module Do not insert objects into the openings of the touchs...
Страница 5: ...in case of a defect to avoid damage Contact information can be found at www prowise com en contact 2 4 Environment Unplug the power cable if the screen will not be used for an extended period of time...
Страница 6: ...es that can be reused or recycled Device Do not dispose of the device together with the household waste at the end of its lifespan Enquire about the possibilities for an environmentally friendly and r...
Страница 7: ...power cable when the above elements have been connected and only use the power cable supplied by Prowise CAUTION Prowise can not be held responsible for any damage or injury caused by the incorrect i...
Страница 8: ...able supplied by Prowise to connect the Prowise Touchscreen to the mains power supply The touchscreen must be placed close to the electrical outlet and the electrical outlet should be easy to reach Ca...
Страница 9: ...iFi module HAZARD WARNING Choking hazard This product contains small parts that form a choking hazard for children Keep this product out of reach for children when not installed into the touchscreen W...
Страница 10: ...steps below to install the OPS PC module Please note the OPS PC module is optional CAUTION Please ensure the power cable is not connected to the main power supply while installing the OPS PC module 1...
Страница 11: ...2 Remove the cover plate 3 Insert the OPS PC module into the slot www prowise com 11 53...
Страница 12: ...he screen to the correct height before use Avoid standing in a stooped or bent posture and ensure that the ends of the screen are located within arm s reach The screen is in an optimal position if you...
Страница 13: ...eight when the screen is used 4 1 Product Specifications Screen Bezel colour Brushed aluminium grey Diagonal 55 65 75 86 Panel type Ultra HD LED IPS Resolution 3840 x 2160 60Hz Glass plate Anti Glare...
Страница 14: ...Audio Speakers 2 1 sound 2 front speakers and 1 subwoofer Front speaker power 2 x 18W 8 Sub woofer power 1 x 15W 8 Max amplifier output 80W Dolby Audio certification Yes Microphone Type Microphone Arr...
Страница 15: ...DMI 2 0 CEC HDCP2 2 2 HDMI 2 0 CEC ARC HDCP2 2 1 YPbPr Component 1 3 5 mm mini jack female VGA 1 AV Composite 1 3 5 mm mini jack female Audio in 1 3 5 mm mini jack female Analog Audio output headphone...
Страница 16: ...4 140 F Storage humidity 10 90 Operation humidity 10 90 General information Voltage 100 240 V 50 60Hz Nominal energy consumption without modules 140W Eco mode energy consumption 72W On mode energy co...
Страница 17: ...VESA mounting for external devices VESA 100 x 100 mm Certifications CE EMC LVD FCC IC RoHS UL CB RCM and Energy Star Warranty 5 years standard extendable to 7 or 8 years www prowise com 17 53...
Страница 18: ...4 2 In the box www prowise com 18 53...
Страница 19: ...Fi module 13 Power cable EU 5 metres 14 USB touch cable 15 HDMI cable WARNING Keep the packaging material such as plastic foil away from children Improper use of packaging materials can result in a c...
Страница 20: ...Fi Module slot side D External inputs outputs side 1 HDMI output 2 0 2 Display Port 1 2 3 2 x HDMI 2 0 CEC 4 HDMI 2 0 ARC 5 USB Type B Touch port 6 LAN port E USB 2 0 F USB 2 0 G AC in and main power...
Страница 21: ...input 7 Component video input YPbPr 8 AV video input Composite 4 4 Touchscreen control The Prowise Touchscreen is fitted with 20 points multi touch The screen recognises up to 20 simultaneous touch p...
Страница 22: ...one finger across the screen in the desired direction The touchscreen can also be controlled by using a computer mouse or with the supplied remote control Furthermore you can use the control button lo...
Страница 23: ...n is turned on Blue Backlight is turned off Blue Sleep mode Flashing red every 2 seconds Standby mode Red 4 6 Microphone The Prowise Touchscreen has 4 wide area microphones Thanks to these 4 wide area...
Страница 24: ...t of the tab to log in using NFC technology The remote control s IR sensor is located here PLEASE NOTE To log in with an NFC card the card must first be configured using the Prowise Central settings m...
Страница 25: ...the screen The advantages of this are Write small and switch to large without any software interaction Switch between colours by turning around the pen Write simultaneously in 2 different colours and...
Страница 26: ...gressive cleansers as these can cause damage to the screen Never spray a cleanser directly onto the screen apply it to a cloth first The cloth may be slightly damp but not wet as this can cause damage...
Страница 27: ...ctrical outlet to avoid a short circuit CAUTION Unplug the power cord before cleaning the screen 5 Getting started 5 1 Turn the touchscreen on and off Enable 1 Ensure the touchscreen is connected to t...
Страница 28: ...tion The system will shut down in 15 seconds will appear 3 Select Shut down if you want to shut down the touchscreen immediately or wait 15 seconds Press Cancel to cancel the shut down process 4 Turn...
Страница 29: ...er 1 minute to shut down the touchscreen This notification will be automatically accepted after 15 seconds by the system and the touchscreen will be shut down PLEASE NOTE Turn the touchscreen off comp...
Страница 30: ...ntrol 4 The touchscreen will turn on and the setup guide will appear 5 Follow the steps of the setup guide to complete the setup 6 Once you are connected to the internet the touchscreen will automatic...
Страница 31: ...and connect to it as soon as Ethernet has been activated in the settings menu Follow the steps below to view the specifications of the network 1 Place five fingers on the screen for at least 2 seconds...
Страница 32: ...eveal the password 8 Press the Connect button to connect to the wireless network 5 4 Adjusting the volume The volume of the touchscreen can be adjusted in different ways With the remote control Use th...
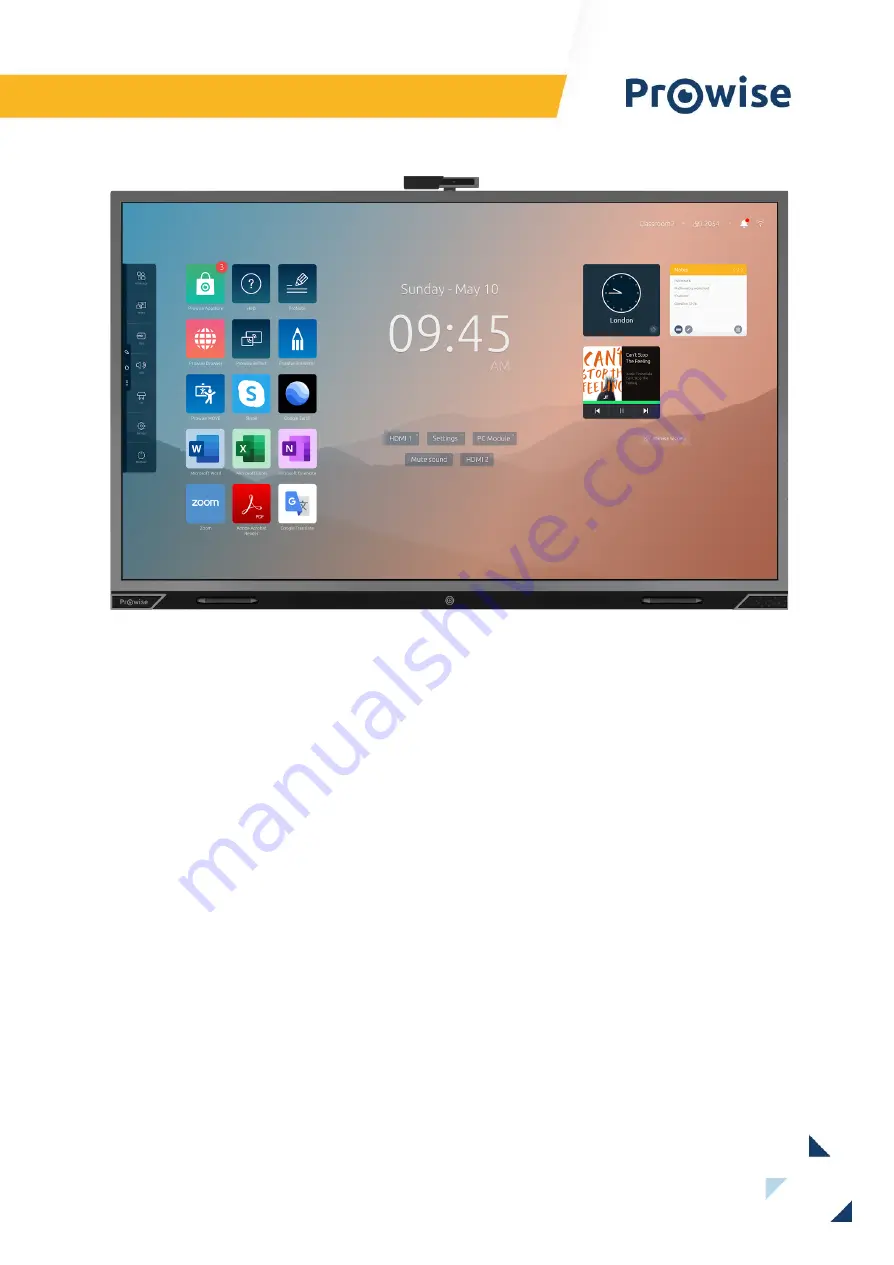
Страница 33: ...ons are always visible on the left hand side of the Prowise touchscreen ProNote icon open ProNote the integrated whiteboard software Home icon go to Prowise Central home Three dots open the Prowise Ce...
Страница 34: ...7 Changing the settings The Central settings menu is located in the menu Here you can adjust multiple settings of your Prowise Touchscreen such as display and audio settings connectivity NFC and other...
Страница 35: ...ith Prowise Central This can either be a Wi Fi or an Ethernet connection Automatic OTA updates are activated by default Updates are installed once the touchscreen is switched off This can be switched...
Страница 36: ...9 Remote control 9 1 Schematic overview and explanation of the buttons www prowise com 36 53...
Страница 37: ...an input other than Prowise Central home is active this button can be used to return to Prowise Central home 9 Opens the Prowise Central input selection 10 Opens the Prowise Central settings menu 11 T...
Страница 38: ...control point it to the IR receiver of the touchscreen bottom right corner of the touchscreen The remote control has a range of around 8 metres CAUTION Any obstacles between the remote control and the...
Страница 39: ...ontrol 2 Insert the two batteries 1 5V AAA into the remote control 3 Place them with the positive and negative poles as indicated by the and signs in the battery compartment 4 Close the battery compar...
Страница 40: ...input port of the touchscreen 2 Connect the USB touch cable to the touch USB port of the touchscreen and to a USB port on the external PC 3 Once all cables have been connected switch on the touchscre...
Страница 41: ...soon as the touchscreen and the external PC have booted up navigate to Input in the Central menu and select the source 10 1 4 AV The composite video signal is a signal that emits transmits both video...
Страница 42: ...lifier by plugging it into the analogue audio output or the digital coax port Use the amplifier s volume control to adjust the amplifier s volume PLEASE NOTE The audio outputs the analogue line output...
Страница 43: ...Audio Return Channel connection This allows the external audio device to be controlled via the touchscreen To connect an audio device via ARC insert one end of an HDMI cable into the touchscreen s HDM...
Страница 44: ...lity that works via HDMI The devices that are connected to each other in this way communicate via CEC This allows these devices to be controlled via the touchscreen s remote control Connect a device v...
Страница 45: ...2 interface communication between the touchscreen and the connected PC or other control unit with RS232 protocol Pin2 is TXD Pin3 is RXD Pin to Pin connection as below Serial Port Settings Items Value...
Страница 46: ...B CC 01 01 00 02 DD EE FF Source HDMI 1 AA BB CC 02 06 00 08 DD EE FF HDMI 2 AA BB CC 02 07 00 09 DD EE FF HDMI 3 AA BB CC 02 05 00 07 DD EE FF PC AA BB CC 02 08 00 0A DD EE FF Android AA BB CC 02 0A...
Страница 47: ...ue 0 100 hex code Contrast AA BB CC 08 0A value checksum DD EE FF value 0 100 hex code Display preset Normal AA BB CC 08 0D 00 15 DD EE FF Display preset Dynamic AA BB CC 08 0D 01 16 DD EE FF Display...
Страница 48: ...D DD EE FF IR lock Off AA BB CC 38 05 00 3D DD EE FF IR lock On AA BB CC 38 05 01 3E DD EE FF Touch Off AA BB CC 38 07 00 3F DD EE FF Touch On AA BB CC 38 07 01 40 DD EE FF PC PC Power ON AA BB CC 09...
Страница 49: ...23 DD EE FF Display AA BB CC 07 4C 00 53 DD EE FF Input AA BB CC 07 07 00 0E DD EE FF Home AA BB CC 07 48 00 4F DD EE FF Corner menu AA BB CC 07 0D 00 14 DD EE FF Backspace AA BB CC 07 40 00 47 DD EE...
Страница 50: ...7 5B 00 62 DD EE FF F5 AA BB CC 07 44 00 4B DD EE FF F6 AA BB CC 07 50 00 57 DD EE FF F7 AA BB CC 07 43 00 4A DD EE FF F8 AA BB CC 07 1A 00 21 DD EE FF F9 AA BB CC 07 04 00 0B DD EE FF F10 AA BB CC 07...
Страница 51: ...E FF HDMI3 AA BB CC 81 08 00 89 DD EE FF PC AA BB CC 81 0A 00 8B DD EE FF Prowise Central Audio Obtain volume AA BB CC 03 02 00 05 DD EE FF AA BB CC 82 00 value checksum DD EE FF VOLUME value hex code...
Страница 52: ...checksum DD EE FF CONTRAST value hex code Obtain preset AA BB CC 39 06 00 3F DD EE FF AA BB CC 40 06 00 46 DD EE FF DISPLAY_PRESET_S TANDARD AA BB CC 40 06 01 47 DD EE FF DISPLAY_PRESET_ DYNAMIC AA BB...
Страница 53: ...2 DD EE FF TOUCH_OFF AA BB CC 40 12 01 53 DD EE FF TOUCH_ON PC Obtain PC state AA BB CC 09 02 00 0B DD EE FF AA BB CC 83 01 00 84 DD EE FF PC_ON AA BB CC 83 00 00 83 DD EE FF PC_OFF AA BB CC 83 02 00...