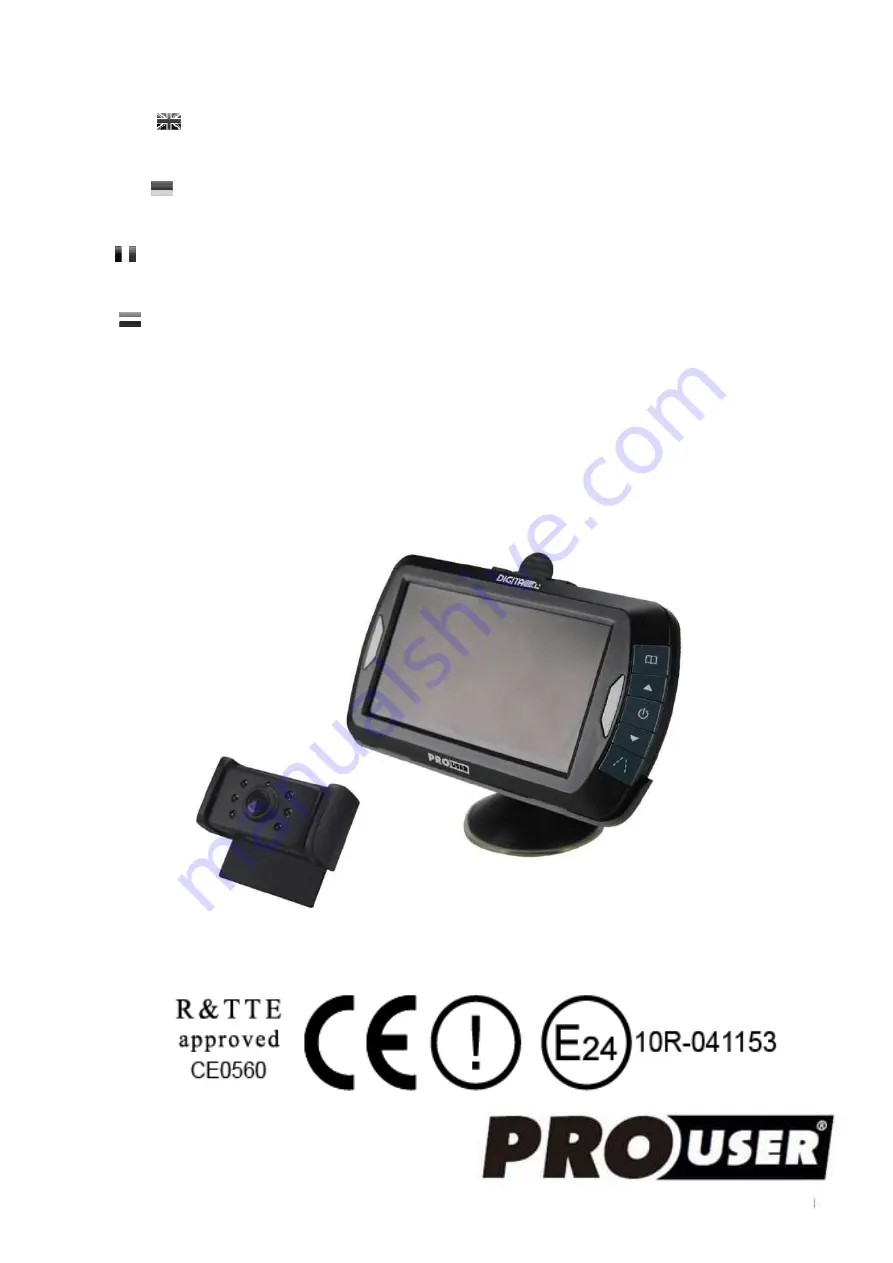
PROUSER DRC4310 Скачать руководство пользователя страница 1


DIGITAL WIRELESS


BACK-UP CAMERA 

SYSTEM 

 DIGITALES KABELLOSES RÜCKFAHR-

KAMERA-SYSTEM 

 SYSTEME DE CAMERA DE RECUL SANS FIL 

NUMERIQUE 

 DIGITALE DRAADLOOS CAMERASYSTEEM 


with 12cm / 4.3” monitor 

mit 12cm / 4,3” Monitor 

avec écran 12cm / 4,3” 

met 12cm / 4,3” monitor 


DRC4310 


Содержание DRC4310

Страница 1: ...AMERA SYSTEM DIGITALES KABELLOSES R CKFAHR KAMERA SYSTEM SYSTEME DE CAMERA DE RECUL SANS FIL NUMERIQUE DIGITALE DRAADLOOS CAMERASYSTEEM with 12cm 4 3 monitor mit 12cm 4 3 Monitor avec cran 12cm 4 3 me...

Страница 2: ...2...

Страница 3: ...IMPORTANT SAFETY INSTRUCTIONS Before You Install If you are not confident working with 12V 24V DC vehicle wiring removing and reinstalling interior panels carpeting dashboards or other components of...

Страница 4: ...have been installed in the camera The camera itself is screwed on the mounting plate The camera is tiltable camera angle can be adjusted manually on vertical direction Make sure that its field of view...

Страница 5: ...the accessory position engage the parking brake and put the car in reverse Look at the vehicle s tail lights to see where the reverse lights are located they are the white lights To locate the reverse...

Страница 6: ...4V power outlet The cable must not interfere with the safe operation of the vehicle 6 Insert the small 12V 24V DC plug of the power cable into the right side of the monitor 7 Plug the 12V 24V cigarett...

Страница 7: ...the blue LED will blink on and off When the monitor power is off no picture can appear on the screen and the blue LED will be off Menu button Press the Menu button to enter the menu screen as shown be...

Страница 8: ...the orientation of the picture These different views allow you to mount the camera and monitor in any position with keeping the right picture on the monitor Simply enter the Picture direction menu by...

Страница 9: ...Check with your local authority or retailer for recycling advice WARRANTY Pro User warrants this product for a period of 2 years from the date of purchase to the original purchaser Warranty is not tr...

Страница 10: ...cht sicher f hlen dieses System an die 12V 24V Stromversorgung Ihres Fahrzeuges selbstst ndig zu montieren bohren von L chern abnehmen von Verkleidungen etc nehmen Sie Kontakt zu Ihrem Autohaus oder z...

Страница 11: ...iese Montageplatte wird die Kamera in einem weiteren Schritt befestigt Die Kamera ist vertikal schwenkbar bitte stellen Sie diese nach den Gegebenheiten ein Bei manchen Fahrzeugen ist es leider nicht...

Страница 12: ...n und legen Sie den R ckw rtsgang ein Dann schauen Sie am Heck Ihres Autos wo sich der R ckfahrscheinwerfer befindet Um die Kabel vom R ckfahrscheinwerfer zu finden m ssen Sie die R ckseite der Heckbe...

Страница 13: ...te Position aus Drehen Sie nun die Schrauben an 6 Legen Sie das Netzkabel zum Zigarettenanz nder Verlegen Sie das Kabel so das es zu keinen Einschr nkungen oder Behinderungen w hrend der Fahrt kommen...

Страница 14: ...at aber kein Bild empfangen wird blinkt die blaue LED Wenn der Monitor ausgeschaltet ist wird kein Bild angezeigt und die blaue LED ist aus Menu Schalter Wenn Sie den Schalter Menu dr cken erscheint a...

Страница 15: ...ng Je nach Installationsort der Kamera m chten Sie ggf das Bild drehen Dies k nnen Sie ber das Untermen Picture Direction Bilddrehung machen Um die Ausrichtung des Monitor Bildes zu ndern dr cken Sie...

Страница 16: ...en nicht mit dem Hausm ll entsorgt worden Bitte entsorgen Sie diese Ger te an den daf r vorgesehenen Entsorgungsstellen oder fragen Sie Ihren Fachh ndler GARANTIE Pro User gew hrt eine Garantie von 2...

Страница 17: ...lation Si vous ne vous sentez pas capable d intervenir sur le circuit lectrique 12 24 volt DC d une voiture de d monter et remonter les panneaux int rieurs la moquette le tableau de bord ou d autres p...

Страница 18: ...se fixe derri re la plaque d immatriculation La cam ra de recul peut se fixer sur ces plaques de montages La cam ra est inclinable l angle de vue peut donc tre ajust manuellement verticalement Assurez...

Страница 19: ...e arri re g n ralement le feu blanc Tournez la clef de contact de votre v hicule serrez le frein main puis enclencher la marche arri re Regardez l arri re de votre v hicule ou demander une autre perso...

Страница 20: ...fixer 2 Positionner la ventouse sur une surface parfaitement plane lisse et propre 3 Appuyer la ventouse sur la surface et faite basculer le loquet 4 Enficher le moniteur sur la fixation 5 Ajuster l...

Страница 21: ...ire quand l image appara t Si le moniteur est allum mais sans image alors la LED bleu clignote Lorsque le moniteur est teint pas d image appara t et la LED bleu ne s allume pas Bouton MENU Appuyer sur...

Страница 22: ...s diff rentes vue vous permettent d installer la camera dans n importe quel sens et de toujours avoir une image correctement positionn e S lectionnez le menu Picture direction puis appuyez sur la touc...

Страница 23: ...z votre revendeur ou votre mairie afin de conna tre la proc dure de recyclage GARANTIE Pro User garantie ses produits pendant 2 ans partir de la date d achat originelle La garantie n est pas transf ra...

Страница 24: ...in het werken met de 12 24 volt DC bedrading van uw voertuig het demonteren en opnieuw aanbrengen van de binnenpanelen vloerbedekking of andere onderdelen van uw voertuig neem dan contact op met de f...

Страница 25: ...et kenteken De camera kan op deze plaat worden vastgezet De hoek van de camera is instelbaar in verticale richting Zorg ervoor dat er geen obstakels het zicht van de lens belemmeren Bij sommige autoty...

Страница 26: ...van de camera aan op de zender 9 Nu moet u kijken waar de achteruitrijlichten van het voertuig zich bevinden Draai de contactsleutel in de accessoirestand activeer de handrem en zet de auto in zijn a...

Страница 27: ...gnap goed aan op het door u gereinigde oppervlak zoals het dashboard of het raam Duw het handeltje naar beneden om de zuignap goed vast te zetten op het oppervlak 4 Schuif het beeldscherm in de arm di...

Страница 28: ...dat beide accukabels zijn aangesloten op de accu van de auto 2 Draai de contactsleutel in de accessoirestand start het voertuig niet 3 Activeer de handrem en zet de versnelling in zijn achteruit 4 Na...

Страница 29: ...uk op de MENU knop om toegang te krijgen tot het menuscherm zoals hieronder getoond beeldscherm instellingen beeldscherm ori ntatie koppelen en product informatie Gebruik de pijltjestoetsen om door he...

Страница 30: ...ordt Koppelen Selecteer het pictogram Koppelen met de pijltjestoetsen en druk vervolgens op de Power knop Druk kort daarna op de rubberen knop aan de onderkant van de camera tot het signaal goed ontva...

Страница 31: ...ij het recyclen GARANTIE Pro User garandeert dit product voor een periode van 2 jaar na de datum van verkoop aan de oorspronkelijke koper De garantie is niet overdraagbaar De garantie dekt alleen defe...

Страница 32: ...ic compatibility EMC Low voltage directive 2004 108 EC 2006 95 EC 3 Funkanlagen und 4 ROHS Richtline Telekommunikationsendeinrichtungen ROHS directive Radio and Telecommunication Terminal Equipment 20...

Страница 33: ...33 www pro user com...

Отзывы: