background image

16 

For technical questions call 1-800-665-8685

Twin Tank Wheelbarrow Portable Air Compressor

V 3.03  

8474488

Additional instructions can be found in the engine owner’s manual. 
Use the drain valve located on the pump aftercooler or intercooler 
for cold-starting purposes. Take additional care to keep dirt/debris 
from entering the fuel tank or obstructing the airflow through the 
engine or past the pump. Make sure the airflow to the regulator is 
completely closed (gauge attached reads 0 PSI) before attaching 
air hose and accessory. A slight hissing


noise caused by the airflow 

being directed to atmosphere during engine idle is normal. Store 
compressor in a warm/dry location and perform maintenance as 
indicated in your manuals.

STARTING IN COLD TEMPERATURES


1.  Open drain valve located on the pump’s 'finned' aftercooler. 

If this drain cannot be located carefully open one or both 
drains on the bottom of the air tanks.

2.  Check engine and pump oil level. With the air compressor 

in a level position the engine oil level should be maintained 
to the bottom edge of either oil fill port. The pump oil level 
should be maintained between the top and bottom portion 
of the red bulls eye on the sight glass or half-way up.

3.  Please note the engine maximum RPM setting is factory set 

and secured by the use of a hex head screw between the 
throttle arm and throttle plate. Do not remove the screw or 
alter the factory locked position of the engine throttle arm.

4.  Rotate the engine kill switch to the ON position, open the 

fuel shutoff lever to the right (R), close the choke lever to the 
left (L). Start the engine, open the choke lever (R). If engine 
begins to falter or bog down close/open the choke (L or R) 
until engine maintains proper speed. The choke must be fully 
open (R) to operate the engine. Close drains after the engine 
and pump are cycling efficiently.

5.  When outside temperatures drop consistently below 40° F 

(4.4° C), change the pump oil to either 10W, synthetic blend 
or full synthetic. It may still be necessary to employ the cold 
start technique described above. 

Содержание Twin Tank Wheelbarrow

Страница 1: ...Please read this manual before use User Manual V 3 03 8474488 Twin Tank Wheelbarrow Portable Air Compressor...

Страница 2: ...s 5 3 litres Start Type Recoil Auto Idle Down 1 900 RPM Pump Stages Single Cylinders 3 RPM 900 to 1 400 RPM Air Delivery 18 CFM 90 PSI Max Air Pressure 150 PSI Cut in Pressure 105 PSI Cut out Pressure...

Страница 3: ...icated pump with cast iron cylinders for longer life Ball bearing crankshaft Oil level sight gauge Oversized flywheel for extra cooling Automotive style bearing inserts on connecting rods Aftercooler...

Страница 4: ...erate in a safe work environment Keep your work area clean well lit and free of distractions 2 Keep anyone not wearing the appropriate safety equipment away from the work area 3 Store devices properly...

Страница 5: ...ated area Use a respirator device and follow the manufacturer s recommendations for their spray equipment Keep compressor at least 25 feet away from spray equipment 1 3 Serious injury or death may occ...

Страница 6: ...or Fire 3 1 Serious injury or death may result from normal electrical sparks that occur within the motor and or pressure switch Always operate compressor in a well ventilated area free of combustible...

Страница 7: ...e made only by authorized or trained service personnel 5 Risk of Burn Serious burn injuries could occur from touching exposed metal parts such as the compressor head copper braided discharge lines and...

Страница 8: ...alcohol or drugs Stay alert while operating the compressor and pay close attention to the task at hand 9 Risk of Damage to Air Compressor or Property Failure to transport or operate the air compresso...

Страница 9: ...device or use it for an unintended purpose PARTS IDENTIFICATION WARNING Do not operate the device if any part is missing Replace the missing part before operating Failure to do so could result in a ma...

Страница 10: ...orking pressure or counterclockwise to decrease Push adjustment knob back down to lock in setting Never exceed the manufacturer s maximum allowable pressure rating of the tool being used or item being...

Страница 11: ...habit of checking the oil level of the compressor pump and engine Our belt driven air compressors are equipped with a sight gauge to make the daily task of checking the oil level easier Always maintai...

Страница 12: ...ps head screw on the carburetor A slight increase to the idle speed setting may be required when operating in colder temperatures Turn screw clockwise in 1 4 turn increments to increase the idle speed...

Страница 13: ...te air compressor system The kill switch must be moved to the ON position prior to pulling the recoil rope assembly to start the engine 15 Engine Choke Moving the choke lever completely to the left cl...

Страница 14: ...d pumps have a dipper on the bottom of the connecting rod that must remain submerged in the oil bath Operation at more than a 10 angle will cause the pump to seize 2 Operate in a clean dry and well ve...

Страница 15: ...ng compressor for any length of time 8 Do not alter factory RPM settings on gas powered compressors Engine throttle arm is factory set and locked into position at RPMs that will provide maximum perfor...

Страница 16: ...engine and pump oil level With the air compressor in a level position the engine oil level should be maintained to the bottom edge of either oil fill port The pump oil level should be maintained betw...

Страница 17: ...maintenance Wait for compressor to cool before servicing Failure to follow these instructions could result in an injury Your new air compressor represents the finest engineering and construction avail...

Страница 18: ...ped with 30 WT oil in the pump and 10w 30 oil in the motor Change the oil if necessary based on the temperature range found in the Oil Type Table Prior to daily operation make a habit of checking the...

Страница 19: ...0 oil in the motor Change the oil if necessary based on the temperature range found in the Oil Type Table Temperature 0 to 32 F 32 to 55 F 56 to 100 F 10 to 115 F 17 to 0 C 0 to 13 C 14 to 38 C 23 to...

Страница 20: ...ks X Inspect Air Filter s X Check for Unusual Noise or Vibration X Inspect Belt Guard X Check for Air or Oil Leaks X Clean Exterior of Air Compressor X Check Condition of Vibration Pads X Tighten Reto...

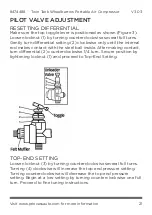
Страница 21: ...kwise only until the internal rod makes contact with the steel ball inside After making contact turn differential 2 counterclockwise 1 4 turn Secure position by tightening locknut 1 and proceed to Top...

Страница 22: ...t 100 PSIG Turn the top end setting 4 clockwise in 1 4 turn increments tap down on the internal rod at the toggle attachment and repeat until desired top end setting is reached If the pilot valve begi...

Страница 23: ...cing the flywheel Should the rotation be incorrect disengage the power supply and check the motor wiring Pump flywheel bolt has a left handed thread and a tapered shaft Remove nut by turning clockwise...

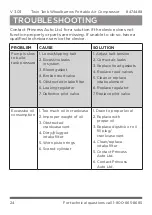
Страница 24: ...4 Broken reed valve 5 Obstructed intake filter 6 Leaking regulator 7 Defective pilot valve 1 Adjust belt tension 2 Correct air leaks 3 Replace head gaskets 4 Replace reed valves 5 Clean or replace in...

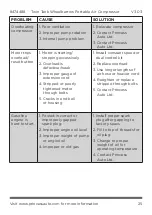
Страница 25: ...on cord 4 Stripped or poorly tightened motor through bolts 5 Cracks in end bell or housing 1 Install constant speed or dual control kit 2 Replace overload 3 Use longer lengths of air hose or heavier c...

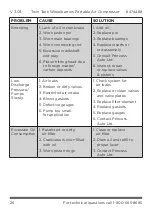
Страница 26: ...sult Princess Auto Ltd 6 Inspect repair or replace valves pistons Low Discharge Pressure Pumps Slowly 1 Air leaks 2 Broken or dirty valves 3 Restricted air intake 4 Blown gaskets 5 Defective gauges 6...

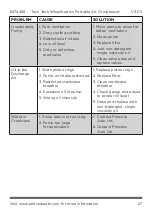
Страница 27: ...r 4 Add non detergent single viscosity oil 5 Clean valve plate and replace valves Oil in the Discharge Air 1 Worn piston rings 2 Pump air intake restricted 3 Restricted crankcase breather 4 Excessive...

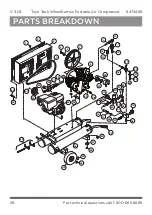
Страница 28: ...Twin Tank Wheelbarrow Portable Air Compressor V 3 03 8474488 PARTS BREAKDOWN 45 42 44 47 48 52 46 43 51 53 23 39 16 19 13 24 32 7 33 31 15 11 9 14 28 29 27 5 26 8 18 22 20 10 6 12 1 21 37 4 30 38 36...

Страница 29: ...9 1 2 in Copper Discharge Tube with Fittings 1 PA9H DISCH TB 10 1 2 NPT x 1 2 in Compression Elbow 1 BREL0500X050039 11 1 2 x 1 2 in NPT Check Valve with 1 8 in Port 1 CV4X4L 1 12 1 8 NPT x 1 4 in Com...

Страница 30: ...28 1 2 x 1 1 2 in Nipple 1 BLNP0500X1500 29 1 4 in Hose x 39 in 1 178 30 Aluminum Block Manifold 1 154 31 1 4 in NPT 165 PSI Safety Valve 1 SRV0250N165 32 Handle Grip 2 328 33 1 4 in Ball Drain Valve...

Страница 31: ...4488 V 3 03 PART DESCRIPTION QTY PART ID 47 3 Pack Intake Elements 1 LBFILTERPAK PAPER 48 Intake Filter Assembly 3 LB51111 5600 49 1 4 in Keystock 1 MIS10096C 50 Pulley 1 PUAK46X1000 51 Set Screw 1 MI...

Страница 32: ...V 3 03 8474488 Manuel d utilisateur Veuillez lire ce manuel avant d utiliser cet appareil Compresseur d air portatif sur ch ssis brouette r servoir double...

Страница 33: ...rage rappel Mise au ralenti automatique 1 900 tr min Pompe tages 1 tage Cylindres 3 Tr min 900 to 1 400 tr min Diffusion d air 18 pi cubes min 90 lb po carr Pression d air max 150 lb po carr Pression...

Страница 34: ...s chantiers ou dans les cours FONCTIONS Caract ristiques standard du compresseur essence Pneu rempli de mousse et l preuve des crevaisons Pompe lubrifi e par barbotage avec cylindres en fonte pour ass...

Страница 35: ...de fonctionnement ou d inspection et d entretien D FINITIONS DE DANGER Veuillez vous familiariser avec les avis de danger qui sont pr sent s dans ce manuel Un avis est une alerte indiquant qu il exist...

Страница 36: ...pareils lectriques en pr sence de gaz ou de liquides inflammables S CURIT PERSONNELLE ATTENTION Portez de l quipement de protection personnelle homologu par l Association canadienne de normalisation C...

Страница 37: ...pareil respiratoire et observez les recommandations du fabricant de l quipement de vaporisation Tenez le compresseur au moins 25 pi de l quipement de vaporisation 1 3 Des blessures graves ou m me la m...

Страница 38: ...la pression nominale maximale de l outil 2 4 N utilisez jamais le compresseur pour gonfler les petits objets basse pression comme les jouets 3 Risque d explosion ou d incendie 3 1 Des blessures grave...

Страница 39: ...m diatement un couvercle de protection endommag 4 2 D branchez toujours le compresseur d air et videz compl tement les r servoirs d air avant de tenter toute r paration ou de proc der l entretien Ne l...

Страница 40: ...tenter de proc der l entretien ou de fixer des outils pneumatiques vacuez doucement la pression du syst me 8 Risque de fonctionnement dangereux Des blessures graves ou m me la mort peuvent survenir en...

Страница 41: ...ez le compresseur autour de mat riaux inflammables ou de r coltes de buissons de for ts et de p turages un pare tincelles approuv doit tre install entretenu et maintenu en bon tat de marche UTILISATIO...

Страница 42: ...sque la pression du r servoir est parfaitement nulle La soupape ressort devrait se d placer librement l int rieur du corps de la soupape de d charge de pression Une soupape de s curit hors d usage pou...

Страница 43: ...is es 5 Filtre d admission d air Les filtres d admission d air sont install s pour emp cher les mati res trang res de p n trer dans le moteur ou dans la pompe du compresseur V rifiez r guli rement les...

Страница 44: ...ote ou du pressostat Le clapet de non retour fonctionne conjointement avec la soupape de d charge du pressostat afin de permettre un d marrage sans charge du syst me de compresseur Un pouss e rapide d...

Страница 45: ...de 1 4 tour pour augmenter la vitesse de ralenti Si la vitesse de r glage de ralenti est trop faible un encrassement pr matur de la bougie se produira 11 Soupape de d marrage froid Nos appareils porta...

Страница 46: ...pe circuit doit tre plac la position ON marche avant de tirer sur la corde de rappel afin de d marrer le moteur 15 trangleur du moteur En d pla ant le levier d trangleur compl tement vers la gauche po...

Страница 47: ...ructions suivantes 1 Utilisez toujours le compresseur au niveau Toutes les pompes lubrifi es par barbotage sont munies d un plongeur situ au bas de la bielle qui doit rester submerg dans le bain d hui...

Страница 48: ...e bris pr matur du compresseur Gardez toujours en bon tat les plaquettes antivibration en caoutchouc situ es sous le r servoir 7 Purgez l humidit des r servoirs d air quotidiennement L eau est un sous...

Страница 49: ...ppareil Vous trouverez des instructions additionnelles dans le manuel du propri taire du moteur Utilisez la soupape de vidange situ e sur le post refroidisseur ou sur le refroidisseur interm diaire de...

Страница 50: ...une vis t te hexagonale situ e entre le levier d acc l rateur et la plaque d acc l rateur N enlevez pas la vis et ne modifiez pas la position du levier d acc l rateur du moteur qu on a verrouill en us...

Страница 51: ...tres AVERTISSEMENT D branchez ou arr tez toujours votre compresseur et videz compl tement les r servoirs d air avant de tenter tout genre d entretien Attendez que le compresseur se soit refroidi avant...

Страница 52: ...serrez les boulons t te uniquement apr s que la pompe se soit refroidie 4 Ne soudez jamais sur les r servoirs d air 5 Ayez recours la chaleur pour liqu fier le produit d tanch it liquide sur les soupa...

Страница 53: ...e au moyen de plongeurs plac s au niveau des bielles La pompe DOIT tre utilis e au niveau pour assurer une lubrification ad quate TABLEAU DES TYPES D HUILE Le compresseur est livr avec de l huile 30 W...

Страница 54: ...s filtre s air X V rifiez la pr sence d un bruit anormale ou d une vibration excessive X Inspectez le garde courroie X V rifiez s il y a des fuites d air ou d huile X Nettoyez l ext rieur du compresse...

Страница 55: ...R INITIALISATION DU DIFF RENTIEL Assurez vous que le levier bascule sup rieur est plac dans la position indiqu e figure 3 Desserrez le contre crou 1 en le tournant de plusieurs tours dans le sens ant...

Страница 56: ...ote devrait se vider au niveau du silencieux de feutre et faire en sorte que le moteur essence tournera au ralenti Si la soupape pilote ne se vide pas alors que la pression du r servoir approche de 13...

Страница 57: ...les contre crous afin de retenir le moteur POULIES D ENTRA NEMENT Les poulies d entra nement doivent tre align es correctement et la tension de la courroie d entra nement doit tre conforme aux exigen...

Страница 58: ...ez une mince couche de lubrifiant sur les pi ces en acier pour viter qu elles ne rouillent Enlevez le lubrifiant avant de r utiliser l appareil MISE AU REBUT Recyclez votre appareil endommag dans une...

Страница 59: ...e d admission obstru 6 Fuites au niveau du r gulateur 7 Soupape pilote d fectueuse 1 Ajustez la tension de courroie 2 Corrigez les fuites d air 3 Remplacez les joints d tanch it de culasse 4 Remplacez...

Страница 60: ...n serrage inad quat 5 Fissures dans l attache d extr mit en clochette ou le bo tier 1 Installez la trousse de vitesse constante ou commande double 2 Remplacez la surcharge 3 Utilisez des tuyaux air pl...

Страница 61: ...spectez r parez ou remplacez les soupapes et les pistons Basse pression de refoulement les pompes tournent lentement 1 Fuites d air 2 Soupapes bris es ou sales 3 Orifice d admission d air obstru 4 Joi...

Страница 62: ...toyez la plaque de soupape et remplacez les soupapes Pr sence d huile dans l air de refoulement 1 Segments de piston us s 2 Orifice d admission d air de la pompe obstru 3 Reniflard de carter moteur ob...

Страница 63: ...ervoir double 32 En cas de questions techniques appelez le 1 800 665 8685 R PARTITION DES PI CES 45 42 44 47 48 52 46 43 51 53 23 39 16 19 13 24 32 7 33 31 15 11 9 14 28 29 27 5 26 8 18 22 20 10 6 12...

Страница 64: ...LB51111 6621 7 Volant moteur 1 LB51132 6601 8 Pompe compl te avec volant moteur 1 PMP13PT03C 9 Tube de refoulement de cuivre de 1 2 po avec raccords 1 PA9H DISCH TB 10 Coude de compression de 1 2 NPT...

Страница 65: ...Support pour accessoire 1 210 22 Boulon de 5 16 18 x 7 8 po 2 MIS10022 23 Rondelle frein de 5 16 po 2 MIS10099 24 crou de 5 16 po 2 MIS10020 25 Support de tuyau 1 178BR 26 Raccord en laiton de 3 8 po...

Страница 66: ...IS10104 41 Serre joint 2 177B 42 Roue 2 WLS50 43 Trousse de tendeur de courroie 1 SBT8HPHO KAK17 ANGLE 44 Moteur Honda Gx270 1 ENG09H01 45 Conduit d vacuation de 1 4 x 1 1 2 po 1 BLNP0250X1500 46 Capu...

Страница 67: ......

Страница 68: ......

Отзывы: