AV124
Document Camera
User Manual - English
[Important]
To download the latest version of the
software or user manual, please visit
http://prometheanplanet.com/support
Страница 1: ...AV124 Document Camera User Manual English Important To download the latest version of the software or user manual please visit http prometheanplanet com support...
Страница 2: ...9 3 4 Incorrect use 10 Chapter 4 Installation and Connections 11 4 1 System diagram 11 4 2 Connecting to a computer 11 4 3 Connecting to a Promethean ActivBoard 11 4 4 To mount it at desk 12 4 5 Insta...
Страница 3: ...4 I would like to adjust the brightness 35 7 5 I would like to turn on off the lamp 35 7 6 I would like to zoom in out images 35 7 7 I would like to capture images 36 7 8 I would like to record video...
Страница 4: ...in out images 44 8 7 I would like to capture images 45 8 8 I would like to capture images continuously 45 8 9 I would like to freeze the live image 45 8 10 I would like to annotate the displayed image...
Страница 5: ...omethean Ltd hereby reserves the right to make changes to product specifications without prior notice The information in this file is subject to change without prior notice To fully explain or describ...
Страница 6: ...g or other soft surface or install in a recessed place unless proper ventilation is provided 8 Never push objects of any kind through cabinet slots Never allow liquid of any kind to spill into the Doc...
Страница 7: ...d cause electric shock This symbol indicates that there are important operating and maintenance instructions in this User Manual with this unit EN55022 CE Radiation Warning This product is intended fo...
Страница 8: ...English 7 Chapter 2 Package Contents AV124 Quick Start Guide Software Quick Reference Guide USB Cable CD Microscope Adapter...
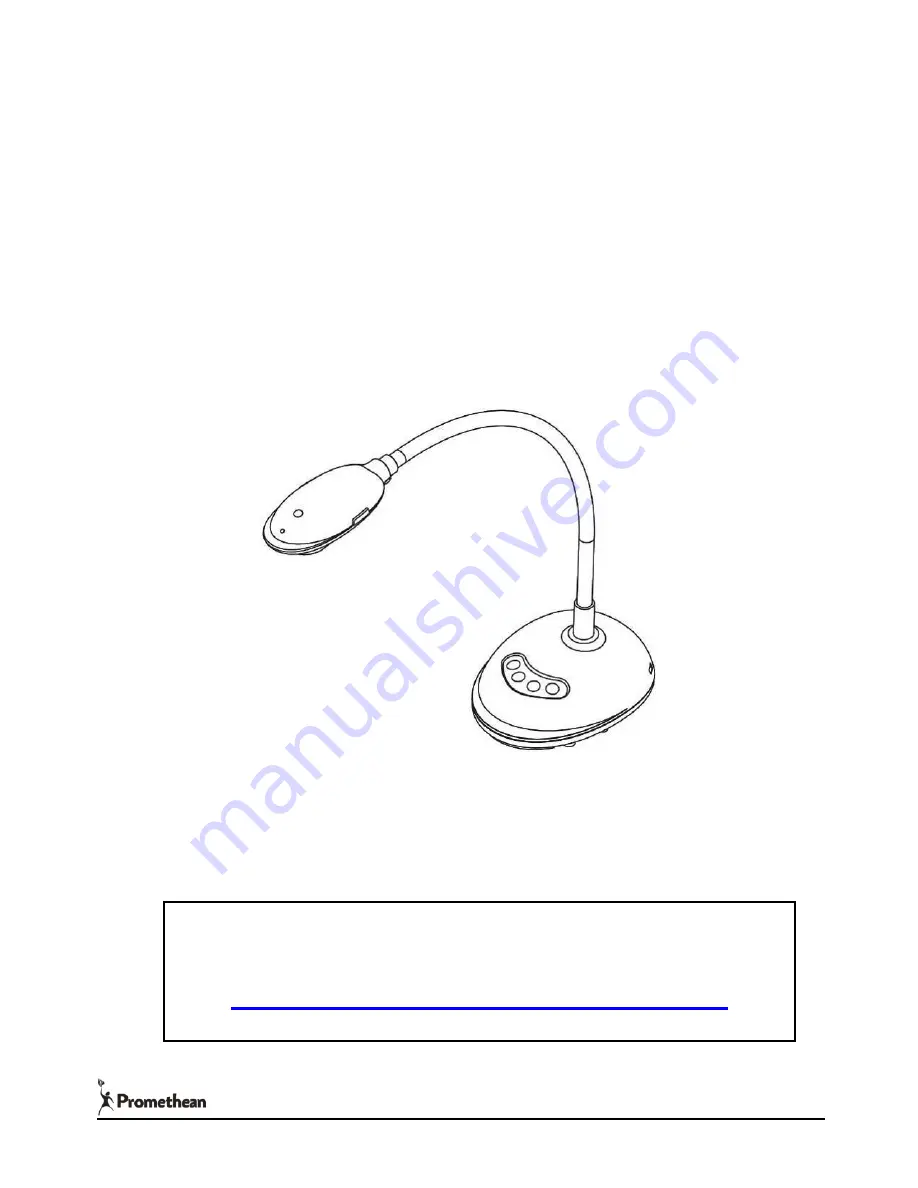
Страница 9: ...ption of LED indicator 1 Enable the image and LED indicator will light up 2 Display the image and LED indicator will light up 3 Disable the image and LED indicator is OFF 3 Lens 5 Gooseneck 4 AF butto...
Страница 10: ...English 9 3 2 Relative Operation Position 3 3 Correct use...
Страница 11: ...English 10 3 4 Incorrect use...
Страница 12: ...ter 4 Installation and Connections 4 1 System diagram 4 2 Connecting to a computer See the picture above 4 3 Connecting to a Promethean ActivBoard USB Cable COMPUTER USB Cable COMPUTER VGA Cable USB C...
Страница 13: ...C OS X 10 5 10 6 10 7 10 8 CPU Intel Core 2 Duo 2GHz and above Memory 1GB RAM Support Direct X 9 Min Screen Resolution 1024x768 Minimum Hard Disc Space Required 1GB Windows XP SP2 and above CPU Intel...
Страница 14: ...2 1 Put the software CD into your computer 4 5 2 2 The software setup program will start automatically Please select ActiView to start the installation progress 4 5 2 3 Please follow the on screen in...
Страница 15: ...English 14 4 5 2 4 Press Yes to create ActiView shortcut on your desktop 4 5 2 5 Once the installation is completed press Finish button then reboot the system...
Страница 16: ...tion Due to limitation on MAC system please disable the software verification according to the following steps If the setting has been disabled please skip to step 4 5 3 2 to start the installation 1...
Страница 17: ...English 16 3 Click the lock on the lower left corner to unlock the panel and enter the username and password of the Administrator 4 Click Anywhere in the figure below...
Страница 18: ...uter 4 5 3 3 Click the CD icon when appears 4 5 3 4 Go to MAC folder Click ActiView to begin the installation wizard and follow the on screen instruction through the installation process 4 5 3 5 Click...
Страница 19: ...English 18 4 5 3 7 Enter your username and password then click Install Software 4 5 3 8 Click Continue Installation to continue...
Страница 20: ...English 19 4 5 3 9 Click Restart to finish installing the software...
Страница 21: ...era 3 Press to display the setting screen of POWER Frequency and follow the screen instructions A live image is displayed when the setting is finished This setting is required for the first use only N...
Страница 22: ...tomatically adjust the image to have the best brightness and focusing performance CAPTURE Capture the image to the computer FOCUS AF Button FREEZE Freeze the current image to remain temporarily on the...
Страница 23: ...OFF ON Thumbnail 2 Thumbnail image of saved video or captured image It will be displayed as if it is a video 3 Save the video which has been edited 4 Save as a new file 5 Change the storage folder 6...
Страница 24: ...IN Open the main function menu and press the right button to display the information about the software ZOOM Adjust image size MASK MODE Open the mask mode CAMERA SETTING Adjust the live image focus P...
Страница 25: ...on Pointer tool Laser tool Insert text Eraser Clear marks of free hand drawing tool Draw a line Draw an ellipse Draw a rectangle Delete Free hand drawing tool Back Next Clear all Select the pen color...
Страница 26: ...wing object Delete Delete the drawing object Bring to Front Bring the drawing object to the front Send to Back Bring the drawing object to the back Bring Forward Bring the drawing object forward Send...
Страница 27: ...al length 3 Focus Manually adjust focal length on an object 4 Auto Exposure Set on off 5 Auto White Balance Set on off 6 Photo Text Setting Photo Text mode 7 Rotate Rotate the image by 0 180 degree 8...
Страница 28: ...ctory reset 2 Language Set the language 3 Video Compression Type Set the recording format Note Please select Enable Video Compression before setting 4 Enable Audio Recorder Enable the audio record dev...
Страница 29: ...English 28 6 4 5 Time Lapse Burst Settings Click to open Time Lapse menu 1 Specify a file name 2 Set the start time 3 Set the capture interval and the capture time...
Страница 30: ...e or decrease the image size Mask Mode Open the mask mode Please refer to 8 13 I would like to use the mask mode CAMERA SETTING Launch the Camera Settings window to adjust live images Please refer to...
Страница 31: ...iptions Pointer tool Laser tool Insert text Eraser Clear marks of free hand drawing tool Draw a line Draw an ellipse Draw a rectangle Delete Free hand drawing tool Back Next Clear all Select the pen c...
Страница 32: ...drawing object Delete Delete the drawing object Bring to Front Bring the drawing object to the front Send to Back Bring the drawing object to the back Bring Forward Bring the drawing object forward S...
Страница 33: ...al length 3 Focus Manually adjust focal length on an object 4 Auto Exposure Set on off 5 Auto White Balance Set on off 6 Photo Text Setting Photo Text mode 7 Rotate Rotate the image by 0 180 degree 8...
Страница 34: ...5 4 Options Click to open Options Menu 1 Factory Reset Activate the factory reset 2 Video Compression Type Set the recording format 3 3 Enable Audio Recorder Enable the audio record device and set the...
Страница 35: ...English 34 6 5 5 Time Lapse Burst Settings Click to open Time Lapse menu 1 Specify a file name 2 Set the start time 3 Set the capture interval and the capture time...
Страница 36: ...and select Hands free AF to enable instant focus function 2 Manually enabled function Press the AF button on the camera head of main unit 7 4 I would like to adjust the brightness 1 Press to show the...
Страница 37: ...1 Press to open the recording tool Note Press to change settings including recording format and audio 2 Press Record to start recording 3 Press Stop to stop recording 4 Press to close the recording t...
Страница 38: ...eeze the current image on the screen 7 11 I would like to annotate the live image 1 Press to show annotation tools 2 The default is the arrow tool Pointer You can select other annotation tools 3 Selec...
Страница 39: ...age files opened from the Thumbnail Note You can add annotation when recording but cannot save it 7 12 I would like to add text to the live image 1 Press to open the annotation tools 2 Select 3 Click...
Страница 40: ...t and right to rotate the object 2 Change the size of the object Click the object and move it to the white point on the screen Press and hold the left mouse button to adjust the size of the object 3 C...
Страница 41: ...he screen 2 Click Save as to display the Save image window 3 Enter the file name and click Save to finish saving 7 16 2 Change the location of file access 1 Click Directory to display the Browse Folde...
Страница 42: ...as shown in the bottom left figure 2 Click Get Picture will capture the photos of live images and insert the files in use shown as top right figure 7 17 2 I would like to insert a photo in MS Word No...
Страница 43: ...d like to change the setting of the AV124 and then capture a photo in MS Word Note For Windows Office 2003 or later versions please use the function with OneNote 1 Click Insert Picture From Scanner or...
Страница 44: ...A window showing a live image see below will be displayed 4 Press Setting When the Camera Settings window pops up the live image can be adjusted 5 Press Capture to capture images in MS Word 6 Press Ca...
Страница 45: ...ds free AF to enable instant focus function 2 Manually enabled function Press the FOCUS AF button on both sides of the lens 8 4 I would like to adjust the brightness Press to show the brightness scrol...
Страница 46: ...ore information about Time Lapse setting Note The captured images will be displayed in the Thumbnail area 8 9 I would like to freeze the live image Press to freeze the live image of Ladibug Press once...
Страница 47: ...l Note You can add annotation when recording but cannot save it 8 11 I would like to add textual annotation to images Press to open the annotation tools Select Select pen color Select transparency Sel...
Страница 48: ...tion when recording but cannot save it 8 13 I would like to use the mask mode Press to open the mask mode You can use the mouse to directly modify the length and the width of the block Press to modify...
Страница 49: ...aved image files 8 15 1 Save as a new file First double click the picture or image file in the Thumbnail window on the left side of the screen Click Save as to display the Save As window After enterin...
Страница 50: ...ext time 8 15 3 Delete a file First double click the picture in the Thumbnail window on the right side of the screen Click Delete the Delete File window will be displayed Click Yes to delete files 8 1...
Страница 51: ...microscope Note Please choose an appropriate microscope adapter Microscope adapter accessories are applicable to eyepieces of 28 mm 2 Connect the lens with the microscope adaptor 3 If the image is not...
Страница 52: ...the lens 3 AV124 cannot operate normally The machine cannot operate normally probably because the power supply of the USB port at the front end of the computer is insufficient Try to connect to a USB...