6
3.1
Designated use and limitations to use
The machine is designed for turning and drilling machinable metal and plastic materials only.
The workpiece must allow to safely be loaded, supported and clamped.
The machine is intended for indoor use. The protection rating of the electrical installation is IP 54.
To avoid tipping, the machine must be bolted down with four anchor bolts.
If used for other purposes, JET disclaims any real or implied warranty and holds itself harmless from any injury that may result from
that use.
WARNING:
The machine is not suitable for machining magnesium…high danger to fire !
Never place your fingers in a position where they could contact any rotating parts or chips.
Check the save clamping of the work piece before starting the machine.
Don’t exceed the clamping range of the chuck.
Work pieces longer than 3 times the chucking diameter need to be supported by the tailstock or a steady rest.
Avoid small chucking diameters at big turning diameters. Avoid short chucking lengths and small chucking contact.
Do not exceed the max speed of the work holding device.
Use the right tool at the correct speed and feed rate. Do not force a tool or attachment to do a job for which it was not designed. The
right tool will do the job better and more safely.
Use recommended accessories; improper accessories may be hazardous.
Maintain tools with care. Keep cutting tools sharp and clean for the best and safest performance.
Follow instructions for lubricating and changing accessories.
Do not attempt to adjust or remove tools during operation.
Never stop a rotating chuck or workpiece with your hands.
Choose a small spindle speed when working unbalanced work pieces and for threading and tapping operations.
Any work piece stock extending the rear end of the headstock must be covered on its entire length. High danger of injury!
Long work pieces may need a steady rest support. A long and thin work piece can suddenly bend at high speed rotation.
Never move the tailstock or tailstock quill while the machine is running.
Remove cutting chips with the aid of an appropriate chip hook when the machine is at a standstill only.
Measurements and adjustments may be carried out when the machine is at a standstill only.
Maintenance and repair work may only be carried out after the machine is protected against accidental starting, pull the mains plug.
Remove loose items and unnecessary work pieces from the area before starting the machine.
Rotate workpiece by hand before applying power. Use lowest speed when starting new workpiece.
Tighten all locks before operating.
3.2
Remaining hazards
When using the machine according to regulations some remaining hazards may still exist.
The rotating work piece and chuck can cause injury.
Thrown and hot work pieces and cutting chips can lead to injury.
Chips and noise can be health hazards. Be sure to wear personal protection gear such as safety goggles and ear protection.
The use of incorrect mains supply or a damaged power cord can lead to injuries caused by electricity.
When opening the electrical cabinet, the grid-feeding voltage persists. Therefore pay attention every time you enter it.
Содержание PBD-2870
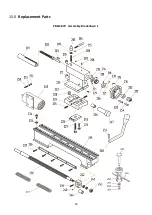
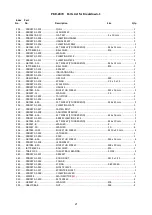
Страница 20: ...20 15 0 Replacement Parts PBD 2870 Assembly Breakdown 1 ...
Страница 23: ...23 PBD 2870 Assembly Breakdown 2 ...
Страница 25: ...25 PBD 2870 Assembly Breakdown 3 ...
Страница 27: ...27 PBD 2870 Assembly Breakdown 4 ...
Страница 29: ...29 PBD 2870 Assembly Breakdown 5 ...
Страница 31: ...31 PBD 2870 Assembly Breakdown 6 ...
Страница 33: ...33 PBD 2870 Assembly Breakdown 7 ...
Страница 39: ...39 16 0 Wiring Diagrams PBD 2870 1 230V PE 50Hz ...
Страница 58: ...58 15 0 Ersatzteile PBD 2870 Explosionszeichnung 1 ...
Страница 60: ...60 PBD 2870 Explosionszeichnung 2 ...
Страница 62: ...62 PBD 2870 Explosionszeichnung 3 ...
Страница 64: ...64 PBD 2870 Explosionszeichnung 4 ...
Страница 66: ...66 PBD 2870 Explosionszeichnung 5 ...
Страница 68: ...68 PBD 2870 Explosionszeichnung 6 ...
Страница 70: ...70 PBD 2870 Explosionszeichnung 7 ...
Страница 72: ...72 16 0 Schaltplan PBD 2870 1 230 V PE 50 Hz ...
Страница 91: ...91 15 0 Pièces de rechange PBD 2870 Vue explosée 1 ...
Страница 93: ...93 PBD 2870 Vue explosée 2 ...
Страница 95: ...95 PBD 2870 Vue explosée 3 ...
Страница 97: ...97 PBD 2870 Vue explosée 4 ...
Страница 99: ...99 PBD 2870 Vue explosée 5 ...
Страница 101: ...101 PBD 2870 Vue explosée 6 ...
Страница 103: ...103 PBD 2870 Vue explosée 7 ...
Страница 105: ...105 16 0 Schémas de câblage PBD 2870 1 230V PE 50Hz ...


