background image

PROLiNK® PRC2401U

 Wireless

 AC2600 MU-MIMO Dual-Band Gigabit Router


12 

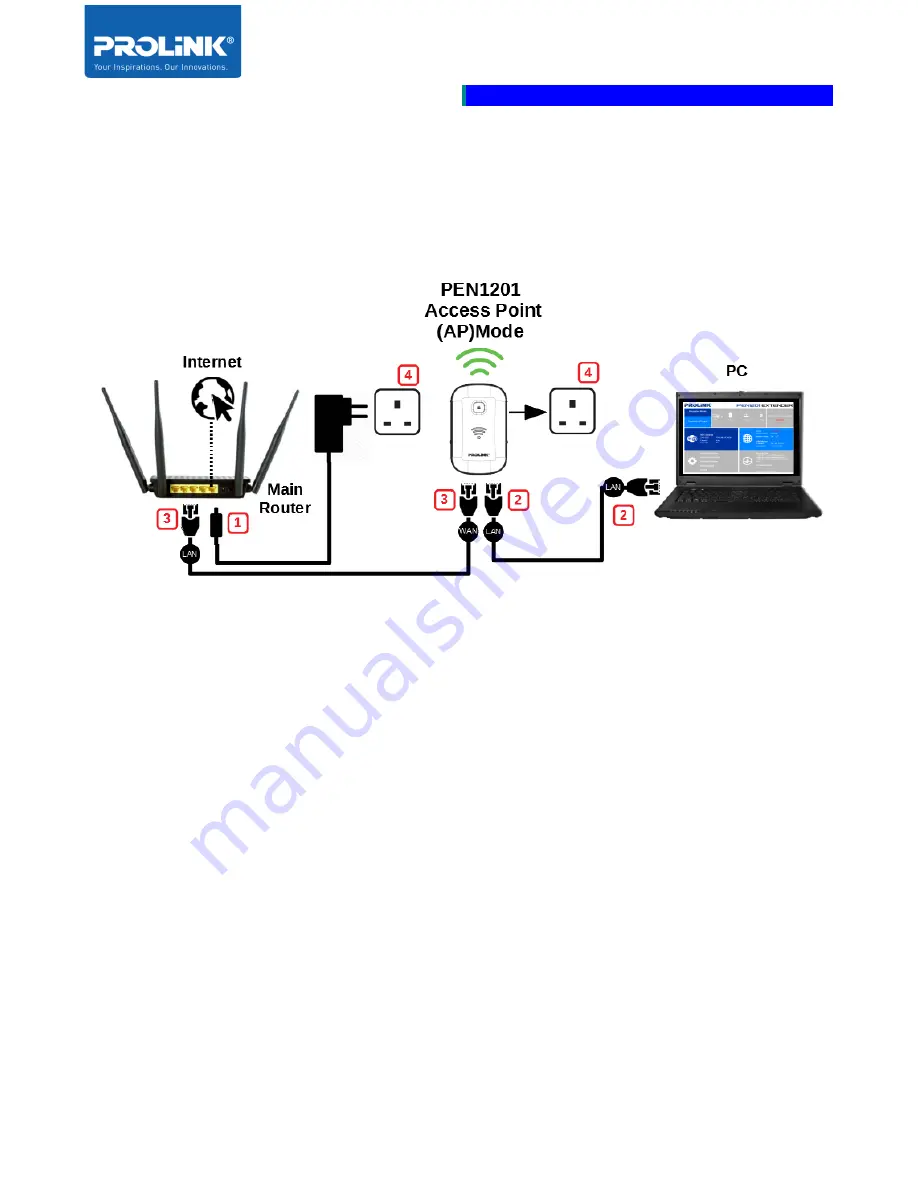
Access Point (AP) Mode Setup 

The following is a step to setup PEN1201 as AP Mode. Follow steps below to complete the 
hardware connection. 


1. 

Turn OFF Main Router/Existing Router 

2. 

Connect  Ethernet  cable  between  Main/Existing 

Router  LAN  port

  to 

PEN1201  WAN 

Port

3. 

Connect Ethernet cable between 

Computer LAN port

 to 

PEN1201 LAN port

5. 

Ensure  the  PEN1201 

Operation  Mode  Switch

  is  set  to  “

AP

”  and  Turn  ON  power 

Main/Existing Router and PEN1201.  

Содержание PEN1201

Страница 1: ...USER MANUAL PROLiNK Wireless N 300Mbps Range Extender PEN1201 ...

Страница 2: ...quipment has been tested and found to comply with the limits for a Class B digital device under Part 15 of the FCC Rules These limits are designed to provide reasonable protection against radio interference in a commercial environment This equipment can generate use and radiate radio frequency energy and if not installed and used following the instructions in this manual may cause harmful interfer...

Страница 3: ...ii PREFACE Revision Date Descriptions 1 0 26 June 2019 Initial release 1 1 5 June 2020 Updated content and Formatting ...

Страница 4: ...PEN1201 Web Interface through Mobile Phone 17 3 3 Setup Wizard 20 Repeater Wizard 20 Router Wizard 22 Access Point AP Wizard 27 4 Web User Interface UI Configuration 29 4 1 Home Page 30 Home Page Repeater 31 Repeater Wizard 31 Internet Status and LAN Setting 32 Extender PEN1201 ICON Status 32 Home Page Router 33 Router Wizard 33 WAN Setting and LAN Setting 34 PEN1201 ICON Status 34 Home Page Acces...

Страница 5: ...iv 6 Frequently Asked Questions 41 ...

Страница 6: ... the packaging contents of Extender PEN1201 the product overview regarding all the main features available and the appearance of the product included the LED indicator 1 1 Package Contents Quantity unit Item Description 1 1 PEN1201 Range Extender 2 1 Quick Installation Guide 3 1 RJ45 Ethernet Cable ...

Страница 7: ...hold the space saving wall mounted Extender enables full flexibility to shift the positioning of the device with minimal hassle The newly modernized outlook also features a Smart LED Indicator which helps detect the signal strength from the primary router and guide users to find and locate the positioning for optimal Wi Fi coverage Other upgraded features include straightforward and easily accessi...

Страница 8: ...PROLiNK PEN1201 Wireless N 300Mbps Range Extender II Page 3 1 3 Hardware Overview ...

Страница 9: ...n Hold for 10 seconds and release to reset to factory setting 5 Power Switch Top position Turn OFF Extender Bottom position Turn ON Extender 6 Operation Mode switch Top position Access Point AP Mode Middle position Repeater Mode Bottom position Router Mode 7 AC Power Input To plug into switch socket outlet 8 WAN LAN Port For Router and AP Mode this port is to be connected with Internet source Mode...

Страница 10: ...is turned Off No Power ON Extender is turned On Fast Blinking Extender is having data transmission Slow Blinking Triggering WPS Wi Fi Signal Strength One LED Bar Low Wi Fi signal strength Two LED Bar Good Wi Fi signal strength Three LED Bar Excellent Wi Fi signal strength Status Indicator Wi Fi Signal Strength Indicator WPS Button ...

Страница 11: ...ector at both ends Laptop PC equipped with Ethernet Network adapter 10Base T or 100Base TX or 1000Base TX and Wi Fi card adapter Web Browser Microsoft Edge Chrome Firefox or Safari 2 2 Placement Guide For the best Wi Fi signal transmission between PEN1201 and network devices that connect to it Place the Extender PEN1201 in a well ventilated place and avoid exposure to moisture or excessive heat Ke...

Страница 12: ...utlet and switch ON The Wi Fi Signal Strength indicators indicate the link quality once PEN1201 is connected to the existing router or access point It is recommended to achieve Two or Three LED bars which illustrate reliable connectivity between the Extender PEN1201 and existing router or access point ...

Страница 13: ...lient can successfully access the Internet via the main router Repeater Mode Setup Default The following is a step to setup PEN1210 as a Wi Fi range extender or Repeater Make sure your internet connection source from the main router is valid Follow the step below to complete the hardware connection 1 Turn OFF Main Existing Router 2 Connect Ethernet cable between Computer LAN port to PEN1210 LAN po...

Страница 14: ...rocess takes approximately 60 seconds When PEN1210 is ready to setup the Status indicator will lit up solid green Note that at this point the Repeater Mode is not yet fully set and Wi Fi Signal Strength indicator will not lit up Please follow until Section 3 4 Setup Wizard ...

Страница 15: ...ion source is coming from ADSL Modem follow the following step below to complete the hardware connection 1 Turn OFF modem 2 Connect Ethernet cable between modem Internet LAN port to PEN1201 WAN Port 3 Connect Ethernet cable between Computer LAN port to PEN1201 LAN port 4 Ensure the PEN1201 Operation Mode Switch is set to Router Turn ON power for modem and PEN1201 ...

Страница 16: ...nder II 11 The booting up process takes approximately 60 seconds When PEN1210 is ready to setup the Status indicator will lit up solid green Note that at this point the Router Mode is not yet fully set Please follow until Section 3 4 Setup Wizard ...

Страница 17: ...llow steps below to complete the hardware connection 1 Turn OFF Main Router Existing Router 2 Connect Ethernet cable between Main Existing Router LAN port to PEN1201 WAN Port 3 Connect Ethernet cable between Computer LAN port to PEN1201 LAN port 5 Ensure the PEN1201 Operation Mode Switch is set to AP and Turn ON power Main Existing Router and PEN1201 ...

Страница 18: ...d Gigabit Router 13 The booting up process takes approximately 60 seconds When PEN1210 is ready to setup the Status indicator will lit up solid green Note that at this point the AP Mode is not yet fully set Please follow until Section 3 4 Setup Wizard ...

Страница 19: ...ration and guide on using Setup Wizard 3 1 TCP IP Setup By default PEN1201 IP address is 192 168 123 253 and Subnet Mask is 255 255 255 0 Please ensure that your TCP IP Protocol is set to Obtain an IP address automatically for Windows OS or Using DHCP for MAC OS To verify the connection between Computer and PEN1201 run command prompt and execute ping to PEN1201 IP address To complete Ping command ...

Страница 20: ...ur connection between Computer and PEN1201 probably failed You may follow below steps in order to try rectifying the issue 1 Please recheck and ensure the Hardware Setup is correct 2 Try to follow the Hardware Setup but with another Client PC Laptop mobile phone 3 Ensure that the client devices are not using Fixed IP Address ...

Страница 21: ...reviously changed or set the PEN1201 as any mode with different Wi Fi SSID and password please do connect based on the last set configuration Log in to PEN1201 Web Interface through PC Laptop 1 Launch an Internet Browser and access http pen1201 setup or http 192 168 123 253 2 Key in Username as admin and password as password 3 After Successfully login it will show the current Operation Mode By def...

Страница 22: ...ser The following steps is to enter the Mobile Web Configuration in mobile web browser By default PEN1201 Wi Fi SSID is PROLiNK_XXXXXX and the default Wi Fi password is password12345 This information can also be found at Product Label If you have previously changed or set the PEN1201 as any mode with different Wi Fi SSID and password please do connect based on the last set configuration ...

Страница 23: ...ge Extender II Page 18 1 Open the web browser either using Chrome Firefox or Safari In the address bar enter http pen1201 setup or http 192 168 123 253 2 After Login it will show the Home Page By Default the PEN1201 is set in Repeater Mode ...

Страница 24: ...PROLiNK PEN1201 Wireless N 300Mbps Range Extender II Page 19 ...

Страница 25: ...witch is switched to desired mode before turning the unit on and start to configure By default PROLiNK PEN1201 is set to Repeater Mode Repeater Wizard 1 After setting the Operation Mode Switch to Repeater mode followed by logging into http pen1201 setup or http 192 168 123 253 It will show that it is in Repeater Mode Click Repeater Wizard to start the setup 2 Select your main router Wi Fi SSID and...

Страница 26: ...he PEN1201 new SSID s Wireless Password Wireless Key will be the same as the selected main router Wi Fi SSID 3 Click Save to proceed the PEN1201 will auto reboot After approximately 60 seconds you can now connect to new Repeater SSID your_Main_Router_SSID ext with your_Main_Router_Wi Fi Password to connect Note After Setup to access PEN1201 web interface please connect to PEN1201 s set SSID and en...

Страница 27: ...ROLiNK PEN1201 Wireless N 300Mbps Range Extender II Page 22 Router Wizard 1 Set Operation Mode Switch to Router PEN1201 page will show the PEN1201 is in Router Mode Click Router Wizard to start the setup ...

Страница 28: ...lect Intelligent Detection for auto ISP connection detection alternatively you can choose your preferred Connection Type The available option is DHCP PPPoE and Static IP Address Note Please do remember to set your preferred 2 4GHz Wi Fi SSID and Wi Fi Password under Wi Fi Settings before clicking Save to proceed ...

Страница 29: ...onnect to PEN1201 s set SSID and enter http pen1201 setup at your Internet Browser Address bar a DHCP If your Internet connection subscription from ISP is DHCP set your preferred 2 4GHz Wi Fi SSID and Wi Fi Password and proceed to click Save After the configuration is saved the device will reboot and when you go back to http pen1201 setup it will show Internet status connected ...

Страница 30: ...er II Page 25 b PPPoE Enter the Username and Password provided by the ISP If the PPPoE username and password is incorrect the PEN1201 interface will show disconnected Set your preferred 2 4GHz Wi Fi SSID and Wi Fi Password and proceed to click Save ...

Страница 31: ...s Range Extender II Page 26 c Static IP Address Enter the IP Address Subnet Mask Default Gateway Primary DNS Address based on information provided by ISP Set your preferred 2 4GHz Wi Fi SSID and Wi Fi Password and proceed to click Save ...

Страница 32: ... pen1201 setup to start the setup 2 Make sure that the Internet source is connected to PEN1201 WAN port Set your preferred Wi Fi SSID and Wi Fi Password Set the Channel to Auto or to any of the desired Wi Fi Channel number Click Save to proceed it will reboot the PEN1201 and in approximately 60 seconds you can now connect wirelessly to the newly set SSID and password ...

Страница 33: ...tus of the internet connection It it disconnected please check your Host Main Router connection or contact your ISP regarding the internet connection Note After Setup to access PEN1201 web interface please connect to PEN1201 s set SSID and enter http pen1201 setup at your Internet Browser Address bar ...

Страница 34: ...u have completed your setup wizard Repeater mode AP mode Router mode Enter the default GUI username and password username admin password password If you forgot the password factory reset the PEN1201 by press and hold the Reset button for 10 seconds Reset button is located at the side of the unit The First page shows up after login successfully is a Home Page The home page displays the current stat...

Страница 35: ...e 30 4 1 Home Page For PEN1201 it has three different homepages as it has three different operation modes which is Homepage Repeater Homepage Router and Homepage Access Point AP In this chapter it will explain all the available option for each operation mode ...

Страница 36: ... Home Page after successfully login to http pen1201 setup in repeater mode Repeater Wizard Repeater wizard is the software design to help the user how to setup the repeater quickly It will help to find which connection need to extend and it will help to save the setting and reboot the router automatically The detail setup can be found at Repeater Wizard page ...

Страница 37: ...and the signal between Host Wi Fi to the Extender PEN1201 Click on LAN Setting to set the DHCP Start IP Address and DHCP End IP Address Extender PEN1201 ICON Status On PEN1201 Status panel it shows the details of the device about running time from last turn off or restart Latest Update Firmware Version install and the MAC address of the Extender PEN120 Click the icon it shows the System Info and S...

Страница 38: ...is the Home Page after successfully login in Router Mode Router Wizard Router wizard is the software design to help the user how to setup the router quickly It will help to find which connection need to configure depends on your ISP subscription and it will help to save the setting and reboot the router automatically The details explanation can be found at Router Wizard page ...

Страница 39: ...ck on LAN Setting to set the DHCP Start IP Address and DHCP End IP Address Click SAVE when done and the router will restart and back to homepage PEN1201 ICON Status On Extender PEN1201 Status panel it shows the details of the device about running time from last turn off or restart Latest Update Firmware Version install and the MAC address of the Extender PEN1201 Click on the icon it shows System I...

Страница 40: ...e Shows is the Home Page after successfully login in AP Mode AP Wizard Router wizard is the software design to help the user how to setup the router quickly It will help to find which connection need to configure depends on your ISP subscription and it will help to save the setting and reboot the router automatically The details explanation can be found at Access Point AP Wizard page ...

Страница 41: ... its connected or disconnected Click on LAN Setting to see the details of IP Address DHCP start and end IP Address Extender PEN1201 Status On Extender PEN1201 Status panel it shows the details of the device about running time from last turn off or restart Latest Update Firmware Version install and the MAC address of the Extender PEN1201 ...

Страница 42: ... Receive Tx Rate Mbps and it also shows Online Time Client Active Time 4 3 Wi Fi Setting Click on Wi Fi Setting to display the 2 4G Wi Fi setting set to the Extender PEN1201 The option available to configure is Wi Fi SSID to change Wi Fi broadcast name using encrypted password Manually change Wi Fi Key or password recommended for better security to change password consist of Capital and Small Lett...

Страница 43: ...hanges to take effect Save Import Settings In this page you will be able to back up the current PEN1201 configuration to load backed up configuration onto the repeater to reset the PEN1201 to factory default settings To back up the current PEN1201 click Export To load previously backed up PEN1201 settings click Choose File point to the previous configuration file click Import To restore PEN1201 to...

Страница 44: ...rade Firmware click Choose File point to the provided firmware file click Upload Note DO NOT Disconnect or power off the PEN1201 during the upgrade as it will become corrupted and unusable Restart Device Click Restart Device to reboot the PEN1201 It will take about a 60 second to finish up the booting process Logout Click to logout from the PEN1201 Web Interface ...

Страница 45: ... Wireless Wireless Standards IEEE 802 11b g n Wireless Frequency Band 2 4GHz Wireless N Wireless Link Rate Up to 300Mbps at 2 4GHz Wireless N Wireless Antenna 2x Internal 3dBi Antenna Wireless Security WPA2 PSK encryption Software WAN Connection Type Repeater mode AP mode Router mode Dynamic IP Static IP PPPoE DHCP Setting DHCP Server DHCP Client Environmental Operating Temperature 0oC 40oC Storag...

Страница 46: ...4 How do I access the PEN1201 in order to change configuration Ans Connect your PC Mobile Client to the PEN1201 after which type and go to http pen1201 setup Note please remember to type http onto your Web Browser 5 How do I change the repeater SSID after I have successfully set it in Repeater AP Router mode Ans Step1 Connect your PC Mobile Client to the PEN1201 Step2 Launch a Web Browser type htt...

Отзывы: