background image

version 1.1 

ZRM 6013+

 Instruction manual 

Menu


last update: 30.07.2014 

page 53 


14.4.4  Practical sample combination of wet timer and interval timer 

The interval timer can be used e.g. to define the performance of the retroreflection of a marking 
in dependence on the effluent water at wet measurements. 
A combination of the wet timer and 
interval timer makes sense if the interval measurements should not start immediately after 
moistening of the road marking. 
 
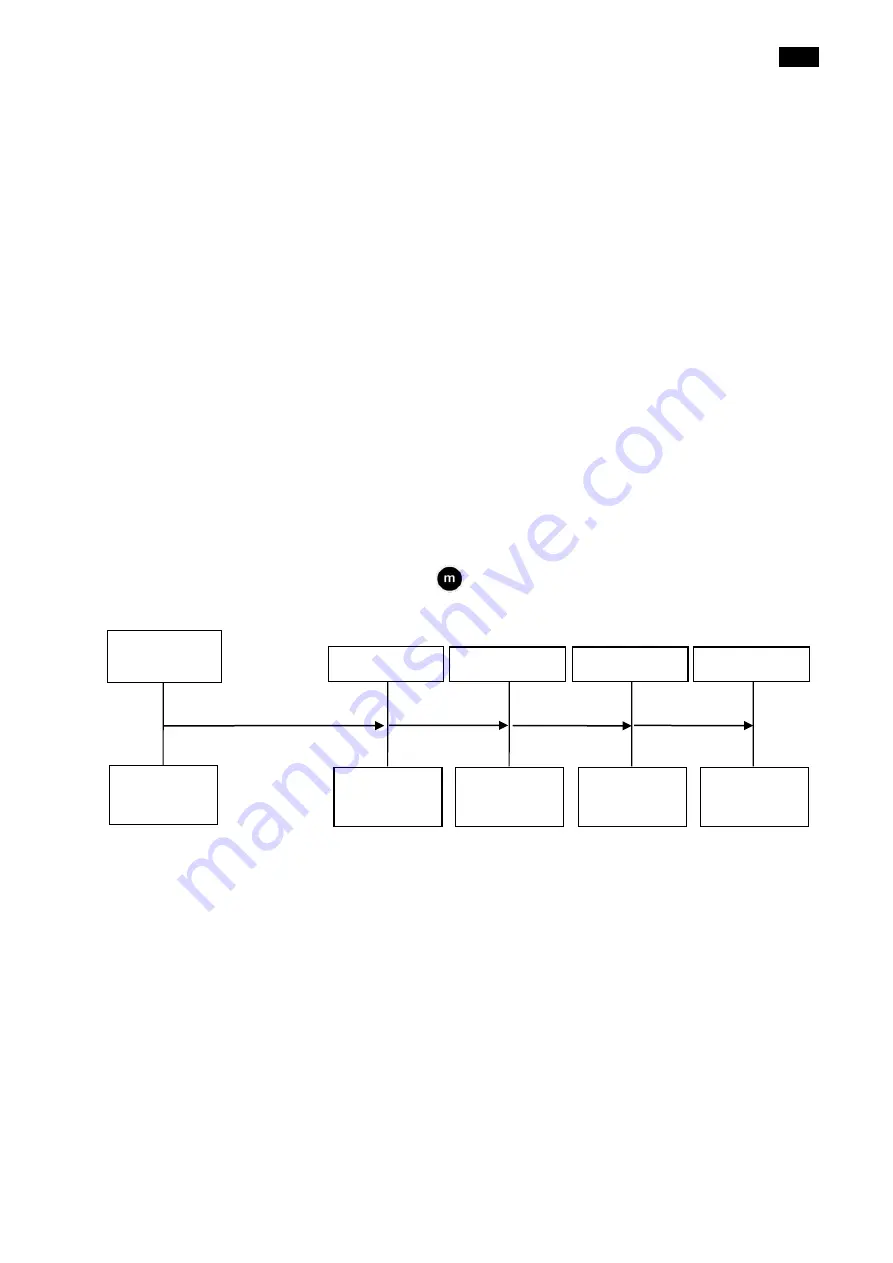
The following drawing shows the effect of the settings below: 
 

Wet timer: activated 

The wet timer has been activated as mentioned in chapter 14.4 

Timers

 on page 48. 


Wet timer time: 45 seconds:


The wet time has been set at 45 seconds as described in chapter 14.4.1 

„Wet timer” on 

page 48. 
 

Interval timer: activated 

The interval timer has been activated as mentioned in chapter 14.4 

Timers

 on page 48. 


Interval time: 5 seconds 

The interval time has been set at 5 seconds as described in chapter 14.4.2 

„Interval timer” on 

page 49. 
 

Interval counts: 4 

The interval counts has been set at 4 as described in chapter 14.4.2 

„Interval timer” on page 49. 

After the setting, press the measuring button 

 and the following procedure will start: 


The first measurement will be carried out by the wet timer. Afterwards the set number of interval 
counts will be carried out. So in this sample there will be altogether 4 measurements. 
 
The measurements can be shown on your computer using the free sof

tware „MappingTools”. 

For this you need either to store the measuring data on an USB flash drive as described in 
chapter 12.6 

„Storing the measuring data on a USB flash drive“ on page 42 or open the 

measuring data directly on the 

ZRM 6013+

 as described in chapter 13 

„Data export and 

MappingTools software

 on page 43. 

Measurement 

Start wet 

timer 

Measurement 


Measurement 


HH:mm:ss 
14:00:00 

HH:mm:ss 
14:00:45 

HH:mm:ss 
14:00:50 

HH:mm:ss 
14:00:55 

Measurement 


HH:mm:ss 
14:01:00 

Содержание Zehntner ZRM 6013+

Страница 1: ...Instruction manual version 1 1 dated 30 07 2014 ZRM 6013 Retroreflectometer RL Qd Firmware as from v 1 2 3...

Страница 2: ......

Страница 3: ...13 4 10 Further features information 13 5 Display and functions 14 5 1 Abridged survey 14 6 Setting up 16 7 Navigation 16 7 1 Activation respectively deactivation 16 7 2 Scrolling 16 7 3 Exit 16 8 Ca...

Страница 4: ...ive 44 13 4 Evaluation and mapping software MappingTools 44 13 5 Data export to Microsoft Excel 45 14 Menu 46 14 1 Menu structure 46 14 2 Navigation in the menu 47 14 3 Measure mode 47 14 3 1 Geometri...

Страница 5: ...e Calibration is not OK 65 17 5 Error message Factory calibration has expired 65 17 6 Bluetooth error message No new devices found 66 17 7 Bluetooth error message The connection could not be completed...

Страница 6: ...ment description The retroreflectometer ZRM 6013 is a portable rechargeable battery powered precision measuring instrument for the determination of night RL and or day Qd visibility of road markings T...

Страница 7: ...e manual completely In particular the safety precautions and warnings The ZRM 6013 is exclusively designed for the determination of the night and or day visibility of road markings as well as ambient...

Страница 8: ...ts If you even suspect by your visual impression that damage has occurred make a note of the suspected damage on the delivery receipt or freight papers and get the carrier to sign it Moreover the forw...

Страница 9: ...delivery 1 battery operated retroreflectometer with 5 7 colour touchscreen 1 calibration standard 1 universal battery charger 100 240 V 50 60 Hz 1 mapping and data analysis software MappingTools 1 USB...

Страница 10: ...ing material The transportation carrying case is at the same time an optimal storage case for the ZRM 6013 when not in use The ZRM 6013 is always to stow away locked into the calibration standard 3 4...

Страница 11: ...tions can be bought after the sale at Proceq or an authorized agent Extended handle with measuring button WAAS GPS unit Bluetooth interface built in thermal printer and bigger SD flash memory cards re...

Страница 12: ...ting there are listed night visibility RL and day visibility Qd to be calibrated on the calibration standard Take care that the ZRM 6013 is placed correctly on the included calibration standard Otherw...

Страница 13: ...ptional built in thermal printer or an external printer for printing out the test report For further information please refer to chapter 10 4 Print as from page 28 4 8 Archive memory All stored files...

Страница 14: ...2 Measuring button 3 Quick start menu button 4 Touchscreen 5 Handle 6 Optional extended handle 7 Measuring button of extended handle 8 Fixing screw of optional extended handle 9 Label incl serial num...

Страница 15: ...andle 11 Host USB interface type A 12 Mini USB interface type B 13 current measuring value 14 Single values 15 Average value 16 Ambient temperature relative humidity 17 Battery status 18 Wet timer 19...

Страница 16: ...easy to learn and use the ZRM 6013 By pressing icons certain functions are activated or deactivated This is either shown with a white tick on green background a green thick with a yellow marking e g o...

Страница 17: ...ble and is valid only for the delivered instrument Following indications are noted on the label of the calibration standard After the expiry date of the calibration standard a factory calibration of t...

Страница 18: ...ion standard Otherwise the ZRM 6013 will give you an error message The instrument has to snap in which is indicated by a click sound Press the symbol and to open the calibration function In the standa...

Страница 19: ...ht visibility RL and day visibility Qd to be calibrated on the calibration standard You can have a look at the standard settings if you press in the menu Calibrate the button and choose a geometry RL...

Страница 20: ...out using the calibration standard which belongs to the instrument black plate in accordance with chapter 8 3 Calibration on calibration standard on page 18 Following indications are noted on the labe...

Страница 21: ...avoid cleaning by proper handling and storage as mentioned in chapter 8 4 2 Storage on page 21 If you observe deviations on the retroreflection values and you suspect the ACC175 has been soiled clean...

Страница 22: ...RL or Qd is deactivated you can activate them by clicking on the line Calibrate and choose On Please check the calibration settings also for the Qd geometry and if necessary change them accordingly Af...

Страница 23: ...ottom side of the instrument is soiled you have the possibility to display the deviation in percent from the nominal value of the 2nd standard By pressing and and selecting Setup and Calibration you c...

Страница 24: ...take further measurements the last measurement value is always shown in the second line on the top For editing or deleting such a measurement please refer to chapter 9 1 4 Edit delete and store measur...

Страница 25: ...asurement in due time after moistening the road In the ZRM 6013 the stopwatch is integrated and releases the measurement automatically after the requested time Never pour water on the instrument Never...

Страница 26: ...e inserted information will be added to all future readings until you edit the additional information again You also have the possibility to add the additional information later on in the archive This...

Страница 27: ...d to follow a certain procedure in order to get reasonable values This instruction is available at Proceq or at an authorized Proceq agent 9 3 2 Local regulations Please observe that some countries ha...

Страница 28: ...1 WAAS GPS unit as from page 30 10 3 Archive All stored files are located in the archive By and you open the archive memory There you are able to edit delete export to USB flash drive as well as to p...

Страница 29: ...n the standard setting there are listed night visibility RL and day visibility Qd to be calibrated on the calibration standard By pressing you trigger the calibration After the calibration you get a m...

Страница 30: ...GPS unit is not able to receive a positioning signal The coordinates cannot be displayed Weak GPS Signal The WAAS GPS unit is receiving the positioning signal The quality of the GPS signal is poor No...

Страница 31: ...d 10 20 Fair Represents a low confidence level Positional measurements should be discarded or used only to indicate a very rough estimate of the current location 20 Poor At this level measurements are...

Страница 32: ...ng link http www broadcom com support bluetooth update php Before updating the WIDCOMM Bluetooth software please check whether you have different Bluetooth software installed on your PC laptop If you...

Страница 33: ...to be set up properly This initial setup has to be made only once for each device The device which you want to connect via Bluetooth to the ZRM 6013 must be visible otherwise it won t be detected by...

Страница 34: ...visible checking Allow Bluetooth devices to find this computer The ZRM 6013 starts loading the Bluetooth settings It might be necessary to reload the screen using the backwards arrow and selecting Bl...

Страница 35: ...ce and will be registered with the pin 1234 This pairing process will only have to be carried out once as long as the paired device is not removed from My devices Press the backwards arrow Press File...

Страница 36: ...ng code and press Next Enter the pin code 1234 and press Next This message indicates a successful pairing of the ZRM 6013 with the PC laptop Make sure that the File Transfer Service Obex is activated...

Страница 37: ...2014 page 37 Go to the Services tab and check File Transfer Obex Click Apply to save the changes and then close the window In case the File Transfer Obex service is not available you have to install t...

Страница 38: ...ceed without prior initial setup Prepare the ZRM 6013 for file transfer by pressing and and selecting Setup and Bluetooth and File Transfer Now the ZRM 6013 is ready for file transfer Use your PC lapt...

Страница 39: ...error message The connection could not be completed on page 66 11 3 Built in thermal printer The ZRM 6013 offers the possibility to print out a measuring report using the optional built in thermal pri...

Страница 40: ...measurements Here the measurements can be sorted using the following criteria By date grouped by date By job grouped by job Last measurement All measurements sorted by date and time the last measureme...

Страница 41: ...measurement stored under the job Default will be deleted at once It is recommended carrying out a back up copy on your PC laptop or on a USB flash drive Here you are able to delete this single entry...

Страница 42: ...s keyboard 12 5 Printing of a measuring report By pressing the symbol you are opening the window for selecting a printer Here you can either choose the optional built in thermal printer or an external...

Страница 43: ...USB interface type B mini for connection to a PC 13 2 PC Mode Connect the ZRM 6013 with a USB cable to a computer The message PC Mode should appear on the touchscreen of the ZRM 6013 After the softwar...

Страница 44: ...software MappingTools For evaluation of measurements start the free software MappingTools For information on installation and working with the mapping software MappingTools please refer to the separa...

Страница 45: ...This is described in the separate instruction manual MappingTools An Excel Measuring report may look as follows Job Name Default Device Name ZRM 6013 Serial Number 480006013 Date Number of Measuremen...

Страница 46: ...Hour Minute Time format Date format Device name Company name Device serial number Software version Measurement counter Disk space Last calibration Next factory calibration Cal Code Device version Ena...

Страница 47: ...the top of each window you can read in which menu you are 14 3 Measure mode By and and selecting Measure mode you are able to change the measurement settings 14 3 1 Geometries Path and selecting Measu...

Страница 48: ...symbol is shown the average reading is activated 14 4 Timers 14 4 1 Wet timer Path and selecting Timers The ZRM 6013 is equipped with a wet timer so that the measurement will be taken right after the...

Страница 49: ...n in the display in the measure mode by the icon 14 4 2 Interval timer Path and selecting Timers Here you can activate the interval mode By this continuous measurements will be taken The interval time...

Страница 50: ...al version 1 1 page 50 last update 30 07 2014 Here you can set the interval time between 5 and 1 000 seconds Here you can set the interval counts between 2 and 500 If both timers are activated all cur...

Страница 51: ...apter 14 4 2 Interval timer on page 49 Interval counts 12 The interval counts has been set at 12 as described in chapter 14 4 2 Interval timer on page 49 After carrying out the measurements we exporte...

Страница 52: ...onds after start Measurement No RL mcd lx m Moistening of the road marking and start interval timer by pressing the measuring button at 04 03 2014 10 17 0 1 56 04 03 2014 10 17 5 2 73 04 03 2014 10 17...

Страница 53: ...e 48 Interval time 5 seconds The interval time has been set at 5 seconds as described in chapter 14 4 2 Interval timer on page 49 Interval counts 4 The interval counts has been set at 4 as described i...

Страница 54: ...006013 04 03 2014 14 01 1 105 256 Sissach 480006013 Practical sample wet timer and interval timer 60 70 80 90 100 110 120 1 2 3 4 Measurements RL values in mcd lx m For the interpretation of the above...

Страница 55: ...delete message 14 6 Setup 14 6 1 User Path and selecting Setup To add a user enables relating measurements to a specific operator and to store user specific settings If no user has been added the use...

Страница 56: ...ou want to contribute and translate a new language or if you have some comments on an existing language please feel free to contact Proceq 14 6 3 Date and time Path and selecting Setup Top list Bottom...

Страница 57: ...Setup At Enable sound you are able to activate or deactivate the sound which will be played after a measurement At Sound volume you are able to set the volume from 1 to 5 14 6 6 Database Path and sel...

Страница 58: ...ou are sure that you have selected the correct database you need to confirm this message for finishing the delete job 14 6 7 Bluetooth Interface Path and selecting Setup The Bluetooth functionality is...

Страница 59: ...you after the calibration interval that the calibration of the instrument is due By pressing and and selecting Setup and Calibration you are able to set the calibration interval between 1 day and 49 d...

Страница 60: ...e settings are stored in the user profile 14 6 12 Reset settings to factory default Path and selecting Setup Here you have the possibility to reset the ZRM 6013 to the factory settings The reset to th...

Страница 61: ...version 1 1 ZRM 6013 Instruction manual Menu last update 30 07 2014 page 61 Device name Last calibration Device version Device serial number Software version Disk space Measurement counter...

Страница 62: ...is completely empty The ZRM 6013 announces this by displaying the symbol of an empty battery and an error message If there is no action the instrument will shut off once the Auto off time has been rea...

Страница 63: ...indicator light on the charger shows the charge of the battery in the charging cycle Is the indicator light red the unit is fast charging The battery charger is in constant current mode and the charge...

Страница 64: ...ing case 16 2 Cleaning We recommend that the instrument is checked and certified by Proceq once a year Otherwise clean the instrument periodically using water and oil free compressed air max 1 5 to 2...

Страница 65: ...an press Acknowledge all and the status message will disappear You can change the calibration interval as described in chapter 14 6 9 on page 59 17 4 Error message Calibration is not OK In order to pr...

Страница 66: ...2 1 Description on page 32 Make sure that Bluetooth is enabled on your PC laptop For further information please also refer to chapter 11 2 2 Establishing connection as from page 32 17 7 Bluetooth erro...

Страница 67: ...013 Instruction manual Maintenance last update 30 07 2014 page 67 17 8 Reset of ZRM 6013 If the firmware of the ZRM 6013 has a hang up you can reset the instrument by pressing the on off button for at...

Страница 68: ...river of 30 m under normal conditions The illumination angle is 1 24 18 2 Different illustration of RL The angle definitions above are valid for EN 1436 It is important to understand that EN 1436 and...

Страница 69: ...approx 2 seconds for RL and Qd single about 1 second Memory 1 GB SD flash memory about 50 000 measurements Touchscreen display 5 7 colour TFT LCD LED backlight VGA resolution External charger 100 240...

Страница 70: ...lacing 63 Status indication 62 Bluetooth Interface 31 58 Description 31 Error message 66 67 Establishing connection 31 Features 31 C Calibration 16 2nd calibration standard 18 Calibration failure 65 C...

Страница 71: ...ng back to measure mode 15 Export Bluetooth Interface 31 Excel 43 PC laptop 42 USB flash drive 41 43 Extent of delivery 8 F Factory calibration expired 66 Factory settings Reset 60 Features 5 69 Firmw...

Страница 72: ...Measuring principle Qd 68 RL 68 Measuring report 27 41 45 Memory Archive 39 Auto save 48 Space 61 Menu Levels 46 Navigation 47 Quickstart menu 27 Structure 46 Meters Miles 60 Microchronometer 24 Micro...

Страница 73: ...on not OK 65 Connection not completed 66 Factory calibration expired 66 No new devices found 66 Stopwatch 24 Storage Conditions 69 Transportation carrying case 9 Store Auto save 48 Database to USB fla...

Страница 74: ......

Страница 75: ......

Страница 76: ...Subject to change Copyright 2017 by Proceq SA Schwerzenbach All rights reserved www proceq com Version 1 1 dated 30 07 2014...

Отзывы: