background image

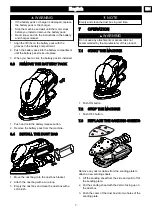
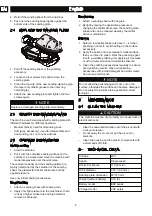
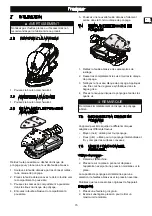
4. Roll off the sanding sheet from the dust box.
5. Push new the sanding sheet tightly against the

bottom side of the sanding plate.

7.4

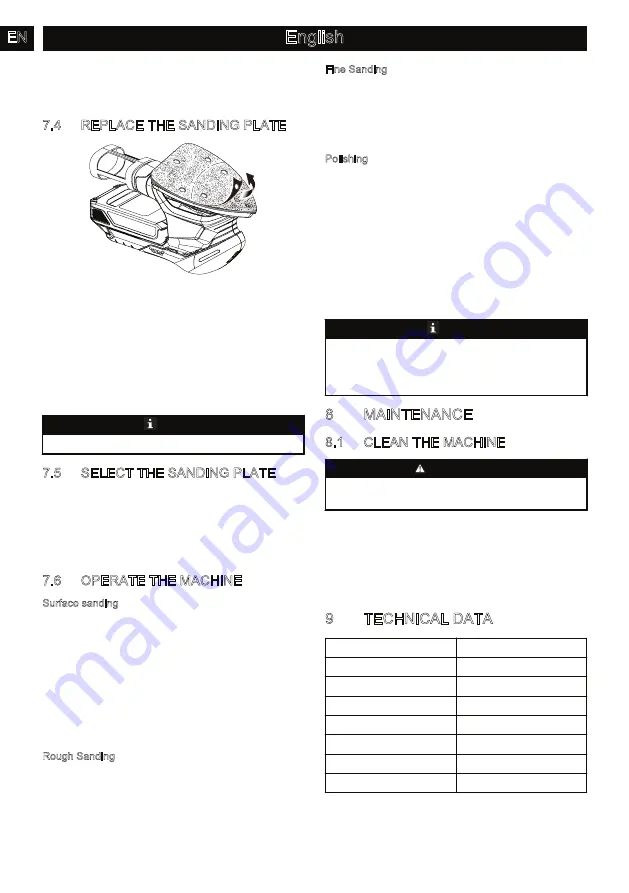
REPLACE THE SANDING PLATE

1. Pull off the sanding sheet or the polishing

accessory.

2. Loosen the four screws fully and remove the

sanding plate.

3. Clean the top side of the new sanding plate. Apply a

thin layer of synthetic grease to the outer ring

hatched grey.

4. Attach the new sanding plate and tighten the four

screws again.


NOTE

Replace a damaged sanding plate immediately.

7.5

SELECT THE SANDING PLATE

The machine can be equipped with sanding plate with

different hardness for different operation.
• Medium (black): used for all sanding work,
• Soft (grey, accessory): used for intermediate and

fine sanding, incl. on convex surfaces.

7.6

OPERATE THE MACHINE

Surface sanding
1. Start the machine.
2. Put it with the complete sanding surface on the

surface to be worked and move the machine with

moderate pressure over the workpiece.

The removal capacity and the sanding pattern are

mainly determined by the selection of the sanding

sheet, the preselected orbital stroke rate and the

applied pressure.
Use only initial sanding accessories.
Rough Sanding
1. Attach a sanding sheet with coarse grain.
2. Apply only light pressure to the machine so that it

runs at a higher stroke rate and high material

removal is achieved.

Fine Sanding
1. Attach a sanding sheet with fine grain.
2. By lightly varying the application pressure or

changing the orbital stroke rate, the sanding plate

stroke rate can be reduced whereby the orbital

action is maintained.

Polishing
1. Select a low orbital stroke rate (level 1 – 4) when

polishing in order to avoid heating up the surface

excessively.

2. Apply the polish onto a somewhat smaller surface

than you intend to polish. Work the polishing agent

in with a suitable polishing tool applying it crosswise

or with circular motion and moderate pressure.

3. Clean the polishing accessories regularly to ensure

good polishing results. Wash out polishing

accessories with a mild detergent and warm water;

do not use paint thinner.


NOTE

Do not allow the polishing agent to dry out on the

surface, otherwise the surface can become damaged.

Do not subject the surface to be polished to direct

sunlight.

8

MAINTENANCE

8.1

CLEAN THE MACHINE


CAUTION

The machine must be dry. Humidity can cause risks of

electrical shocks.

• Clear the unwanted material out of the air vent with

a vacuum cleaner.

• Do not spray the air vent or put the air vent in

solvents.

• Clean the housing and the plastic components with

a moist and soft cloth.

9

TECHNICAL DATA

Voltage

20 V

Speed

Single speed

Orbits Per Minute

11,000 min

-1

Orbit diameter

0.03 " (0.8 mm)

Sanding plate dimension

90*140 mm

Weight (without battery)

0.75 lbs

Battery model

BAP series

Charger model

CAP sereis

8

English

EN

Содержание CFG303

Страница 1: ...CFG303 EN OPERATOR MANUAL FR MANUEL D OP RATEUR SANDER PONCEUSE ES MANUAL DEL OPERADOR LIJADORA...

Страница 2: ...ety rules 5 4 Symbols on the product 6 5 Risk levels 6 6 Installation 6 6 1 Unpack the machine 6 6 2 Install the battery pack 6 6 3 Remove the battery pack 7 6 4 Install the dust bag 7 7 Operation 7 7...

Страница 3: ...ill increase the risk of electric shock Do not abuse the cord Never use the cord for carrying pulling or unplugging the power tool Keep cord away from heat oil sharp edges and moving parts Damaged or...

Страница 4: ...ive conditions liquid may be ejected from the battery avoid contact If contact accidentally occurs flush with plenty of soap and water If liquid contacts eyes immediately seek medical help Liquid ejec...

Страница 5: ...fety instructions Wear ear protection Wear eye protection Do not expose the product to rain or moist conditions 5 RISK LEVELS The following signal words and meanings are intended to explain the levels...

Страница 6: ...tery pack from the machine 6 4 INSTALL THE DUST BAG 1 Move the dust bag onto the dust box bracket 2 Attach the dust bag with a wire loop 3 Empty the dust box and clean the dust box with a soft brush N...

Страница 7: ...e rate and high material removal is achieved Fine Sanding 1 Attach a sanding sheet with fine grain 2 By lightly varying the application pressure or changing the orbital stroke rate the sanding plate s...

Страница 8: ...rom new ITEMS NOT COVERED BY WARRANTY 1 Any part that has become inoperative due to misuse commercial use abuse neglect accident improper maintenance or alteration or 2 The unit if it has not been ope...

Страница 9: ...R gles sp cifiques de s curit 12 4 Symbols on the product 13 5 Niveaux de risques 13 6 Installation 14 6 1 D ballez la machine 14 6 2 Installez le bloc batterie 14 6 3 Retirez le bloc batterie 14 6 4...

Страница 10: ...rise de terre Des prises non modifi es et leurs prises de courant respectives r duisent les risques de choc lectrique vitez que le corps n entre en contact avec des surfaces mises la terre comme les t...

Страница 11: ...obiles ou la fixation des pi ces mobiles la cassure des pi ces et toute autre condition qui pourrait affecter le fonctionnement de l outil lectrique Si il est endommag faites r parer l outil lectrique...

Страница 12: ...Pour un meilleur rendement votre batterie devrait tre charg e dans des endroits o la temp rature est au dessus de 50 F mais inf rieure 100 F Pour r duire le risque de blessure ne la rangez pas dehors...

Страница 13: ...i le bloc batterie ou le chargeur est endommag remplacez le au besoin Arr tez la machine et attendez que le moteur s arr te avant d installer ou de retirer le bloc batterie Lisez comprenez et suivez l...

Страница 14: ...serrez compl tement les vis et retirez le disque de pon age 3 Nettoyez le nouveau disque de pon age Appliquez une fine couche de graisse synth tique dans la bague grise 4 Placez le nouveau disque de p...

Страница 15: ...YEAR ANS A OS GARANTIE DE GARANT A DE LA HERRAMIENTA Powerworks garantit par la pr sente ce produit l acheteur original avec preuve d achat pour une p riode de trois 2 ans contre tout d faut de mat ri...

Страница 16: ...pec ficas de seguridad 19 4 S mbolos en el producto 20 5 Niveles de riesgo 20 6 Instalaci n 21 6 1 Desembalaje de la m quina 21 6 2 Instalaci n de la bater a 21 6 3 Retirada de la bater a 21 6 4 Insta...

Страница 17: ...ierra La utilizaci n de enchufes no modificados y de tomas de corriente adecuadas reducir el riesgo de descarga el ctrica Evite el contacto del cuerpo con superficies conectadas a tierra como tuber as...

Страница 18: ...s lleve a reparar la herramienta el ctrica antes del uso Numerosos accidentes se deben a herramientas el ctricas mal mantenidas Mantenga limpias y afiladas las herramientas de corte Las herramientas d...

Страница 19: ...cir el riesgo de descarga el ctrica Para obtener los mejores resultados su herramienta a bater a debe cargarse en un lugar donde la temperatura sea superior a 50 F 10 C pero inferior a 100 F 37 7 C Pa...

Страница 20: ...la caja y el embalaje de conformidad con los reglamentos locales 6 2 INSTALACI N DE LA BATER A AVISO Si la bater a o el cargador ha sufrido da os sustituya la bater a o el cargador Detenga la m quina...

Страница 21: ...ja de lija o el accesorio pulidor 2 Afloje los cuatro tornillos totalmente y retire la placa de lijado 3 Limpie la parte superior de la nueva placa de lijado Aplique una capa fina de grasa sint tica e...

Страница 22: ...n pa o h medo y suave 9 Tensi n 20 V Vitesse vide Vitesse unique Orbits Per Minute 11 000 min 1 Orbit diameter 0 03 0 8 mm Dimension du disque de pon age 90 140 mm Peso sin bater a 0 75 lbs Modelo de...

Страница 23: ...ostes de transporte de cualquier pieza enviada para su sustituci n bajo esta garant a a menos que dicha devoluci n sea solicitada por escrito por Powerworks 24 Espa ol ES Powerworks Tools PO Box 1238...

Отзывы: