background image

10

OPERATION

TO MOVE FORWARD AND BACKWARD  

(See Fig. 7)

The direction and speed of movement is controlled by the 

forward and reverse drive pedals.
•  Start tractor and release parking brake.
• 

Slowly depress forward (K) or reverse (L) drive pedal to 

begin movement. Ground speed increases the further 

down the pedal is depressed.

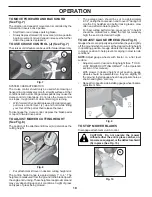
TO USE CRUISE CONTROL (J) (See Fig. 7)

The cruise control feature can be used for forward travel only.

SYSTEM CHARACTERISTICS
The cruise control should only be used while mowing or 

transporting on relatively smooth, straight surfaces. Other 

con di tions such as trimming at slow speeds may cause the 

cruise control to dis en gage. Do not use the cruise control 

on slopes, rough terrian or while trimmimg or turning.
• 

With forward drive pedal depressed to desired speed, 

pull cruise control lever (J) up and hold while lifting 

your foot off the pedal, then release the lever.

To disengage the cruise control, depress the brake pedal 

or tap on forward drive pedal.

J

K

L

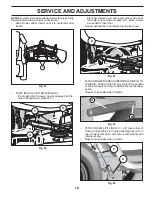
TO ADJUST MOWER CUTTING HEIGHT 

(See Fig. 8)

The position of the attachment lift lever (A) determines the 

cutting height.

A

Fig. 8

Fig. 7

•  Put attachment lift lever in desired cutting height slot.
The cutting height range is ap prox i mate ly 1" to 4". The 

heights are measured from the ground to the blade tip with 

the engine not running. These heights are approximate and 

may vary depending upon soil conditions, height of grass 

and types of grass being mowed.

•  The average lawn should be cut to approximately 

2-1/2" during the cool season and to over 3" during hot 

months. For healthier and better looking lawns, mow 

often and after moderate growth.

•  For best cutting performance, grass over 6" in height 

should be mowed twice. Make the first cut relatively 

high; the second to de sired height.

TO ADJUST GAUGE WHEELS (See Fig. 9)

Gauge wheels  are properly adjusted when they are slightly 

off the ground when mower is at the desired cutting height 

in operating position. Gauge wheels then keep the deck 

in proper position to help prevent scalping in most terrain 

conditions. 

NOTE:

Adjust gauge wheels with tractor on a flat level 

surface.
•  Adjust mower to desired cutting height (See “TO AD-

 JUST MOWER CUT TING HEIGHT” in the Operation 

sec tion of this manual).

•  With mower in desired height of cut po si tion, gauge 

wheels should be assembled so they are slightly off 

the ground. In stall gauge wheel in appropriate hole as 

shown and tighten se cure ly.

• 

Repeat for opposite side installing gauge wheel in same 

adjustment hole.

Fig. 9

Fig. 10

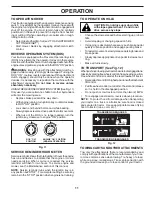
CAUTION:  Do not operate the mower 

without either the en tire grass catcher, on 

mowers so equipped, or the deflector shield 

(S) in place (See Fig. 10).

TO STOP MOWER BLADES

Disengage at tach ment clutch con trol.

S

Содержание 433413

Страница 1: ...PROTECTION DURING OPERATION Visit our website www poulan pro com WARNING Read this Manual and follow all Warnings and Safety Instructions Failure to do so can result in serious injury IMPORTANT MANUAL DO NOT THROW AWAY 12 23 09 SR 433413 Printed in the U S A 03032 ...

Страница 2: ...op engine and remove keys before dismounting Disengage blades when not mowing Shut off engine and wait for all parts to come to a complete stop before cleaning the machine removing the grass catcher or unclogging the discharge chute Operate machine only in daylight or good artificial light Do not operate the machine while under the influence of alcohol or drugs Watch for traffic when operating nea...

Страница 3: ...ch towed equipment except at the hitch point Follow the manufacturer s recommendation for weight limits for towed equipment and towing on slopes Never allow children or others in or on towed equipment On slopes the weight of the towed equipment may cause loss of traction and loss of control Travel slowly and allow extra distance to stop V SERVICE SAFE HANDLING OF GASOLINE To avoid personal injury ...

Страница 4: ...ls to service or repair this tractor Please read and retain this manual The instructions will enable you to assemble and maintain your tractor properly Always observe the SAFETY RULES CUSTOMER RESPONSIBILITIES Read and observe the safety rules Follow a regular schedule in maintaining caring for and using your tractor Follow the instructions under Maintenance and Stor age sections of this owner s m...

Страница 5: ...erminals charge battery for minimum of one hour at 6 10 amps See BATTERY in Maintenance section of this manual for charging instructions For battery and battery cable installation see RE PLACINGBATTERY inthe ServiceandAdjustments section in this manual Fig 2 TO ADJUST SEAT See Fig 1 Grasp adjustment handle A and pull up slide seat to desired position and release adjustment handle A Fig 1 NOTE You ...

Страница 6: ...htened securely All tires are properly inflated For shipping purposes the tires were overinflated at the factory Be sure mower deck is properly leveled side to side front to rear for best cutting results Tires must be properly inflated for leveling Check mower and drive belts Be sure they are routed properly around pulleys and inside all belt keepers Check wiring See that all connections are still...

Страница 7: ...ety inform ation about hazards which can result in death serious injury and or property damage DANGER indicates a hazard which if not avoided will result in death or serious injury WARNING indicates a hazard which if not avoided could result in death or serious injury CAUTION indicates a hazard which if not avoided might result in minor or moderate injury CAUTION when used without the alert symbol...

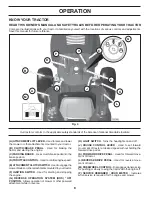
Страница 8: ...ONTROL Usedtocontrolenginespeed E ATTACHMENTCLUTCHSWITCH Usedtoengagethe mowerbladesorotherattachmentsmountedtoyourtractor F IGNITION SWITCH Used for starting and stopping the engine G REVERSE OPERATION SYSTEM ROS ON POSITION Allows operation of mower or other powered attachment while in reverse H LIGHT SWITCH Turns the headlights on and off J CRUISE CONTROL LEVER Used to set forward movement of t...

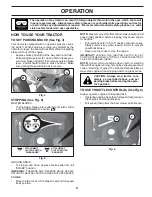
Страница 9: ...ull speed fast offers the best mower performance STOPPING See Fig 5 MOWER BLADES To stop mower blades place attachment clutch control in the DISENGAGED position GROUND DRIVE To stop ground drive depress brake pedal into full BRAKE position IMPORTANT FORWARD AND REVERSE DRIVE PEDALS RETURN TO NEUTRAL POSITION WHEN NOT DEPRESSED ENGINE Move throttle control D between half and full speed fast positio...

Страница 10: ...ed from the ground to the blade tip with theenginenotrunning Theseheightsareapproximateand may vary depending upon soil conditions height of grass and types of grass being mowed The average lawn should be cut to approximately 2 1 2 during the cool season and to over 3 during hot months For healthier and better looking lawns mow often and after moderate growth For best cutting performance grass ove...

Страница 11: ...than 15 and do not drive across any slope Choose the slowest speed before starting up or down hills Avoid stopping or changing speed on hills If stopping is absolutely necessary push brake pedal quickly to brake position and engage parking brake To restart movement slowly release parking brake and brake pedal Slowly depress appropriate drive pedal to slowest set ting Make all turns slowly TO TRANS...

Страница 12: ...gine has run out of fuel it will take extra cranking time to move fuel from the tank to the engine Besurefreewheelcontrolisinthetransmissionengaged position Sit on seat in operating position depress brake pedal and set parking brake Move attachment clutch to DISENGAGED position Move throttle control to choke position NOTE Before starting read the warm and cold starting procedures below Insertkeyin...

Страница 13: ...l to half 1 2 speed Disengage parking brake 8 Drive tractor forward for approximately five feet then backwards for five feet Repeat this driving procedure three times Your transmission is now purged and now ready for normal operation MOWING TIPS Tire chains cannot be used when the mower housing is attached to tractor Mower should be properly leveled for best mowing performance See TO LEVEL MOWER H...

Страница 14: ...Replace Mower Blades Che Clean Debris Off Steering Plate ck Transaxle Cooling Che Check Operator Presence ROS Systems ck V Belts Check Mower Levelness LUBRICATION CHART GENERAL RECOMMENDATIONS The warranty on this tractor does not cover items that have beensubjectedtooperatorabuseornegligence Toreceive full value from the warranty operator must maintain tractor as instructed in this manual Some ad...

Страница 15: ...nto reverse should shut off the engine When the engine is running with the ignition switch in the ROS ON position and the attachment clutch engaged any attempt by the operator to shift into reverse should NOT shut off the engine BLADE CARE Forbestresultsmowerbladesmustbekeptsharp Replace bent or damaged blades CAUTION Useonlyareplacementbladeap proved by the manufacturer of your tractor Using a bl...

Страница 16: ...n more freely when warm Catch oil in a suitable container Remove oil fill cap dipstick Be careful not to allow dirt to enter the engine when changing oil Remove yellow cap from end of drain valve and install the drain tube onto the fitting Unlock drain valve by pushing inward and turning counterclockwise To open pull out on the drain valve After oil has drained completely close and lock the drain ...

Страница 17: ... throttle lever in the Fast position IMPORTANT Recheck the area making certain the area is clear 7 Move the tractor s attachment clutch control to the EN GAGED position Remainintheoperator spositionwith the cutting deck engaged until the deck is cleaned 8 Move the tractor s attachment clutch control to the DISENGAGED position Turn the ignition key to the STOP position to turn the tractor s engine ...

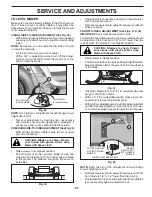
Страница 18: ...assis and rear lift link C from rear mowerbracket D removeretainerspringsandwashers Go to other side of mower and disconnect the suspen sion arm and rear lift link CAUTION After rear lift links are discon nected the attachment lift lever will be spring loaded Have a tight grip on lift leverwhenchangingpositionofthelever From right side of mower disconnect anti sway bar S from right rear mower brac...

Страница 19: ...owards you and insert other end of bar into hole in rear mower bracket D Move mower as needed to insert bar Secure with washer and retainer spring as shown ATTACH MOWER SIDE SUSPENSION ARMS A TO CHASSIS Position hole in arm over pin B on outside of tractor chassis and secure with washer and retainer spring Repeat on opposite side of tractor Fig 24 A B ATTACH REAR LIFT LINKS C Lift rear corner of m...

Страница 20: ...racket H and secure with washer and retainer spring J Disengage belt tension rod K from locking bracket L Install belt onto engine clutch pulley M IMPORTANT Check belt for proper routing in all mower pulley grooves Engage belt tension rod K on locking bracket L CAUTION Belt tension rod is spring loaded Have a tight grip on rod and engage slowly Raise attachment lift lever to highest position If ne...

Страница 21: ...s and visually checking the appearance Readjust if necessary until you are satisfied with the results A Turn nut left to lower mower Turn nut right to raise mower Fig 29 Fig 30 PRECISION SIDE TO SIDE ADJUSTMENT See Fig 30 With all tires properly inflated park tractor on level ground or driveway CAUTION Blades are sharp Protect your hands with gloves and or wrap blade with heavy cloth Raise mower t...

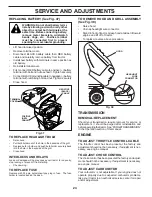
Страница 22: ... F Be sure belt is inside the belt keeper 4 Install belt on centerspan idler E 5 Install belt through stationary idler C and clutching idler D 6 Reinstall anti rotation link B on right side of tractor Tighten securely 7 Reconnect clutch harness A 8 Make sure belt is in all pulley grooves and inside all belt guides and keepers 9 Install mower See TO INSTALL MOWER section in this manual V Q P M K L ...

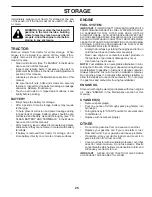
Страница 23: ...over retaining ring and washers to allow wheel removal rear wheel contains a square key Do not lose Repair tire and reassemble On rear wheels only align grooves in rear wheel hub and axle Insert square key Replace washers and snap retaining ring securely in axle groove Replace axle cover NOTE Tosealtirepuncturesandpreventflattiresduetoslow leaks tire sealant may be purchased from your local parts ...

Страница 24: ...d INTERLOCKS AND RELAYS Loose or damaged wiring may cause your tractor to run poorly stop running or prevent it from starting Check wiring TO REPLACE FUSE Replace with 20 amp automotive type plug in fuse The fuse holder is located behind the dash TO REMOVE HOOD AND GRILL ASSEMBLY See Fig 38 Raise hood Unsnap headlight wire connector Stand in front of tractor Grasp hood at sides tilt toward engine ...

Страница 25: ...UELSYSTEMPARTSSUCH AS CARBURETOR FUEL FILTER FUEL HOSE OR TANK DURING STORAGE ALSO EXPERIENCE INDICATES THAT ALCOHOL BLENDED FUELS CALLED GASOHOL OR USING ETHANOLORMETHANOL CANATTRACTMOISTUREWHICH LEADSTOSEPARATIONANDFORMATIONOFACIDSDURING STORAGE ACIDIC GAS CAN DAMAGE THE FUEL SYSTEM OF AN ENGINE WHILE IN STORAGE Empty the fuel tank by starting the engine and let it run until the fuel lines and c...

Страница 26: ... 6 Check all wiring 7 Faulty ignition switch 7 Check replace ignition switch 8 Faulty solenoid or starter 8 Check replace solenoid or starter 9 Faulty operator presence switch es 9 Contact an authorized service center department Engine clicks but will not start 1 Weak or dead battery 1 Recharge or replace battery 2 Corroded battery terminals 2 Clean battery terminals 3 Loose or damaged wiring 3 Ch...

Страница 27: ...mproperly installed 9 Reinstall blades sharp edge down 10 Improper blades used 10 Replace with blades listed in parts manual 11 Cloggedmowerdeckventholesfrombuildup of grass leaves trash around mandrels 11 Clean around mandrels to open vent holes Headlight s not working if so equipped 1 Switch is OFF 1 Turn switch ON 2 Bulb s or lamp s burned out 2 Replace bulb s or lamp s 3 Faulty light switch 3 ...

Страница 28: ...28 SERVICE NOTES ...

Страница 29: ... never across the face Do not mow slopes greater than 15 degrees Make turns gradually to prevent tipping or loss of control Exercise extreme caution when changing direction on slopes 1 Fold this page along dotted line indicated above 2 Hold page before you so that its left edge is vertically parallel to a tree trunk or other upright structure 3 Sight across the fold in the direction of hill slope ...

Страница 30: ... D Number b Description of part For Technical Assistance call 1 800 829 5886 For a Parts Manual go to our website www poulan pro com support asp NOTE HOP provides parts and service through its authorized distributors and dealers therefore all requests for parts and service should be directed to your local dealer s The philosophy of HOP is to continually improve all of its products If the operating...

Страница 31: ...nce technique appelez 1 800 829 5886 Pour un manuel de pièces allez à notre site web www poulan pro com support asp N B HOP assure la distribution des pièces de rechange et l entretien de ses pro du its par l intermédiaire des concessionnaires et des distributeurs agrées par conséquent toute de mande de pièces ou d entretien doit être adressée directement au distributeur agréé le plus proche La ph...

Страница 32: ... DES PENTES AFIN D AMÉLIORER LA SÉCURITÉ D UTILISATION TONDEZ LES PENTES EN MONTANT OU EN DESCENDANT MAIS JAMAIS EN TRAVERS 15 DEGRÉS MAX P L I E Z S U I V A N T L E S P O I N T I L L É S C E C I E S T U N E P E N T E A 1 5 D E G R É S ...

Страница 33: ...28 REMARQUES D ENTRETIEN ...

Страница 34: ...u boîtier de tondeuse 8 La courroie d entraînement de tondeuse est usée 8 Remplacez la courroie d entraînement de tondeuse 9 Les lames n ont pas été correctement montées 9 Réinstallez les lames avec le bord tranchant vers le bas 10 Les mauvaises lames ont été montées 10 Remplacez les lames avec les lames recommandées dans ce manuel 11 Les trous d évent du carter de tondeuse sont ob strués par l ac...

Страница 35: ...terie 6 Le câblage est lâche ou endommagé 6 Vérifiez tout le câblage 7 Le contacteur d allumage est défectueux 7 Vérifiez remplacez le contacteur d allumage 8 Le solénoïde ou le démarreur est défectueux 8 Vérifiez remplacez le solénoïde ou le démarreur 9 L interrupteur qui détecte la présence du conduc teur est défectueux 9 Contactez un centre d entretien autorisé II y a un déclic mais le moteur n...

Страница 36: ...CE OU LE RÉSERVOIR D ESSENCE PENDANT L ENTREPOSAGE L EXPÉRIENCE DÉMONTRE QUE LES CARBURANTS QUI SONT MÉLANGÉS AVEC DE L ALCOOL ÉTHANOL OU MÉTHANOL ET PARFOIS APPELÉS GASOHOL PEUVENT ATTIRER L HUMIDITÉ QUI CAUSE LA SÉPARATION ET LA FORMATION D ACIDE PENDANT L ENTREPOSAGE L ESSENCE ACIDE PEUT AVARIER LE SYSTÈME DE CARBURANT DU MOTEUR PENDANT L ENTREPOSAGE Vidangez le réservoir d essence en mettant e...

Страница 37: ...la cause du mauvais fonctionnement de l arrêt ou du non démarrage du tracteur Vérifiez le câblage Voir le schéma du câblage électrique dans la section Pièces de Rechange POUR REMPLACER LE FUSIBLE Remplacez par un fusible enfichable de type automobile de 20A Le porte fusible est situé di rec te ment derrière le ta bleau de bord POUR ENLEVER LE CAPOT ET LA CALANDRE Voir la Fig 39 Soulevez le capot D...

Страница 38: ...pneu BAGUE DE RETENUE COUVRE ESSIEU RON DEL LES CLÉ CARRÉE ROUE ARRIÈRE SEU LE MENT 0 0 6 6 3 Fig 36 POUR DÉMARRER LE MOTEUR AVEC UNE BAT TE RIE FAIBLE Voir la Fig 37 AVERTISSEMENT Les batteries au plomb et à l aci de produisent des gaz explosifs Gar dez les étin cel les les flammes les ci ga ret tes etc loin des batteries Portez toujours des lu net tes protectrices lorsque vous êtes pré d une bat...

Страница 39: ... La tige de tension de la cour roie possède un mécanisme à ressort Tenez fermement la tige et enclenchez la lentement Soulevez le levier de levage à sa position la plus haute Fig 34 V Q P M K L R P Q R R P O U R R E M P L A C E R L A C O U R R O I E D ENTRAÎNEMENT Voir la Fig 35 Stationnez le tracteur sur une surface de niveau Actionnez le frein de stationnement En cas de besoin un autocollant ser...

Страница 40: ...bord inférieur de la lame jusqu au sol La distance devrait être la même des deux côtés Si un ajustement est nécessaire voyez les étapes des in structions Ajustement visuel ci dessus Vérifiez de nouveau les mesures ajustez si nécessaires jusqu à ce que les deux côtés soient égaux REMARQUE Chaque tour complet de l écrou de réglage modifie la hauteur de la tondeuse d environ 1 8 Vérifiez de nouveau l...

Страница 41: ... E F H G J Fig 27 F M C E K D L D A C S H B Fig 29 Replacez le volant de sorte que les roues soient droites vers l avant FIXEZ LA BIELLE AVANT E Commencez à la gauche du tracteur Insérez l embout de l assemblage de la bielle dans l orifice avant du support de suspension avant du tracteur F et fixez fermement à l aide d un ressort arrêtoir G par l orifice de la bielle situé derrière le support Insé...

Страница 42: ...ez l autre extrémité dans l orifice à l arrière du support arrière de la tondeuse D Bougez la tondeuse au besoin pour insérer la barre Fixez solidement en place à l aide d une rondelle et d un petit 5 16 ressort arrêtoir tel que montré FIXEZ LES BRAS DE SUSPENSION LATÉRAUX DE LA TONDEUSE AU CHÂSSIS Placez l orifice du bras sur la tige B à l extérieur du châssis du tracteur et fixez solidement à l ...

Страница 43: ...e désengagez le bras de suspension A de la tondeuse du châssis et la bielle de levage arrière C du support arrière de la tondeuse D retirez les ressorts arrêtoirs et les rondelles Allez de l autre côté de la tondeuse et désengagez le bras de suspension et la bielle arrière ATTENTION Après avoir désengagé les bielles le levier d accrochage possède un mécanisme à ressort Tenez fermement le levier lo...

Страница 44: ...MPORTANT Assurez vous encore une fois que la zone est dégagée 7 Déplacez vous le contrôle d embrayage d accessoire à la position EMBRAYÉE Ne quittez pas le siège de l opérateur pendant l embrayage du plateau de coupe jusqu à ce que le plateau soit nettoyé 8 Déplacez vous le contrôle d embrayage d accessoire à la position DÉBRAYÉE Mettez la clé de contact en position STOP pour couper le moteur Ferm...

Страница 45: ...efroidissement et les autres surfaces ex té rieu res du moteur soient propres en tout temps Toutes les 100 heures d utilisation plus souvent dans des con di tions poussiéreuses et sales enlevez le boîtier de souf fle rie et les autres déflecteurs d air de refroidissement Nettoyez les ailettes de refroidissement et les surfaces extérieures si né ces sai re Assurez vous que les déflecteurs d air de ...

Страница 46: ... PAS ENTRETIEN DES LAMES Pour obtenir les meilleurs résultats les lames de tondeuse doi vent toujours être tranchantes Remplacez les lames cour bées ou endommagées LAME MANDRIN BOULON DE LAME TROU DU CENTRE ÉTOILE ENLEVER LA LAME Voir la Fig 15 Rellvez la tondeuse le plus haut possible pour avoir aux lames REMARQUE Protégez vos mains avec des gants et ou en ve lop pez la lame dans un linge épais E...

Страница 47: ...é des systèmes de fixation Vérifiez le système de frein Vérifiez la pression des pneus Vérifiez le système de présence d opérateur et le système del ROS Vérifiez l intégrité des systèmes de fixation Affilez Remplacez les lames de tondeuse Tableau de lubrification Vérifiez le niveau de batterie Nettoyez la batterie et les bornes Vérifiez le niveau d huile du moteur Remplacez l huile du moteur avec ...

Страница 48: ... le moteur marche déplacez la com man de des gaz à la position de demi vitesse 1 2 Dégagez le frein à main Avancez le tracteur de 150 cm 5 pieds ap proxi ma ti ve ment et ensuite reculez de 150 cm 5 pieds Répétez ce procédé de conduire trois 3 fois Votre tracteur est maintenant purgé et prêt pour l uti li sa tion nor ma le Fig 13 CONSEILS DE TONTE Les chaînes de pneu ne peuvent pas être utilisées ...

Страница 49: ... être causés POUR DÉMARRER LE MOTEUR Voir la Fig 3 Si vous démarrez le moteur pour la première fois ou si le moteur est sans essence il faut plus de temps pour déplacer l essence du réservoir au moteur Assurez vous que la commande roue libre soit dans la position d engrenage engagée Asseyez vous sur le siège enfoncez la pédale frein et en gagez le frein de sta tion ne ment Déplacez l embrayage d a...

Страница 50: ...ents trop lourds dans une pente Les pneus peu vent perdre de l ad hé ren ce avec le terrain et vous faire perdre la maîrise de votre tracteur INDICATEUR D ENTRETIEN HOROMÈTRE L indicateur d entretien montre le total d heures de fonctionnement du moteur et clignote lorsque l entretien du moteur ou de la tonde use est nécessaire Si c est le cas l indicateur d entretien clignote pendant deux heures P...

Страница 51: ...e qui sont tondus J K L A S La pelouse doit être tondue à 6 35 cm 2 1 2 po pendant la saison fraîche et à plus de 7 62 cm 3 po pendant la saison chaude Tondez souvent pour les meilleurs résultats Pour le meilleur rendement si l herbe mesure plus de 15 24 cm 6 po vous devez la tondre deux fois La première fois lais sez la plutôt longue et la deuxième fois à la hauteur désirée POUR UTILISER LA TONDE...

Страница 52: ... le moteur à pleine vitesse rapide Faire fonctionner le moteur à une vitesse inférieure à sa vitesse maximale rapide réduit l efficacité du moteur Une pleine vitesse rapide permet une meilleure performance de la tondeuse UTILISATION Fig 5 POUR ARRÊTER Voir la Fig 5 LAMES DE TONDEUSE Pour arrêter les lames de tondeuse bougez le contrôle d embrayage d accessoire à la position DÉBRAYÉE ENTRAÎNEMENT P...

Страница 53: ...INTERRUPTEUR D EMBRAYAGE D ACCESSOIRE est uti li sé pour EMBRAYÉE les lames de tondeuse ou les autres ac ces soi res montés sur le tracteur F CONTACTEUR D ALLUMAGE permet de démarrer et de cou per le moteur G COMMUTATEUR DU SYSTÈME DE PRÉSENCE DE L OPÉRATEUR ROS POSITION ON Permet le fonctionnement de la plate forme de faucheuse ou de tout autre attachement actionné tandis qu à l envers Fig 3 H L ...

Страница 54: ... avoir pour résultats la mort de sérieuses blessures et ou endommager votre propriété DANGER indique un risque qui s il n est pas évité aura comme conséquence la mort ou des blessures sérieuses AVERTISSEMENT indique un risque qui s il n est pas évité pourrait avoir comme conséquence la mort ou des blessures sérieuses ATTENTION indique un risque qui s il n est pas évité pourrait causer des blessure...

Страница 55: ...ne position confortable et il a été serré à fond Tous les pneus ont été correctement gonflés Les pneus ont été surgonflés pour l expédition Assurez vous que le carter de tondeuse ait été correctement nivelé du devant à l arrière d un côté à l autre pour obtenir les meilleurs résultats Les pneus doivent être cor rec te ment gonflés pour le nivellement Vérifiez la tondeuse et les courroies d entraîn...

Страница 56: ...ou l année indiquée sur l étiquette Étiquette localisée entre les bor nes chargez la batterie pour un minimum d une heure à 6 10 amps Voir BATTERIE dans la section Entretien de ce manuel Pour installer la batterie et câble du batterie suivez le procédé décrit dans la section REPLACEZ LA BATTERIE dans la section REVISION ET REGLAGES de ce manuel REMARQUE Procidez comme suit pour retirer le tracteur...

Страница 57: ... le centre d entretien autorisé le plus proche Vous y trouverez des techniciens qualifiés équipés des outils ap pro priés pour faire l entretien et la réparation de ce tracteur Veuillez lire et conserver ce manuel Les instructions qu il con tient vous permettront de monter et d entretenir cor rec te ment votre tracteur Observez toujours les RÈGLES DE SÉCURITÉ RESPONSABILITÉS DU CLIENT Lisez et obs...

Страница 58: ...jusqu à la fin de l opération de remplissage N utilisez pas de dispositif de verrouillage de la buse ouverte Si du carburant tombe sur vos vêtements changez les im médiatement Ne faites jamais déborder le réservoir Remettez le capuchon de gaz en place et serrez solidement ENTRETIEN GÉNÉRAL Ne faites jamais fonctionner la machine dans un endroit clos Tous les écrous et les boulons doivent être bien...

Страница 59: ...par des tondeuses autoportées sont plus fréquents chez les opé rateurs de plus de 60 ans Ces personnes doivent évaluer leur capacité de conduire une tondeuse en garantissant un niveau de sécurité adéquat à eux mêmes et aux autres Respectez les recommandations du fabricant au niveau des poids des roues et des contrepoids Libérez la machine des brins d herbe des feuilles ou autres débris accumulés s...

Страница 60: ...otre site web www poulan pro com AVERTISSEMENT Lisez soigneusement le man uel suivez tous les aver tis se ments et les in struc tions de sécurité Les bles sures sérieuses peu vent en résulter si vous ne lisez pas ces aver tis se ments et in struc tions de sécurité MANUEL IMPORTANT NE JETEZ PAS 12 23 09 SR 433413 Imprimé aux É U 03032 ...

Отзывы: