background image

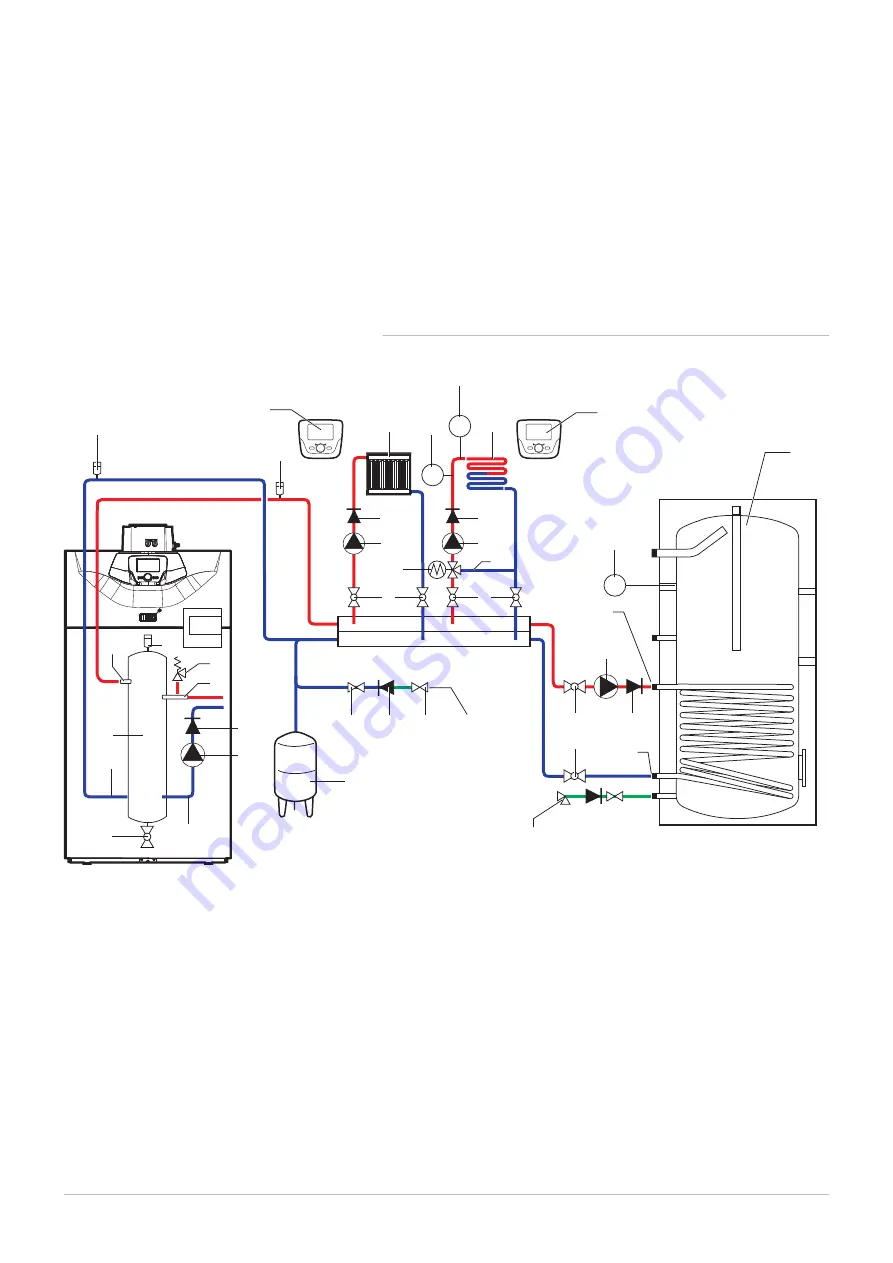
1 Boiler flow

1a Heating flow direct circuit

2 Heating pump

2a Heating return direct circuit

3 4 bar (0.4 MPa) safety valve

7 Automatic air vent

9 Isolation valve

16 Closed expansion vessel

18 Heating circuit fill point

24 Domestic hot water tank exchanger primary inlet

25 Domestic hot water tank exchanger primary outlet

26 DHW load pump

27 Non-return valve

30 Calibrated and sealed safety unit

30e Drain valve

31 Independent domestic hot water tank

33 Domestic hot water temperature sensor

34 Modulating boiler pump

35 Low-loss header (accessory)

38 Remote control

64 Direct heating circuit

119 Boiler return

5.6.2 

Connection diagram: 1 1 direct c 1 

underfloor heating c 1 domestic hot water tank

Fig.31

1 1 direct c 1 underfloor heating c 1 domestic hot water tank

MW-3000019-04

30

T

7

7

31

24

25

33

9

9

1a

35

2a

119

30e

7

16

27

18

38

38

9

T

S

44

61

93

2

27

27

9

117

65

64

9
9

26

27

2c

27

34

1

3

1 Boiler flow

1a Heating flow

2 Heating pump

2a Heating return

2c Three-way valve bypass

3 4 bar (0.4 MPa) safety valve

7 Automatic air vent

9 Isolation valve

16 Closed expansion vessel

18 Heating circuit fill point

24 Domestic hot water tank exchanger primary inlet

25 Domestic hot water tank exchanger primary outlet

26 DHW load pump

27 Non-return valve

30 Calibrated and sealed safety unit

30e Drain valve

31 Independent domestic hot water tank

33 Domestic hot water temperature sensor

34 Modulating boiler pump

35 Low-loss header (optional)

38 Remote control with or without room temperature 

sensor

44 Safety device to safeguard against overheating of 

the underfloor heating system, in accordance with 

prevailing regulations

61 Thermometer

64 Direct heating circuit (example: radiators)

65 Heating circuit with mixing valve, may be low 

temperature heating circuit (underfloor heating or 

radiators)

93 Heating pump for underfloor heating circuit

117 Three-way mixing valve

119 Boiler return

5  Before installation

7609493 - v08 - 24072018

33

Содержание Sirius two FS 110

Страница 1: ...MW 2000819 1 en Installation Manual Floor standing condensing gas boiler SIRIUS THREE FS 50 SIRIUS THREE FS 70 SIRIUS THREE FS 90 SIRIUS THREE FS 110 ...

Страница 2: ...using the product and keep it in a safe place for later reference In order to ensure continued safe and efficient operation we recommend that the product is serviced regularly Our service and customer service organisation can assist with this We hope you enjoy years of problem free operation with the product ...

Страница 3: ...ion of the symbols 23 4 5 Standard delivery 23 4 6 Accessories and options 23 5 Before installation 25 5 1 Installation regulations 25 5 2 Installation requirements 25 5 2 1 Water treatment 25 5 2 2 Gas supply 25 5 2 3 Electrical power supply 25 5 2 4 Circulating pump 26 5 3 Choice of the location 27 5 3 1 Ventilation 28 5 3 2 Overall space needed for the boiler 28 5 3 3 Data plate 29 5 3 4 Select...

Страница 4: ... siphon 55 6 9 Completing installation 55 7 Commissioning 56 7 1 General 56 7 2 Check list before commissioning 56 7 3 Commissioning procedure 56 7 3 1 First time commissioning 56 7 3 2 Checking the gas inlet 56 7 3 3 Checking the electrical connections 57 7 3 4 Checking the hydraulic circuit 57 7 4 Gas settings 57 7 4 1 Configuring the fan speed 57 7 4 2 Setting the air gas ratio maximum heat inp...

Страница 5: ... flow temperature 98 9 2 15 Managing boilers in cascade 98 9 3 Accessing the information menu 98 10 Maintenance 100 10 1 General 100 10 2 Standard inspection and maintenance operations 100 10 2 1 Performing the annual service 100 10 2 2 Removing the burner 100 10 2 3 Cleaning the heat exchanger 103 10 2 4 Checking the burner 103 10 2 5 Cleaning the siphon 105 10 2 6 Remounting the burner 105 10 2 ...

Страница 6: ...itches doorbell light motor lift etc 2 Shut off the gas supply 3 Open the windows 4 Locate the probable leak and seal it immediately 5 If the leak is before the gas meter contact the gas supplier Danger If you smell flue gases 1 Switch off the appliance 2 Open the windows 3 Locate the probable source of the flue gas leak and fix it immediately Caution Do not touch the flue gas pipes Depending on t...

Страница 7: ... be made to the boiler Caution The appliance should be switched to Summer or Frost Protection mode rather than be switched off in order to guarantee the following functions Avoidance of pumps blocking Frost Protection Caution The frost protection function only protects the boiler not the heating system Caution The frost protection function does not work if the boiler is powered off Caution Drain t...

Страница 8: ...s with the appliance and it turns out to be damaged it must be replaced by the manufacturer its after sales service or persons with similar qualifications in order to obviate any danger 1 3 Liabilities 1 3 1 Manufacturer s liability Our products are manufactured in compliance with the requirements of the various Directives applicable They are therefore delivered with the marking and any documents ...

Страница 9: ...ven in the manuals provided with the appliance Install the appliance in compliance with prevailing legislation and standards Carry out initial commissioning and any checks necessary Explain the installation to the user If maintenance is necessary warn the user of the obligation to check the appliance and keep it in good working order Give all the instruction manuals to the user 1 Safety 7609493 v0...

Страница 10: ...c shock Warning Risk of dangerous situations that may result in minor personal injury Caution Risk of material damage Important Please note important information See Reference to other manuals or pages in this manual 2 2 2 Symbols used on the appliance 1 Alternating current 2 Protective earthing 3 Before installing and commissioning the appliance carefully read the instruction manuals provided 4 D...

Страница 11: ...ipment for sealed water systems BS 6644 Specification for the installation of gas fired condensing boilers with a nominal output exceeding 70 kW BS EN 12828 Design for water based heating systems BS EN 13831 Closed expansion vessels Apart from the legal provisions and Directives the additional Directives described in these instructions must also be observed For all provisions and Directives referr...

Страница 12: ... Characteristics of the heating circuit Unit SIRIUS THREE FS 50 SIRIUS THREE FS 70 SIRIUS THREE FS 90 SIRIUS THREE FS 110 Water content excluding expansion vessel litre 2 81 4 98 8 34 9 83 Minimum operating pressure MPa bar 0 05 0 5 0 05 0 5 0 05 0 5 0 05 0 5 Maximum operating pressure MOP MPa bar 0 38 3 8 0 38 3 8 0 38 3 8 0 38 3 8 Maximum water temperature C 85 85 85 85 Maximum operating tempera...

Страница 13: ...S THREE FS 90 SIRIUS THREE FS 110 Ingress protection rating IP21 IP21 IP21 IP21 Weight empty kg 60 70 104 109 3 2 1 Other technical parameters Tab 6 Technical parameters for boiler space heaters Product name SIRIUS THREE FS 50 SIRIUS THREE FS 70 SIRIUS THREE FS 90 SIRIUS THREE FS 110 Condensing boiler Yes Yes Yes Yes Low temperature boiler 1 No No No No B1 boiler No No No No Cogeneration space hea...

Страница 14: ...ater inlet and 80 C feed temperature at heater outlet See The back cover for contact details 3 2 2 Sensor specifications Tab 7 Heating flow sensor and return sensor Temperature in C 30 65 85 Resistance in ohms 8059 2084 1070 Tab 8 Flue gas sensor Tempera ture in C 50 10 0 40 100 200 250 300 Resistance in ohms 1 755765 117521 67650 10569 1377 145 65 34 Tab 9 Outside sensor Tempera ture in C 30 15 5...

Страница 15: ...1 546 621 699 737 177 98 62 54 1222 1 MW 3000002 02 1 2 3 5 4 1 Heating circuit return R1 1 2 2 Heating circuit flow R1 1 2 3 Gas inlet R1 4 Condensate discharge DN18 5 Flue gas outlet 110 160 1 Adjustable feet Fig 4 Space required by 2 boilers in cascade A B MW 1000234 1 A SIRIUS THREE FS 50 A SIRIUS THREE FS 70 B SIRIUS THREE FS 90 B SIRIUS THREE FS 110 For more information see Accessories and o...

Страница 16: ...ump F Domestic hot water pump G Safety contact H Boiler pump I Auxiliary sensor 1 J Auxiliary sensor 2 K Outside sensor L Domestic hot water sensor M Room temperature sensor 1 N Room temperature sensor 2 O Room temperature sensor 3 P Boiler pump modulation PWM 1 Flow temperature sensor 2 Return temperature sensor 3 Hydraulic pressure sensor 4 Flue gas sensor 5 Control panel display 6 Ionisation pr...

Страница 17: ...t water pump G Safety contact H Boiler pump I Auxiliary sensor 1 J Auxiliary sensor 2 K Outside sensor L Domestic hot water sensor M Room temperature sensor 1 N Room temperature sensor 2 O Room temperature sensor 3 P Boiler pump modulation PWM 1 Flow temperature sensor 2 Return temperature sensor 3 Hydraulic pressure sensor 4 Flue gas sensor 5 Control panel display 6 Ionisation probe 7 Spark plug ...

Страница 18: ...gs the heat demand and the actual temperatures measured by the temperature sensors The gas and air are mixed in the Venturi The gas air ratio command function accurately adjusts the quantities of gas and air required This provides optimum combustion over the entire output range The gas air mixture is sent to the burner located upstream of the heat exchanger 4 2 3 Low loss header accessory The low ...

Страница 19: ...Heating circuit return 8 Safety valve 9 Modulating circulating pump 10 Non return valve 4 2 4 System in cascade The boiler is ideally suited for a cascade system configuration Use a boiler cascade connection kit to connect boilers in cascade Important Please contact the After Sales Service for further information Fig 9 Boilers in cascade MW 3000145 01 4 Description of the product 7609493 v08 24072...

Страница 20: ...ing message is displayed without stopping the circulating pump Post circulating pump After the burner stops depending on the room thermostat setting and if in heating mode the circulating pump runs for a further 3 minutes Frost protection device When the flow temperature is lower than 5 C the burner starts up and runs until the flow temperature reaches 15 C This device runs under the following con...

Страница 21: ...0 Flue gas sensor 21 Controller PCB 22 Mounting point for a maximum of two AVS 75 modules A third AVS 75 module can be used by the boiler but must be fixed to the wall and powered externally 23 Mounting point for communication module OCI 345 Caution Danger of short circuit on the OCI 345 communication module if it is fixed in another emplacement 24 Safety thermostat on the combustion chamber door ...

Страница 22: ...placement 24 Safety thermostat on the combustion chamber door 25 Flow temperature sensor 1 Burner 2 Burner bracket 3 Safety thermostat on the combustion chamber door 4 Flame inspection window 5 Spark plug 6 Ionisation probe 7 Gas collector 8 Venturi 9 Fan 10 Silencer SIRIUS THREE FS 90 model only 11 Igniter 4 4 Control panel description 4 4 1 Description of the keys Operating mode key This key is ...

Страница 23: ...r imperial system Protection Mode active the boiler s frost protection is activated Outside temperature C Solar integration available Generic error 1 Date day month year 2 Day of the week 3 Boiler heating circuit pressure 4 Clock hours and minutes 5 Comfort period indicators over 24 hours in Domestic Hot Water mode and Heating mode 4 5 Standard delivery The SIRIUS THREE FS boiler comes in a packag...

Страница 24: ...cascade without gas pipes SIRIUS THREE FS 50 SIRIUS THREE FS 70 2 5142771 Connection kit for boilers in cascade without gas pipes SIRIUS THREE FS 50 SIRIUS THREE FS 70 3 5142772 Connection kit for boiler in cascade without gas pipes for SIRIUS THREE FS 50 SIRIUS THREE FS 70 4 5142773 Connection kit for boiler in cascade without gas pipes for SIRIUS THREE FS 90 SIRIUS THREE FS 110 2 5142774 Connect...

Страница 25: ... protector for the heating circuits Use these products carefully following their manufacturers instructions For an existing system Before carrying out installation of the boiler drain and flush the system to eliminate sludge and pollutants using the appropriate products permitted see products recommended above Any foreign particles in the heating circuit impair proper functioning of the boiler e g...

Страница 26: ...er flow rate at nominal heat output 1330 litres hour where T 30 C 4 Operating water flow rate at nominal heat output 2000 litres hour where T 20 C 5 Operating water flow rate at nominal heat output 2660 litres hour where T 15 C 1 Q flow rate litres hour 2 H pressure in metres of water column mWC 3 Operating water flow rate at nominal heat output 1920 litres hour where T 30 C 4 Operating water flow...

Страница 27: ...ion Install the boiler in a frost free location Caution Install the boiler on a solid stable structure able to bear its weight Caution Do not stock chloride or fluoride compounds close to the boiler They are particularly corrosive and may contaminate the combustion air Chloride and fluoride compounds are present in aerosol sprays paints solvents cleaning products washing products detergents glues ...

Страница 28: ...m dimensions given in the diagram below Also allow for openings to obviate the following hazards Accumulation of gas Overheating of the premises Minimum cross section of openings see BS 5440 Part 1 and Part 2 and BS 6644 Ventilation to be provided for the boilers Ventilation to be provided for boilers with low loss header optional 5 3 2 Overall space needed for the boiler To ensure adequate access...

Страница 29: ...for boilers equipped with a low loss header kit MW 1000019 03 250 250 1127 848 1100 1100 500 500 1000 681 250 320 1000 681 250 500 5 3 3 Data plate The data plate is located on the back of the boiler The data plate provides important information regarding the appliance Serial number Model Gas category etc Fig 23 Location of the data plate MW 3000013 5 Before installation 7609493 v08 24072018 29 ...

Страница 30: ...hat covers the following characteristics On a façade of the area to be heated on the north if possible Half way up the wall of the area to be heated Under the influence of changes in the weather Protected from direct sunlight Easy to access Fig 24 MW 8800N001 3 2 1 2 1 1 2 H 1 2 H min 2 5 m 1 2 H min 2 5 m 1 2 Z H Z 1 Recommended position 2 Possible position H Inhabited height controlled by the se...

Страница 31: ... into recycling bins The plastic sleeve and the polystyrene should be put into the household waste Danger There is a risk of suffocation keep out of reach of children 3 Remove the front panel by pulling firmly on the notches provided 4 Remove the four screws holding the boiler in place on the pallet 5 Take the condensates hose that you will find in the boiler and connect it to the condensates disc...

Страница 32: ...le feet 5 6 Connecting diagrams 5 6 1 Connection diagram 1 boiler 1 direct circuit 1 domestic hot water tank Fig 30 1 boiler 1 direct circuit 1 domestic hot water tank MW 3000018 04 T 30 38 64 31 18 27 2 27 34 9 9 7 7 7 1 3 1a 35 2a 119 27 9 9 16 33 24 26 9 9 27 25 30e Fig 29 Removing the struts 7 7 8 8 MW 1000235 1 5 Before installation 32 7609493 v08 24072018 ...

Страница 33: ... 44 61 93 2 27 27 9 117 65 64 9 9 26 27 2c 27 34 1 3 1 Boiler flow 1a Heating flow 2 Heating pump 2a Heating return 2c Three way valve bypass 3 4 bar 0 4 MPa safety valve 7 Automatic air vent 9 Isolation valve 16 Closed expansion vessel 18 Heating circuit fill point 24 Domestic hot water tank exchanger primary inlet 25 Domestic hot water tank exchanger primary outlet 26 DHW load pump 27 Non return...

Страница 34: ...er tank exchanger primary outlet 26 DHW load pump 27 Non return valve 30 Calibrated and sealed safety unit 30e Drain valve 31 Independent domestic hot water tank 33 Domestic hot water temperature sensor 34 Modulating boiler pump 35 Low loss header 38 Remote control with or without room temperature sensor 44 Safety device to safeguard against overheating of the underfloor heating system in accordan...

Страница 35: ...Heating return 3 4 bar 0 4 MPa safety valve 7 Automatic air vent 27 Non return valve 30e Drain valve 34 Modulating boiler pump 35 Low loss header optional 119 Boiler return Fig 33 Boiler in 0 10 V MW 3000021 04 1a 35 2a 119 30e 7 AVS75 1 3 27 34 5 Before installation 7609493 v08 24072018 35 ...

Страница 36: ... practice and the recommendations in this manual 6 2 Preparation 6 2 1 Accessing the internal boiler components 1 Remove the front panel by pulling firmly on the notches provided 2 Lift and tilt the panel holding the control panel Fig 34 MW 1000007 03 1 Fig 35 MW 1000008 04 2 6 Installation 36 7609493 v08 24072018 ...

Страница 37: ...4 Pull the top panel towards you and lift 5 Unclip the panel for the control panel and place it on the notches provided Fig 36 MW 3000122 01 3 Fig 37 MW 1000010 05 4 Fig 38 MW 3000025 01 5 5 6 Installation 7609493 v08 24072018 37 ...

Страница 38: ...Always install a safety valve calibrated to 4 bar on the heating circuit The safety valve can be connected to a venting pot The safety valve must not be used to drain the heating circuit See In the case of an assembly with a low loss header use the assembly instructions for the low loss header If using a cascade kit use the assembly instructions for the cascade kit Important The pipes are not prov...

Страница 39: ... circulating pump on the heating return pipe circulating pump not provided 6 3 2 Connecting the expansion vessel 1 Determine the volume of the expansion vessel according to the volume of water in the heating circuit 2 Connect the expansion vessel to the heating circuit return pipe Volume of the expansion vessel on the heating circuit Terms and conditions of validity Safety valve calibrated to 0 4 ...

Страница 40: ...ate neutralisers recommended by the manufacturer of the boiler 1 Connect a plastic hose to the condensate discharge outlet DN18 2 Insert the other end of the hose into a waste water discharge outlet Caution Do not create a siphon using the discharge hose For more information see Unpacking initial preparation page 31 6 4 Gas connection Warning Close the main gas valve before starting work on the ga...

Страница 41: ...nnection to a collective flue for sealed boilers The chimney or flue gas pipe must be suitable for such use C53 Separate air flue gas connection using a bi flow adapter The terminal parts of combustion air intake and combustion product discharge pipes must not be plan ned on opposite walls of the building C63 The maximum pressure drop in the pipes ΔP must not exceed the values given in the table b...

Страница 42: ...ler to the discharge intake pipes in every direction due to the 360 rotation option It can also be used as an extra elbow in combination with the coaxial pipe or the 45 elbow If discharging to the outside the discharge intake pipe must stick out of the wall by at least 18 mm to allow fitting of the aluminium rosette and its sealing unit and thus prevent any infiltration of water Insertion of a 90 ...

Страница 43: ...f a 90 elbow reduces the total length of the pipe by 0 5 metres Insertion of a 45 elbow reduces the total length of the pipe by 0 25 metres The first 90 elbow is not taken into account in calculating the maximum length available 6 5 4 Pipes in cascade not provided These types of pipes are used to discharge the combustion products from several boilers interlinked in cascade via a shared flue gas co...

Страница 44: ...or the adapted configuration and their pressure drops must comply with the values given in the following corresponding table s Caution Be careful that the discharge pipe outlet for combustible products is not directed towards a habitation zone Configuration B23p Ventilation of the premises in accordance with the NFP 45 204 or DTU 61 1 standard Lengths L1 L2 and L3 are obtained with Centrotec pipes...

Страница 45: ...2 elbows L1 L2 flexible m 15 56 6 38 L3 5m 2 elbows L1 L2 rigid m 56 56 L3 5m 2 elbows L1 L2 flexible m 56 38 Tab 19 Flue system connection type B23p for SIRIUS THREE FS 90 and SIRIUS THREE FS 110 Arrangement Configuration Unit SIRIUS THREE FS 90 SIRIUS THREE FS 90 SIRIUS THREE FS 110 SIRIUS THREE FS 110 SIRIUS THREE FS 110 mm Ø 110 Ø 125 Ø 110 Ø 125 Ø 160 L3 2m 2 elbows L1 L2 rigid m 20 56 56 56 ...

Страница 46: ...Pipes subject to technical evaluation 14 08 1289 Tab 21 Maximum length for configuration C33 Configuration Unit SIRIUS THREE FS 50 SIRIUS THREE FS 70 SIRIUS THREE FS 90 SIRIUS THREE FS 110 mm Ø 80 Ø 125 Ø 80 Ø 125 Ø 110 Ø 160 Ø 110 Ø 160 5 m L 10 m L 10 m L 10 m L 10 m 6 m L 10 m L 10 m L 10 m L 10 m 7 m L 8 m L 8 m L 8 m L 8 m 8 m L 9 m L 9 m L 9 m L 9 m Fig 52 Maximum length of the connections M...

Страница 47: ...e appliance via a circuit that includes an omni polar switch with contact opening distance of 3 mm or more When making electrical connections to the mains respect the polarities Danger Position the various electrical cables in such a way that they never touch the heating pipes Keep the various electrical cables far enough from the heating pipes so that they cannot be damaged by the effect of the h...

Страница 48: ... mm in width 1 Press down the spring on the terminal block with a suitable screwdriver 2 Insert the stripped part of the wire into the corresponding connector Caution The length to be stripped must be between 10 and 12 mm Fig 55 Pressing down the spring MW 3000037 03 1 Fig 56 Connecting the wire MW 3000038 04 2 6 Installation 48 7609493 v08 24072018 ...

Страница 49: ...wer supply terminal block Fig 58 Power supply terminal block MW 1000015 05 1 2 3 4 Aux 1 2 230 V TA TS L N T1 T2 L L N N S1 S2 L N 2 4 6 8 5 7 1 3 2 Power supply auxiliary circuit 1 3 Power supply auxiliary circuit 2 4 Room thermostat 5 Heating circuit pump 6 Domestic hot water pump 7 Safety contact 8 Boiler pump Fig 57 Attaching the wire MW 3000039 03 3 6 Installation 7609493 v08 24072018 49 ...

Страница 50: ...at must not be installed in the control panel under any circumstances The sum of the currents from all outlets must not exceed 4 A 6 7 6 Description of the sensor terminal block Fig 59 Sensor terminal block MW 1000016 04 1 1 2 1 2 3 1 2 1 2 3 2 3 1 2 3 4 5 6 8 7 1 Auxiliary sensor 1 BX1 2 Auxiliary sensor 2 BX2 3 Outside sensor 4 Domestic hot water sensor 5 Room temperature sensor 1 6 Room tempera...

Страница 51: ...e sensor 34 Primary pump 38 Remote control 167 Boiler control panel For more information see Connection diagram 1 boiler 1 direct circuit 1 domestic hot water tank page 32 6 7 8 Electrical connection 1 boiler 1 direct circuit 1 underfloor heating circuit 1 domestic hot water tank Fig 61 1 boiler 1 direct circuit 1 underfloor heating circuit 1 domestic hot water tank 1 2 3 4 Aux 1 2 230 V TA TS L N...

Страница 52: ...er 1 direct circuit 1 underfloor heating circuit 1 domestic hot water tank page 65 Connection diagram 1 boiler 1 direct circuit 1 underfloor heating circuit 1 domestic hot water tank page 33 6 7 9 Electrical connection controlling a boiler in 0 10 V Fig 62 Controlling a boiler in 0 10 V 1 2 3 4 Aux 1 2 230 V TA TS L N T1 T2 L L N N S1 S2 L N MW 3000041 04 34 AVS75 38 34 Primary pump 38 Remote cont...

Страница 53: ... 3000040 06 167 200 201 167 158 10 2 44 34 34 26 11 21 38 33 38 AVS75 OCI345 OCI345 1 2 3 1 2 3 2 Heating pump 10 Three way mixing valve 11 Heating pump 21 Outside temperature sensor 26 DHW load pump 33 Domestic hot water temperature sensor 34 Primary pump 38 Room temperature sensor 44 Safety device to safeguard against overheating of the underfloor heating system in accordance with prevailing reg...

Страница 54: ...tions between the various MB and DB connectors use a shielded cable with the following specifications Type Cross section Maximum length HAR H05 VV F 2 x 1 5 mm2 200 m 6 8 Filling the installation 6 8 1 Filling the heating system Before filling the heating system rinse it thoroughly In many cases the heating circuits can be filled with mains water without treating the water 1 Fill the heating syste...

Страница 55: ...illing the siphon 1 Clean the siphon 2 Completely fill the siphon until it overflows Danger Fill the siphon to the top If the siphon is empty there is a danger of poisoning by combustion products For more information see Cleaning the siphon page 105 6 9 Completing installation 1 Reconnect the earth wire and put the front panel back in place 2 Discard the various packaging items 3 Affix the data pl...

Страница 56: ...oiler components 7 Check the electrical connections on the thermostat and the other external components 8 Check the ventilation in the room in which the system is installed 9 Check the flue gas connections 10 Test the boiler at full load 11 Test the boiler at part load For more information see Setting the air gas ratio maximum heat input page 59 Setting the air gas ratio reduced heat input page 60...

Страница 57: ...ck the connection of the optional equipment 7 Check the length of the cables and that they are firmly secured in the cable clamps 7 3 4 Checking the hydraulic circuit 1 Check the siphon which must be completely filled with water 2 Check that there are no leaks on the boiler s hydraulic connections 3 Check the pressure in the expansion vessel before filling the system 7 4 Gas settings 7 4 1 Configu...

Страница 58: ...ired speed LF minimum rpm 1500 1270 1250 1300 9524 Required speed LF minimum for boilers in cascade rpm 1700 1470 1450 1500 9529 Required speed HF 2441 Fan speed heating max maximum rpm 6650 6450 6500 6900 9512 Required speed ignition ignition rpm 2300 2100 2400 2500 Tab 27 Fan speed for gas type G31 Parameter Output Unit SIRIUS THREE FS 50 SIRIUS THREE FS 70 SIRIUS THREE FS 90 SIRIUS THREE FS 110...

Страница 59: ...ses 5 Compare the values measured with the set point values in the Control and setting values table 6 If necessary adjust the air gas ratio using the gas flow rate adjustment screw Important Turn the gas adjustment screw clockwise to reduce the CO2 content Turn the gas adjustment screw counter clockwise to increase the CO2 content Caution Be sure to correctly replace the plug after taking a measur...

Страница 60: ...depends on the CO2 value measured at maximum heat input 6 If necessary adjust the air gas ratio using the OFFSET adjustment screw Important Turn the gas adjustment screw clockwise to increase the CO2 content Turn the gas adjustment screw counter clockwise to reduce the CO2 content Caution Be sure to correctly replace the plug after taking a measurement For more information see Check list before co...

Страница 61: ...ng screw 1 Remove the plug 2 Use a flat blade screwdriver 3 Sealed chamber pressure signal 4 Gas supply pressure outlet For more information see Checking the gas inlet page 56 7 4 5 CO2 checking and setting values Tab 29 Checking and setting values for gas type G20 Unit SIRIUS THREE FS 50 SIRIUS THREE FS 70 SIRIUS THREE FS 90 SIRIUS THREE FS 110 Diameter of the Venturi mm 24 30 34 38 Diameter of t...

Страница 62: ... 9 3 9 5 9 0 9 4 9 6 9 1 9 5 9 7 9 2 9 6 1 The CO2 value is valid with the front panel mounted If the front panel is removed open chamber the value readout is lower by 0 2 2 Nominal value Tab 32 Checking and setting values for gas type G25 Unit SIRIUS THREE FS 50 SIRIUS THREE FS 70 SIRIUS THREE FS 90 SIRIUS THREE FS 110 Diameter of the Venturi mm 24 30 34 38 Diameter of the nozzles mm 4 20 no 2 Va...

Страница 63: ...If the front panel is removed open chamber the value readout is lower by 0 2 2 Nominal value Tab 35 Checking and setting values for gas type G31 Unit SIRIUS THREE FS 50 SIRIUS THREE FS 70 SIRIUS THREE FS 90 SIRIUS THREE FS 110 Diameter of the Venturi mm 24 30 34 38 Diameter of the nozzles mm 2 95 no 2 4 0 no 2 4 5 no 2 5 0 no 2 Maximum CO ppm 250 250 250 250 Tab 36 Authorised CO2 ranges for gas ty...

Страница 64: ...O2 measured at maximum power In accordance with the new EN 15502 standard for gas boilers the settings ranges for CO2 at minimum power are indicated for each CO2 value measured at maximum power 7 4 6 Adapting to another gas type Caution Only a fully trained qualified professional may carry out the following operations The boiler is pre set in the factory to run on natural gas H G20 Conversion kits...

Страница 65: ... Set the air gas ratio 11 Replace the gas setting label with the one delivered with the boiler and tick the corresponding gas setting For more information see CO2 checking and setting values page 61 Setting the air gas ratio reduced heat input page 60 Setting the air gas ratio maximum heat input page 59 7 5 Configuring the system 7 5 1 Configuring an installation with 1 boiler 1 low loss header 1 ...

Страница 66: ...ode CH2 On 5731 Sensor input BX2 Common flow sensor B10 5932 Sensor input BX3 Cascade return sensor B70 6020 Function extension module 1 Temps mode CH2 6600 Device address 1 6640 Clock mode Master 3 Go to the installer parameters on boiler 2 slave boiler 4 Set the following parameters on boiler 2 Tab 42 Settings on boiler 2 slave boiler Parameter number Parameter Setting 5710 Temps mode CH1 Off 66...

Страница 67: ...ler in a cascade Parameter number Parameter Setting Description 5977 Function input H5 None Deactivation of the thermostat on terminal block M1 1 2 6030 Relay output QX21 module 1 heating pump CH1 Q2 Check on the pump on circuit 1 6040 Sensor input BX21 module 1 Common flow sensor B10 Check on the cascade dis charge temperature 6041 Sensor input BX22 module 1 Cascade return sensor B70 Check on the...

Страница 68: ...ct the Commissioning menu by turning the button 4 Confirm the menu selection by pressing the button Important Press the MENU key to return to the main display The parameters for the Commissioning mode can now be accessed Use the button to select and modify them For more information see List of installer parameters page 73 Fig 71 Accessing the User parameters MW 3000052 EN 02 MENU 14 13 1 5 bar 18 ...

Страница 69: ...t Protection The electronic management system of the boiler includes protection against frost If the water temperature falls below 5 C the burner starts up in order to provide a water temperature of 30 C This function only works if the boiler is turned on the gas supply open and the hydraulic pressure correct 8 4 1 Activating the Off 1 Press the key to access the shortcuts menu 2 Select the parame...

Страница 70: ...ng is always activated The symbols 1 2 3 and are displayed Reduced Heating is deactivated The symbols 1 2 3 and are displayed Timed Heating is dependent on the time range program med The symbols and 1 2 3 are displayed Off The boiler is shut down and frost protection is ac tive The symbol is displayed Room temperature CH1 Room temperature set point in comfort mode Hot water heating Setting domesti...

Страница 71: ...ephone number of the After Sales Service 0845 070 1057 9 1 3 List of user parameters Tab 48 Menu Set time and date Parameter number Parameter Description 1 Hours minutes Setting the time 2 Day month Setting the day and the month 3 Year Setting the year Tab 49 Menu Operator section Parameter number Parameter Description Factory setting 20 Change Language Setting the interface language English 27 Pr...

Страница 72: ...ay and month of the start of the current holiday period 643 653 663 End Selecting the day and month of the end of the current holiday period 648 658 668 Operating level Boiler operating mode during the holiday period Off Reduced Off Tab 53 Menu Temps mode CH1 Temps mode CH2 Temps mode CH3 Parameter number Parameter Description Factory setting Heating circuit 1 Heating circuit 2 Heating cir cuit 3 ...

Страница 73: ...d standby mode Centrally 54 Readjustment room sensor 3 C to 3 C 0 C 70 Software version Tab 55 Temps mode CH1 Temps mode CH2 menus Temps mode CH3 Parameter number Parameter Description Unit Factory set ting Heating circuit 1 Heating circuit 2 Heating circuit 3 714 1014 1314 Frost protection setpoint C 6 720 1020 1320 Heating curve slope Heating curve gradient The regulator calcu lates the flow tem...

Страница 74: ... the mixing valve used seconds 30 850 1150 1450 Floor curing function Controlled screed drying function Off The function is inoperative Curing functional heating Active for 7 days 3 days at 25 C and 4 days at 55 C Curing heating Active for 18 days 6 days from 25 C to 55 C increasing by 5 C a day 6 days at 55 C 6 days from 55 C to 25 C di minishing by 5 C a day Functional curing heating Functional ...

Страница 75: ...perature measured while the anti legionella function is running 45 C 1680 Optg mode changeover In cases of external switching via the Hx inputs the regime to which the switch must be made must first be defined None Off None Tab 57 Menu Boiler Settings Parameter number Parameter Description Unit Factory set ting 2214 Setpoint manual control In manual mode the flow temperature set point can be set t...

Страница 76: ...Selection of the domestic hot water sensor Hot water sensor B3 Domestic hot water sensor for tank Thermostat The sensor used for domestic hot water is a thermostat Hot water sensor B3 5731 HW controlling element Type of actuator for controlling the domestic hot water requirement No charging request No function Charging pump Domestic hot water loading is done with a pump Diverting valve Domestic ho...

Страница 77: ...The relay is controlled according to the settings on timer program 5 Buffer return valve Y15 Solar pump ext exch K9 Solar ctrl elem buffer K8 Solar ctrl elem swi pool K18 Contact for heating the swimming pool with solar energy if using several heat exchangers Cons circuit pump VK2 Q18 Cascade pump Q25 Boiler pump common to all boilers in a cas cade St tank transfer pump Q11 Hot water mixing pump Q...

Страница 78: ... return sensor B70 Cascade return sensor Swimming pool sensor B13 Swimming pool sensor Solar flow sensor B63 Solar flow sensor for measuring efficiency Solar return sensor B64 Solar return sensor for measuring efficien cy Primary exch sensor B26 None 5932 Sensor input BX3 See Sensor input BX2 None 5970 Function input H4 None Default setting for boilers with domestic hot water tank Flow measurement...

Страница 79: ... pool solar This function enables the release of solar swimming pool heating by an external resource Operating level HW The temperature level can be adjusted by a contact external timer program rather than by the internal timer pro gram Operating level CH1 The temperature level can be adjusted by a contact external timer program rather than by the internal timer pro gram Operating level CH2 The te...

Страница 80: ...ne 6024 Funct input EX21 module 1 None Limit thermostat CH None 6026 Funct input EX21 module 2 See Funct input EX21 module 1 without 6028 Funct input EX21 module 3 See Funct input EX21 module 1 without 6030 Relay output QX21 module 1 See QX1 relay outlet without 6031 Relay output QX22 module 1 See QX1 relay outlet without 6032 Relay output QX23 module 1 See QX1 relay outlet without 6033 Relay outp...

Страница 81: ...ltage value 1 H2 module 2 Definition of parameters for collector specifications 0 6058 Funct value 1 H2 module 2 Definition of parameters for collector specifications 0 6059 Voltage value 2 H2 module 2 Definition of parameters for collector specifications 0 6060 Funct value 2 H2 module 2 Definition of parameters for collector specifications 0 6062 Function input H2 module 3 See the H5 inlet functi...

Страница 82: ...e 1 Last troubleshooting code that occurred 6806 Burner control phase 1 Last locking phase indicating the place where the error occurred 6810 6996 History 2 to History 20 Error history Tab 61 Menu Service special operation Parameter number Parameter Description Factory set ting 7045 Time since maintenance Resetting the boiler operating time after boiler servicing 0 months 7130 Chimney sweep functi...

Страница 83: ...State central heating CH3 8003 State hot water 8005 State boiler 8007 State solar 8008 State solid fuel boiler 8009 State burner 8010 State buffer 8011 State swimming pool Tab 63 Menus Diagnostics heat generation Parameter num ber Parameter Description 8310 Boiler temperature Control temp Value displayed 8311 Boiler setpoint Control setpoint 8313 Control sensor 8314 Boiler return temp 8315 Boiler ...

Страница 84: ...urs minutes appears 4 Confirm the parameter selection by pressing the button The parameter flashes it can be modified 5 Modify the parameter by turning the button 6 Confirm the setting by pressing the button 7 Set the other parameters if necessary Important Press the MENU key to return to the main display For more information see List of user parameters page 71 9 2 2 Language Selection 1 Press the...

Страница 85: ...t water production 1 Press the key to access the shortcuts menu 2 Select the parameter 316 Hot water boost by turning the button 3 Press the button to start forcing domestic hot water Important Press the button a second time to stop forcing domestic hot water Important Press the MENU key to return to the main display For more information see Shortcuts menu page 70 9 2 5 Setting the room temperatur...

Страница 86: ...ess the shortcuts menu 2 Select the parameter Hot water temp setpoint by turning the button 3 Press the button to confirm 4 Turn the button to modify the temperature set point 5 Press the button to confirm Important Press the MENU key to return to the main display For more information see Shortcuts menu page 70 9 2 8 Setting the room temperature set point Reduced mode 1 Press the MENU key to acces...

Страница 87: ...oliday heating CH1 menu by turning the button 3 Confirm the menu selection by pressing the button The Select parameter appears 4 Select the Holiday period to be programmed by turning the button 5 Confirm by pressing the button 6 Select the Start parameter by turning the button 7 Confirm the menu selection by pressing the button 8 Select and confirm the start date day month of the holiday period wi...

Страница 88: ...e room temperature set point Reduced mode page 86 Activating the Off page 69 9 2 10 Using the boiler according to thermal output Using the boiler according to thermal output makes it possible to calibrate the gas valve 1 From the home screen press the and MENU keys simultaneously 2 Select the parameter Controller stop function by turning the button 3 Press the button to confirm The parameter Contr...

Страница 89: ... button to confirm 3 Turn the button to temporarily modify the temperature set point on the selected heating circuit 4 Press the button to confirm The selected heating circuit is active 9 2 12 Locking Unlocking parameter modification It is possible to lock all functions associated with the MENU key to prevent unauthorised persons from modifying the parameters Locking parameter modification 1 Press...

Страница 90: ...meters menu 2 Press the key and the button simultaneously for around 6 seconds temporarily unlocked is displayed Important Unlocking is temporary and lasts 1 minute 3 Press the MENU key to access the user parameters menu 4 Select the Operator unit menu by turning the button 5 Confirm the menu selection by pressing the button 6 Select menu 27 Programming lock by turning the button Fig 89 Selecting ...

Страница 91: ... parameters Select days 560 for domestic hot water Pre setting selected Days programmed Mon Sun Monday Tuesday Wednesday Thursday Friday Satur day Sunday Mon Fri Monday Tuesday Wednesday Thursday Friday Sat Sun Saturday Sunday Mon Monday Tue Tuesday Wed Wednesday Thu Thursday Fri Friday Sat Saturday Sun Sunday 1 Period of operation at the comfort temperature 2 Period of operation in reduced mode T...

Страница 92: ...66 domestic hot water Single days Pre set programs On 1 Off 1 On 2 Off 2 On 3 Off 3 Monday Tuesday Wed nesday Thursday Friday Saturday Sunday 06 00 08 00 11 00 13 00 17 00 23 00 For more information see Changing the operating mode page 85 Selecting a Timer Program 1 Select a heating circuit 2 Press the MENU key to access the parameters 3 Select the Time central heating CH1 menu by turning the butt...

Страница 93: ...by pressing the button Important Press the MENU key to return to the main screen For more information see Changing the operating mode page 85 Copying a time range page 96 Customising the time ranges 1 Select a heating circuit 2 Press the MENU key to access the parameters Fig 95 Selecting the parameter Select days MW 3000130 EN 02 MENU Mon Sun Time central heating CH1 Select days Fig 96 Selecting t...

Страница 94: ...ng the button The current selection flashes 6 Select a weekly interval 7 Confirm the menu selection by pressing the button 8 Select the parameter 1st Time ON 501 521 541 or 561 by turning the button Fig 98 Selecting the menu Time central heating CH1 MW 3000071 EN 03 MENU Information Set time and date Fig 99 Selecting the parameter Select days MW 3000133 EN 02 MENU Mon Sun Time central heating CH1 ...

Страница 95: ...69 Parameters of the time ranges First time range Second time range Third time range Beginning of the time range 1st Time ON 501 521 541 or 561 2nd Time ON 503 523 543 or 563 3rd Time ON 505 525 545 or 565 End of the time range 1st Time OFF 502 522 542 or 562 2nd Time OFF 504 524 544 or 564 3rd Time OFF 506 526 546 or 566 Important Press the MENU key to return to the main screen Fig 101 Selecting ...

Страница 96: ...eter Time hot water 4 Confirm the menu selection by pressing the button The parameter Select days 500 520 540 or 560 appears 5 Confirm the menu selection by pressing the button The current selection flashes 6 Select a day 7 Confirm the menu selection by pressing the button 8 Select a predefined or customised time range 9 Select the parameter Copy 515 535 555 or 575 by turning the button 10 Confirm...

Страница 97: ... the parameters Time central heating CH2 or Time setting 3 CHP For the domestic hot water circuit select the parameter Time hot water 3 Confirm the menu selection by pressing the button The parameter Select days 500 520 540 or 560 appears 4 Select the parameter Default values 516 536 556 or 576 by turning the button 5 Confirm the parameter selection by pressing the button The parameter No flashes ...

Страница 98: ...m ber Parameter Setting Description 3540 Auto source seq ch over Number of hours Operating time before the auto matic change of the master boiler sequence 3541 Auto source seq exclusion First First and last Last None Exclusion of the boiler or boilers from the periodic sequence rota tion For more information see List of installer parameters page 73 9 3 Accessing the information menu 1 Go to the pa...

Страница 99: ...For more information see Information menu page 70 9 Settings 7609493 v08 24072018 99 ...

Страница 100: ...e the combustion chamber Use a vacuum cleaner for any cleaning work 3 Check the condition of the insulation in the door and at the bottom of the combustion chamber and the condition of the gaskets on the combustion chamber door 4 Check the condition and position of the ignition and flame detection electrodes as well as the condition of the burner and its retaining device 5 Check for any impurities...

Страница 101: ... connecting the gas valve to the Venturi unit Reference Model A SIRIUS THREE FS 50 B SIRIUS THREE FS 70 SIRIUS THREE FS 90 SIRIUS THREE FS 110 Fig 112 Removing the cables from the fan MW 3000127 03 5 5 Fig 113 Removing the cables from the electrode and the sensor MW 3000128 02 6 Fig 114 Removing the connection pipe 7 MW 3000107 01 7 A B 10 Maintenance 7609493 v08 24072018 101 ...

Страница 102: ... the burner to access the inside of the heat exchanger For more information see Accessing the internal boiler components page 36 Fig 115 Disconnecting the safety thermostat on the combustion chamber door and the pin under the ignition electrode MW 3000182 02 8 8 Fig 116 Removing the retaining nuts MW 3000108 04 9 9 Fig 117 Removing the fan the collector and the burner 10 MW 3000109 04 10 Maintenan...

Страница 103: ...ter jet straight at the insulating surface behind the heat exchanger If the insulating surface is wet it must be changed 5 Check the burner 6 Clean the siphon 7 Remount the burner For more information see Removing the burner page 100 Checking the burner page 103 Cleaning the siphon page 105 Remounting the burner page 105 10 2 4 Checking the burner 1 Remove the burner 2 Check whether the surface of...

Страница 104: ...of 1 mm Important Replace the ignition electrode if it is damaged 7 Check the distance between the ignition electrode and the ground electrode Tab 73 Distances and tolerances to be observed for the ignition electrode and the ground electrode Distance SIRIUS THREE FS 50 SIRIUS THREE FS 70 SIRIUS THREE FS 90 SIRIUS THREE FS 110 L3 4 mm with a tolerance of 0 5 mm Important Replace the ignition electr...

Страница 105: ...ally the condensates discharge pipe Important Use a pair of pliers to put the spring tightening clamps back in place 11 Remount the burner For more information see Removing the burner page 100 Accessing the internal boiler components page 36 Remounting the burner page 105 10 2 6 Remounting the burner 1 Remount the pipe connecting the gas valve to the Venturi unit 2 Remount the burner the Venturi a...

Страница 106: ...hanger against the danger of overheating if the insulation malfunctions Intervention by the device is signalled by the display of the anomaly E110 on the screen 1 Rear of the heat exchanger 2 Thermal fuse Important When replacing the thermal fuse also replace the insulating surface inside the heat exchanger which has been damaged by overheating For more information see Removing the burner page 100...

Страница 107: ...EE FS 50 SIRIUS THREE FS 70 Insert the sensor into the flue gas measurement point to at least 9 cm for SIRIUS THREE FS 90 SIRIUS THREE FS 110 3 Set the boiler s heat input to 100 4 Measure the percentage of CO2 in the flue gases 5 Compare the values measured with the set point values in the Control and setting values table Important A tolerance of 0 5 is acceptable when the front panel is closed 6...

Страница 108: ...bustion air intake circuit Caution Be sure to correctly replace the plug after taking a measurement For more information see Using the boiler according to thermal output page 88 CO2 checking and setting values page 61 Checking combustion reduced heat input page 109 Fig 127 Checking the air in the intake circuit 7 MW 3000111 03 10 Maintenance 108 7609493 v08 24072018 ...

Страница 109: ...US THREE FS 70 Insert the sensor into the flue gas measurement point to at least 9 cm for SIRIUS THREE FS 90 SIRIUS THREE FS 110 3 Set the boiler s heat input to 0 4 Measure the percentage of CO2 in the flue gases 5 Compare the values measured with the set point values in the Control and setting values table Important A tolerance of 0 5 is acceptable when the front panel is closed 6 If necessary m...

Страница 110: ... Using the boiler according to thermal output page 88 CO2 checking and setting values page 61 Setting the air gas ratio maximum heat input page 59 10 3 Replacing the 4 A fuses on the electrical terminal blocks Danger of electric shock Before any work switch off the mains supply to the boiler 1 Pivot the fuse holder socket N towards you Fig 129 Checking the air in the intake circuit 7 MW 3000111 03...

Страница 111: ...socket with the eyelet 3 Take out the damaged fuse and replace it with an identical one 4 A 4 Check the fuse L proceeding in the same way Fig 131 Location of the fuse MW 3000229 01 2 3 10 Maintenance 7609493 v08 24072018 111 ...

Страница 112: ...ict between several control units internal anomaly 91 91 Data loss in EEPROM Loss of data in EEPROM 98 98 Extension module 1 Extension module 1 error 99 99 Extension module 2 Extension module 2 error 100 100 2 clock time masters 2 master clocks 102 102 Clock without backup Master clock with no power reserve 103 103 Communication failure Communication error 109 109 Boiler temp supervision Air prese...

Страница 113: ...ance operations page 100 Removing the burner page 100 Checking the burner page 103 Remounting the burner page 105 Thermal fuse in the heat exchanger page 106 Check the combustion page 107 Checking combustion maximum heat input page 107 Checking combustion reduced heat input page 109 11 1 1 Automatic error code clearing If the symbol is displayed at the same time as the error code the error code is...

Страница 114: ... inspection and maintenance operations page 100 Removing the burner page 100 Checking the burner page 103 Remounting the burner page 105 Thermal fuse in the heat exchanger page 106 Check the combustion page 107 Checking combustion maximum heat input page 107 Checking combustion reduced heat input page 109 11 Troubleshooting 114 7609493 v08 24072018 ...

Страница 115: ...nside it 6 Remove the pipe connecting the boiler to the chimney and close the nozzle with a plug 12 2 Recommissioning procedure Caution Only qualified professionals are authorised to carry out maintenance work on the boiler and the heating system Should it prove necessary to carry out the recommissioning of the boiler proceed as follows 1 Re establish electrical power to the boiler 2 Remove the si...

Страница 116: ... as follows 1 Switch off the boiler 2 Cut the power supply to the boiler 3 Close the main gas valve 4 Close the water mains 5 Close the gas valve on the boiler 6 Drain the installation 7 Remove the air vent hose above the siphon 8 Remove the siphon 9 Remove the air flue gas pipes 10 Disconnect all pipes on the underside of the boiler 11 Dismantle the boiler Fig 133 MW 3000179 03 13 Disposal recycl...

Страница 117: ...es with the standard type described in the EC declaration of conformity It has been manufactured and commissioned in accordance with European directives The original declaration of conformity is available from the manufacturer 14 Appendix 7609493 v08 24072018 117 ...

Страница 118: ...14 Appendix 118 7609493 v08 24072018 ...

Страница 119: ...chnological information contained in these technical instructions as well as any drawings and technical descriptions supplied remain our property and shall not be multiplied without our prior consent in writing Subject to alterations ...

Страница 120: ...lands Business Centre Oaklands Park Wokingham RG41 2FD Phone 0345 070 1055 www potertoncommercial co uk Potterton Commercial Part of Baxi Heating UK Ltd Innovation House 7609493 v08 24072018 7609493 001 08 ...

Отзывы: