background image

Flange Machine

Part Number 6Z8303

Index

83

too noisy, 78
turns off during operation, problem, 74
will not turn on, 73

flange rack, description, 24
flange, definition, 1
front of sewing head, thread tensioner locations, 41
front overedge needle guard, setting, 51

G

grounding the flange machine, 15
guard

belt part number, 34
description, 6
setting, 51

H

height

flange machine, 19
looper adjustment, 47
lower main feed, setting, 55
needle bar, adjusting, 46
presser foot and top feed setting, 53

help, 2
high-speed spring system, 19, 54
horseplay, 8

I

increase

needle thread take-up, 43
sewing speed, 29
thread tension, 41

inspecting the needle, 35
installation

assembly time for machine, 11
final safety check, 17
instructions, machine, 12
machine site preparation, 11

irregular stitches, problem, 75

K

knife

replacement, 69
setting, 66

L

left-hand looper, description, 36
length of machine, 19
linkage oil reservoir, 14
location

air regulator, 7
control box, 24
control buttons, 26
flange cutter, 23
flange cutter pedal, 26
flange rack, 24
linkage oil reservoir, 14
model and serial numbers, 3
oil drain plug, 60
ON button, 28
orange button, condensation release, 66
pneumatic panel, 24
shuttle valve, 25
spreader, 48
stitch length setting push button, 39
thread tensioner, 40
warning decals, 5

loop formation, type of thread to use for, 34
looper

definition, 1
height gauge, part number, 34
left-hand, 36
replacement, 37
right-hand, 36
testing for burrs, 36
thread take-up, adjusting, 43

lower main feed, height, setting, 55
lubrication

automatic system, 63
draining oil from sewing head, 60
filter, replacing, 61
schedule, 60
sewing head, 13, 59
spring housing system, 63, 64

M

machine

does not start, problem, 74
specifications, 19
turns off during operation, problem, 74

main components of flange machine, 20
main power does not turn on, problem, 73
main sewing pedal, 25
material

causes for poor feeding, 75
causes for pulling, 75

Содержание PFM-4000

Страница 1: ...Installation Operations and General Maintenance PFM 4000 Flange Machine 6Z8303 PFM 4000 Flange Machine ...

Страница 2: ...is a registered trademark of Texaco Inc Certain illustrations in this manual are used with the permission of Pegasus Sewing Machine Manufacturing Company Limited All other product names are either registered trademarks or trademarks of their respective owners in the United States and or other countries All rights reserved U S patents pending 60 472 351 Porter International Inc 388 Newburyport Turn...

Страница 3: ...ng Your Work Area 10 Section 3 Installation and Setup 11 Preparing the Site 11 Unpacking the Flange Machine 11 Installing the PFM 4000 Flange Machine 12 Assembling the Belt Guard 12 Positioning the Synchronizer the Waste Remover System and the Flange Rack 12 Assembling the Thread Stand 13 Lubricating the Sewing Head 13 Threading the Sewing Head 15 Grounding the PFM 4000 Flange Machine 15 Connectin...

Страница 4: ...000 Flange Machine 28 Preparing to Sew 28 Activating the Machine 28 Setting the Sewing Speed 29 Flanging a Mattress Panel 30 Finishing a Mattress Panel 31 Section 6 Sewing Adjustments 33 Checking Supplies 33 Thread 34 Needles 35 Loopers and Needle Guards 35 Mounting the Needles 37 Mounting the Loopers 37 Threading the Sewing Head 38 Setting Stitch Length 39 Making Tension Adjustments 40 Adjusting ...

Страница 5: ...tting the Synchronizer 56 Section 8 General Maintenance 57 Safety Procedures for Cleaning and Maintaining the PFM 4000 Flange Machine 57 Cleaning the Machine 58 Lubricating the Sewing Head 59 Filling the Sewing Head Oil Reservoir 59 Draining the Sewing Head Oil 60 Replacing the Oil Filter 61 Working with an Automatic Lubrication System 62 Lubricating Other Sections 64 Releasing Condensation from t...

Страница 6: ...Table of Contents iv PartNumber6Z8303 Section 9 Troubleshooting 73 Electrical and Control System Problems 73 Sewing Problems 75 Mechanical Problems 78 Other Problems 80 Index 81 ...

Страница 7: ...stitch formation Parts kit that includes two loopers assorted screws two knives top and bottom a spreader a looper height gauge and needles Accessories kit that includes various tools to assist with lubrication and adjustments How This Manual Is Organized Section 1 About This Manual presents an overview of the manual and how to use it Section 2 Safety details important safety devices specific to t...

Страница 8: ...s Visual aids in this manual may include photographs drawings or tables Each one provides additional details or information Throughout this manual Warning Caution and Note statements have been added to notify you of important information How to Get Additional Help We recognize there are times when you need additional help Porter International is available to you Monday through Friday 8 00 a m to 5...

Страница 9: ...h telephone support In this situation our technical staff will assess your problem and if necessary travel to your site Please be aware that certain fees apply Contact the Porter International Service Department manager at 1 800 343 8138 or 1 978 948 8288 for specific information on fees and services How to Give Your Feedback We re interested in hearing what you have to say Please let us know what...

Страница 10: ...4 PFM 4000 PartNumber6Z8303 About This Manual ...

Страница 11: ...e machine is clearly marked with decals as a reminder to observe safe operating procedures Red decals indicate an immediately dangerous situation which if not avoided will result in serious personal injury or death One red danger decal is located under the tabletop near the rotary flange cutter Special precautions are necessary Yellow decals advise of safety risks and good safety procedures warn a...

Страница 12: ... providing protection to the operator The guards typically found on the PFM 4000 Flange Machine are the belt guard and the eye guard Inspect these guards daily to ensure all hardware is present and securely fastened Figure 2 3 Eye guard Figure 2 1 Yellow caution decal Figure 2 2 Red danger decal WARNING Do not operate your machine without these safety guards properly installed Never remove or defe...

Страница 13: ...re inch a measure of air pressure Pneumatic power to the flange machine is supplied through a single connection The main air regulator is located at the bottom of the pneumatic panel This panel is located under the tabletop and is mounted to the legs on the right side of the table The proper setting for the main air regulator is 80 psi 5 5 bars See Section 3 Installation and Setup for more informa...

Страница 14: ...use damaged needles Dispose of needles in a closeable puncture resistant container exceed 30 psi 2 bars when using compressed air for cleaning purposes use the air hose on any body parts or point it at another person DO make sure you are physically able to operate the flange machine and are able to reach all emergency stops quickly keep your hair short or tied back and always wear safety glasses D...

Страница 15: ... resistant safety glasses Do not use tinted lenses Do not remove prescription lenses Wear a particle or dust mask when there are particles in the air that could cause you discomfort allergies or respiratory distress Due to the nature of the sewing industry static electricity may be present Wear appropriate anti static clothing to reduce static discharge A fiber content of at least 50 cotton is pre...

Страница 16: ...th Administration a U S government agency Ensure safe clearances for aisles and passageways OSHA minimum distance is 3 feet or 1 meter Secure all cables and hoses to avoid tripping and entanglement Locate and read all warning and caution decals Safely store loose tools parts or other foreign objects that can be in on or near the flange machine Keep hand tools in a fixed location when the flange ma...

Страница 17: ...lectrical outlet for 220 VAC single phase must be accessible For overseas voltage differences a transformer is optional Ensure that the flange machine has a clear work area of at least 3 feet 1 meter around the entire machine Unpacking the Flange Machine The PFM 4000 Flange Machine consists primarily of the sewing head and the sewing table These are packed as separate units and are found within th...

Страница 18: ...ad the sewing head Assembling the Belt Guard Assemble the belt guard during the setup and installation of the machine Do this before attaching the synchronizer to the handwheel To assemble the belt guard 1 Place the sewing head in its designated operating position on the sewing table 2 Connect the V belt to the sewing head and the motor pulley 3 Attach the belt guard to the fixing screws using the...

Страница 19: ...p of the machine 3 Position the thread guide bar above and slightly in front of the oil sight window 4 After the setting is correct tighten the screws securely Figure 3 2 Assembling the thread stand Lubricating the Sewing Head The factory drains the oil prior to shipping You must add oil to the machine during the installation and setup process Refer to Section 8 General Maintenance for more detail...

Страница 20: ...he bottom indicator line add enough oil to raise it to the proper level 5 After achieving the proper level replace the oil plug 6 Fill the linkage oil reservoir if the oil level is below the indicator line This reservoir is located on the back of the pneumatic panel between the table legs Figure 3 4 7 To add oil turn the reservoir clockwise to release it and fill the reservoir with oil 8 After the...

Страница 21: ...e knots off 4 Continue threading each needle by hand For further detail see Section 6 Sewing Adjustments Grounding the PFM 4000 Flange Machine NEC National Electric Code establishes requirements for electrical wiring and equipment Before connecting the power source you must properly ground the flange machine To do this identify the single ground wire leading from the synchronizer which is located ...

Страница 22: ...ft side of the machine is in the OFF position 4 Plug the machine receptacle into the outlet 5 Press the black ON button located on the left side of the sewing table WARNING Only qualified electrical personnel should perform grounding procedures Be careful when installing ground connections Failure to install connections correctly can cause serious injury or death IMPORTANT Porter International Inc...

Страница 23: ...e first time or after moving the machine to a new location perform the following steps 1 Verify that the sewing head contains the proper amount of oil 2 Verify that air pressure is available Connect the air supply 3 Properly ground the machine 4 Connect the receptacle to the outlet The flange machine is ready for operation Making a Safety Check Before operating the PFM 4000 Flange Machine walk aro...

Страница 24: ...18 PFM 4000 PartNumber6Z8303 Installation and Setup ...

Страница 25: ...t provides automatic linkage cooling and lubrication The feature that separates the PFM 4000 Flange Machine from all others is the high speed spring system This unique spring system design allows for high revolutions per minute rpm with minimal vibration As a result the flange machine sews at a speed of up to 4000 rpm at 3 to 3 5 stitches per inch and is capable of flanging materials from 3 8 inch...

Страница 26: ... flanging Needle thread and looper thread join together to stitch the flange material to the panel The sewing head on this flange machine is a single compact unit containing a number of features outlined in this section Figure 4 1 Sewing head detail power requirements 220 V single phase 15 amps 380 V single phase 10 amps transformer is optional 415 480 V 15 amps transformer is required air require...

Страница 27: ...s The tensioners are the knobs that adjust the upper and lower thread tension They control how tightly the thread is pulled when stitching Balance between the upper thread tension and the lower thread tension forms proper stitches For locating the tensioners and applying the correct tensions refer to Section 6 Sewing Adjustments and Section 7 Timing Procedures Thread Guides There are a number of d...

Страница 28: ... in the needle plate allow the lower feed to pass through without interruption Flange Guide The flange guide is the stainless steel frame around the bed or flat part of the sewing head It supports the panel and enables it to move smoothly through the sewing motion Sewing Table Components The second component of the flange machine is the table It is assembled at the factory prior to shipping and ha...

Страница 29: ...ad and comes attached to the table This device cuts the flange material through a small opening in the tabletop Pressing the foot pedal to the right of the main sewing pedal activates the flange cutter Figure 4 4 Rotary flange cutter Waste Remover System The waste remover system is a vacuum generated by an air supply The system moves trim waste through the pipe and deposits it into the waste conta...

Страница 30: ...ontrols pressure to the presser foot Another important component found on the back of the pneumatic panel is the linkage lubricator regulator Figure 4 6 It controls cooling and oiling for the top feed For more information on the top feed see Section 5 Operating Procedures IMPORTANT For safe shipping the flange rack is packaged with the flange machine After delivery you must unwrap the rack and att...

Страница 31: ...nter of the pedal bar under the table It activates the waste remover operates the sewing head controls the sewing speed and raises the presser foot The operator presses this pedal forward with the toes or in a downward motion with the heel depending on the function needed main air regulator shuttle valve flow control 15 20 psi 1 03 1 38 bars 20 30 psi 80 psi 5 5 bars 1 38 2 06 bars regulator 5 20 ...

Страница 32: ...g the flange machine The power ON and OFF buttons are located on the left side of the sewing table The ON button is square shaped and black in color The OFF button is square shaped and red in color Optional Equipment EDS T 100 Air Table The EDS T 100 Air Table provides nearly effortless manipulation of heavy materials during the flanging process The air table works with and enhances the flange mac...

Страница 33: ...chine layers of material 3 8 95 cm to 6 15 24 cm thick The presser foot compresses the layers and the walking foot mechanism automatically pulls them through as they are sewn This allows the operator more freedom to guide the layered material and ensures even stitching Quick Start for Experienced Operators The following quick start steps are for experienced operators For operators new to the flang...

Страница 34: ... the PFM 4000 Flange Machine Know how to stop the machine in case of an emergency To do so remove your foot from the main sewing pedal and press the red OFF button located on the left side of the sewing table or unplug the machine receptacle from the outlet Preparing to Sew Before you begin operating the PFM 4000 Flange Machine always do the following 1 Perform a safety check See Making a Safety C...

Страница 35: ...ocated beneath the sewing table To decrease the programmed sewing speed 1 Locate the program keys on the lower left side of the control box Figure 5 1 2 Press the C key to reduce the number setting until the desired speed is achieved To increase the programmed sewing speed 1 Locate the program keys on the lower left side of the control box Figure 5 1 2 Press the D key to increase the number settin...

Страница 36: ...the presser foot and the top feed 2 Insert the flange material into the flange guide Using the opening in the guide align the material with the needles 3 Sew two or three stitches approximately 10 mm by pressing the main sewing pedal in a forward motion with your toes 4 Press the main sewing pedal in a downward motion with your heel to raise the presser foot and the top feed 5 From the left insert...

Страница 37: ...the machine when sewing off between pieces To finish sewing a mattress panel after the flange material has been attached 1 Sew off onto the flange material Figure 5 2 Sewing off onto the flange material 2 Fold the flange material to the left toward the rotary flange cutter Activate the rotary flange cutter by pressing the flange cutter pedal with your foot This pedal is located to the right of the...

Страница 38: ...e flange guide 4 After the flange material is completely severed raise your foot from the flange cutter pedal to stop the cutting operation WARNING The rotary flange cutter blade is extremely sharp Observe decals and keep hands and fingers clear of the cutting area Failure to do so could result in serious personal injury Figure 5 4 Cutting the flange material ...

Страница 39: ...our machine Use these parts and accessories for the adjustment and timing procedures discussed in this section in Section 7 Timing Procedures and in Section 8 General Maintenance Table 6 1 Spare Parts Kit WARNING Press the red OFF button located on the left side of the sewing table before performing any sewing adjustments Confirm that the machine will not operate when you press the pedal Failure t...

Страница 40: ...e nylon bonded thread with the specifications of 46 69 Bonded Nylon or T30 T40 Poly Spun Some companies find success with cotton thread as well Figure 6 1 Proper loop formation 6Z3538 Screw 6Z3649 Screw FD bar guide 6Z7027 Needle 135 x 7 24 6Z4219 Looper height gauge 6Z8303 Manual PFM 4000 Flange Machine Installation Operations and General Maintenance Part No Part Part No Accessory 6Z0187 Allen wr...

Страница 41: ...hread back and forth along all inside edges of the eye The thread should move smoothly 3 Select another needle if the thread snags or frays See Section 2 Safety to learn how to properly handle and dispose of needles Figure 6 2 details the specific parts of the needle Become familiar with these parts Always verify the condition of the needle before sewing Figure 6 2 Parts of a needle Loopers and Ne...

Страница 42: ...t for burrs on the top and on the inside of the looper If you feel a burr on the top of the looper use a fine grit aluminum oxide emery paper for metals and rub very gently to remove the burr Do not use emery paper on the looper s point To test for burrs on the inside of the looper 1 Thread the looper 2 Using a slight tension slide the looper back and forth The thread should move smoothly 3 Select...

Страница 43: ...on 3 Insert a needle into the needle bar as far as it will go making certain that the scarf of the needle is facing the rear of the machine Figure 6 5 4 Hold the needle in place and carefully tighten the needle screw Figure 6 5 Mounting and replacing the needle Mounting the Loopers The PFM 4000 Flange Machine arrives with the loopers already mounted to the looper base To replace a looper 1 Remove ...

Страница 44: ...ontinue threading each needle by hand Always thread the sewing head after making timing adjustments For information on timing see Section 7 Timing Procedures Adjustment to the threading such as lacing the thread through more or fewer eyelets and thread guides maintains the correct thread tension and flow Figure 6 6 and Figure 6 7 illustrate the correct thread paths For additional reference refer t...

Страница 45: ...the cloth plate moving it to the left 2 Locate the push button indicated in Figure 6 8 3 Press the push button and at the same time turn the handwheel in the sewing direction Do this until the push button moves farther inward into the hole in the eccentric IMPORTANT The actual length of stitches made may vary with different types of materials The factory sets seam width at 1 inch This is not adjus...

Страница 46: ...ght as possible while still sufficient to set the stitch correctly in the material and ensure an even stitch Adjusting Thread Tensioners Tension Disc A metal disc specifically designed to apply tension to thread Tensioners assist in controlling stitch tension The PFM 4000 Flange Machine uses tension springs and tension discs similar to a home sewing machine Three tensioners are located on the fron...

Страница 47: ...e tensioner open the cloth plate Pull the thread through ensuring that tension on the thread is loose Proceed to the safety stitch needle thread tensioner Figure 6 9 Safety stitch looper thread tensioner Adjusting the Safety Stitch Needle Thread Tensioner Look at the front of the sewing head You will see three tensioner knobs located on the upper part of the sewing head The safety stitch needle th...

Страница 48: ...oosen the upper thread tension and repeat the test Make any adjustments as necessary Adjusting Thread Take up Thread take up recovers the amount of loose thread created by the loopers and the feeding motion The PFM 4000 Flange Machine has two types of take up the needle thread take up and the looper thread take up The needle thread take up and thread guide may be adjusted to increase or decrease t...

Страница 49: ...Use the looper thread take up and guide to change the ratio of looper thread in the finished stitch To change the amount of thread handled 1 Loosen the thread guide screw and the looper thread take up rod screw 2 Move the thread guide and the take up rod to the left for more thread or to the right for less thread 3 Tighten the two screws making certain that the take up rod passes through the cente...

Страница 50: ...e the two adjustment shims as needed until the teeth of the lower main feed and the top feed have only a minimum space between them 3 Test the spacing between the top feed and the lower feed by passing a sheet of paper between them This space should be enough to allow a piece of paper to pass between the teeth of the lower main feed and the top feed Figure 6 11 Top Feed dead band location ...

Страница 51: ...ther related components as a result Time the primary sewing head components in the following order 1 Needle bar height 2 Safety stitch looper 3 Overedge looper height 4 Overedge looper 5 Spreader 6 Needle guards 7 Walking foot mechanism 8 Synchronizer Study the procedures in this section to determine whether or not the adjustments you make will affect other components as well For all adjustments o...

Страница 52: ... The measurement from the point of the looper to the center of the needle should be 1 5 mm To set the safety stitch looper 1 Rotate the handwheel so that the point of the looper is at the center of the needle 2 Loosen the looper set screw so that you can move the looper up and down 3 Raise the looper and set the gap with the spacer as shown in Figure 7 2 4 After the gap is set tighten the looper s...

Страница 53: ...g the Overedge Looper Height Chain Finger This component is located above the looper and assists with forming the overedge stitch on the side of the material When no material is present the overedge stitch forms around the chain finger To adjust or set the looper height 1 Loosen the 8 mm looper holder screw 2 Rotate the handwheel until the looper passes under the chain finger with 0 5 mm clearance...

Страница 54: ... front and back 6 After the looper is correctly set tighten the looper lever screw Figure 7 4 Setting the overedge looper Timing the Spreader Spreader The spreader on this flange machine is a small forked metal part used to form the triangle needed for proper stitch formation The spreader on the PFM 4000 Flange Machine is located on the right side of the looper on the spreader rod It picks up the ...

Страница 55: ...nd left to right 5 Manually move the spreader left to right until the measurement from the bottom point of the spreader is 5 6 mm from the center of the needle 6 Manually move the spreader up or down until the 14 mm measurement between the top of the needle plate and the bottom point of the spreader is achieved 7 After the setting is correct lightly tighten the spreader screw 8 Turn the handwheel ...

Страница 56: ...rd Setting the Safety Stitch Needle Guard The safety stitch needle guard on the PFM 4000 Flange Machine is a two piece needle guard To set the safety stitch needle guard refer to Figure 7 6 and do the following 1 Rotate the handwheel clockwise until the needle is in its lowest position 2 Set the rear needle guard at the needle just below the needle eye Make sure the guard does not deflect the need...

Страница 57: ...m the back of the needle making sure they do not touch one another 4 After the setting is correct tighten the rear needle guard screw Setting the Front Overedge Needle Guard To set this guard refer to Figure 7 7 and do the following 1 Locate the two screws positioned side by side in front of the lower knife 2 Loosen both screws and manually move the front needle guard to the front of the needle 3 ...

Страница 58: ...er main feed height Figure 7 8 Presser foot and top feed Adjusting the Presser Foot Front or Back For correct spacing of the needles and correct spacing of the spreader when it passes behind the presser foot extension you may need to adjust the presser foot To adjust the presser foot 1 Rotate the handwheel so that the spreader is positioned as closely behind the presser foot as possible without co...

Страница 59: ...de Places pressure on the top feed and the presser beam to hold them against the inner guide 1 Remove the outer guide by removing the two socket head cap screws from the outer housing 2 Center the cap screw within the presser foot arm holder slot Tighten the screw 3 Adjust the presser foot arm front to back as needed so that the presser foot clears the needle bars in all positions of its travel 4 ...

Страница 60: ...ure the presser foot and top feed settings are correct before adjusting the spring system Instructions for those settings begin on page 52 To adjust the high speed spring system refer to Figure 7 10 and do the following 1 Ensure the main air regulator is set at 80 psi 2 Manually rotate the handwheel until the presser foot touches the needle plate 3 Loosen the jam nut 4 Turn the cylinder shaft cloc...

Страница 61: ...located on the front of the feed and one is located on the left side of the feed Loosen both screws 2 Adjust the feeds by raising or lowering the feeds until the proper height is obtained 3 After the feeds are in the correct position securely tighten the front feed screw first Then tighten the feed screw on the side IMPORTANT When they are set in the correct position a straight edge can be placed ...

Страница 62: ...al to turn the machine one revolution 2 Remove the synchronizer cover To do this grasp the bottom and lift upward 3 Loosen the locking screw 4 Hold the needle positioning disks in place and rotate the handwheel ensuring the needles reach their lowest position Continue holding the disks and rotating the handwheel until the needle eyes are on an even level with the needle plate 5 When the correct se...

Страница 63: ...eaning or performing maintenance on the PFM 4000 Flange Machine Precision Parts Components with accurate calibrated measurements or positions Always wear appropriate personal safety items Always turn off the flange machine to clean or lubricate Do not touch control system components except where indicated Do not attempt to adjust precision parts Always properly store and dispose of cleaning and lu...

Страница 64: ...e plate without interruption 1 Open the covers and remove the collected lint from around the loopers feed slots and under the needle plate 2 Use a small brush or compressed air to clean these areas daily 3 Remove the side cover and clean lint build up from the top feed and presser foot linkages Figure 8 1 4 After you finish cleaning close the covers Figure 8 1 Machine covers CAUTION Do not exceed ...

Страница 65: ...ing the Sewing Head Oil Reservoir To fill the oil reservoir refer to Figure 8 2 and do the following 1 Remove the oil plug located on the top of the sewing head 2 Using the oil container and the oil funnel that are provided in the accessories kit pour fresh oil into the reservoir 3 Fill the reservoir 4 Check the sight gauge on the front of the sewing head This gauge is in the lower right corner Th...

Страница 66: ...oil from the machine 1 Have a container ready to collect the used oil 2 Remove the machine from its stand and set it on a table or a flat working surface 3 Remove the oil drain plug located on the lower left side of the machine and collect the oil in the container Figure 8 3 4 After the oil is completely drained secure the plug 5 Dispose of the oil according to local or national regulations See Fi...

Страница 67: ...filter shows signs of wear Figure 8 4 Replacing the oil filter 1 Follow the instructions under Draining the Sewing Head Oil on page 60 2 Remove the top cover of the sewing head by removing the four screws that secure the cover Figure 8 4 3 Remove the three screws that secure the oil filter cover 4 Remove the oil cap and the O ring 5 Remove the old filter and replace it with the new one 6 When you ...

Страница 68: ...ted areas when you install the machine and when the machine has been inoperative for long periods Use the oil container provided in the accessories kit to oil all points requiring lubrication For regular maintenance lubricate the sewing head at the points indicated in Figure 8 5 and Figure 8 6 Figure 8 5 Lubrication points top view Figure 8 6 Lubricating the spreader IMPORTANT Two oil plugs are lo...

Страница 69: ...spring housing has a set screw in the oiling access hole Figure 8 7 Remove this screw to oil the internal wicking system of the spring housing After oiling replace the set screw to prevent contaminants from entering the housing Remember to oil other moveable parts not reached by wicks Figure 8 7 Lubricating the spring housing wicking system CAUTION Use lightweight needle oil only Do not use oil th...

Страница 70: ...olor water white viscosity cSt cSt SUS SUS at 40 Celsius 18 2 test method D 445 at 100 Celsius 3 7 test method D 445 at 100 Fahrenheit 97 test method calc at 210 Fahrenheit 39 test method calc pour point Celsius Fahrenheit test method D 97 32 25 flash point Celsius Fahrenheit test method D 92 168 335 viscosity index 75 test method D 2270 gravity API 31 8 test method D 1298 IMPORTANT The informatio...

Страница 71: ...le legs Figure 8 9 Add oil when the oil level falls below the indicator line To add oil turn the reservoir clockwise to release it and fill the reservoir with oil Figure 8 9 Linkage lubricator regulator and linkage oil reservoir IMPORTANT The linkage lubricator regulator is factory set at 5 to 20 psi 34 to 1 4 bars Verify this setting each time you fill the linkage oil reservoir If any adjustments...

Страница 72: ...ng all areas sew a test strip to check for excess oil Releasing Condensation from the Pneumatic System Release condensation from the pneumatic system daily To do this refer to Figure 8 10 and do the following 1 Ensure the machine is turned off 2 Locate the orange button on the bottom of the main air regulator 3 Press the button upward to release any collected moisture Figure 8 10 Releasing condens...

Страница 73: ...e 3 After the bottom knife is level with the needle plate tighten the knife screw Next set the top knife Setting the Top Knife To set the top knife 1 Rotate the handwheel until the knife reaches its lowest position 2 Loosen the knife screw located at the front of the knife 3 Set the knife 1 5 mm below the top of the bottom knife 4 After the knife setting is correct tighten the top knife screw Figu...

Страница 74: ...sser foot 3 Check for interference by manually moving the presser foot up and down The motion should not cause interference with the top knife holder 4 When the setting is correct tighten the top knife screw Checking the Setting of the Knives After you have followed the preceding steps check the knives to verify that they function together properly To do this 1 Take a small piece of thread and pla...

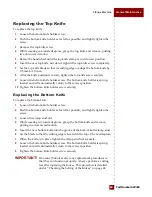
Страница 75: ...sition 10 Tighten the bottom knife holder screw securely Replacing the Bottom Knife To replace the bottom knife 1 Loosen the bottom knife holder screw 2 Push the bottom knife holder as far left as possible and lightly tighten the screw 3 Loosen the clamp stud nut 4 While wearing cut resistant gloves grasp the bottom knife and remove pulling in a downward motion 5 Insert the new bottom knife into t...

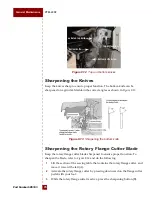
Страница 76: ...Rotary Flange Cutter Blade Keep the rotary flange cutter blade sharpened to ensure proper function To sharpen the blade refer to Figure 8 14 and do the following 1 Lift the section of the sewing table that contains the rotary flange cutter and move it toward the left A 2 Activate the rotary flange cutter by pressing downward on the flange cutter pedal with your foot 3 While the rotary flange cutte...

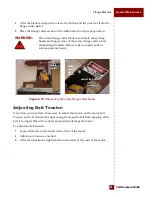
Страница 77: ... slipping If the belt is too tight this will overload and possibly damage the motor To adjust the belt tension 1 Loosen the bottom nut found on the front of the motor 2 Adjust up or down as needed 3 After the adjustment tighten both nuts located at the ends of the motor WARNING The rotary flange cutter blade is extremely sharp Keep hands and fingers clear of the rotary flange cutter while sharpeni...

Страница 78: ...72 PFM 4000 PartNumber6Z8303 General Maintenance ...

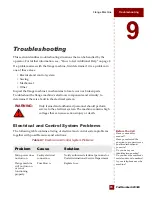
Страница 79: ...ll Have you read this manual Have you referred the question to a supervisor or qualified technician at your site Do you have your identification number Do you have the machine s serial and model numbers Is your telephone near the machine The following table contains a listing of electrical and control system problems together with possible causes and solutions Table 9 1 Electrical and Control Syst...

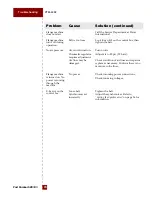
Страница 80: ...stment Air lines may be damaged Turn on air Adjust air to 80 psi 5 5 bars Check condition of air lines and repair or replace as necessary Confirm there is no moisture in the lines Flange machine is turned on No power is coming through the machine No power Check incoming power connections Check incoming voltages E 8 error on the control box Loose belt Synchronizer set incorrectly Tighten the belt A...

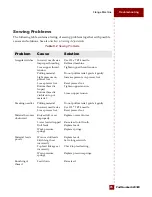
Страница 81: ...ead tension Do not pull material guide it gently Increase pressure on presser foot Reset presser foot Tighten upper tension Loosen upper tension Breaking needles Pulling material Incorrect needle size Loose presser foot Do not pull material guide it gently Use 135 x 7 24 needle Reset presser foot Materialbecomes obstructed Knives dull or set improperly Lower feeds dropped Dull feeds Weak pressure ...

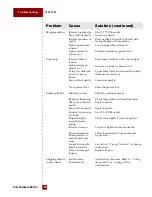
Страница 82: ... and type Insert new needle Reset the presser foot Breaking thread Stitching too fast Improper threading Sharp eye or burr in needle Bent or blunt needle Incorrect type or size of needle Thread tangled around tension spring Incorrect tension Dust and debris in thread path or in needle and looper areas Looper and needle timed incorrectly Worn or damaged loopers Stitch at a medium speed Check thread...

Страница 83: ...eader out of alignment Check the timing of the needle and looper Reset if necessary If the thread is making a large loop raise the needle bar If the thread is making a small loop lower the needle bar Check thread condition Change thread spool upper thread must be the same weight as looper thread Align or replace spreader Problem Cause Solution continued ...

Страница 84: ...k the tubes Flange cutter does not operate or operates poorly No air pressure Kinked air lines Dull or improperly set knives Check for pressure Check lines Sharpen or reset knives No action when cutter pedal is pressed No air pressure Kinked lines Check air pressure Check lines Power is ON sewing head does not move Loose belt Machine is obstructed Needle positioner is set incorrectly Tighten belt ...

Страница 85: ... Installation and Setup Connecting the Pneumatic Power for proper procedure Air units not working Air connected incorrectly Air lines pinched See Section 3 Installation and Setup Connecting the Pneumatic Power for proper procedure Check air lines Machine will not sew Synchronizer incorrectly set Belt is loose Adjust the sychronizer Refer to Setting the Synchronizer on page 56 for information Tight...

Страница 86: ...and solutions Table 9 4 Other Problems Problem Cause Solution Materialbecomes soiled when sewing Sewing head or table is dirty Sewing head is overlubricated Clean flange machine Check lubrication See Section 8 General Maintenance Material wrinkles Too many stitches per inch Reduce stitches per inch Rust Excessive humidity Eliminate source of humidity Oil all machine parts regularly ...

Страница 87: ...cation description 62 B belt guard assembly 12 part number 34 safety feature 6 belt tension adjustment 71 bottom knife adjustment 68 part number 33 setting 67 breaking thread problem 76 burrs description 35 testing looper for 36 C calling for help 2 caution decals safety feature 5 chain finger description 47 chain of thread sewing 31 checking electrical connection 16 feeds setting 55 knife setting...

Страница 88: ...6 safety stitch looper 36 sewing head 20 spare parts 33 spreader 48 tension disc 40 thread guides 21 thread stand 23 thread take up 42 walking foot mechanism 21 waste remover system 23 yellow decals 5 documentation feedback 3 draining oil from the machine 60 E electrical power requirements 7 16 even stitches adjusting tension 40 experienced operators instructions for 27 eye guard safety feature 6 ...

Страница 89: ...ription 36 length of machine 19 linkage oil reservoir 14 location air regulator 7 control box 24 control buttons 26 flange cutter 23 flange cutter pedal 26 flange rack 24 linkage oil reservoir 14 model and serial numbers 3 oil drain plug 60 ON button 28 orange button condensation release 66 pneumatic panel 24 shuttle valve 25 spreader 48 stitch length setting push button 39 thread tensioner 40 war...

Страница 90: ...61 oil reservoir filling sewing head 59 oil sight window location 14 operation flanging 30 preparing work area for 10 quick start 27 optional equipment description 26 OSHA definition 10 outer guide description 53 overedge looper description 36 part number 33 thread tensioner adjustment 41 overedge needle guards 51 overedge needle thread tensioner adjustment 42 overview of safety features 5 P panel...

Страница 91: ...looper height 47 lower main feed height 55 needle bar height 46 needle guards 50 presser foot height 53 rear overedge needle guard 51 stitch length 39 top feed height 53 walking foot mechanism 52 sewing a thread chain 31 sewing head description 20 lubrication 13 59 timing adjustment 45 troubleshooting 78 sewing off definition 31 sewing speed changing 29 maximum rpm 19 sewing table components 22 sh...

Страница 92: ...t number 34 shipped with the PFM 4000 Flange Machine 1 top feed dead band adjustment 43 function 28 height setting 53 top knife adjustment 68 part number 33 replacement 69 transformer 11 troubleshooting 73 80 breaking thread 76 lubrication 78 needle bar does not move 78 no power 73 74 tweezers part number 34 types of needles to use 22 U unpacking the flange machine 11 upper feed top feed definitio...

Отзывы: