


Disassembly
If you later decide you want to solder additional parts to the Zumo Shield, it is possible to remove it
from the chassis with some careful effort.
1. Remove the tracks from the chassis.
2. Remove the battery cover and batteries from the chassis.
3. Unscrew all four sets of machine screws and nuts holding the shield to the chassis.
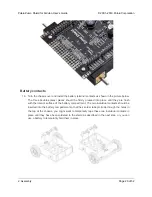
4. Squeeze the negative battery terminal spring and gently ease both battery terminals out
through the holes in the chassis. The motors will stay attached to the shield as it separates
from the chassis.
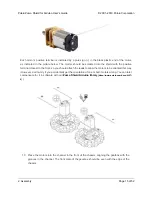
5. Carefully bend both motors away from the shield to allow the front piece of the spacer plate
to be removed.
You can reassemble the Zumo afterwards by following this procedure in reverse. (Make sure to replace
the spacer plate pieces properly.)
2.c. Adding a Zumo reflectance sensor array (optional)
Overview
The
[https://www.pololu.com/product/1419]
is an easy way to add line-
following and edge-detection capabilities to the Zumo robot. It is designed specifically to mount to the
front expansion area of the Zumo shield, and it includes everything you need for installation. Note
that the reflectance sensor array is not included with the Zumo shield or Zumo Robot Kit, and the
Zumo robot can be used without it. For more information on the Zumo reflectance sensor’s capabilities
and how it works (including a schematic diagram), please see its
. This section is devoted specifically to assembling the sensor and using it with the Zumo
shield.
Pololu Zumo Shield for Arduino User’s Guide
© 2001–2019 Pololu Corporation
2. Assembly
Page 23 of 52


