background image

18

Polaroid PDC 5350 Digital Camera User Guide

www.polaroid-digital.com

19

Polaroid PDC 5350 Digital Camera User Guide
www.polaroid-digital.com

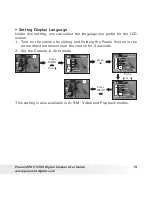
• Setting Display Language 

Under this setting, you can select the language you prefer for the LCD 

screen. 

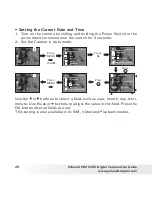
1.  Turn on the camera by sliding and holding the Power Switch in the 

arrow direction shown near the switch for 2 seconds.

2.  Set the Camera in Auto mode. 

Press

13.62MB

NTSC
Standard

Language

English

13.62MB

NTSC
Standard
On

Press

MENU 

then 

Press

or

Press

MENU 

Setup Menu

On
NTSC

Off

Standard

This setting is also available in A/S/M, Video and Playback modes.

Содержание PDC 5350

Страница 1: ...PDC 5350 Digital Camera User Guide www polaroid digital com 37 111mm EQ 1 2 7 4 9 AUTO FOCUS f 7 7 23 1m m ...

Страница 2: ...mm EQ 1 2 7 4 9 AUTO FOCUS f 7 7 23 1m m Front View 1 2 3 4 1 Operation LED 2 Viewfinder 3 Flash Charge Focus LED 4 Flash Erase button 5 Playback button 6 Macro Protect button Back View 7 LCD screen 8 Display on off button 9 Zoom Out button 10 Zoom In button 11 Up button 12 Right button 13 OK button 14 Down button 15 Left button 16 Menu button 17 Power switch ...

Страница 3: ...amera User Guide www polaroid digital com 1 Microphone 2 Shutter button 3 Mode dial 4 Speaker 5 Tripod mount 4 3 Top View 1 Bottom View 2 5 1 Cover for USB port DC in jack 2 Hand strap holder 3 Battery SD card cover Side view 1 2 3 ...

Страница 4: ...ing the Beep Sound On Off 15 Folder Formatting 16 Formatting the Internal Memory 17 Setting Print Date On Off 18 Setting Display Language 19 Setting the Current Date and Time 20 Switching the Information Display LCD Screen Off 21 3 Taking and Managing the Pictures 22 Taking a Picture in Auto Mode 22 Drive Mode 24 Taking a Picture with the LCD Screen Off 24 Set Flash Mode 25 Taking Macro Pictures 2...

Страница 5: ...ory to a Memory Card 59 To Print Selected Pictures 60 DPOF Digital Print Order Format 61 P I M PRINT Image Matching 62 To Format a Memory Card 63 7 Installing the Software Onto a Computer 64 Installing the Software 64 Software Included with Your Camera 66 Computer System Requirements 67 8 Transferring Pictures and Video Clips to a Computer 68 Before You Transfer Pictures 68 Connecting to Your Comp...

Страница 6: ... needs of the more advanced photographer Here are a few examples of how you can use your camera Enjoy point shoot or full manual operation Adjust the resolution for print or email white balance and exposure compensation to suit light conditions Set the exposure aperture or ISO for full manual control Store pictures and video clips to the internal memory or a SD card Playback pictures and video cli...

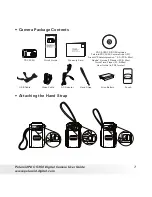
Страница 7: ...ford MA 01730 1434 Pouch PDC 5350 CD ROM includes Polaroid PDC 5350 Camera Driver PC Arcsoft PhotoImpression 4 0 PC Mac Adobe Acrobat Reader PC Mac QuickTime Player PC Mac User Guide in PDF format AC Adaptor Quick Guide PDC 5350 Quick Start Guide Guide de Démarrage rapide Guida Rapida Guía Rápida de Inicio Guia de Início Rápido ML 0403 Part no OM837657 R1 Printed in China Schnellanleitung Attachin...

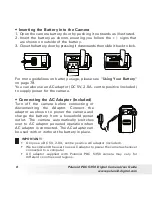
Страница 8: ...entre positive included to supply power for the camera Connecting the AC Adaptor Included Turn off the camera before connecting or disconnecting the Adaptor Connect the adaptor as shown to power the camera and charge the battery from a household power outlet The camera automatically switches over to AC adaptor powered operation when AC adaptor is connected The AC adapter can be used with or withou...

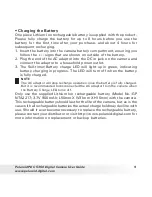
Страница 9: ...harge LED will light up in green indicating battery charging in progress The LED will turn off when the battery is fully charged NOTE The AC adaptor will stop recharge operation once the battery is fully charged But it is recommended to disconnected the AC adaptor from the camera when the Battery Charge LED turns off Only use the supplied Lithium Ion rechargeable battery Model No GP NTA2217 3 7V 9...

Страница 10: ...he Power Switch in the arrow direction shown near the switch for 2 seconds 2 Set the camera in Auto A S M or Video mode 3 Check the battery power status that appears on the LCD screen Battery has adequate power Battery power is low Battery power is exhausted Recharge battery will appear on the LCD screen when the battery is exhausted and then the camera will turn off automatically Please recharge ...

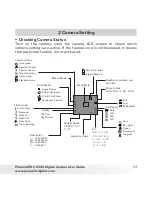
Страница 11: ... 7 1 0 1 3 1 7 2 0 EV L 2560X1920 M1 2048X1536 M2 1280X960 S 640X480 Resolution Camera Status Auto mode Aperture Priority Shutter Priority Manual Setting Video mode Playback mode ISO Speed Auto 100 200 400 Auto Day Light Cloudy Fluorescent Tungsten Single Picture 2 SEC Self timer 10 SEC Self timer Continuous Pictures Drive Mode SD card Inserted Internal Memory Focus Mark Flash mode A Auto Flash Re...

Страница 12: ...ettings to customize your camera Mode dial Auto mode Under this mode the camera will automatically judge the environment conditions for you It will set the Exposure and White balance automatically according to the shooting environment A S M mode Under this mode you can set the aperture shutter or Manual setting for priority based on different environment condition before taking pictures Further de...

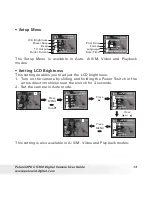
Страница 13: ...ilable in Auto A S M Video and Playback modes Setting LCD Brightness This setting enables you to adjust the LCD brightness 1 Turn on the camera by sliding and holding the Power Switch in the arrow direction shown near the switch for 2 seconds 2 Set the camera in Auto mode Press LCD Brightness On NTSC Off Press MENU then Press Press MENU or Setup Menu On NTSC Off Standard Standard LCD Brightness On...

Страница 14: ...1 Turn on the camera by sliding and holding the Power Switch in the arrow direction shown near the switch for 2 seconds 2 Set the camera in Auto mode Press Press MENU Power Save Off Setup Menu 1 Min Press MENU then Press or Setup Menu On NTSC Off Standard On NTSC Standard On NTSC Standard This setting is also available in A S M Video and Playback modes NOTE Auto power off is automatically disabled...

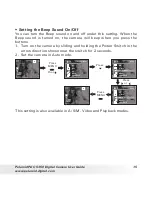
Страница 15: ... camera will beep when you press the buttons 1 Turn on the camera by sliding and holding the Power Switch in the arrow direction shown near the switch for 2 seconds 2 Set the camera in Auto mode Press Beep NTSC On Off 1 Min Beep NTSC On Off 1 Min Press MENU then Press or Press MENU Setup Menu On NTSC Off Standard Standard Standard This setting is also available in A S M Video and Playback modes ...

Страница 16: ...direction shown near the switch for 2 seconds 2 Set the camera in Auto mode Press Folder Format On NTSC Standard Date 1 Min Folder Format On NTSC Standard Date 1 Min Press MENU then Press MENU Press or Setup Menu On NTSC Off Standard Standard If this option is selected the directory folder will be named as 100V5000 Date When this option is selected the directory folder will be named after the curr...

Страница 17: ... OK Format Media Format Media OK Press MENU then Setup Menu On NTSC Off Standard Format On NTSC Standard On NOTE Data deleted by a format operation cannot be recovered Make sure you do not have any useful data currently stored in the internal memory before you format it Formatting the internal memory destroys all the pictures even those are protected With a memory card inserted the above operation...

Страница 18: ...en 1 Turn on the camera by sliding and holding the Power Switch in the arrow direction shown near the switch for 2 seconds 2 Set the Camera in Auto mode Press Print Date On On Off NTSC Standard Print Date On On Off NTSC Standard Press or Press MENU Press MENU then Setup Menu On NTSC Off Standard Off Off This setting is also available in A S M Video and Playback modes ...

Страница 19: ... LCD screen 1 Turn on the camera by sliding and holding the Power Switch in the arrow direction shown near the switch for 2 seconds 2 Set the Camera in Auto mode Press 13 62MB NTSC Standard Language English 13 62MB NTSC Standard On Press MENU then Press or Press MENU Setup Menu On NTSC Off Standard This setting is also available in A S M Video and Playback modes ...

Страница 20: ...ress Press Date Time Standard On English 12 16 03 16 42 Set Date Time OK Cance 13 62MB Date Time Standard On English 13 62MB OK 11 16 03 16 42 OK 11 16 2003 17 00 MM DD YY Press MENU Press MENU then Setup Menu On NTSC Off Standard Use the or buttons to select a field such as year month day hour minute Use the or buttons to adjust the value in the field Press the OK button after all fields are set ...

Страница 21: ...CD screen will turn off You can turn on the information display and the LCD screen by pressing the Display button one more time Display button LCD screen on Information display on LCD screen on Information display off LCD screen off information display off Press Press Press This feature is only available in Auto A S M and Video modes In Playback mode you can turn on and off the information display...

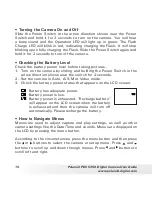
Страница 22: ...ed Doing so will prevent the current picture being saved and may corrupt other pictures already stored on the camera s internal memory or on a memory card Taking a Picture in Auto Mode Take a single picture at approximately 18 inches to infinity 45 cm to infinity 1 Turn on the camera by sliding and holding the Power Switch in the arrow direction shown near the switch for 2 seconds Shutter button 2...

Страница 23: ... is always ready to take pictures or videos even if you are in the Menu or Playback mode Pressing the Shutter button half way in either the menu or playback modes will quickly switch the camera to the capture or video mode depending on where the Mode Dial is set When the Focus LED blinks and the red focus mark appears on the LCD screen when it is on there is difficulty in focusing the subject Rele...

Страница 24: ...r Continuous Pictures Press Camera Menu Press MENU On Off Drive Mode You may press Left or Right button to select Single Picture 2 second Self timer 10 second Self timer or Continuous Pictures mode in Auto or A S M mode Taking a Picture with the LCD Screen Off You can also take a picture with the LCD screen off The procedure is the same as above but frame your subject using the Viewfinder instead ...

Страница 25: ... 7 metres Telephoto 2 6 6 7 feet 0 8 2 0 metres The camera has six flash modes default setting is Auto Use the flash when you take pictures at night indoors or outdoors in heavy shadows A Auto Flash Mode The flash fires automatically as needed Use this setting to take most pictures Flash Mode on The flash fires for every picture Use this setting in high contrast situations to provide fill light or...

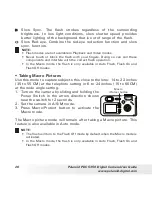
Страница 26: ... only available in Auto Flash Flash On and Flash Off modes Taking Macro Pictures Use this mode to capture subjects this close to the lens 14 to 22 inches 35 to 55 CM at the telephoto setting or 6 to 24 inches 15 to 60CM at the wide angle setting 1 Turn on the camera by sliding and holding the Power Switch in the arrow direction shown near the switch for 2 seconds 2 Set the camera in A S M mode 3 P...

Страница 27: ...place the camera on flat surface or use a tripod for the Self timer function 1 Turn on the camera by sliding and holding the Power Switch in the arrow direction shown near the switch for 2 seconds 2 Set the Camera in Auto or A S M mode Press Camera Menu On Off Drive Mode On Off Drive Mode Press MENU Press MENU Press or 2 SEC Self timer indicates a countdown of two seconds 10 SEC Self timer indicat...

Страница 28: ...ENU button to enter the Camera Menu and select the Single Image function again Place the camera on a flat surface or use a tripod when using the self timer function Zoom Feature There are two types of zoom in this camera optical zoom and digital zoom Optical zoom alters the focal distance of the lens zoom and its factor range is 1X to 3X Digital zoom is activated after you reach the maximum optica...

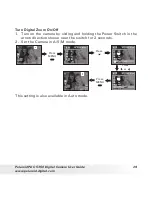
Страница 29: ... 1 Turn on the camera by sliding and holding the Power Switch in the arrow direction shown near the switch for 2 seconds 2 Set the Camera in A S M mode Press Camera Menu On Off Digital Zoom On Off On Off Digital Zoom On Off Press or Press MENU Press MENU This setting is also available in Auto mode ...

Страница 30: ...ack them under the zoom setting you just made The zoom setting will remain after taking pictures If you want to take a normal size picture please use the Zoom Out button NOTE Zoom feature is not available in Macro and Video modes Digital zoom feature is not available when you set the camera in Playback mode or turn Digital Zoom off Setting the Picture Resolution and Quality Picture resolution refe...

Страница 31: ...Turn on the camera by sliding and holding the Power Switch in the arrow direction shown near the switch for 2 seconds 2 Set the Camera in the Auto or A S M mode Press Camera Menu Resolution Resolution Press or Press MENU Press MENU NOTE This setting is available in both the Auto and A S M modes ...

Страница 32: ... Resolution M1 2048 X 1536 Fine Approx 16 pictures Normal Approx 23 pictures Resolution M2 1280 X 960 Fine Approx 40 pictures Normal Approx 48 pictures Resolution S 640 X 480 Fine Approx 129 pictures Normal Approx 160 pictures NOTE Scene complexity affects a picture s file size For example a picture of trees in autumn has a larger file size than a picture of blue sky at the same resolution and qua...

Страница 33: ...hown near the switch for 2 seconds 2 Set the camera in A S M mode Press Press Camera Menu On Off Drive Mode On Off Drive Mode Press MENU Press MENU The flash will turn to the Flash Off mode by default after you activate this mode The Continuous pictures mode will remain after taking the pictures NOTE The number of continuous pictures you can take depends on the memory available and resolution sett...

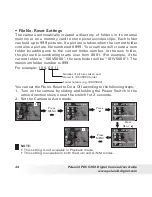
Страница 34: ...arts over from 0001 For example if the current folder is 100V5000 the new folder will be 101V5000 The maximum folder number is 999 For example 100 0011 Number of pictures taken and stored in 100V5000 folder Folder number e g 100V5000 You can set the File no Reset to On or Off according to the following steps 1 Turn on the camera by sliding and holding the Power Switch in the arrow direction shown ...

Страница 35: ... inserted in the camera the picture file number will continue from the last number used Setting Quick View Under this setting you can take a quick view at the picture just taken for 2 seconds or 10 seconds 1 Turn on the camera by sliding and holding the Power Switch in the arrow direction shown near the switch for 2 seconds 2 Set the Camera in A S M mode Press MENU Press Camera Menu QuickView On O...

Страница 36: ...age correctly When you set the aperture in the aperture priority mode the camera automatically selects a shutter speed to match the brightness Select a lower aperture value opening the aperture allows you to fade the background and create a beautiful portrait A higher aperture value closing it brings the entire range from foreground to background into focus You can set the camera to A mode and tak...

Страница 37: ...ors The icon will appear when the shutter speed is slow which reminds you to hold the camera steady or use a tripod The LCD screen will show you the aperture value and the shutter speed at which you take the picture The camera highlights the shutter speed value in red if the aperture value is not suitable for taking a picture If this happens release your finger and adjust the aperture value by pre...

Страница 38: ... the camera automatically selects an aperture value to match the brightness Faster shutter speeds allow you to catch an instantaneous image of a moving subject while slower speeds create a flowing effect and allow you to shoot without a flash in dark areas You can set the camera to S mode and take a picture by the following steps 1 Turn on the camera by sliding and holding the Power Switch in the ...

Страница 39: ...amera steady or use a tripod The LCD screen will show you the aperture value and the shutter speed at which you take the picture The camera highlights the aperture value in red if the shutter speed is not suitable for taking a picture If this happens release your finger and adjust the aperture value by pressing Left Right button Recompose the scene and press the Shutter button halfway to reset the...

Страница 40: ...s is convenient for shooting fireworks and other images where it is difficult to set the correct exposure automatically You can set the camera to M mode and take a picture by the following steps 1 Turn on the camera by sliding and holding the Power Switch in the arrow direction shown near the switch for 2 seconds 2 Set the camera in A S M mode Press Press Camera Menu Mode Mode Press MENU Press MEN...

Страница 41: ...y or use a tripod The LCD screen will show you the aperture value and the shutter speed at which you take the picture The camera highlights both the aperture value and the shutter speed in red if they are not suitable for taking a picture If this happens release your finger press Down button to select the aperture value field or the shutter speed field and press Left Right button to adjust the ape...

Страница 42: ...witch for 2 seconds 2 Set the Camera in A S M mode Press OK Press MENU Press or Press MENU then Press MENU You can also adjust EV in the A S M mode by pressing the OK button to select the A S or M mode and then pressing the OK button again Press the Left and Right buttons to adjust EV and then press the Menu button to confirm your choice NOTE A higher EV value is best used for light coloured subje...

Страница 43: ...era by sliding and holding the Power Switch in the arrow direction shown near the switch for 2 seconds 2 Set the Camera in A S M mode White Balance WB Cloudy White Balance Press MENU then Press OK WB Auto Press or Press MENU Press MENU When shooting under these conditions Select this setting Normal conditions Camera adjusts white balance automatically Outdoor daylight Cloudy Indoors illuminated by...

Страница 44: ...ISO value allows higher shutter speed at the expense of mottled or grain appearing in the final picture You can change the ISO value according to the following steps 1 Turn on the camera by sliding and holding the Power Switch in the arrow direction shown near the switch for 2 seconds 2 Set the Camera in A S M mode Press Press Camera Menu ISO ISO Press MENU Press MENU 100 200 400 In the same light...

Страница 45: ...the switch for 2 seconds 2 Set the Camera in Video mode Press Shutter button to start Press Shutter button to stop Use the Video mode to record video clips with audio feature While recording the Operation LED blinks in green the icon turns to red and the recording time in seconds increases on the LCD screen NOTE Zoom feature is not available while recording a video clip Video clips are recorded in...

Страница 46: ...OTE The camera records video clips to the internal memory with one resolution setting of 320 x 240 pixels When a memory card is inserted for recording video clips two resolution settings of 640 x 480 and 320 x 240 pixels are available 1 Insert a SD card For a detailed guideline on memory card usage please see 6 Using the SD Secure Digital Card on page 56 2 Turn on the camera by sliding and holding...

Страница 47: ...o Quality Press Press MENU Press MENU Press or Video Menu On On On Below is the approximate length of video clips the camera may hold based on the 16MB internal memory Memory capacity may be expanded with a SD card Resolution 320 x 240 Fine Approx 2 0 minutes Normal Approx 2 9 minutes ...

Страница 48: ...yback modes will quickly switch the camera to the capture or video mode depending on where the Mode Dial is set Pressing Playback button again will turn off the camera Reviewing the Pictures 1 Turn on the camera by sliding and holding the Power Switch in the arrow direction shown near the switch for 2 seconds 2 Press the Playback button to activate the Playback mode 3 Press Left Right button to vi...

Страница 49: ...olding the Power Switch in the arrow direction shown near the switch for 2 seconds 2 Press the Playback button to activate the Playback mode 3 Press Zoom out button the thumbnail pictures will be shown on the LCD screen and the latest reviewed picture will be highlighted You may press Left Right button to select the thumbnail picture you want you review Press the Zoom out button and the camera wil...

Страница 50: ...e Playback mode Slide Show Slide Show Period 3 Sec Repeat On Set Play Set Repeat Off On 3 Sec Press OK Press MENU then Press OK Set Period Off 4 Sec Press MENU then and OK Press then and The slide show will automatically run from the first picture taken after you press the OK button The LCD screen can show all pictures at a period of 3 30 seconds You can press Left Right button to skip backward or...

Страница 51: ... to the capture or video mode depending on where the Mode Dial is set Pressing Playback button again will turn off the camera Playing the Video Clips 1 Turn on the camera by sliding and holding the Power Switch in the arrow direction shown near the switch for 2 seconds 2 Press the Playback button to activate the Playback mode 3 Use Left Right button to select the video clip you want to play 4 Pres...

Страница 52: ...current picture or video clip file To unprotect the protected picture or video clip please press the Mode button again and the icon will disappear from the LCD screen Deleting One Picture or Video Clip 1 Turn on the camera by sliding and holding the Power Switch in the arrow direction shown near the switch for 2 seconds 2 Press the Playback button to activate the Playback mode 3 Press the Left Rig...

Страница 53: ...ion shown near the switch for 2 seconds 2 Press the Playback button to activate the Playback mode Playback Menu Erase All Erase All OK Press OK Press OK Press OK No Image Erase All Press MENU Press then OK NOTE Protected files can not be deleted Remove protection before deleting You may cancel the deletion by pressing the MENU button All deleted picture and video clips can not be recovered ...

Страница 54: ...and PAL for Europe Asia excluding Taiwan etc You can choose the video output system according to the following steps 1 Turn on the camera by sliding and holding the Power Switch in the arrow direction shown near the switch for 2 seconds 2 Set the camera in Auto mode Press TV Output On NTSC PAL 1 Min TV Output On NTSC PAL 1 Min Press MENU then Press MENU Press or Setup Menu On NTSC Off Standard Sta...

Страница 55: ... to take on the TV screen 4 When the mode dial is turned to Video you can record a video clip with audio feature 5 When the camera is set to the Playback mode you can review all the pictures and video clips with audio feature stored in the camera on the TV NOTE One end of the video cable is a USB plug and the other end includes a video plug yellow and a audio plug white Please connect the USB plug...

Страница 56: ...portant data on other media MO disc computer hard drive etc 3 If a memory card starts to behave abnormally you can restore normal operation by reformatting it However we recommend that you always take along more than one memory card whenever using the camera far away from the home or office 4 We recommend that you format a memory card before using it for the first time after purchasing it or whene...

Страница 57: ...ry SD card cover as illustrated Insert the SD card ensuring the card is inserted correctly as illustrated Close the battery SD card cover Make sure that the terminal of the memory card is facing the front of the camera Notched corner of SD card Please note that the icon will appear on the LCD screen indicating the SD card insertion ...

Страница 58: ...r on the LCD screen indicating there is no memory card inserted in the camera IMPORTANT Never insert any other objects besides a SD memory card into the camera s card slot Doing so creates the risk of damaging the camera and card slot Make sure that the terminal of the memory card is facing towards the front of the camera Should water or any foreign objects ever get into the card slot immediately ...

Страница 59: ...to a memory card as follows Press Playback Menu Press OK Copy Card Copy Card OK Copy Card Press MENU Press or then OK You can press Left Right button to select the copy direction A status bar will appear on the LCD screen and the red part will increase while copying the pictures and video clips NOTE When there is no picture or video clip in the memory card or in the internal memory two beep sounds...

Страница 60: ... On Off Index Print OK Order Reset On Print Press MENU then Press OK then Use Left and Right buttons to select the picture you want to print out and use Up and Down buttons to select the number of printing copies for the selected picture The total number of printing copies will appear on the LCD screen You can select Reset to clear all setting in above operations Press Menu button to confirm your ...

Страница 61: ...mpatible printer or at a professional print service from the memory card in accordance with the file name and number of copies settings recorded on the card With this camera you should always select images by viewing them on the LCD screen Do not specify images by file name without viewing the file contents IMPORTANT DPOF print settings can be configured for images on a memory card only not for im...

Страница 62: ...ed them See the documentation that came with your printer for full details about PRINT Image Matching Now your digital camera and your printer can speak the same language PRINT Image Matching technology ensures that PRINT Image Matching enabled digital cameras and printers work together perfectly to produce the best possible prints Through this innovative technology the printer is able to instantl...

Страница 63: ...rmat On OK Format Media Format Media Press MENU then and NTSC Standard On 125 86MB Format On NTSC Standard On You may cancel formatting by pressing the MENU button in the above operation IMPORTANT You can format a memory card on the camera or on a computer However formatting a memory card on a computer takes much longer Note that data deleted by a format operation cannot be recovered Make sure you...

Страница 64: ...ed to use under English Windows OS IMPORTANT For Windows 98SE Windows 98SE needs to install the PDC 5350 Driver for Mass Storage function After the installation please restart the Windows before connecting the camera to the PC IMPORTANT For Windows Me 2000 XP Directly plug in the camera to transfer and play the pictures video clips or audio clips No need to install the driver IMPORTANT To play vid...

Страница 65: ...low the on screen instructions Open Close NOTE If the setup screen doesn t appear after loading the CD then you can manually start it by double clicking the My Computer Icon on your desktop then double clicking the icon for the CD ROM drive When the CD ROM window opens double click the INSTALL E EXE icon For Macintosh Users MAC 1 Before you begin close all other software applications opened on you...

Страница 66: ... and movie clips store in your camera You could also edit and retouch your photos then add special effects or place them in cards calendars frames and fantasy templates ArcSoft PhotoImpression also includes a wide variety of printing options QuickTime Player Media Playing Software The QuickTime Player is an easy to use application for playing interacting with or viewing any video audio VR or graph...

Страница 67: ...r XP Pentium II 333MHz or equivalent processor 64MB RAM 128MB recommended USB Port 200MB free disk space Colour monitor with high colour 16 bit graphic capability or higher CD ROM drive Standard mouse and keyboard Stereo speakers For Macintosh Users MAC PowerPC Processor Mac OS Version 9 2 X USB Port 64MB RAM 128MB recommended 150MB Free disk space Colour monitor with high colour 16 bit graphic ca...

Страница 68: ...ftware Onto a Computer on page 64 Connecting to Your Computer Connecting with the USB Cable 1 Turn the camera Off 2 Plug the labelled end of the USB cable into the socket marked on your computer 3 Plug the other end of the USB cable into the port on your camera 4 Turn on the camera and an interface New Hardware Found will show on the computer desktop 5 A removable disk drive will be installed onto...

Страница 69: ...em to a folder of your choice You can also create sub folders to group them or use the Arcsoft software to edit and manage the pictures or video clips For Macintosh Users MAC NOTE For MAC user directly plug in the camera no need to install the driver 1 Turn on the camera 2 Set the camera to Playback mode 3 Connect the camera to MAC via the USB cable the systems will automatically recognize the MAS...

Страница 70: ... remove it and it s driver completely from your system to avoid conflicting with your PDC 5350 I see the following error message during driver installation An error occurred during the move data process 115 Component WIN98 ICO File Group 98ICO File C Polaroid PDC 5350 driver installs second time Please remove the existing PDC 5350 driver first and install again Camera Driver is not installed You n...

Страница 71: ...ries are dead Recharge your battery LCD screen image is out of focus Macro Mode being used for scenery or portraits Or Normal focus being used for macro images Use normal focus for scenery and portraits Or Use Macro mode for macro images Recorded pictures are not saved in memory Camera powers off before the save operation is complete Or Removing the memory card before the save operation is complet...

Страница 72: ...amera I cannot erase pictures All the pictures in memory are protected Unprotected the pictures you want to delete LCD screen does not appear on the screen of the connected television There is a problem with the camera TV connection Or TV setup is wrong Or Video system is incompatible Use the supplied video cable to connect the camera to the TV Or Consult the documentation of the TV and set it to ...

Страница 73: ...ArcSoft China Support Centre Beijing ArcSoft Japan Support Centre Tokyo Tel 8610 6849 1368 Tel 81 03 3834 5256 Fax 8610 6849 1367 Fax 81 03 5816 4730 E mail china arcsoft com Web http www mds2000 co jp arcsoft E mail japan arcsoft com and support mds2000 com For Oceania For Europe Middle East ArcSoft Australian Support Centre Africa Rest of the World Baulkham Hills New South Wales ArcSoft Europe S...

Страница 74: ...res Normal Approx 23 pictures Resolution M2 1280 X 960 Fine Approx 40 pictures Normal Approx 48 pictures Resolution S 640 X 480 Fine Approx 129 pictures Normal Approx 160 pictures Still Image Quality Fine 5X compression rate Normal 10X compression rate Storable Video Clip Length Based on 16MB internal memory 320 x 240 pixels 20fps Fine Approx 2 0 minutes Normal Approx 2 9 minutes NOTE While the ca...

Страница 75: ... 60 CM The focusing range is the distance from the lens surface to the subject Built in Flash Flash Modes AUTO OFF ON Red eye reduction Slow sync Slow red eye Flash Range Wide 2 6 9 feet 0 8 2 7 metres Telephoto 2 6 6 7 feet 0 8 2 metres Low Battery indicator 3 levels Full Low and Exhausted Weight Approximately 174g excluding batteries Auto Power Off Off 1 10 minute s LCD Screen 1 5 TFT colour pan...

Страница 76: ...20 L 2560 x 1920 L 2560 x 1920 L 2560 x 1920 L 2560 x 1920 M1 2048 x 1536 M2 1280 x 960 S 640 x 480 M1 2048 x 1536 M2 1280 x 960 S 640 x 480 M1 2048 x 1536 M2 1280 x 960 S 640 x 480 M1 2048 x 1536 M2 1280 x 960 S 640 x 480 M1 2048 x 1536 M2 1280 x 960 S 640 x 480 170 220 310 440 750 900 2300 3100 8 11 16 23 40 48 129 160 17 24 40 50 90 100 260 330 40 50 85 110 185 215 560 700 82 107 152 217 375 45...

Страница 77: ... x 240 L 640 x 480 S 320 x 240 512MB L 640 x 480 S 320 x 240 L 640 x 480 S 320 x 240 2 0 minutes 1 6 minutes 4 2 minutes 3 3 minutes 8 3 minutes 6 5 minutes 18 9 minutes 13 2 minutes 38 5 minutes 26 3 minutes 77 minutes 1 0 minutes 109 minutes 2 9 minutes 2 0 minutes 5 8 minutes 4 0 minutes 11 9 minutes 8 1 minutes 26 9 minutes 33 minutes 54 7 minutes 16 5 minutes NOTE Scene complexity affects a p...

Страница 78: ... Add Remove 2 The following dialog box appears click OK to confirm removing the camera driver 3 The uninstallation program runs automatically please restart your computer when it is finished Using Your Battery WARNINGS Battery should be replaced by an adult Insert the battery with the correct polarity Remove exhausted battery from the camera immediately Do not short the supply terminals Do not dis...

Страница 79: ...s voltage which can be dangerous if live parts are exposed We recommend that you regularly examine the AC adaptor for any breakage NEVER try to repair or open the AC adaptor Camera Cautions NEVER immerse any part of the Camera or its accessories into any fluid or liquid ALWAYS disconnect the Camera from your PC or TV before cleaning it ALWAYS remove dust or stains with a soft cloth dampened with w...

Страница 80: ...quipment generates uses and can radiate radio frequency energy and if not installed and used in accordance with the instructions may cause harmful interference to radio communications However there is no guarantee that interference will not occur in a particular installation If this equipment does cause harmful interference to radio or television reception which can be determined by turning the eq...

Страница 81: ...UK 0604 Part No OM3238UK002 ...

Отзывы: