1. Package Contents
2. Physical Introduction
– 1 –
– 2 –
– 3 –
– 4 –
3. Hardware Installation
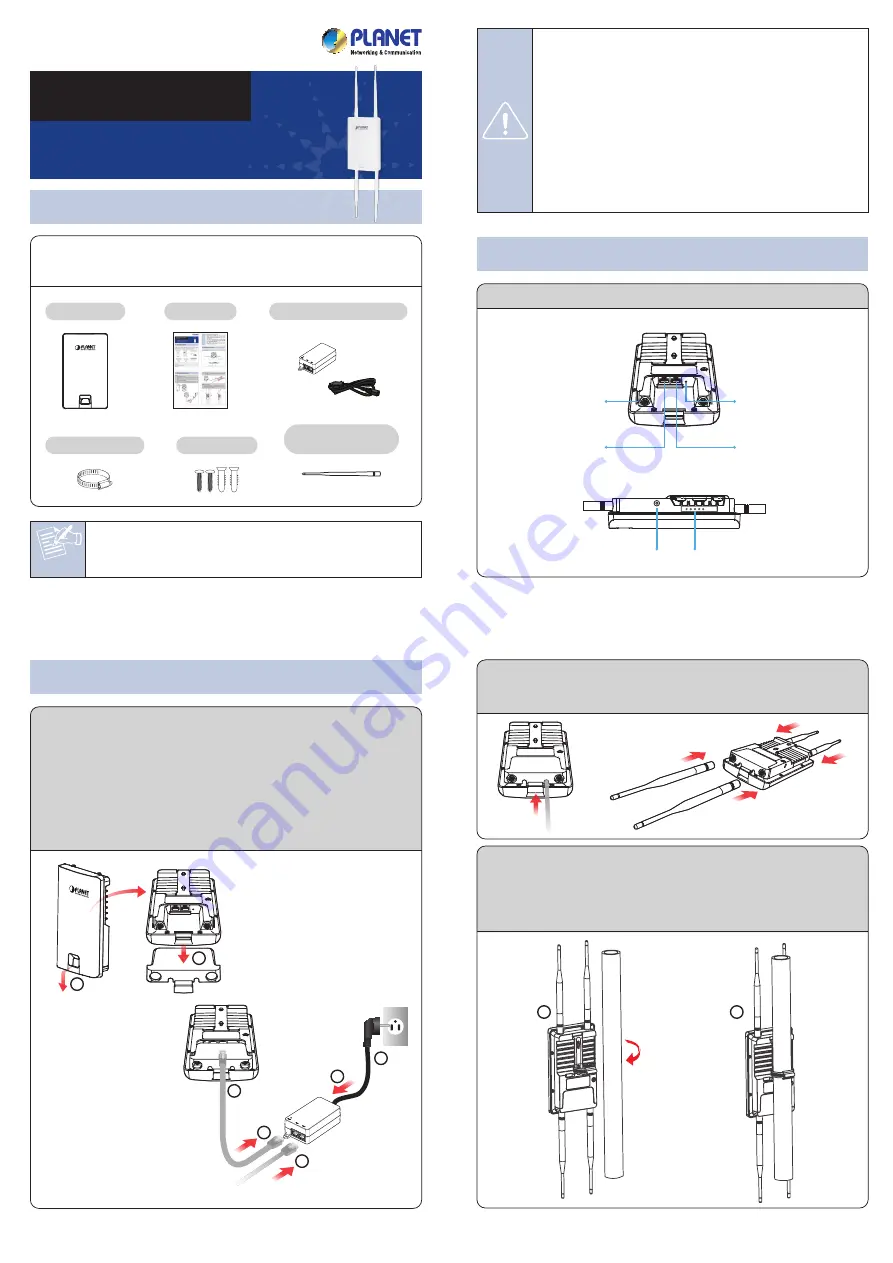
Hardware Description
2011-E10690-000
Step 1:
(1) Remove the bottom cover.
(2) Connect one end of the Ethernet cable into the LAN (Passive PoE)
port of the device and the other end to the PoE port on the PoE
Injector.
(3) Connect the power cord with the PoE Injector and plug the other
end into an electrical outlet.
(4) Connect the second Ethernet cable into the LAN port of the PoE
Injector and the other end to the Ethernet port on the computer.
WDAP-702AC
Quick Guide
Note
If there is any item missing or damaged, please contact the
seller immediately.
IMPORTANT SAFETY PRECAUTIONS:
1.
LIVES MAY BE AT RISK!
Please be aware of the
electrical wires around. Carefully read the section
"OUTDOOR INSTALLATION WARNING"
in the manual
before installation.
2. Users
MUST
complete grounding wired with the device;
otherwise, a sudden lightning could cause fatal damage
to the device.
EMD (Lightning) DAMAGE IS NOT
COVERED UNDER WARRANTY
.
3. Users
MUST
use the “PoE Injector and Power Cord”
shipped in the box with the device. Use of other options
will cause damage to the device.
Thank you for choosing PLANET Outdoor Wireless AP. Before installing,
please verify the contents inside the package box. The device mentioned
herein is the brief name of the "Outdoor Wireless AP/CPE".
WDAP-702AC
Quick Installation Guide
1200Mbps Dual Band 802.11ac
Outdoor Wireless AP
PoE Injector & Power Cord
2.4GHz Antenna x 2
5GHz Antenna x 2
Step 3:
Pole Mounting
(1) Thread the open end of the mounting ring through the tab on the
pole mounting bracket on the back of the device.
(2) Lock and tighten the mounting ring to secure the mounting bracket
to the pole to finish the installation.
– 5 –
– 6 –
– 7 –
– 8 –
Step 1:
The Web management allows you to access and manage the
device easily. Launch the Web browser and enter the default IP
address
“http://192.168.1.253”
.
Step 2:
When the login window appears, please enter the User Name
and the Password. The default User Name and Password are
both
“admin”
. Then click the
Login
button to continue.
For security reasons, it is recommended to change the password at the
first login and memorize it.
4. Web Login
1. Click the
“Start”
button located in the lower-left corner of your
computer.
2. Click
“Control Panel”
.
3. Double-click the
“Network and Sharing Center”
icon.
4. Click
“Change Adapter Settings”
.
5. Double-click
“Local Area Connection”
.
6. Select
“Internet Protocol Version 4 (TCP/IPv4)”
and click
“Properties”
.
7. Select
“Use the following IP address”
and then click the
“OK”
button twice to save the configuration. For example, you may choose
from 192.168.1.1 to 192.168.1.254 excluding the default IP address
of the device (192.168.1.253).
A computer with wired Ethernet connection is required for the first-time
configuration of the device.
Further Information:
The above steps introduce the simple installations and configurations of
the device. For further configurations, please refer to the user manual,
which can be downloaded from the website.
WDAP-702AC:
http://www.planet.com.tw/en/support/download.php?ty
pe1=4&model=48986&type=3
If you have further questions, please contact the local dealer or
distributor where you purchased this product.
Screw Set x 1
Mounting Ring x 1
Step 4:
Wall Mounting
(1) Mark the locations on the surface for the two mounting holes. Use
the appropriate drill bit to drill two holes with a diameter of 8.1mm
and depth of 26mm.
(2) Hammer the anchors into the holes until they are aligned to the
wall.
(3) Screw the screws into the anchors.
(4) Place the device against the wall with the mounting screw heads to
finish the installation.
Step 2:
Place the bottom cover back into the device and attach the
antennas onto the antenna connectors of the device to finish
the installation.
Default IP Address:
192.168.1.253
Default User Name:
admin
Default Password:
admin
Default 2.4GHz SSID:
PLANET_1-2.4GHz
Default 5GHz SSID:
PLANET_1-5GHz
Step 3:
After you enter into the Web User Interface, click
Wireless
on
the left hand side of the screen to configure the wireless
connection. Once the basic configuration of the device is done,
go to the
Changes
page to save and apply the changes.
1
1
3
2
1
RP-SMA Connector
LAN2
Reset Button
LAN1 (Passive PoE)
5GHz
2.4GHz
LAN 2
LAN 1
Power
LEDs
Grounding Terminal
1
2
4
2
3
3
2
4
To PC


