PLANAR LCD MONITOR
PV174 MANUAL
www.planar.com
Страница 1: ...PLANAR LCD MONITOR PV174 MANUAL www planar com...
Страница 2: ......
Страница 3: ...equency energy and if not installed and used in accordance with the instructions may cause harmful inerference to radio communications However there is no guarantee that interference will not occur in...
Страница 4: ...reen with a slightly dampened rag 2 Do not place your LCD monitor near a window Exposing the monitor to rain water moisture or sunlight can severely damage it 3 Do not place anything on top of the mon...
Страница 5: ...Video 4 Connecting the Stereo Speakers 4 Connecting USB Devices 5 Power Management System 5 CHAPTER 2 6 The Display Controls 6 LCD Monitor Control Panel 6 Adjusting the Display 6 OSD Main Menu Analog...
Страница 6: ......
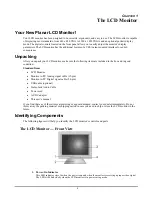
Страница 7: ...and in good condition Standard Items LCD Monitor Monitor to PC Analog signal cable 15 pin Monitor to PC Digital signal cable 24 pin USB cable optional Stereo Jack Audio Cable Power cord AC DC adapter...
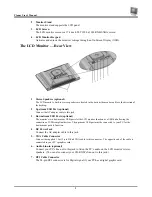
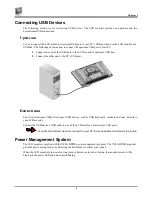
Страница 8: ...onal The monitor s two downstream USB ports let the LCD monitor function as a USB hub allowing the connection of USB compliant devices The upstream USB port must be connected to your PC for the downst...
Страница 9: ...cape to portrait To switch to the portrait mode tilt the monitor backwards and using both hands gently turn it 90 in a clockwise direction Forcing the monitor past its maximum extension can result in...
Страница 10: ...ed only 5 Tighten the connecting screws If both analog 15 pin D sub VGA and digital 24 pin DVI input ports are connected at the same time the signal input can be selected with the OSD On Screen Displa...
Страница 11: ...B port Downstream The two downstream USB ports connect USB devices such as USB keyboards scanners and mice directly to your LCD monitor Connect the USB device s USB cable to one of the LCD monitor s d...
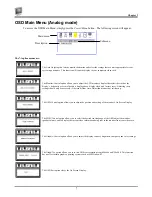
Страница 12: ...s you to increase the menu item value The button allows you to decrease the menu item value Adjusting the Display The LCD monitor features an intuitive menu driven On Screen Display OSD You can access...
Страница 13: ...ttings should only be necessary if the results from Auto Adjust function are not satisfactory The OSD Control option allows you to adjust the position and setting of the monitor s On Screen Display Th...
Страница 14: ...splay noise Clock Press the Adjust buttons to stabilize the display clock timing An improper clock setting will result in wide vertical bands on the display Reset Press the Adjust button to reset the...
Страница 15: ...desired sharpness setting Color Press the Adjust buttons to select the desired color temperature setting The available options are CIE coordinate values 9300 6500 Selecting the USER option allows for...
Страница 16: ...on allows you to adjust the display contrast brightness sharpness and color settings The OSD Exit option closes the On Screen Display The Monitor Control Option Pressing the Adjust key while the Monit...
Страница 17: ...displays the current resolution vertical refresh rate and monitor firmware version Exit Press the Adjust button to exit the Misc Control submenu Graphic Control Option Pressing the Adjust key while t...
Страница 18: ...ngle Horizontal 80 80 L R Vertical 80 80 U D Display Colors Dithering 16M Video Interface Analog port VGA Compatible Analog RGB 15 pin D Sub Separate Sync Composite Digital port DDWG compliant Single...
Страница 19: ...x600 36 00 56 25 35 16 A D 12 SVGA 800x600 40 00 60 32 37 88 A D 13 VESA 800x600 50 00 72 19 48 08 A D 14 VESA 800x600 49 50 75 00 46 88 A D 15 VGA 720x400 28 32 70 09 31 47 A 16 XGA 1024x768 65 00 60...
Страница 20: ...her Adjustment Control button until the lines disappear and you have a clear display PROBLEM There is no LCD Display If there is no display on the LCD refer to the following 1 Make sure that the power...