background image


46 


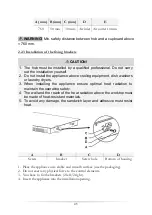
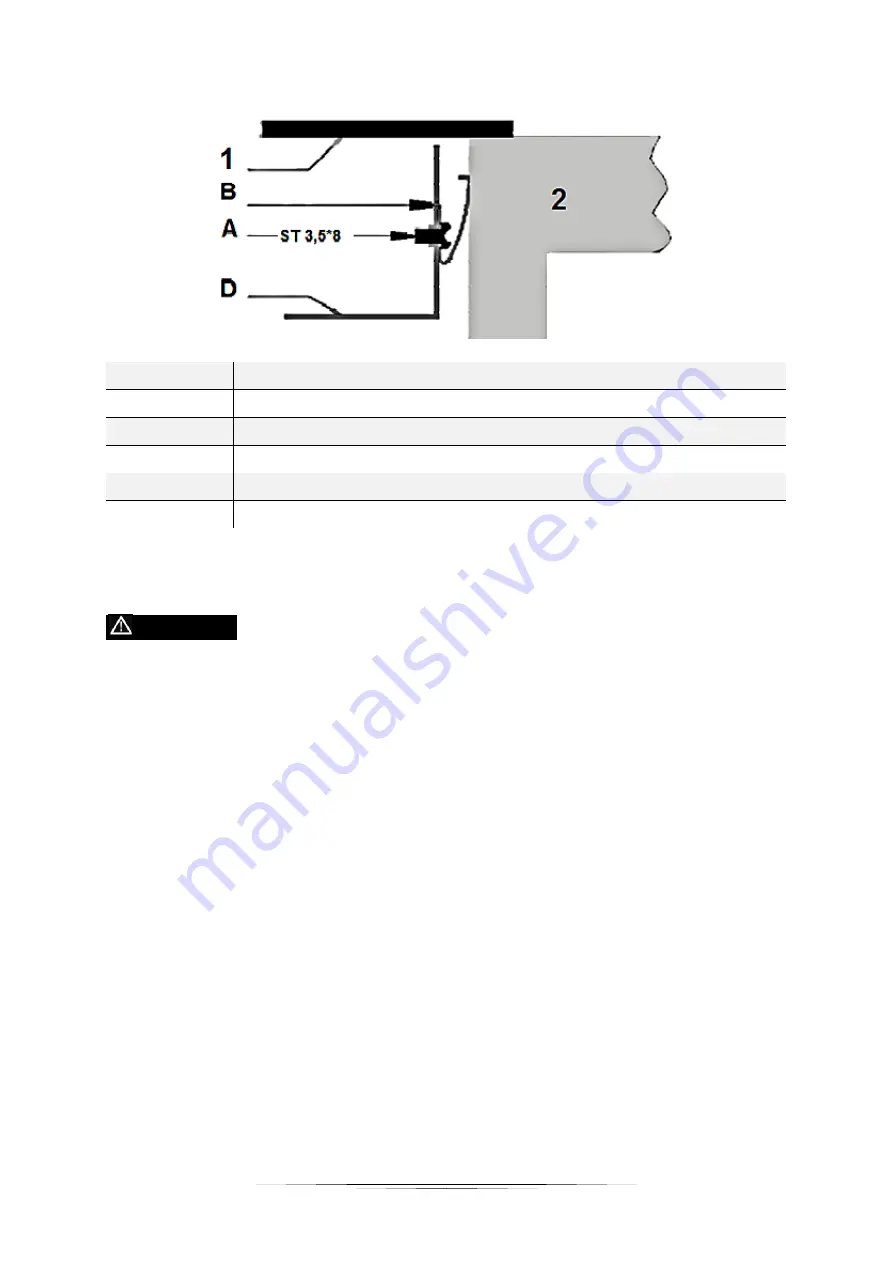
C

ERAMIC GLASS PANEL


W

ORKTOP


S

CREW


B

RACKET


S

CREW HOLE


B

OTTOM OF THE HOUSING


2.3 Electrical connection 


 DANGER!


All  electrical  work  must  be  carried  out  by  a  qualified 

professional.

 Do not modify the energy supply. The connection must be 

carried out in accordance with the current local and legal regulations. RISK 
OF ELECTRIC SHOCK!


1.


The appliance is equipped with a Schuko safety plug. Only use a Schuko safety 

plug and a properly-grounded safety socket for connecting the appliance to the 
mains. 

2.


Your  household  power  supply  must  meet  the  power  consumption  of  the 
appliance. 

3.


The voltage must meet the values on the nameplate. 

4.


The power cord must withstand the values on the nameplate. 

5.


When connecting do not use adapters, reducers and branching devices as they 
cause overheating. RISK OF FIRE! 

6.


The power cord must not touch hot areas and its temperature must not exceed 
75

0

 C. 

7.


When the socket is not accessible for the user, an all-pole disconnecting device 
must be incorporated during installation. Disconnecting devices are switches with 

a contact opening distance of  at least 3 mm. These include LS-switches, fuses and 
protectors  (EN  30335).  Read  the  information  on  the  nameplate  and  the 
connection diagram before connecting the appliance to the mains. The electricity 
supply  must  be  performed  via  a  16A  automatic  cut-out.  If   in  doubt,  always 

contact the local building authorities and consult the relevant legal provisions. 

Содержание IF 2

Страница 1: ...USHALT TECHNOLOGY FOR DOMESTIC USE 10 10 2019 Bedienungsanleitung Instruction Manual Induktionskochfeld Induction Hob IF 2 Deutsch Seite 2 English Page 35 Česky www pkm online de Slovensky www pkm online de www pkm online de ...

Страница 2: ...sungen 6 2 Installation 11 2 1 Entpacken und Wahl des Standorts 11 2 2 Einbau des Kochfelds 12 2 2 1 Anforderungen vor der Installation 12 2 2 2 Auswahl der Installationsumgebung 12 2 2 3 Befestigung der Halteklammern 14 2 3 Elektrischer Anschluss 15 3 Bedienung 16 3 1 Kochzonen und Bedienfeld 16 3 2 Bedienung der Sensoren 18 3 3 Geeignetes Kochgeschirr 18 3 4 Einen Kochvorgang beginnen 19 3 5 Nac...

Страница 3: ...se des Gerätes haben Entsorgen Sie das Verpackungsmaterial entsprechend den örtlichen Vorschriften Ihres Wohnorts Das von Ihnen gekaufte Gerät wurde möglicherweise inzwischen verbessert und weist somit vielleicht Unterschiede zur Bedienungsanleitung auf Dennoch sind die Funktionen und Betriebsbedingungen identisch sodass Sie die Bedienungsanleitung im vollen Umfang nutzen können Technische Änderun...

Страница 4: ...die zum Anschluss des Gerätes an die Stromversorgung notwendig sind dürfen nur von einer qualifizierten Fachkraft Elektrotechniker in durchgeführt werden Das Gerät ist ausschließlich zur privaten Nutzung bestimmt Das Gerät ist ausschließlich zum Kochen in einem Privathaushalt bestimmt Das Gerät ist ausschließlich zum Betrieb innerhalb geschlossener Räume bestimmt Dieses Gerät darf nicht für gewerb...

Страница 5: ...ochfelds kommen kann Konsultieren Sie den Hersteller des Herzschrittmachers oder Ihren Arzt um festzustellen ob der Herzschrittmacher diesen Bestimmungen entspricht oder es zu Störungen am Herzschrittmacher während des Betriebs eines Induktions Kochfelds kommen kann 1 1 Signalwörter GEFAHR verweist auf eine Gefahrensituation die wenn sie nicht abgewendet wird eine unmittelbare Gefährdung für Leben...

Страница 6: ...zlichen Verordnungen und die Zusatzvorschriften der örtlichen Stromversorgungsunternehmen genau kennt und sorgfältig beachtet 4 Schließen Sie das Gerät keinesfalls an die Stromversorgung an wenn das Gerät das Netzkabel oder der Netzstecker sichtbare Beschädigungen aufweisen 5 Versuchen Sie niemals selbst das Gerät zu reparieren Reparaturen die von dazu nicht qualifizierten Personen durchgeführt we...

Страница 7: ...ndeiner Fehlfunktion aufgrund eines technischen Defekts kommen trennen Sie das Gerät umgehend von der Stromversorgung entsprechende Haussicherung abschalten Melden Sie die Fehlfunktion ihrem Kundendienst damit diese umgehend behoben werden kann 7 Reparieren Sie das Gerät niemals selbst Reparaturen die von dazu nicht qualifizierten Personen durchgeführt werden können zu ernsthaften Verletzungen und...

Страница 8: ...rüber befindenden Dunstabzugshaube muss mindestens 760 mm betragen 20 Lagern Sie keine Gegenstände auf dem Kochfeld BRANDGEFAHR 21 Unbeaufsichtigtes Kochen mit Ölen und Fetten kann gefährlich sein und zu einem Feuer führen Versuchen Sie NIEMALS ein durch Öl oder Fett unterstütztes Feuer mit Wasser zu löschen Stattdessen schalten Sie das Gerät ab und ersticken Sie das Feuer mittels eines Deckels od...

Страница 9: ...nigen des Gerätes da diese die Oberfläche verkratzen und somit Risse im Glas verursachen 2 Schalten Sie das Kochfeld nicht an bevor Sie ein Kochgeschirr auf eine Kochzone gestellt haben 3 Schalten Sie die Kochzonen nach Benutzung immer mit den entsprechenden Sensoren des Bedienfelds aus Verlassen Sie sich nicht auf die Auto Erkennung1 nachdem Sie Ihr Kochgeschirr von den Kochzonen entfernt haben 4...

Страница 10: ...er reagieren in der Nähe des Gerätes Dazu gehören z B Kreditkarten Speicherkarten Computer MP3 Abspielgeräte etc 3 Stellen oder legen Sie keine schweren Gegenstände auf das Kochfeld 4 Benutzen Sie ausschließlich für Induktion geeignetes Kochgeschirr da Sie ansonsten das Gerät beschädigen 5 Das Gerät muss von mindestens zwei Personen transportiert und angeschlossen werden 6 Merken Sie sich die Posi...

Страница 11: ... Dunstabzugshaube muss mindestens 760 mm betragen VORSICHT Das Gerät darf nicht über Kühlgeräten Geschirrspülmaschinen und Wäschetrocknern installiert werden VORSICHT Lassen Sie das Gerät so installieren dass eine optimale Wärmeabstrahlung zur Aufrechterhaltung der Betriebssicherheit ermöglicht wird VORSICHT Die Wand und die Einflussbereiche der Wärmeabstrahlung oberhalb der Arbeitsplatte müssen h...

Страница 12: ...andabschlüsse wie Keramikfliesen für die das Kochfeld umgebende Wandoberfläche Schranktüren und Schubladen dürfen nicht mit dem Netzanschlusskabel in Kontakt kommen Das Gerät benötigt eine angemessene Frischluftzufuhr von außen zu seiner Unterseite Wenn das Gerät über einem Backofen installiert wird muss der Backofen über eine Gehäusekühlung verfügen Installieren Sie eine Thermalschutzsperre unter...

Страница 13: ...erden Der Lufteinlass D und Luftauslass E dürfen in keiner Weise blockiert sein Das Gerät muss sich immer im ordnungsgemäßen Zustand befinden Die obere Abschlusskante des Einbaumöbels X darf nicht direkt an die Einbauöffnung anschließen 1 Bringen Sie die Abschlusskante versetzt an 2 oder schrägen Sie die Abschlusskante ab 3 ...

Страница 14: ...assen Sie das Gerät so installieren dass eine optimale Wärmeabstrahlung zur Aufrechterhaltung der Betriebssicherheit ermöglicht wird 4 Die Wand und die Einflussbereiche der Wärmeabstrahlung oberhalb der Arbeitsplatte müssen hitzeresistent sein 5 Zur Vermeidung von Schäden müssen die Verbundschichten und Kleber hitzeresistent sein A B C D Schraube Klammer Schraubenloch Gehäuse Unterseite 1 Legen Si...

Страница 15: ...ßlich einen Schuko Stecker und eine ordnungsgemäß geerdete Sicherheits Netzanschlussdose 2 Ihr Hausstromnetz muss für die Leistungsaufnahme des Gerätes geeignet sein 3 Die Stromspannung muss den auf dem Typenschild angegebenen Werten entsprechen 4 Das Netzanschlusskabel muss den auf dem Typenschild angegebenen Werten widerstehen können 5 Verwenden Sie zum Anschluss keine Adapter Spannungsminderer ...

Страница 16: ...fall die örtlichen Baubehörde um Rat und informieren Sie sich über die entsprechenden Rechtsvorschriften 8 Das Netzanschlusskabel darf nicht geknickt oder gepresst werden 9 Überprüfen Sie das Netzanschlusskabel regelmäßig Das Netzanschlusskabel darf nur von einer qualifizierten Fachkraft Elektrotechniker in ausgetauscht werden 3 Bedienung 3 1 Kochzonen und Bedienfeld KOCHZONEN 1 Kochzone max 2000 ...

Страница 17: ...chen ist sicher fortschrittlich effizient und ökonomisch Elektromagnetische Schwingungen generieren die Hitze direkt im Kochgeschirr Die Glasplatte kann nur dann heiß werden wenn sie durch ein heißes Kochgeschirr aufgeheizt wird 1 Kochgeschirr 2 Magnetischer Energiekreislauf 3 Glaskeramikplatte 4 Induktionsspule 5 Induktionsstrom ...

Страница 18: ...nner Film aus Wasser kann die Benutzung der Sensortasten schwierig machen 3 3 Geeignetes Kochgeschirr Verwenden Sie nur Kochgeschirr das einen für Induktionskochen geeigneten Boden aufweist Achten Sie auf das Induktions Symbol auf der Verpackung oder dem Boden des Kochgeschirrs Sie können die Eignung des Kochgeschirrs mit einem Magneten überprüfen Wenn der Magnet am Boden des Kochgeschirrs haften ...

Страница 19: ...Kochfeld bewegen Schieben Sie es nicht über die Glaskeramik da Sie diese ansonsten verkratzen können 3 4 Einen Kochvorgang beginnen 1 Berühren Sie den AN AUS Sensor Nachdem Sie das Gerät eingeschaltet haben ertönt das akustische Signal einmal alle Anzeigen zeigen oder Das Gerät befindet sich im Standby Modus 2 Stellen Sie ein geeignetes Kochgeschirr auf die gewünschte Kochzone Die Unterseite des K...

Страница 20: ...hgeschirr verwenden findet keine Aufheizung statt Die Anzeige erlischt automatisch nach 1 Minute auch wenn Sie kein geeignetes Kochgeschirr auf die Kochzone gestellt haben 3 5 Nach Beendigung eines Kochvorgangs 1 Berühren Sie in der AUSWAHL DER KOCHZONEN den Sensor der Kochzone die Sie abschalten wollen 2 Schalten Sie nun die entsprechende Kochzone aus indem Sie sie mit dem Sensor auf 0 stellen Ac...

Страница 21: ...en 3 7 Übertemperaturschutz Ein Temperaturfühler überwacht die Temperatur im Inneren des Gerätes Das Gerät stellt seinen Betrieb automatisch ein wenn eine Übertemperatur diagnostiziert wird 3 8 Erkennen kleiner Gegenstände Wenn sich Kochgeschirr von ungeeigneter Größe oder Beschaffenheit z B Aluminium oder andere kleine Gegenstände wie Messer Gabeln etc auf dem Gerät befinden schaltet das Gerät na...

Страница 22: ...Sie können den Zeitwächter auch benutzen ohne dass dieser eine Kochzone nach Ablauf des eingestellten Zeitraums automatisch abschaltet Die maximal wählbare Zeitspanne beträgt 99 Minuten 2 Berühren Sie den TIMER Sensor das Display zeigt an 3 Stellen Sie die Zeit mit dem und Sensor ein Falls die gewählte Zeitspanne 99 Minuten überschreitet springt der Timer automatisch auf 0 a Berühren Sie oder einm...

Страница 23: ...er Wert wird um 10 Minuten erhöht vermindert 4 Berühren Sie den AUSWAHL DER KOCHZONEN Sensor und danach den TIMER Sensor wird der Timer gelöscht und 00 erscheint im Minuten Display 5 Nach dem Einstellen der Zeit beginnt der Countdown Das Display zeigt die verbleibende Zeit an und die Timeranzeige blinkt für 5 Sekunden 6 Der rote Punkt neben der Leistungsstärken Anzeige leuchtet auf um anzuzeigen d...

Страница 24: ...em dicken und geraden Boden kann bis zu einem Drittel an Energie sparen Decken Sie ihr Kochgeschirr ab wenn möglich andernfalls verbrauchen Sie das 4 fache an Energie Der Durchmesser des Kochgeschirrs sollte nicht kleiner als der Durchmesser des verwendeten Kochrings sein Sorgen Sie dafür dass die Kochzone und der Boden des Kochgeschirrs sauber sind Verunreinigungen können den Wärmeaustausch negat...

Страница 25: ...nötig ansteigen 5 Hinweise für das Kochen und Braten WARNUNG Lassen Sie beim Braten und Frittieren äußerste Vorsicht walten da Öle und Fette sehr schnell erhitzen besonders bei einer hohen Einstellung der Leistungsstärke Extrem heiße Öle und Fette entzünden sich spontan und stellen somit eine ernsthafte Brandgefahr dar WARNUNG Versuchen Sie NIEMALS ein durch Öl oder Fett unterstütztes Feuer mit Wa...

Страница 26: ...erem Boden 3 Reiben Sie beide Seiten des Steaks mit Öl ein Träufeln Sie eine kleine Menge an Öl in die heiße Pfanne und geben Sie dann das Fleisch in die Pfanne 4 Wenden Sie das Fleisch während der Zubereitung nur einmal Die genaue Garzeit hängt von der Dicke des Steaks sowie Ihrer persönlichen Vorliebe hinsichtlich des Garpunkts ab medium medium rare etc Die Garzeit kann also von 2 bis 8 Minuten ...

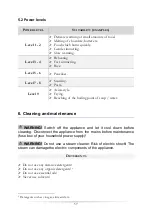
Страница 27: ... anbrennen Schonendes Köcheln Langsames Aufwärmen Stufe 3 4 Nachwärmen Schnelles Köcheln Reis kochen Stufe 5 6 Pfannkuchen Stufe 7 8 Sautieren Nudeln kochen Stufe 9 Anschwenken Anbraten Suppe zum Kochen bringen Wasser kochen 6 Reinigung und Pflege WARNUNG Schalten Sie das Gerät vor dem Reinigen unbedingt aus und lassen Sie es vollständig abkühlen Trennen Sie das Gerät vor allen Wartungsarbeiten vo...

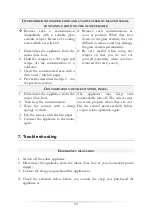
Страница 28: ...k am geeignetsten ART DER VERUNREINIGUNG VORGEHENSWEISE SICHERHEITSHINWEISE ALLTÄGLICHE VERUNREINIGUNGEN DER GLASKERAMIK FINGERABDRÜCKE FLECKEN DURCH LEBENSMITTEL ODER NICHT ZUCKERHALTIGE SPRITZER 1 Trennen Sie das Gerät von der Stromversorgung Haussicherung 2 Verwenden Sie einen geeigneten Glaskeramik Reiniger während die Glaskeramik noch warm aber nicht heiß ist 3 Mit einem weichen Tuch Küchenpa...

Страница 29: ...skeramik abkühlen können Sie nachher nur noch schwer zu entfernen sein und auch die Glaskeramik Oberfläche dauerhaft beschädigen Verwenden Sie den Glaskeramik Schaber äußerst vorsichtig damit Sie sich nicht an der Klinge schneiden besonders dann wenn Sie die Sicherheitsabdeckung zurückgeschoben haben VERUNREINIGUNGEN AUF DEN SENSORTASTEN 1 Trennen Sie das Gerät von der Stromversorgung Haussicherun...

Страница 30: ...2 Benutzen Sie die Fingerkuppe DIE GLASKERAMIK IST VERKRATZT 1 Sie haben ungeeignetes Kochgeschirr mit rauen und scharfen Kanten verwendet 1 Verwenden Sie für Glaskeramik geeignetes Kochgeschirr 2 Sie haben ungeeignete Reinigungsmittel wie z B Scheuermittel verwendet 2 Verwenden Sie für Glaskeramik geeignete Reinigungsmittel EINIGE PFANNEN TÖPFE ERZEUGEN KRACKENDE ODER KLICKENDE GERÄUSCHE 1 Diese ...

Страница 31: ...ER EINE KOCHZONE SCHALTET SICH UNERWARTET AB EIN AKUSTISCHES SIGNAL ERTÖNT UND ES WIRD EIN FEHLER KODE ANGEZEIGT3 MEIST ALTERNIEREND MIT EIN ODER ZWEI ZAHLEN AUF DEM TIMER DISPLAY 1 Technische Fehlfunktion 1 Schreiben Sie den Fehlercode auf trennen Sie das Gerät von der Stromversorgung und kontaktieren Sie das Geschäft in dem Sie das Gerät erworben haben Sollte das Gerät Störungen abweichend von d...

Страница 32: ...rbauelement zur Begrenzung des Laststroms 8 Technische Daten TECHNISCHE DATEN Gerätetyp Induktionskochfeld Bedienfeld Touch Control Material Glaskeramik Anzahl Kochzonen 2 Leistung Kochzonen 1 1500 W 1 2000 W Maximale Leistung 3500 W Eingangsspannung 220 240V AC Frequenz 50Hz Restwärmeanzeige Timer 99 Minuten Kabellänge 120 cm Heizstufen 9 pro Kochzone Abmessungen Aussägung B T in cm 26 80 50 00 E...

Страница 33: ...d danach das Stromanschlusskabel am Gerät abschneiden und direkt mit dem Netzstecker entfernen und entsorgen 4 Entsorgen Sie Papier und Kartonagen in den dafür vorgesehenen Behältern 5 Entsorgen Sie Kunststoffe in den dafür vorgesehenen Behältern 6 Falls es in Ihrem Wohnumfeld keine geeigneten Entsorgungsbehälter gibt bringen Sie diese Materialien zu einer geeigneten kommunalen Sammelstelle 7 Nähe...

Страница 34: ...Beschaffenheit die auf den Gebrauchswert des Produkts keinen Einfluss haben 3 Schäden infolge Betriebs und Bedienungsfehler 4 Schäden durch aggressive Umgebungseinflüsse Chemikalien Reinigungsmittel 5 Schäden am Produkt die durch nicht fachgerechte Installation oder Transport verursacht wurden 6 Schäden infolge nicht haushaltsüblicher Nutzung 7 Schäden die außerhalb des Gerätes durch ein PKM Produ...

Страница 35: ...lation 42 2 1 Unpacking and positioning 43 2 2 Installation 43 2 2 1 Ensure before the installation 43 2 2 2 Selection of installation equipment 43 2 2 3 Installation of the fixing brackets 45 2 3 Electrical connection 46 3 Operation 47 3 1 Hob and control panel 47 3 2 Use of the touch control 49 3 3 Suitable cookware 49 3 4 How to start cooking 50 3 5 How to stop cooking 51 3 6 Key lock 51 3 7 Ov...

Страница 36: ...l remain reserved by the manufacturer Please dispose of the packing with respect to your current local and municipal regulations The appliance you have purchased may be an enhanced version of the unit this manual was printed for Nevertheless the functions and operating conditions are identical This manual is therefore still valid Technical modifications as well as misprints shall remain reserved E...

Страница 37: ...nce is intended for private use only The appliance is intended for cooking in a private household only The appliance is intended for indoor use only The appliance is not intended to be operated for commercial purposes during camping and in public transport Operate the appliance in accordance with its intended use only Do not allow anybody who is not familiar with this instruction manual to operate...

Страница 38: ...tructions DANGER To reduce the risk of electrocution 1 Non compliance of the orders of this instruction manual will endanger the life and health of the operator and or can result in damages to the appliance 2 The appliance must be connected to the mains by a qualified professional who is familiar with and adheres to the local requirements and supplementary regulations of your energy supplier 3 All...

Страница 39: ...al 6 In case of an event caused by a technical malfunction disconnect the appliance from the mains Report the malfunction to your service centre so it can be repaired 7 Do not repair the appliance yourself Repairs carried out by unauthorised persons can cause serious damage Always contact the nearest service centre Only original spare parts should be used for repairs 8 Do not use adapters multiple...

Страница 40: ... touch the hob as the insulation material is usually not heat resistant 24 Never use a steam cleaner to clean the appliance The steam will cause serious damage to the electric components of the appliance RISK OF ELECTRICAL SHOCK 25 Never touch the cooking zones while the residual heat indicator is still on RISK OF BURNS 26 The accessible parts of the appliance become hot during operation so keep c...

Страница 41: ...se of the heat transferred by the heated food Potholders or oven gloves may be needed to handle such utensils 10 The blades of scrapers for cleaning an induction hob are very sharp Do not cut yourself especially when you have removed the safety cover of the scraper 11 Metal made items such as knives forks spoons and pan lids should not be put on the appliance because they may become hot 12 This ap...

Страница 42: ... warranty become invalid 2 Installation DANGER All electrical work must be carried out by a qualified professional Do not modify the energy supply The connection must be carried out in accordance with the current local and legal regulations RISK OF ELECTRIC SHOCK WARNING The safety distance between the hob and a wall cupboard above should be at least 760 mm WARNING The safety distance between the ...

Страница 43: ... the installation area The installation must meet the safety requirements as well as the legal rules and regulations The wall sat the hob should be covered with heat resistant material e g ceramic tiles The power cable must not come into contact with cabinet doors or drawers The appliance must be supplied with an adequate flow of fresh air from outside the cabinet to the base of the hob If the hob...

Страница 44: ...tilated properly The air inlet D and outlet E must never be blocked or covered Always keep the appliance in proper condition The top closing edge of the cabinet X must not be flush with the installation opening 1 Install the closing edge in offset positioning 2 or bevel the closing edge 3 ...

Страница 45: ...dry dryers 3 When installing the appliance ensure optimal heat radiation to maintain the operating safety 4 The wall and the reach of the heat radiation above the worktop must be made of heat resistant materials 5 To avoid any damage the sandwich layer and adhesive must resist heat A B C D Screw bracket Screw hole Bottom of housing 1 Place the appliance on a stable and smooth surface use the packa...

Страница 46: ...lues on the nameplate 4 The power cord must withstand the values on the nameplate 5 When connecting do not use adapters reducers and branching devices as they cause overheating RISK OF FIRE 6 The power cord must not touch hot areas and its temperature must not exceed 750 C 7 When the socket is not accessible for the user an all pole disconnecting device must be incorporated during installation Dis...

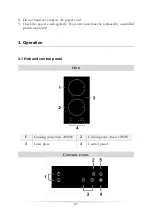
Страница 47: ...cord 9 Check the power cord regularly The power cord must be replaced by a qualified professional only 3 Operation 3 1 Hob and control panel HOB 1 Cooking zone max 2000 W 2 Cooking zone max 1500 W 3 Glass plate 4 Control panel CONTROL PANEL ...

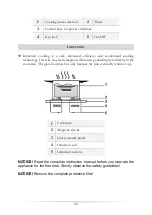
Страница 48: ...ectromagnetic vibrations generating heat directly in the cookware The glass becomes hot only because the pan eventually warms it up 1 Cookware 2 Magnetic circuit 3 Glass ceramic panel 4 Induction coil 5 Induction current NOTICE Read the complete instruction manual before you operate the appliance for the first time Strictly observe the safety guidelines NOTICE Remove the complete protective film ...

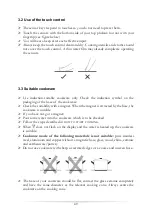
Страница 49: ...Check the suitability with a magnet When the magnet is attracted by the base the cookware is suitable If you have not got a magnet Pour some water into the cookware which is to be checked Follow the steps described in HOW TO START COOKING When does not flash on the display and the water is heated up the cookware is suitable Cookware made of the following materials is not suitable pure stainless st...

Страница 50: ...ounds once the display indicates or The appliance is in stand by mode now 2 Place a cookware on the desired cooking zone Always keep the bottom of the cookware as well as the cooking zone clean and dry 3 Select the power level by touching the SELECTION OF COOKING ZONE sensor The indicator flashes 4 Set the power level with the and sensor 5 When you do not set a power level within 1 minute the appl...

Страница 51: ...ant cooking zone by setting the sensor to 0 Check that the indicator displays 0 and then H 3 Switch off the appliance with the ON OFF sensor 4 Beware of the hot surfaces of the cooking zones An H indicates which cooking zones are still hot The H disappears as soon as the relevant cooking zone has cooled down You can use the residual heat for saving energy when starting a new cooking procedure on a...

Страница 52: ...g aluminium or small objects like knives forks etc are placed on a coking zone the appliance will turn into stand by mode automatically after 1 minute The fan will keep cooling down the appliance for another minute 3 9 Automatic switch off The automatic switch off represents another safety component of your appliance The automatic switch off is activated when you forgot to switch off a cooking zon...

Страница 53: ...1 minute b Hold to increase decrease the value by 10 minutes 4 Touch the TIMER sensor again to cancel the timer The display indicates 00 5 When you have finished the setting the count down of the set time starts The display indicates the remaining time The timer indicator flashes for 5 seconds 6 When the set time has elapsed an acoustic signal sounds for 30 seconds The timer indicates MODE 2 AUTOM...

Страница 54: ...as elapsed the relevant cooking zone is switched off automatically WARNING Other cooking zones will keep operating if they have been turned on previously MODE 3 AUTOMATIC SWITCH OFF FUNCTION OF MORE THAN ONE COOKING ZONE 1 When operating more than one cooking zone automatically the system displays the smallest value For Example If you have set cooking zone one to 6 minutes and cooking zone two to ...

Страница 55: ...ooking times Select a high power level when you start cooking Reduce the power level when your food has been heated up For long cooking times Switch off the cooking zones 5 to 10 minutes before you will finish cooking This saves up to 20 of energy You can use the residual heat of the cooking zones for saving energy when starting a new cooking procedure on a cooking zone which is still warm hot Do ...

Страница 56: ... heavy base 3 Rub both sides of the steak with oil Drizzle a small amount of oil into the hot pan and place the steak into the pan 4 Turn the meat just once while cooking The exact cooking time depends from the size of your steak and your individual preferences medium medium rare etc So the cooking time of each side may vary from 2 to 8 minutes Press the steak to check the cooking result a firm st...

Страница 57: ...he boiling point of soup water 6 Cleaning and maintenance WARNING Switch off the appliance and let it cool down before cleaning Disconnect the appliance from the mains before maintenance fuse box of your household power supply WARNING Do not use a steam cleaner Risk of electric shock The steam can damage the electric components of the appliance DETERGENTS Do not use any abrasive detergents Do not ...

Страница 58: ...N SUGARY SPILLAGES 1 Disconnect the appliance from the mains fuse box 2 Use a suitable detergent for glass ceramic while the glass ceramic is still warm but not hot 3 Clean with a soft cloth kitchen paper and water then dry carefully 4 Connect the appliance to the mains again While the appliance is disconnected from the mains the residual heat indicator does not work so the cooking zones may be st...

Страница 59: ...anently Be very careful when using the scraper so that you do not cut yourself especially when you have removed the safety cover CONTAMINATION OF THE CONTROL PANEL 1 Disconnect the appliance from the mains fuse box 2 Take away the contamination 3 Wipe the sensors with a damp sponge or cloth 4 Dry the sensors with kitchen paper 5 Connect the appliance to the mains again The appliance may beep and a...

Страница 60: ...able detergent e g an abrasive 2 Use suitable detergents SOME COOKWARE MAKE CRACKING OR CLICKING NOISE 1 Your cookware is produced with layers made of different kinds of metal 1 This is normal for such a cookware and does not indicate a malfunction THE APPLIANCE MAKES HUMMING NOISE WHEN USED ON A HIGH HEAT SETTING 1 Caused by induction cooking 1 Normal operating condition but the noise should decr...

Страница 61: ...hased the appliance at If the appliance has a malfunction not noted on the schedule above or if you have checked all items on the above schedule but the problem still exists please contact the customer service 7 1 Error codes CODE POSSIBLE CAUSES MEASURES F3 F4 Temperature sensor of the induction coil is defective Contact the customer service F9 FA Temperature sensor of the IGBT Contact the custom...

Страница 62: ...mum power 3500 W Voltage 220 240V Frequency 50Hz Residual heat indicator Power levels 9 per cooking zone Power cable 120 cm Timer 99 minutes Dim installation opening B T in cm 26 80 50 00 Installation depth in cm 5 80 Dim installation H B T in cm 6 00 28 80 52 00 Weight net gross in kg 4 40 5 80 Technical modifications reserved According to Regulation EU No 65 2014 ...

Страница 63: ...ff the entire power cord Dispose of the power cord and the plug immediately 4 Dispose of any paper and cardboard into the corresponding containers 5 Dispose of any plastics into the corresponding containers 6 If suitable containers are not available at your residential area dispose of these materials at a suitable municipal collection point for waste recycling 7 Receive more detailed information f...

Страница 64: ...eir authorised condition if they do not influence the utility value of the product 3 damage caused by handling errors or false operation 4 damage caused by aggressive environmental conditions chemicals detergents 5 damage caused by non professional installation and haulage 6 damage caused by non common household use 7 damages which have been caused outside the appliance by a PKM product unless a l...

Страница 65: ...inden alle Informationen zum Kundendienst auf der Einlage in dieser Bedienungsanleitung Aftersales service information on the leaflet inside this instruction manual Änderungen vorbehalten Subject to alterations STAND UPDATED 10 10 2019 10 10 2019 PKM GmbH Co KG Neuer Wall 2 47441 Moers ...

Отзывы: