Page 4
For technical questions, please call 1-888-866-5797.
Item 61600
4. Turn the other two Legs (8) so that their
closed ends with holes also face up.
5. Connect the Lower Braces (9) to the
other two Legs’ (8) lower holes.
**
6. Use the other Lower Brace (9)
to connect those two Legs’ (8)
other lower holes.
**
7. Connect the Upper Braces (16) to the
other two Legs’ (8) middle holes.
**
8. Use the other Upper Brace (16)
to connect those two Legs’ (8)
other middle holes.
**
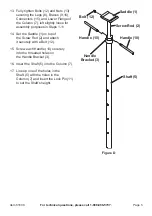
9. Attach a Connector (15) to the upper
hole on the side of each Leg (8),
as shown. Install the Connectors
with their short ends horizontal.
**
Legs (8)
Connectors
(15)
Upper
Braces (16)
Lower
Braces (9)
Figure B
10. Set the Column (7) with its Upper
and Lower Flange in place on
the assembled base as shown.
Make sure it is aligned properly.
11. Secure the Lower Flange of the
Column (7) to the tops of the
Connectors (15) using three Bolts (12),
Washers, and Nuts.
**
12. Secure the Upper Flange of the
Column (7) to the tops of the Legs (8)
using three
Bolts (6)
, Washers, and
Nuts. Fully tighten this hardware
while holding the Legs (8) or clocking
them in position so that they are not
twisted relative to the Column (7) Upper
Flange when the hardware is tight.
Bolts (6)
Bolts (12)
Nuts (13)
Column (7)
(Lower
Flange)
Washers (14)
Column (7)
(Upper
Flange)
Nuts (13)
Figure C

