background image

Checking the MAC address for wired and wireless 

networks

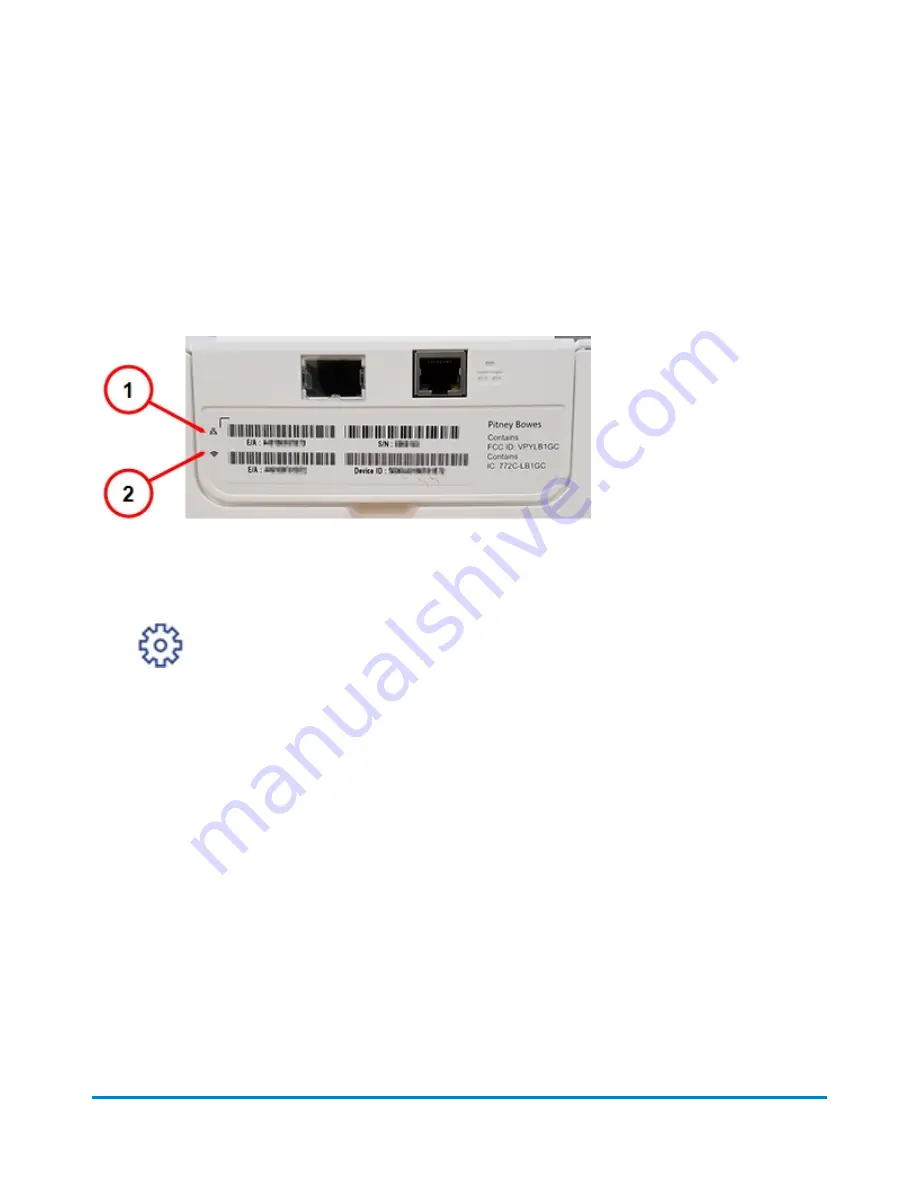
A MAC address is a hardware identification number that uniquely identifies each device on a network. 
Your device uses separate MAC addresses for wired and wireless connections. On the back of the 
device, you'll find both the wired (1) and wireless (2) MAC addresses on a sticker under the LAN port.

To view the current MAC address of a connected device:

 1.  Tap 

Settings

 2.  Tap the right arrow to advance to the next page.

 3.  Tap the right arrow to advance to the next page.

 4.  Tap 

About Device

 5.  Tap the right arrow to advance to the next page.

 6.  The MAC address displayed is based on the current connectivity type of the unit (wired vs 

wireless). If your device is not connected to a network, this field will be blank.

Setting up a proxy server

A proxy server is a computer that acts as a gateway between your local network (and your  device) and 
a larger-scale network (such as the internet). Proxy servers provide increased performance and 
security.

Connectivity

Pitney Bowes

User Guide

October 2021

28

Содержание SendPro Mailstation

Страница 1: ...Shipping Mailing Postage Meters SendPro Mailstation User Guide US English Edition SV63352 Rev E October 07 2021 ...

Страница 2: ...f intellectual property rights of Pitney Bowes and Pitney Bowes assumes no responsibility for any such use of the information We have made every reasonable effort to ensure the accuracy and usefulness of this manual However we cannot assume responsibility for errors or omissions or liability for the misuse or misapplication of our products Except as provided in writing duly signed by an officer of...

Страница 3: ...anuary 2021 Added Priority and Certified Mail advancing correcting and omitting the date and postage correction SV63352 Rev D May 2021 Reorganized table of contents edited topics for clarity SV63352 Rev E October 2021 Edited topics for clarity Other Resources This section identifies other resources that may be helpful when working with the SendPro Mailstation Related Documentation Refer to the Sen...

Страница 4: ...nection 25 Advanced installation requirements 26 Checking the MAC address for wired and wireless networks 28 Setting up a proxy server 28 4 Postage Funding Adding postage 31 Changing your USPS payment method 31 Receiving postage refill receipts by email 32 Transferring funds from an older meter to SendPro Mailstation 32 5 Scales and Weighing Connecting the scale 35 Zeroing the scale 36 Using the s...

Страница 5: ...inting a date correction 47 Printing a prepaid return envelope 47 Printing reports 47 8 Settings Creating a security PIN 49 Changing your security PIN 49 Disabling the security PIN 49 Updating the ZIP Code 50 Omitting the date 50 Advancing the date 51 Clearing or resetting the piece count 51 9 Maintenance Replacing the ink cartridge 53 Moving your SendPro Mailstation 54 10 Rate Change Updating and...

Страница 6: ...11 Accounting Enabling Cost Accounting 58 Adding a cost account 58 Setting the default cost account 58 12 Safety Safety information 61 Pitney Bowes User Guide October 2021 6 ...

Страница 7: ...1 Product Information In this section Parts of the machine 8 Navigating the Home screen 9 Connections on the back of the device 10 Material specifications 10 ...

Страница 8: ...ption 1 Printer tray 2 Ink access cover 3 Touchscreen display 4 Scale may be positioned left right or behind the device on the optional stand 5 Power button and indicator lamp Product Information Pitney Bowes User Guide October 2021 8 ...

Страница 9: ...es the starting point for printing postage Item Description 1 Mail type 2 Weight received from the scale Tap here to enter weight manually 3 Postage balance Tap here to refill postage 4 Settings 5 Cost Account optional Product Information Pitney Bowes User Guide October 2021 9 ...

Страница 10: ... is inactive and will not support any devices 3 AC power cable connection Use only the provided power cable 4 USB port cover 5 RJ45 Ethernet port for a LAN connection Material specifications l Width 3 5 13 in l Length 5 15 in l Thickness 0 0 375 in l Weight 0 13 oz Product Information Pitney Bowes User Guide October 2021 10 ...

Страница 11: ...Caution Envelopes with protruding bumps or embossed surfaces should not be placed into the device Product Information Pitney Bowes User Guide October 2021 11 ...

Страница 12: ...2 Installation In this section Installing the SendPro Mailstation 13 ...

Страница 13: ...l your device Before you begin installing your new SendPro Mailstation you must decide how you plan to pay for postage and what type of connection wired or wireless you wish to use In addition you must gather account and password information Choose your postage payment method Pitney Bowes offers different options to pay for postage for mailing Decide how you wish to fund postage on your SendPro Ma...

Страница 14: ...ail address and password that you use to sign into Your Account on Pitney Bowes l During the installation you can create a new email address and account instead of using an existing one l Find the ZIP Code for the location where you plan to install the device Open the box This diagram lists the items you should find in your box If anything is missing contact Pitney Bowes Installation Pitney Bowes ...

Страница 15: ...Unpack the device a Remove all tape Installation Pitney Bowes User Guide October 2021 15 ...

Страница 16: ... the cover Warning Do not install the ink now You will get the Install ink cartridge prompt later in the installation process Select network connection type a Connect the device to a wall outlet Installation Pitney Bowes User Guide October 2021 16 ...

Страница 17: ...vice o Tap Advanced Network Options o Tap Connect e Tap Continue when you see a Connected to Network message Set up your PB com account a Tap Enter email address l Enter the email you use to log in to Your Account l If you don t have Your Account set up enter your email address to create an account b Tap Next c Follow the prompts to enter your password d Tap Confirm to confirm your email and passw...

Страница 18: ...k cartridge and run a test pattern a Remove the ink cartridge from its container Remove the orange sticker from the bottom of the ink cartridge b Open the ink door Installation Pitney Bowes User Guide October 2021 18 ...

Страница 19: ...artridge in at an upward angle then firmly press it up until it clicks into place d After you click the ink cartridge into place close the ink door e Tap Continue Installation Pitney Bowes User Guide October 2021 19 ...

Страница 20: ...t The device clamps the letter and prints postage The power button flashes while the device prints g When the test print envelope is released by the device compare the printed test pattern to the ones on the screen h Tap Good Test Print if the test pattern looks good i Tap Continue Installation Pitney Bowes User Guide October 2021 20 ...

Страница 21: ...Install the scale a Open the door on the right side of the device to access the USB port b Connect the USB cable to the device Installation Pitney Bowes User Guide October 2021 21 ...

Страница 22: ...ice ii Make sure the scale stand slides along to the left side of the bottom of the device iii Slide the scale into the pegs on the scale stand l Option 2 install the scale on either side of the device i Respond to the prompts on the display to complete the scale installation Installation Pitney Bowes User Guide October 2021 22 ...

Страница 23: ...unt c Tap Add Postage Your SendPro Mailstation is ready for use Related articles l If you get the message No payment method found when you try to add postage see No payment method found error on the SendPro Mailstation l Transferring funds from an older meter to SendPro Mailstation l Advanced connectivity requirements for SendPro Mailstation Installation Pitney Bowes User Guide October 2021 23 ...

Страница 24: ...section Setting up a wireless Wi Fi network connection 25 Setting up a wired network connection 25 Advanced installation requirements 26 Checking the MAC address for wired and wireless networks 28 Setting up a proxy server 28 ...

Страница 25: ... Network 7 Choose your Wi Fi network from the list If your Wi Fi network is hidden tap Join Other Network 8 Enter your Wi Fi password then tap Next 9 Tap Connect 10 Tap Continue Setting up a wired network connection Set up a wired connection when you connect your device to your network with an Ethernet cable 1 Tap Settings 2 Tap Network Settings 3 Tap Change Network Settings 4 Tap Wired 5 Tap Adva...

Страница 26: ...on supports l IEEE 802 11b g n 2 4GHz networks l 802 11a n 5GHz wireless networks SendPro Mailstation does not support l 802 1X networks that require enterprise or domain authentication l Public or Guest networks with a web page login Port and communication requirements This device uses only outbound communications through the network to minimize threats to your network and increase the ease of mo...

Страница 27: ... recommend these FQDN s are left open for the device to function If possible please use this wildcard string l sl pb com If it is not possible to use the wildcard please allow access to the following l upgrades sl pb com l imp sl pb com l agent sl pb com l slpb us east 1 imp csd01a boxen sl pb com l slpb us east 1 imp csd02a boxen sl pb com l slpb us east 1 imp csd03a boxen sl pb com l slpb us eas...

Страница 28: ... 2 Tap the right arrow to advance to the next page 3 Tap the right arrow to advance to the next page 4 Tap About Device 5 Tap the right arrow to advance to the next page 6 The MAC address displayed is based on the current connectivity type of the unit wired vs wireless If your device is not connected to a network this field will be blank Setting up a proxy server A proxy server is a computer that ...

Страница 29: ... the device should use to send network traffic to the proxy server 9 If your Proxy Server requires authentication select the Need Authentication check box and fill in the additional fields a Enter the Proxy Username This may be case sensitive for some proxy servers b Enter the Proxy Password This is case sensitive for proxy servers 10 Tap Next then tap Connect 11 When the device connects to the ne...

Страница 30: ...4 Postage Funding In this section Adding postage 31 Changing your USPS payment method 31 Receiving postage refill receipts by email 32 Transferring funds from an older meter to SendPro Mailstation 32 ...

Страница 31: ... payment method depends on which method you currently use l Credit card l Purchase Power l Reserve Account Credit card If you currently use a credit card as your postage payment method for SendPro Mailstation and you wish to l change to a different credit card or l update your credit card information then you can make these changes in SendPro Online See Changing your USPS payment method in SendPro...

Страница 32: ...to On 6 Optional To add additional emails for notification when a postage refill is set to occur go to SendPro Online on a computer a Select Settings Postage Refills b Enter the email address in the Postage Refill Email field Transferring funds from an older meter to SendPro Mailstation If you upgrade to a SendPro Mailstation from an older meter such as a DM100i DM225 meter follow these steps to r...

Страница 33: ...your old meter the funds return to your original payment method within 24 hours Step 2 Add funds to your SendPro Mailstation Follow the procedure to add funds from your Pitney Bowes account to your SendPro Mailstation l Adding postage to the SendPro Mailstation Postage Funding Pitney Bowes User Guide October 2021 33 ...

Страница 34: ...5 Scales and Weighing In this section Connecting the scale 35 Zeroing the scale 36 Using the scale 36 Entering weight manually 36 ...

Страница 35: ...e cover allowing the cable to run through the channel under the cover 3 Position the scale on the left or right side of the device use the guide pins to hold the scale in place or place the scale on the optional stand behind the device Scales and Weighing Pitney Bowes User Guide October 2021 35 ...

Страница 36: ... video or follow the instructions below to learn how to use the scale You can use the scale with the deck flipped vertically or horizontally 1 Place the letter on the scale 2 The device will display the weight Entering weight manually 1 Tap the Weight section of the Home screen 2 Enter the weight using the number pad 3 Tap Apply Scales and Weighing Pitney Bowes User Guide October 2021 36 ...

Страница 37: ...6 Mailing In this section Sections of the Mailstation stamp 38 Switching between envelope types 39 Sending Certified Mail 40 Sending international mail 41 Sending Priority Mail 42 ...

Страница 38: ... stamp contains elements that identify the mailer and the type of mail First Class Mail 1 Postage amount 2 Postal inscription and class 3 Meter serial number 4 ZIP Code of the machine 5 Datamatrix barcode 6 Date Mailing Pitney Bowes User Guide October 2021 38 ...

Страница 39: ...e mailpiece 4 Meter serial number 5 Datamatrix barcode contains tracking information 6 ZIP Code of the machine 7 Date Switching between envelope types Tap the top of the display to switch between Letter Large Envelope and Postcard Size standards for First Class Mail l Letter o Minimum 3 5 x 5 o Maximum 6 125 x 11 5 Mailing Pitney Bowes User Guide October 2021 39 ...

Страница 40: ...ding Certified Mail You can use your SendPro Mailstation device to send Certified Mail 1 Tap the button on your Home screen to add extra services 2 Tap Certified Mail or Certified Mail Return Receipt 3 To change your Extra Services selection tap the pencil button Mailing Pitney Bowes User Guide October 2021 40 ...

Страница 41: ...turn Receipt The Certified Mail stamp has a larger barcode than the regular First Class stamp Sending international mail To send international mail you must set the destination country 1 Place your envelope on the scale or enter the weight manually 2 Tap the Destination area of the screen 3 Using the on screen keyboard type the first letter of the destination country then tap Search 4 Select the c...

Страница 42: ...ilstation at full retail cost or print a label from SendPro Online at a 40 discount SendPro Mailstation 1 Tap the mail type in the Home screen until you reach Priority Mail 2 Select your package type 3 Enter the destination ZIP Code 4 Insert the letter into the device pushing in all the way to the back and right The device will clamp the letter and print postage The power button will flash while t...

Страница 43: ...PORTANT Depending on the packaging you select you will need one of the following l Flat Rate envelope or box from the Post Office l USPS label 400 available from the Post Office l USPS Label 888 PB available in the PB com Supplies Shop Mailing Pitney Bowes User Guide October 2021 43 ...

Страница 44: ...7 Printing In this section Printing postage 45 Printing a USPS shipping label 45 Printing additional postage 46 Printing a date correction 47 Printing a prepaid return envelope 47 Printing reports 47 ...

Страница 45: ... device will clamp the letter and print postage The power button will flash while the device is printing 5 When the device finishes printing remove the letter Do not pull the letter out of the machine while the power button is flashing Printing a USPS shipping label You can print a USPS shipping label in SendPro Online for Priority Mail First Class Package Services large envelopes over 13oz and la...

Страница 46: ...rrow to advance to the next page 3 Tap Postage Correction 4 Tap Enter Postage Amount 5 Enter the postage amount 6 Tap Apply 7 Position your mail piece so that the meter stamp is in the lower left corner 8 Insert the letter into the device pushing in all the way to the back and right The device will clamp the letter and print postage The power button will flash while the device is printing The word...

Страница 47: ... and right The device will clamp the letter and print postage The power button will flash while the device is printing The word Redate appears on the newly printed postage mark on the back of the envelope Printing a prepaid return envelope If you wish to use a pre printed return envelope card or label on which the postage is prepaid you must print the postage without a date IMPORTANT Date removal ...

Страница 48: ... In this section Creating a security PIN 49 Changing your security PIN 49 Disabling the security PIN 49 Updating the ZIP Code 50 Omitting the date 50 Advancing the date 51 Clearing or resetting the piece count 51 ...

Страница 49: ...ging your security PIN A security PIN lets you restrict access to this device You ll be prompted to enter the PIN when you power up your device is powered up or when it awakes Follow these steps to change your security PIN 1 Tap Settings 2 Tap Security PIN 3 Tap Change Security PIN 4 Enter your current PIN 5 Enter a new four digit PIN 6 Verify the PIN Disabling the security PIN A security PIN lets...

Страница 50: ...3 Tap Update ZIP Code 4 Enter the correct ZIP Code 5 Tap Apply Omitting the date If you want to use a pre printed return envelope card or label on which the postage is prepaid you must print the postage without a date This feature is only available for Meter Reply Mail with First Class Retail Metered classes that include Letter Non Machinable Letter Large Envelope and Postcard 1 Tap Settings 2 Tap...

Страница 51: ...t the date to print from the calendar 6 Tap Apply Clearing or resetting the piece count Make certain that you want to delete the piece count information Once you do you cannot restore the data 1 Tap Settings 2 Tap the right arrow to advance to the next page 3 Tap About Device 4 Tap Piece Count 5 Move the slider on Reset Piece Count Settings Pitney Bowes User Guide October 2021 51 ...

Страница 52: ...9 Maintenance In this section Replacing the ink cartridge 53 Moving your SendPro Mailstation 54 ...

Страница 53: ...nctions 3 Tap Replace Ink 4 Make sure you have the new ink cartridge ready to be installed then tap Yes 5 Lift the ink door by pulling up on the tab 6 Remove the ink cartridge Caution Do not touch the metal parts they may be hot Do not shake the ink cartridge this may cause ink to spill 7 Remove the shipping tape from the new ink cartridge Maintenance Pitney Bowes User Guide October 2021 53 ...

Страница 54: ...ush the ink cartridge into the slot until it clicks 10 Close the cover and follow the prompts on the screen Moving your SendPro Mailstation When moving your SendPro Mailstation keep it level Do not lift the device by the gray feed deck Maintenance Pitney Bowes User Guide October 2021 54 ...

Страница 55: ...10 Rate Change In this section Updating and confirming USPS rates 56 ...

Страница 56: ...tation updates USPS postal rates automatically Your device always prints postage using the current USPS rates since the device pulls the latest USPS rate information from the Pitney Bowes Commerce Cloud Rate Change Pitney Bowes User Guide October 2021 56 ...

Страница 57: ...11 Accounting In this section Enabling Cost Accounting 58 Adding a cost account 58 Setting the default cost account 58 ...

Страница 58: ...t Cost Accounts help you keep track of your postage spend You can create and assign Cost Accounts to all your mailings and shipping labels Go to SendPro Online to add cost accounts Important When you add accounts in SendPro Online you must sync the accounts to your device in one of these ways l Tap Settings Cost Account or Home on your device l Reset your device by holding the power button l Do no...

Страница 59: ...mp whether it s the default or not Setting a default account saves time 1 Tap Settings 2 Tap Cost Accounts 3 Tap Set Default Cost Account 4 Tap an account name 5 Tap Yes 6 Tap Change Default Cost Account 7 Tap Home to continue processing mail Accounting Pitney Bowes User Guide October 2021 59 ...

Страница 60: ...12 Safety In this section Safety information 61 ...

Страница 61: ...arp edges or trap it between pieces of furniture Make sure there is no strain on the power cord l Always unplug the system and discharge static electricity before using aerosol dusters l Use only Pitney Bowes approved supplies in particular aerosol dusters Improper storage and use of aerosol dusters or flammable aerosol dusters can cause an explosive like condition that could result in personal in...

Страница 62: ...ntatives are available Monday through Friday 8 00 AM 8 00 PM ET Servicing Please refer to the warranty information is problems occur Failed units will be returned to the Pitney Bowes U S Service Center For reference purposes the Pitney Bowes U S Service Center contact address is Pitney Bowes Inc 3001 Summer Street Stamford CT 06926 For more information visit our website at pitneybowes com us suppo...

Страница 63: ...This page intentionally left blank ...

Страница 64: ...SV63352 Rev E 2021 Pitney Bowes Inc All Rights Reserved 3001 Summer Street Stamford Connecticut 06926 www pitneybowes com ...

Отзывы: