background image

X-HM30V_DAB_En.fm

En-18

2011August 30

8

7

6

5

4

3

2

1

General control (continued)

The main unit will enter the stand-by mode (when iPod or 

iPhone is not docked) after 15 minutes of inactivity during: 

iPod or iPhone: No connection.

Line In: No detection of input signal or very low sound 

audibility.

DISC/USB Audio/USB Video: In the stop mode.

Note:

However, if iPod or iPhone is docked, the unit will begin 

charging.

"Charge Mode" will be displayed.

The volume is muted temporarily when pressing the 

MUTE button on the remote control. Press again to restore 

the volume.

When the power is first turned on, the unit will enter P.Bass 

mode which emphasises the bass frequencies.

To cancel the P.Bass mode, press the P.BASS button on 

the remote control.

1

Press the BASS/TREBLE button to select “BASS”.

2

Within 5 seconds, press the VOL (+ or –) button to 

adjust the bass.

1

Press the BASS/TREBLE button to select “TREBLE”.

2

Within 5 seconds, press the VOL (+ or –) button to 

adjust the treble.

When the INPUT button on main unit is pressed, the 

current function will change to different mode. Press the 

INPUT button repeatedly to select desired function.

Note:

The backup function will protect the memorised function 

mode for a few hours should there be a power failure or the 

AC power lead becomes disconnected.

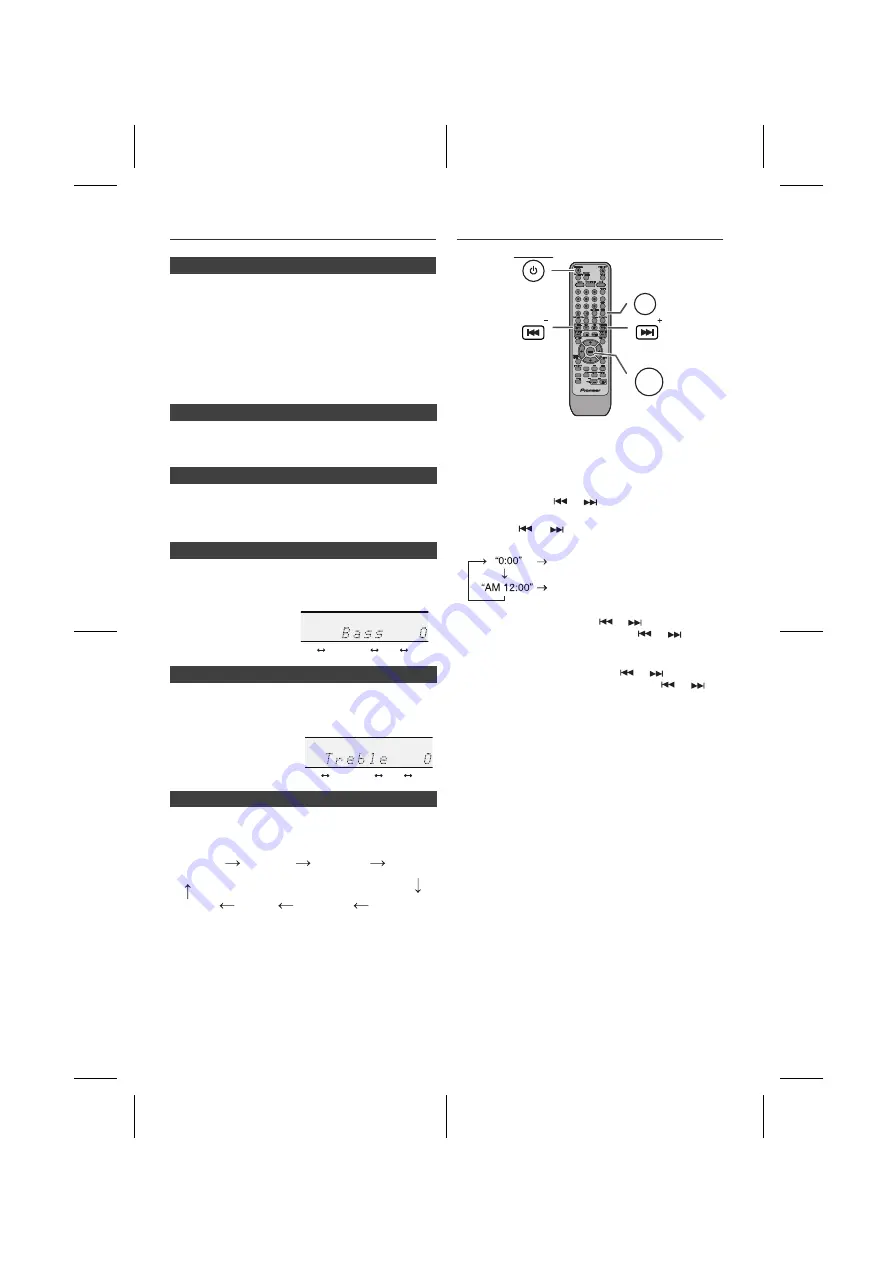
Setting the clock (Remote control only)

In this example, the clock is set for the 24-hour (00:00) 

display.

To confirm the time display:

Press the CLOCK/TIMER button. The time display will 

appear for about 5 seconds.

Note:

When power supply is restored after unit is plugged in 

again or after a power failure, reset the clock (page 43).

To readjust the clock:

Perform “Setting the clock” from step 1. If the “Clock” does 

not appear in step 2, step 4 (for selecting the 24-hour or 

12-hour display) will be skipped.

To change the 24-hour or 12-hour display:

n

Auto power off function

n

Muting

n

P.Bass control

n

Bass control

n

Treble control

n

Function

-5 -4

+4

+5

........

-5 -4

+4

+5

........

FM 

STEREO

FM MONO

iPod

Line In

DISC

(DVD/CD)

DAB

USB Video

USB Audio

1

Press the STANDBY/ON button to turn the power on.

2

Press the CLOCK/TIMER button.

3

Within 10 seconds, press the ENTER button. To adjust 

the day, press the 

 or 

 button and then press the 

ENTER button.

4

Press the 

 or 

 button to select 24-hour or 12-

hour display and then press the ENTER button.

The 24-hour display will appear.

(00:00 - 23:59)
The 12-hour display will appear.

(AM 12:00 - PM 11:59)

 To adjust the hour, press the 

 or 

 button and then 

press the ENTER button. Press the 

 or 

 button 

once to advance the time by 1 hour. Hold it down to 

advance continuously.

6

To adjust the minutes, press the 

 or 

 button and 

then press the ENTER button. Press the 

 or 


button once to advance the time by 1 minute.

1

   Clear all the programmed contents. [Refer to “Factory 

reset, clearing all memory” on page 45 for details.]

2

Perform “Setting the clock” from step 1 onwards.

MEMORY/FOLDER

+

DVD/CD

TUNER/DAB

SCAN

ENTER(DAB)

DISPLAY

STANDBY/ON

CLOCK/TIMER

ENTER

PRESET


PRESET

Содержание X-HM30DAB-k

Страница 1: ...X HM30V_DAB_En fm 2011August 30 En 1 X HM30DAB K DVD Receiver System Operating Instructions ...

Страница 2: ...st be removed and appropriate one fitted Replacement and mounting of an AC plug on the power supply cord of this unit should be performed only by qualified service personnel If connected to an AC outlet the cut off plug can cause severe electrical shock Make sure it is properly disposed of after removal The equipment should be disconnected by removing the mains plug from the wall socket when left ...

Страница 3: ... 1 laser product classified under the Safety of laser products IEC 60825 1 1993 A1 1997 A2 2001 but this product contains a laser diode higher than Class 1 To ensure continued safety do not remove any covers or attempt to gain access to the inside of the product Refer all servicing to qualified personnel The following caution label appears on your unit Location Inside of the unit Made for iPod Mad...

Страница 4: ...rm that the following accessories are included Page General Information Precautions 5 Controls and indicators 5 7 Types of playable discs 8 Description of discs 9 Preparation for Use System connections 10 12 Remote control 12 Changing the setup menu 13 17 General operation General control 17 18 Setting the clock Remote control only 18 iPod iPhone and iPad Listening to the iPod iPhone or iPad 19 21...

Страница 5: ...such as newspapers tablecloths curtains etc l No naked flame sources such as lighted candles should be placed on the apparatus l Attention should be drawn to the environmental aspects of battery disposal l The apparatus is designed for use in moderate climates Warning The voltage used must be the same as that specified on this unit Using this product with a higher voltage other than that which is ...

Страница 6: ...n 37 20 Mute Button 18 21 Open Close Button 21 22 Dimmer Button 17 23 Bass Treble Button 18 24 Audio Button 26 25 Direct Button 28 26 Memory Folder Button 31 33 27 Clear Button 36 28 Sleep Button 42 29 Clock Timer Button 18 42 30 OSD TV OUT Button 20 26 31 Angle Button 24 32 Chapter Track Skip Up or Preset Up Button 21 34 33 Step Button 24 34 Fast Forward or Tuning Up Button 21 34 35 Play and Paus...

Страница 7: ...37 17 Divx Indicator 30 18 Muting Indicator 18 19 CD Indicator 29 20 Title Indicator 33 21 Artist Indicator 33 22 Folder Indicator 33 23 Album Indicator 33 24 File Indicator 33 25 Track Indicator 28 26 Daily Timer Indicator 40 27 Once Timer Indicator 40 28 Disc Indicator 21 29 Total Indicator 33 30 Sleep Indicator 42 n Display DVD Divx DVD Divx 1B A 1B A DIGITAL DIGITAL 2 6 7 8 9 10 11 12 1314 30 ...

Страница 8: ...recording equipment or the disc 2 JPEG or JPG picture discs also play on this unit However pictures may not be clear depends on resolution and recording method 3 Maximum JPEG file size is 10 MBytes If photo bigger than this size it will take some time for the file to be displayed Icons used in this operation manual Some functions may not be available depending on discs The following icons indicate...

Страница 9: ...ormats etc n Title chapter and track Audio CDs consist of tracks A track is each tune on an audio CD n DivX Chapter 1 Chapter 2 Chapter 3 Chapter 1 Chapter 2 Title 1 Title 2 Track 1 Track 2 Track 3 Track 4 Track 5 n Icons used on DVD discs Display Description Region number playable area number DVD discs are programmed with region numbers indicating countries in which they can be played This system...

Страница 10: ...he connections switch off the power and disconnect the power cord from the AC outlet AUX LINE S VIDEO HDMI COMPONENT VIDEO COAXIAL AC IN 4 Right speaker DAB FM aerial To video input socket Wall socket AC 220 V to 240 V 50 Hz 60 Hz Video cable TV Left speaker n DAB FM aerial connection n Speaker connection l Twist exposed wire strands together l Connect the red wire to the plus terminal and other w...

Страница 11: ...ne supplied with this unit l Do not use the supplied power cord for any purpose other than that described above For better quality you can also connect with S video using the S VIDEO OUT jack If your TV also has a component video input or HDMI input you can connect this too Using the component video jacks Component video should deliver superior picture quality when compared to composite video A fu...

Страница 12: ...operating distance is reduced or if the operation becomes erratic Purchase 2 AAA size batteries l Periodically clean the transmitter on the remote control and the sensor on the unit with a soft cloth l Exposing the sensor on the unit to strong light may interfere with operation Change the lighting or the direction of the unit if this occurs l Keep the remote control away from moisture heat shock a...

Страница 13: ...icates default setting Description GENERAL SETUP PAGE TV DISPLAY 4 3 PANSCAN 4 3 LETTERBOX 16 9 WIDE SQUEEZE The screen mode should be set according to the connected TV type for details see page 16 ANGLE MARK ON OFF OSD LANGUAGE ENGLISH GERMAN FRENCH ITALIAN SPANISH You can select the desired OSD On Screen Display language for the setup menu or playback control screen SCREEN SAVER ON A screen save...

Страница 14: ...IDEO OUT setting using the provided video cable if there is no output from the S VIDEO OUT or the COMPONENT VIDEO OUT RESOLUTION 480I 480P 576I 576P 720P 50HZ 1080I 50HZ 1080P 50HZ 720P 60HZ 1080I 60HZ 1080P 60HZ COLOR SETTING SHARPNESS HIGH MEDIUM LOW BRIGHTNESS 20 0 20 CONTRAST 16 0 16 GAMMA HIGH MEDIUM LOW NONE HUE 9 0 9 SATURATION 9 0 9 LUMA DELAY 0T 1T DivX R VOD OK PIONEER provide you the Di...

Страница 15: ... PBC ON OFF Please refer page 27 AUDIO ENGLISH GERMAN FRENCH ITALIAN SPANISH Select the language audible from the speakers SUBTITLE ENGLISH GERMAN FRENCH ITALIAN SPANISH OFF Select the subtitle displayed on the TV screen DISC MENU ENGLISH GERMAN FRENCH ITALIAN SPANISH PARENTAL 1 KID SAFE 2 G 3 PG 4 PG 13 5 PGR 6 R 7 NC 17 8 ADULT Set a restriction level for DVD viewing For details see page 17 PASS...

Страница 16: ...ertically shrunk image is displayed WIDE SQUEEZE When play 4 3 disc with this unit connected to a 16 9 TV wide screen TV the horizontally expended image is displayed If you use this setting a natural looking image 4 3 size can be viewed with the black bands are inserted at the left and right of the screen l If you playback a wide image 16 9 disc with 4 3 TV the vertically shrunk image is displayed...

Страница 17: ... If you turn off and on the main unit with the volume set to 17 or higher the volume starts at 16 Turn the volume knob towards VOLUME on main unit or press VOL on remote control to increase or decrease the volume When you press any of the following buttons the unit turns on l iPod iPhone DVD CD USB LINE TUNER on the remote control Selected function is activated l button on the main unit The unit t...

Страница 18: ...r 00 00 display To confirm the time display Press the CLOCK TIMER button The time display will appear for about 5 seconds Note When power supply is restored after unit is plugged in again or after a power failure reset the clock page 43 To readjust the clock Perform Setting the clock from step 1 If the Clock does not appear in step 2 step 4 for selecting the 24 hour or 12 hour display will be skip...

Страница 19: ...and HP INVALID will be displayed You may also experience brief audio interference during incoming calls 1 Press the STANDBY ON button to turn the power on 2 Press the USB button on the remote control or INPUT button repeatedly on the main unit to select USB Audio function 3 Connect iPod iPhone or iPad to the unit USB iPod will appear 4 Press the button to start playback Note Stop button is invalid...

Страница 20: ...rate any of the buttons on the iPod or iPhone unit The volume level is adjusted by pressing the VOL or button on the main unit or the remote control Adjusting the volume on the iPod iPhone or iPad units give no effect iPod and iPhone operations The operations described below depend on the generation iPod and iPhone you are using System on operation When the main unit is powered on iPod iPhone or i...

Страница 21: ...y ____ ____ Pressformore than 2 seconds to toggle the video out display between iPod or TV Repeat ____ Press to toggle repeat mode Shuffle ____ Press and hold down to toggle shuffle mode iPod Menu ____ Press to view the iPod menu during iPod function iPod Enter ____ Press to confirm the selection iPod Cursor Up Down ____ Press to select the iPod menu PRESET PRESET PRESET PRESET TUNING TUNING TUNIN...

Страница 22: ... not operate between titles You can search the desired point as you play the disc To playback MP3 files through USB terminal 1 Whilst a MP3 track is playing via USB Audio function press and hold or button on the remote control to fast forward or fast reverse 2 Release the or button to return to normal playback n To resume playback after stopping resume play 1 Whilst a disc is playing press the but...

Страница 23: ...onds enter 12340 lIf you enter the wrong number start over from step 1 lPlayback starts after you complete enter the number s 4 Press the DIRECT button to return to the actual size of image standard screen Notes l Some discs cannot play from the specified point l Time search feature is disabled on some discs n To play in the desired order programmed play 1 Whilst in the stop or playback mode press...

Страница 24: ...ill blink n Step function Frame by frame advance playback 1 Whilst a disc is playing press the STEP button Each press of the STEP button advances the frame 2 Press the button to return to the normal playback n Slow motion play 1 Whilst a disc is playing press the SLOW button repeatedly to select the desired speed On DVD the speed changes as follows MEMORY FOLDER DVD CD TUNER DAB SCAN ENTER DAB DIS...

Страница 25: ... mode changes as follows on SVCD VCD The repeat play mode changes as follows on audio CD MP3 DivX and JPEG are displayed when menu screen is ON see page 30 2 To return to the normal playback press the RANDOM REPEAT button repeatedly until no display on TV screen CHAPTER TV screen CHAPTER TITLE ALL Repeat the currently playing chapter Repeat the currently playing title Repeat the currently playing ...

Страница 26: ... changed at each press n To select a subtitle or audio language from the disc menu 1 Whilst in the stop or playback mode press the MENU PBC button to display the disc menu 2 Press the or button to change the setting and press the ENTER button Or use the Numeric buttons for some discs n To change the subtitle language Whilst a disc is playing press the SUBTITLE DIGEST DISPLAY button repeatedly to s...

Страница 27: ... ELAPSED TT 01 03 Ch 01 29 0 15 01 CHAPTER REMAIN TT 01 03 Ch 01 29 0 20 10 DISPLAY OFF Elapsed playback time for current chapter Remaining playback time for current chapter SINGLE ELAPSED SINGLE REMAIN DISPLAY OFF TRACK 01 30 TRACK 01 30 00 40 TRACK 01 30 00 54 TRACK 01 30 00 50 00 54 TOTAL ELAPSED TOTAL REMAIN Elapsed playback time for the current track Remaining playback time for the current tr...

Страница 28: ...ting one from the 6 displayed tracks on the screen 1 During stop mode press the SUBTITLE DIGEST DISPLAY button n To play without activating the playback control function Whilst in the stop or playback mode press the MENU PBC button to cancel the P B C mode l TV screen will show PBC OFF then playback will start n To start playback from the desired point direct play 1 During stop press the DIRECT bu...

Страница 29: ...n some discs l Some disc cannot play from the specified point l Time search feature is disabled on some discs 2 Select digest type by using cursor or button and then press ENTER button lTrack digest disc will be divided by tracks lDisc Interval disc will be divided into 10 minutes interval lUp to 6 tracks will be displayed on the screen 3 Press the Numeric buttons on the remote control to select t...

Страница 30: ...u can use the or button to rotate the JPEG picture see page 31 l Using the Numeric Buttons you can open files or folders directly Enter the number on the right of the display Caution If you convert MP3 data to audio CD data to record on a CD R RW play it as an audio CD The MP3 operation cannot be performed Notes l Up to 20 characters can be displayed for a folder name and a track name Underlines a...

Страница 31: ... Whilst in the main menu screen press the MEMORY FOLDER button All the folders will be viewed on the TV screen folder on The playback will stop after complete playback all the songs in the currently playing folder To perform repeat play press the RANDOM REPEAT button whilst in the stop mode Each time the button is pressed the play mode changes in the following order Note To view back the file list...

Страница 32: ...3 files may differ sometimes depending on the writing software used during file downloading l Bitrate which is supported by MP3 is 32 to 320 kbps WMA is 64 to 160 kbps l For MP3 WMA files please put MP3 WMA extension Files cannot be played back if there is no MP3 WMA extension l The display playback time may not be displayed correctly when playing back a variable bitrate file l Copyright protected...

Страница 33: ...lder number if MP3 WMA format files are recorded as below figure l The folder and file order information which is recorded on the disc depends on the writing software There maybe possibilities that this unit will playback the files not according to our expected playback order l For CD MP3 WMA 255 numbers of folders and files inclusive of the folders which have non playable files can be read n To p...

Страница 34: ...on To repeat desired tracks Perform steps 1 5 in Programmed play section on page 35 and then press the RANDOM REPEAT button repeatedly until Repeat All appears To cancel repeat play Press the RANDOM REPEAT button repeatedly until Normal appears and disappears n Various functions Function Main unit Remote control Operation Play Press in the stop mode Stop Press in the playback mode Pause Press in t...

Страница 35: ...ts MPEG 1 Audio Layer 3 format Sampling Frequency is 32 kHz 44 1 kHz 48 kHz l Playback order for MP3 files may differ depending on the writing software used during file download l Bitrate which is supported by MP3 is 32 kbps to 320 kbps WMA is 64 kbps to 160 kbps l For MP3 WMA files please put MP3 WMA extension Files cannot be played back if there is no MP3 WMA extension l Playlists are not suppor...

Страница 36: ... the remote control to tune in to the desired station l Manual tuning Press the TUNING or button repeatedly to tune in to the desired station l Auto tuning When the TUNING or button is pressed for more than 0 5 seconds scanning will start automatically and the tuner will stop at the first receivable broadcast station MEMORY FOLDER DVD CD TUNING TUNING PRESET PRESET INPUT TUNER DAB STANDBY ON MEMOR...

Страница 37: ...have already been stored in memory the scan will be aborted If you want to redo the ASPM operation erase the preset memory l If no station have been stored in memory END will appear for about 4 seconds l If the RDS signals are very weak station names may not be stored in memory l The same station name can be stored in different channels l In a certain area or during certain time periods the statio...

Страница 38: ...I will appear alternately for about 6 seconds 3 Within 6 seconds press the or button to select the programme type Each time the button is pressed the programme type will appear 4 Whilst the selected programme type is flashing within 6 seconds press the RDS PTY button again After the selected programme type has been lit for 2 seconds SEARCH will appear and the search operation will start NEWS Short...

Страница 39: ...L Features and programmes concerned with travel to near and far destinations package tours and travel ideas and opportunities Not for use for announcements about problems delays or roadworks affecting immediate travel where TP TA should be used LEISURE Programmes concerned with recreational activities in which the listener might participate Examples include Gardening Fishing Antique collecting Coo...

Страница 40: ... DAB ENTER button again to store the station and exit manual tune You can switch DAB display information Press the DAB DISPLAY button Each time the button is pressed the information display changes in the following order When No Service appears the DAB DISPLAY button does not allow you to change the display Station Name Station name is displayed set by default Scrolling text Information scrolls ac...

Страница 41: ...12B 194 064 MHz 7D 227 360 MHz 12C 195 936 MHz 8A 229 072 MHz 12D 197 648 MHz 8B 230 784 MHz 13A 199 360 MHz 8C 232 496 MHz 13B 201 072 MHz 8D 234 208 MHz 13C 202 928 MHz 9A 235 776 MHz 13D 204 640 MHz 9B 237 488 MHz 13E 206 352 MHz 9C 239 200 MHz 13F MEMORY FOLDER DVD CD STANDBY ON CLOCK TIMER ENTER SLEEP PRESET PRESET TUNER DAB SCAN ENTER DAB DISPLAY 1 Set the daily timer page 41 42 2 Set the on...

Страница 42: ...rates at the same time every day It will continue until the daily timer setting is cancelled Cancel the daily timer when it is not in use 1 Turn the power on and press and hold down the CLOCK TIMER button 2 Within 30 seconds press the or button to select Once or Daily and press the ENTER button 3 Within 30 seconds press the or button to select Timer Call and press the ENTER button 1 Turn the power...

Страница 43: ...t still malfunctions reset it Refer to page 45 l No sound is heard l Is the volume level set to Min l Are the headphones connected l Are the speaker wires disconnected n DVD CD Player Symptom Possible cause l Playback does not start l Playback stops in the middle or is not performed properly l Is the disc loaded upside down l Does the disc satisfy the standards l Is the disc distorted or scratched...

Страница 44: ...l The iPod or iPhone is not properly connected to the unit l Is the AC power lead of the unit plugged in l The video cable is not properly connected l The TV monitor s input selection is not properly set l The iPod TV out feature has not been set to output video l Audio from the iPod iPhone cannot be heard via the headphones connected to the unit l iPod or iPhone will not charge l The iPod or iPho...

Страница 45: ...ion changes for product improvement without prior notice The performance specification figures indicated are nominal values of production units There may be some deviations from these values in individual units n Factory reset clearing all memory For DISC USB Video function Please refer Changing the Setup Menu on page 13 Select PREFERENCE DEFAULT and then RESET For others function 1 Press the STAN...

Страница 46: ...d by removing the mains plug from the wall socket when left unused for a long period of time for example when on vacation Manufactured under license from Dolby Laboratories Dolby and the double D symbol are trademarks of Dolby Laboratories DivX DivX Certified and associated logos are trademarks of DivX Inc and are used under license HDMI the HDMI Logo and High Definition Multimedia Interface are t...

Страница 47: ...X HM30V_DAB_En fm En 47 2011August 30 8 7 6 5 4 3 2 1 ...

Страница 48: ...INC 340 Ferrier Street Unit 2 Markham Ontario L3R 2Z5 Canada TEL 1 877 283 5901 905 479 4411 PIONEER EUROPE NV Haven 1087 Keetberglaan 1 B 9120 Melsele Belgium TEL 03 570 05 11 PIONEER ELECTRONICS ASIACENTRE PTE LTD 253 Alexandra Road 04 01 Singapore 159936 TEL 65 6472 7555 PIONEER ELECTRONICS AUSTRALIA PTY LTD 5 Arco Lane Heatherton Victoria 3202 Australia TEL 03 9586 6300 PIONEER ELECTRONICS DE ...

Отзывы: